It is not uncommon to accidentally press ‘Shift + Delete‘ on files instead of just ‘Delete‘, due to our natural habits, many of us tend to use it without realizing it.
I recently found myself in this situation a few days ago. I was actively working on a project and had saved my work file in a specific directory that contained numerous unwanted files that needed to be deleted permanently.
As I began the process of deleting them one by one, I mistakenly pressed ‘Shift + Delete‘ on one of my crucial files. Unfortunately, the file was permanently deleted from my directory.
Feeling concerned about this, I wondered how to recover deleted files but had no clue where to start. Despite spending a significant amount of time attempting to restore the file, I had no luck.
It was a frustrating experience, and I realized the importance of being cautious while managing files to avoid such accidental deletions.
How File Deletion Works in Linux
Having some technical knowledge, I understood how the file system and hard drive (HDD) operate. When you accidentally delete a file, the actual content doesn’t disappear from your computer.
It’s simply removed from the database folder, making it invisible in the directory, but it still lingers somewhere on your hard drive. Essentially, the system has a list pointer to blocks on the storage device that still contain the data. The data won’t be erased from the block storage device unless you overwrite it with a new file.
Realizing this, I considered that my deleted file might still be somewhere in an unindexed area of the hard disk. However, it’s recommended to immediately unmount a device as soon as you realize you’ve deleted an important file. Unmounting helps prevent the blocked files from being overwritten by new ones.
In this scenario, I didn’t want to overwrite that data, so I chose to search the hard drive without mounting it.
Recovering Lost Files in Linux Using Scalpel Tool
Typically, Windows offers a plethora of third-party tools for recovering lost data, while Linux, particularly Ubuntu, provides only a few options. Using Ubuntu as my operating system, I encountered the challenge of finding a tool to recover a lost file.
In the course of my research, I came across ‘Scalpel‘, a tool designed to scan the entire hard drive and retrieve lost files. After installing it, I successfully recovered my lost file, and I must say, Scalpel is truly an amazing tool.
This situation could happen to you too, so I wanted to share my experience. In this article, I will guide you through the process of recovering deleted files using the Scalpel tool.
Let’s dive into it.
What is a Scalpel Tool?
Scalpel is a data recovery tool that is specifically crafted to scan storage devices, such as hard drives, to retrieve lost files that may have been accidentally deleted or lost due to other reasons.
Key features of Scalpel include its ability to search through the entire hard drive, making it effective in recovering files even if they have been removed from the directory or database. The tool is known for its reliability in handling various file types and formats.
One notable characteristic of Scalpel is its suitability for command-line usage, which aligns with the preferences of many Linux users who are comfortable with the terminal interface.
Scalpel proves to be a valuable asset for Linux users facing the challenge of retrieving lost files, providing an efficient and reliable solution to recover data in situations where other tools might fall short.
How to Install Scalpel in Linux
To install Scalpel on Linux, use the following appropriate command for your specific Linux distribution.
sudo apt install scalpel         [On Debian, Ubuntu and Mint]
sudo yum install scalpel         [On RHEL/CentOS/Fedora and Rocky/AlmaLinux]
sudo emerge -a sys-apps/scalpel  [On Gentoo Linux]
sudo apk add scalpel             [On Alpine Linux]
sudo pacman -S scalpel           [On Arch Linux]
sudo zypper install scalpel      [On OpenSUSE]
sudo pkg install scalpel      [On FreeBSD]
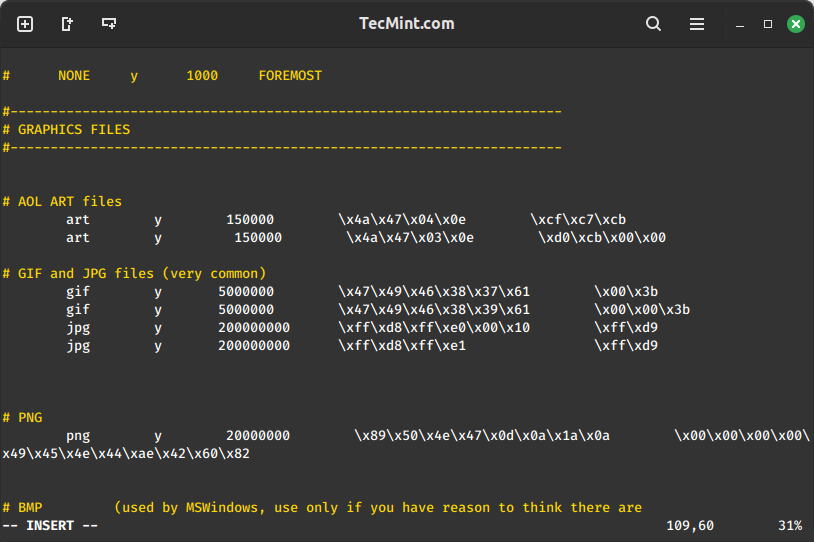
After installing Scalpel, you’ll need to do some text editing. Scalpel comes with its own configuration file located in the ‘/etc‘ directory. The full path is either “/etc/scalpel/scalpel.conf” or “/etc/scalpel.conf“.
When you open the configuration file, you’ll see that everything is initially commented out with '#' symbols.
sudo nano /etc/scalpel/scalpel.conf
Or
sudo nano /etc/scalpel.conf
Before running Scalpel, you have to uncomment the file formats you want to recover. However, uncommenting the entire file can be time-consuming and may lead to a lot of false results.
For example, if you only want to recover '.jpg' files, you can simply uncomment the '.jpg' file section in the Scalpel configuration file.
Now run the the following command in the terminal to search for deleted files.
sudo scalpel /path/to/target/directory
Once you run Scalpel on the directory, it will take time to recover your deleted file depending on the disk space that you are trying to scan and the speed of the machine.
It will generate a ‘rec’ directory containing recovered files in the specified output directory. Review the recovered files and move them to a secure location.
Conclusion
By following these steps, you can install Scalpel on your Linux system and use it to recover deleted files and folders. Remember to carefully configure the Scalpel settings to target specific file formats, reducing the risk of false results and improving the efficiency of the recovery process.
I suggest everyone get into the habit of using just “delete” instead of “Shift + Delete“. Remember, it’s always better to prevent a mistake than to try and fix it later.


How to install in windows scalpel tool? Can you help me out…
You guys have to edit the scalpel.conf file first. It won’t run because by default there’s no file types for it to find. It’s written here up above “YOU HAVE TO UNCOMMENT THE FILE FORMAT”.
@Kaiser,
Thanks for sharing the useful tip, hope it will helpful other users define file types before running the scalpel to recover deleted files..
Opening target “/home/vagrant/GIT/BST”
ERROR: The configuration file didn’t specify any file types to carve.
(If you’re using the default configuration file, you’ll have to
uncomment some of the file types.)
See /etc/scalpel/scalpel.conf.
getting this error again n again
I have installed scalpel, but this not working and give the error
what the solution of this….?
Hi, try this command.
Hi there is option to restore any files
the NONE options should work for any ?
actually im wonder how to restore py (python) files
Most of them are command mode…testdisk and photorec and not very helpfull. tried backbox but unsuccessfull since they are in command mode and tough to know syntax for same. any other free gui recovery options for formatted or bad hard disks. pls ctct johntarun ate gmail
GUI based Linux recovery tool would be helpful. However, I’d prefer to use GUI based recovery tools and that’s why found a great tool entitled, Stellar Phoenix Linux Recovery Software.
http://www.stellarinfo.com/linux-data-recovery.htm
Hope it helps to someone who is not comfortable with using command based Linux recovery tools.
Image file pass 1/2.
** MEMORY ALLOCATION FAILURE **
ERROR: Memory exhausted at line 638 in file dig.c. Scalpel was
allocating memory for carvelists when this condition occurred.
Scalpel will abort.
how to rectify? please help.
Hi.. I lost my all data and partition while installing Ubuntu 14.4 by replacing Windows 7. So is it possible to recover data using scalpel or any other tool.. Plz help me…
I’m running this Scalpel to recover a day’s lost work but get this error:
[root@server home]#scalpel /dev/sda7-o output1
Scalpel version 2.0
Written by Golden G. Richard III and Lodovico Marziale.
ERROR: Couldn’t open configuration file:
scalpel.conf — No such file or directory
Scalpel was unable to read a needed file and will abort.
I am logged in as root and the conf. file exists in /etc/scalpel/scalpel.conf
sorry for the type-o, the correct command is: “scalpel /dev/sda7 -o output1″
Thanks. I used the command and in a folder I see the binary format files. How can I open that
Dear sir i downloaded the scalpel tool from internet i copy in to my linux p.c in /root/home location when i am giving the path $ sudo apt-get install scalpel it is giving some help message so please help me out to install this ofline in my linux fedro 16 p.c
Can you post the message here, so we could get better idea about the problem.
Thanks for updating this very useful tool,I would like to see many more tool like this!!!
what should the location of output folder be?
i’m creating an empty output folder in my home directory but every time the command is giving error of non-empty output directory.
I need to restore something very important.
please help!!!! :(
delete that folder, recreate folder with new name and try again.
i have tried that but its still not working. i really need to restore important files
please help
give the -o switch another directory instead of ouput
-o output1
Thanks for sharing your experience with scalpel.
There is another similar tool called photorec (from the author of testdisk).
You made a very important point about unmounting the file system – which is excellent.
But what do you do when the file you just deleted happens to be on the device (disk partition) for the ‘/’ filesystem? e.g. /etc
There are live rescue cd/usb images that can be of help.
Specifically Ubuntu Rescue Remix:
which according to it’s documentation comes with photorec pre-installed.
My recommendation is to use one of these invaluable distros to recovery files and/or lost partition tables on you hard disks (lost disk partition also happens).
BTW, some of them also come with anti virus software; need internet connection to get the latest updates. I have found them helpful when the native A/V software (some times commercial) were unsuccessful :)
Thanks for updating about few more recovery tools. Will do try it out..
Thanks for sharing about ‘scalpel’ :)
Nice article
Add more tools like foremost & testdisk.