As you might know, VirtualBox is an open-source hypervisor that allows users to create virtual machines and test-run different operating systems. But it doesn’t end there.
VirtualBox also includes VirtualBox guest additions which are additional applications and drivers that improve the performance and usability of a virtual machine.
VirtualBox guest additions provide extended features such as:
- Shared Clipboard: You can seamlessly copy and paste content between the host and guest operating systems.
- Drag and Drop: Additionally, Virtualbox guest additions enable you to drag and drop files between the host and guest operating systems.
- Mouse Pointer Integration: Recall how you usually have to press a combination of keys to release the mouse pointer from the virtual machine? With Virtualbox guest additions, that becomes a thing of the past as you can comfortably move your mouse pointer to and from the guest and host OS.
- Shared Folders: The guest additions also enable you to make folders that can be accessed by the virtual machine as network shares.
- Enhanced Video Performance: By default, virtual machines come with a display that is much smaller and does not provide a resolution that matches that of the host system. With guest addition installed, the virtual machine adjusts to match the resolution of the host system. For example, if the host’s resolution is 1366 x 768, the virtual machine automatically scales from its default resolution to match the host’s resolution.
Let’s now see how you can install VirtualBox guest additions on Fedora Linux distribution.
Installing VirtualBox Guest Additions in Fedora
To install and enable VirtualBox guest additions on your Fedora Linux, you must have VirtualBox installed on your system, if not install it using our guide: How to Install VirtualBox in Fedora Linux.
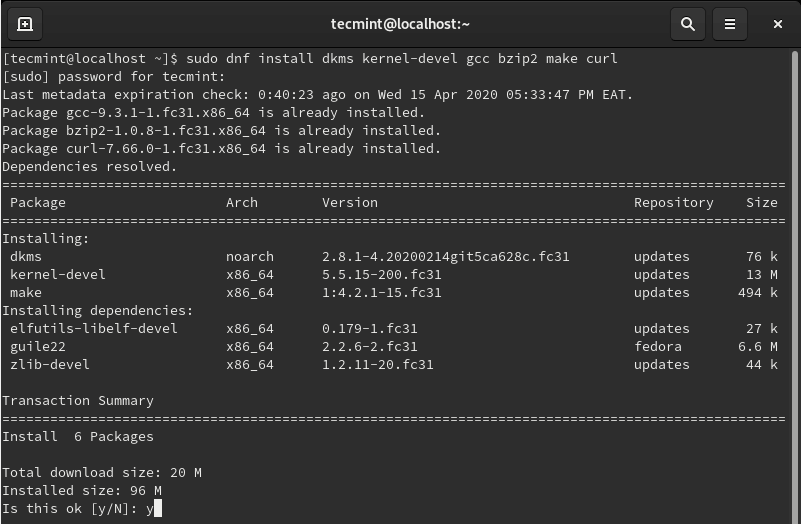
Step 1: Install Kernel Headers and Build Tools
The first step in the installation of VirtualBox guest additions is the installation of kernel headers. This includes the installation of the dkms package (Dynamic Kernel Module Support) alongside other build tools as shown.
$ sudo dnf install dkms kernel-devel gcc bzip2 make curl
Once you have successfully installed kernel headers, you need to confirm the version of the Linux kernel and ensure it matches the version of the just installed kernel headers.
To check the version of the Linux kernel run the command.
$ uname -r
OR
$ hostnamectl | grep -i kernel
To check the version of the kernel development tool (kernel-devel) execute.
$ sudo rpm -qa kernel-devel
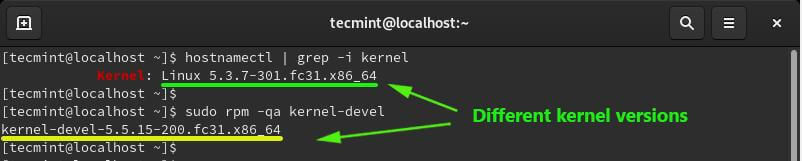
If the versions of the two (kernel version and kernel-devel) do not match as shown in the screenshot above, update the kernel using the command.
$ sudo dnf update kernel-*
When you are done updating the kernel, reboot the system, and again, verify the kernel version again.
$ uname -r

From the output, you can see that the kernel version now matches the kernel-devel version.
Now you can proceed and install VirtualBox guest additions.
Step 2: Install VirtualBox Guest Additions in Fedora
To install guest additions, navigate to Devices –> Insert Guest Additions CD image.
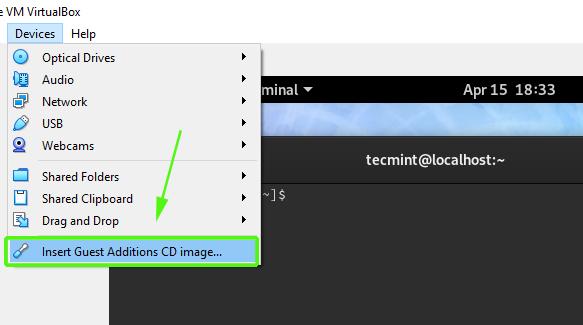
In the pop up that appears, select the Cancel option.

Then navigate to /run/media/username/VBox_GAs_6.0.18. Be sure to replace the username attribute with the currently logged in user. You should get the files shown below.
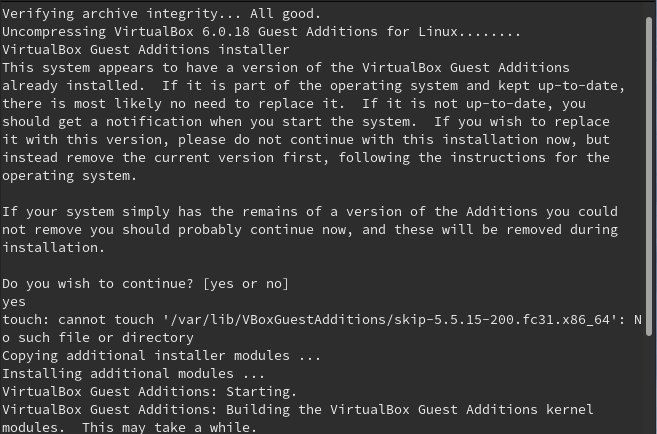
$ cd /run/media/username/VBox_GAs_6.0.18

Finally, run the VBoxLinuxAdditions.run script to install guest additions. This will take about 4-5 minutes to install all the necessary applications.
$ sudo ./VBoxLinuxAdditions.run
Upon completion of the installation of VirtualBox modules, reboot your Fedora system and this time, it will display a full screen and you can now enjoy all the functionalities that come with guest additions.
We have come to the end of this guide. Your feedback is much welcome.


Thank you very much! I’m not sure why VirtualBox Guest Additions needed to rebuild its kernel to work back in 2020 — and still does with Fedora 42 and VirtualBox 7.1.8 in 2025 — but it seems to be necessary (at least for me). This solution worked perfectly on the first try and was actually fun to do. Thanks again!
I am a new old person that tries to learn a little more about Linux, and sometimes I face problems during the installation or later when I use a new OS then I look for information on the web.
The Guest addition CD image is one of them, sometimes is no a problem but in another OS it is a problem, and I found the information on this page