This tutorial will guide you on how you can configure OpenStack networking service in order to allow access from external networks to OpenStack instances.
Requirements
Step 1: Modify Network Interface Configuration Files
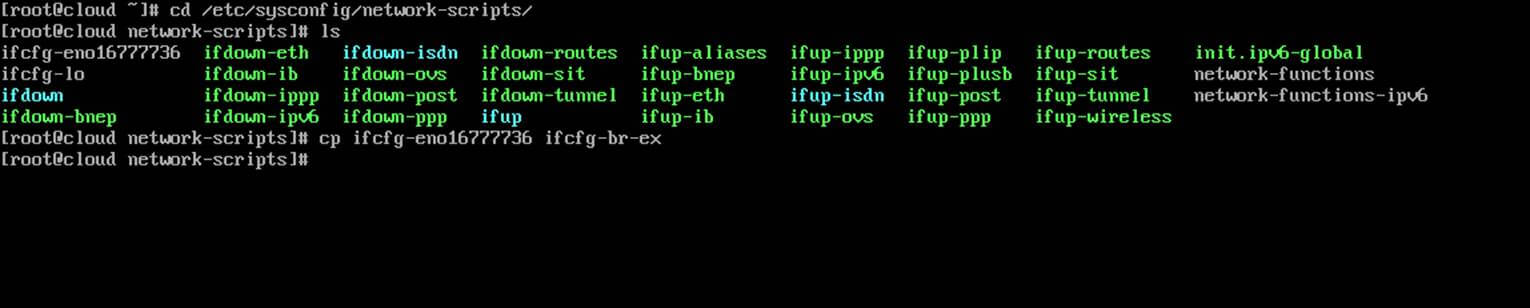
1. Before starting to create OpenStack networks from dashboard, first we need to create an OVS bridge and modify our physical network interface to bind as a port to OVS bridge.
Thus, login to your server terminal, navigate to network interfaces directory scripts and use the physical interface as an excerpt to setup OVS bridge interface by issuing the following commands:
# cd /etc/sysconfig/network-scripts/
# ls
# cp ifcfg-eno16777736 ifcfg-br-ex
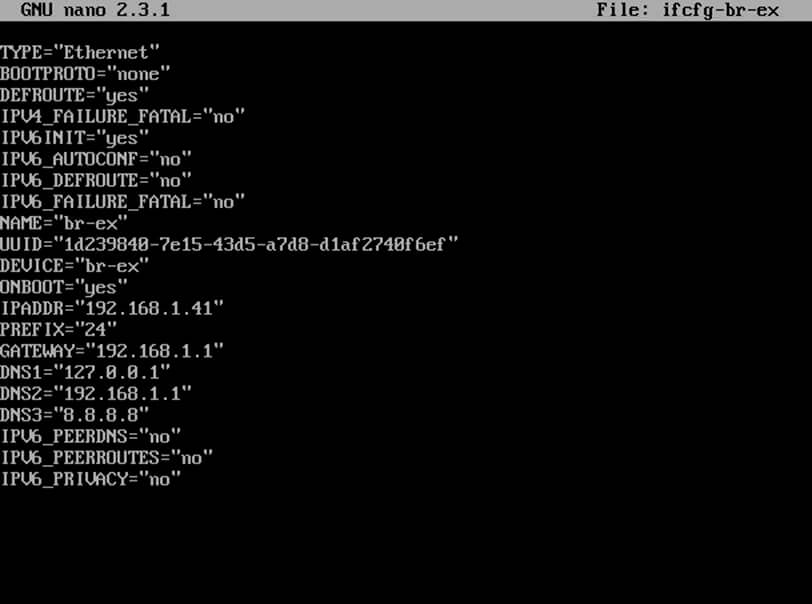
2. Next, edit and modify the bridge interface (br-ex) using a text editor as illustrated below:
# vi ifcfg-br-ex
Interface br-ex excerpt:
TYPE="Ethernet"
BOOTPROTO="none"
DEFROUTE="yes"
IPV4_FAILURE_FATAL="no"
IPV6INIT="no"
IPV6_AUTOCONF="no"
IPV6_DEFROUTE="no"
IPV6_FAILURE_FATAL="no"
NAME="br-ex"
UUID="1d239840-7e15-43d5-a7d8-d1af2740f6ef"
DEVICE="br-ex"
ONBOOT="yes"
IPADDR="192.168.1.41"
PREFIX="24"
GATEWAY="192.168.1.1"
DNS1="127.0.0.1"
DNS2="192.168.1.1"
DNS3="8.8.8.8"
IPV6_PEERDNS="no"
IPV6_PEERROUTES="no"
IPV6_PRIVACY="no"
3. Do the same with the physical interface (eno16777736), but make sure it looks like this:
# vi ifcfg-eno16777736
Interface eno16777736 excerpt:
TYPE="Ethernet"
BOOTPROTO="none"
DEFROUTE="yes"
IPV4_FAILURE_FATAL="no"
IPV6INIT="no"
IPV6_AUTOCONF="no"
IPV6_DEFROUTE="no"
IPV6_FAILURE_FATAL="no"
NAME="eno16777736"
DEVICE="eno16777736"
ONBOOT="yes"
TYPE=”OVSPort”
DEVICETYPE=”ovs”
OVS_BRIDGE=”br-ex”
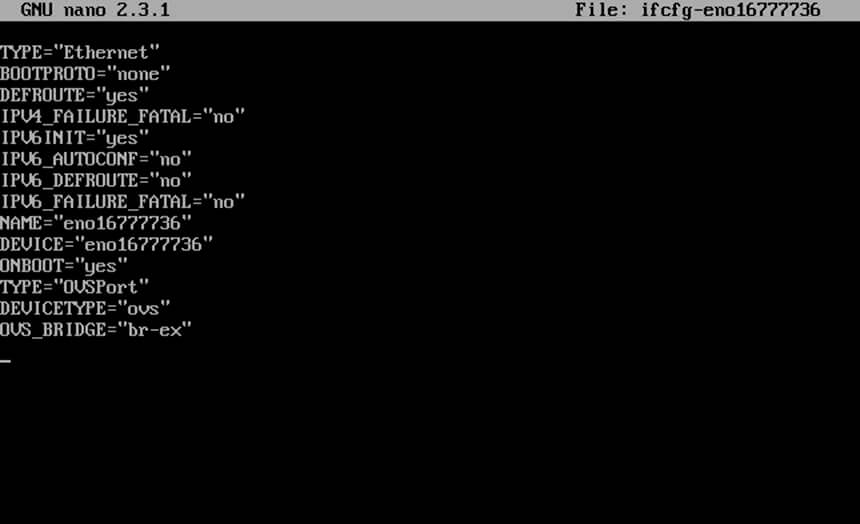
Important: While editing interfaces cards make sure you replace the physical interface name, IPs and DNS servers accordingly.
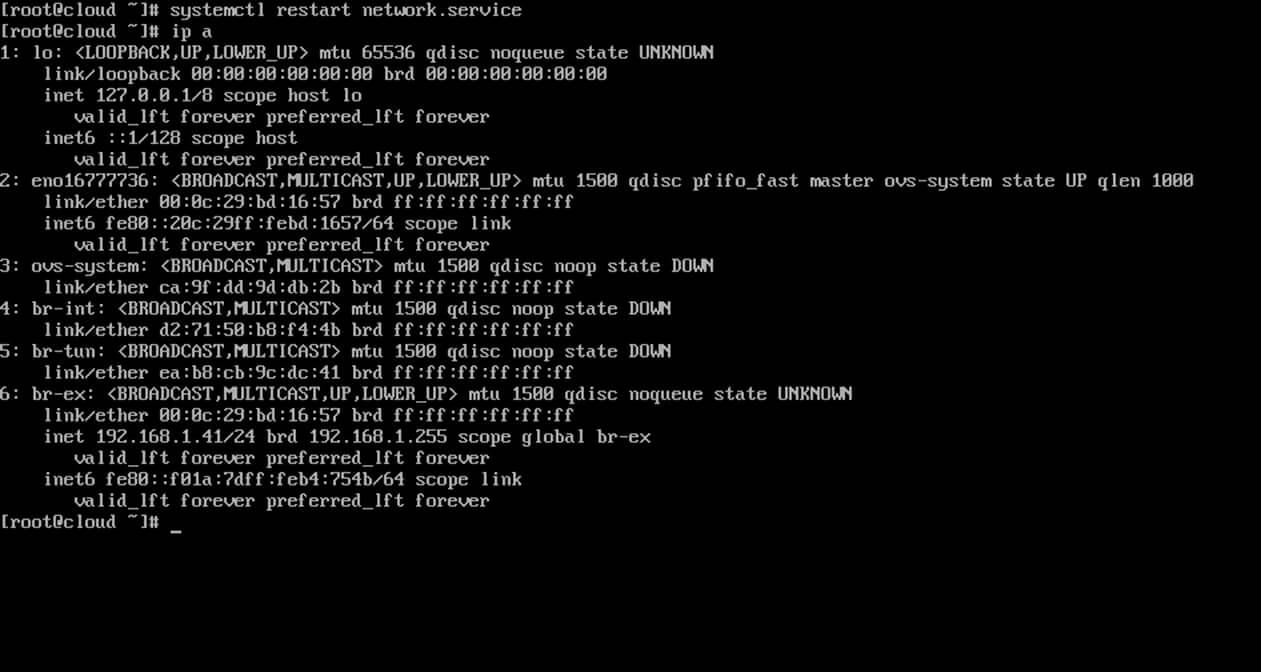
4. Finally, after you’ve modified edited both network interfaces, restart network daemon to reflect changes and verify the new configurations using ip command.
# systemctl restart network.service
# ip a
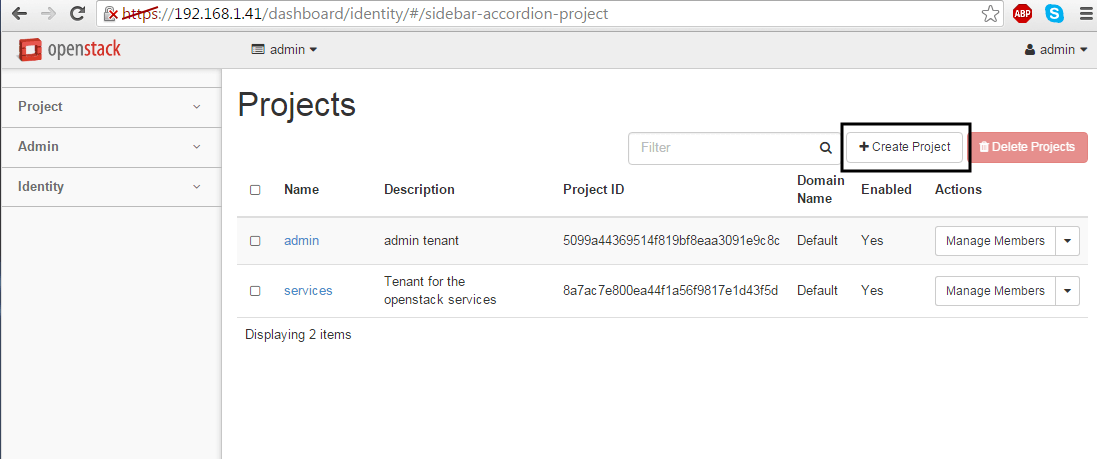
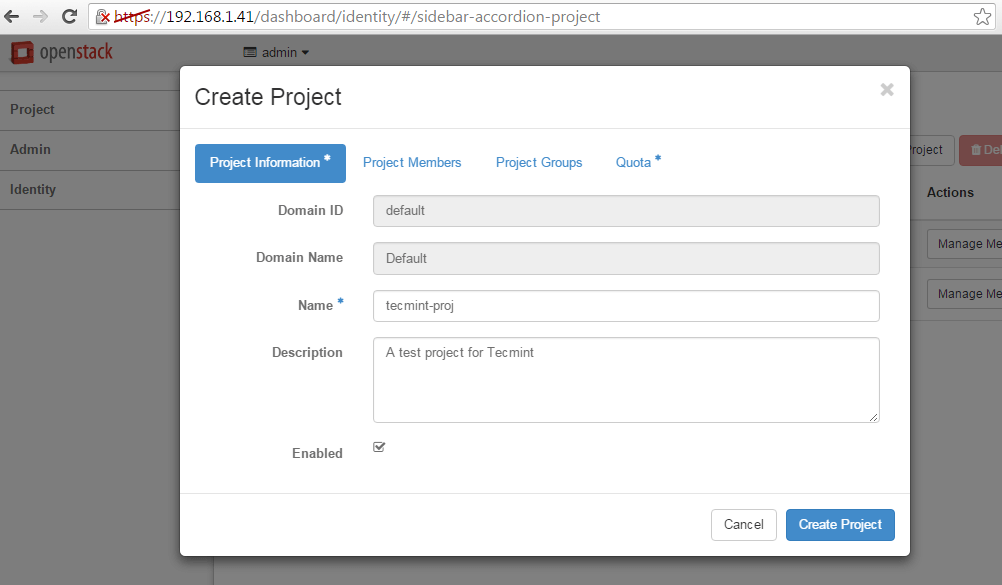
Step 2: Create a New OpenStack Project (Tenant)
5. On this step we need to use Openstack dashboard in order to further configure our cloud environment.
Login to Openstack web panel (dashboard) with admin credentials and go to Identity -> Projects -> Create Project and create a new project as illustrated below.
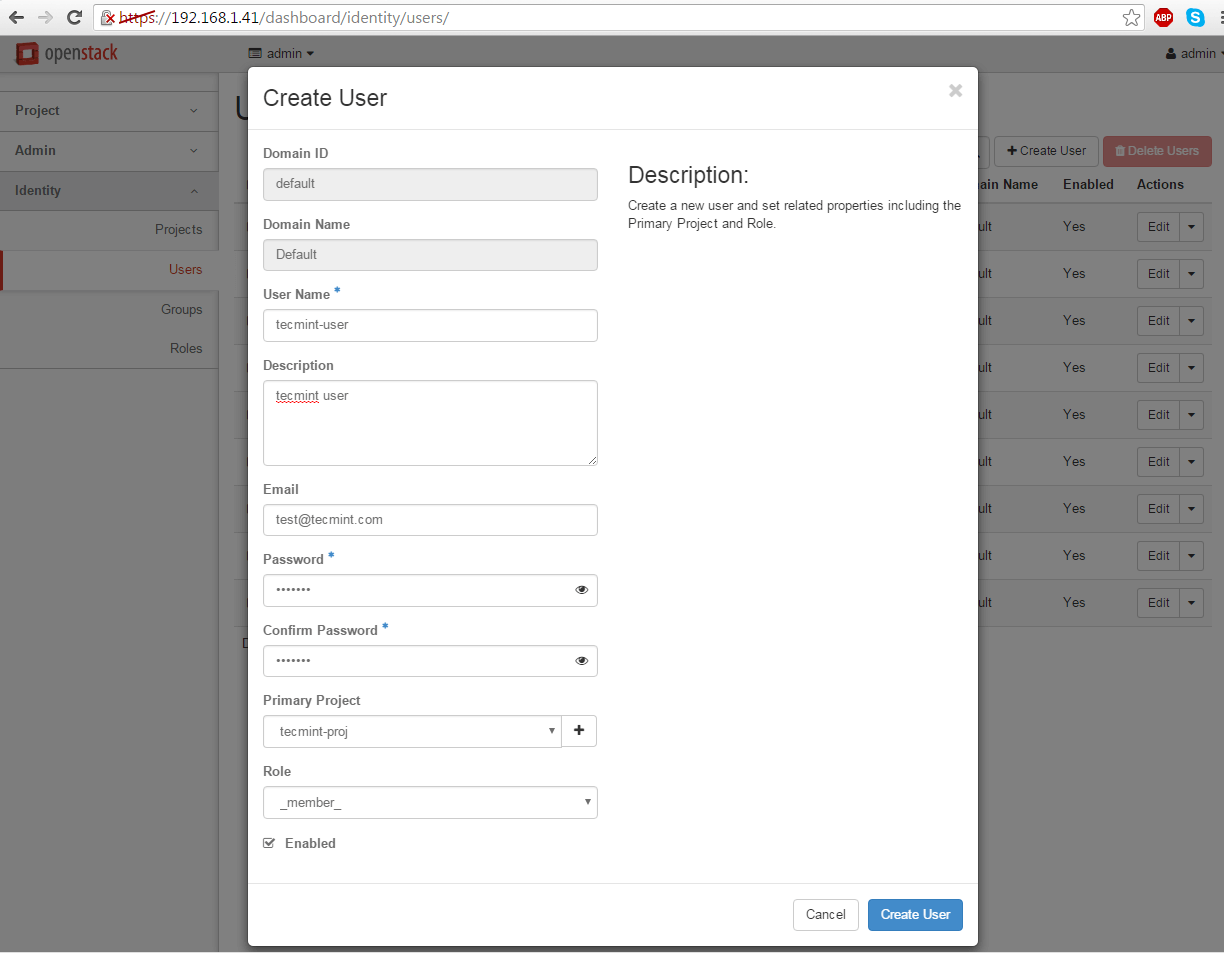
6. Next, navigate to Identity -> Users -> Create User and create a new user by filling all the fields with the required information.
Assure that this new user has the Role assigned as a _member_ of the newly created tenant (project).
Step 3: Configure OpenStack Network
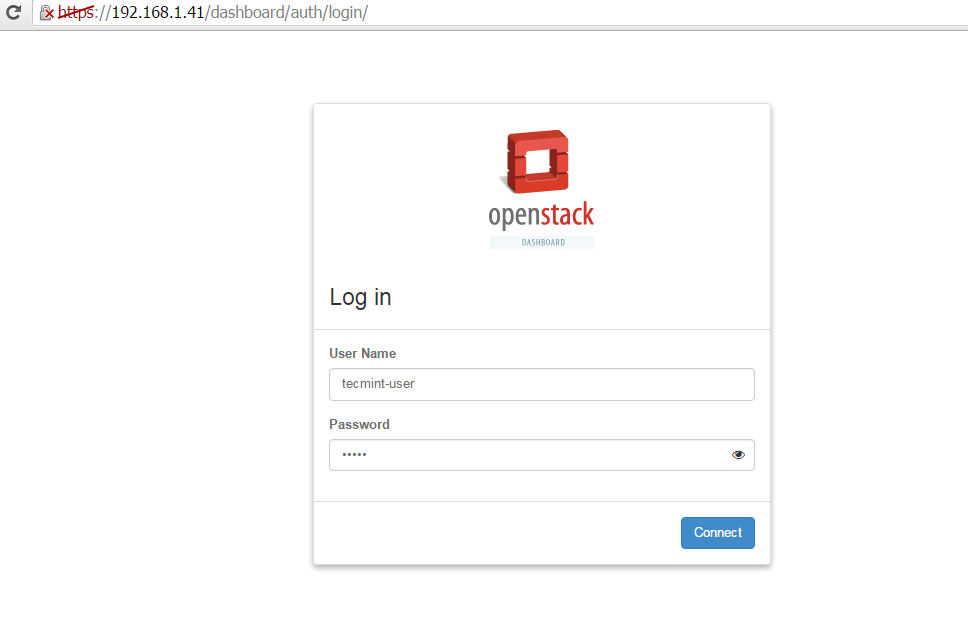
7. After the user has been created, log out admin from dashboard and log in with the new user in order to create two networks (internal network and external).
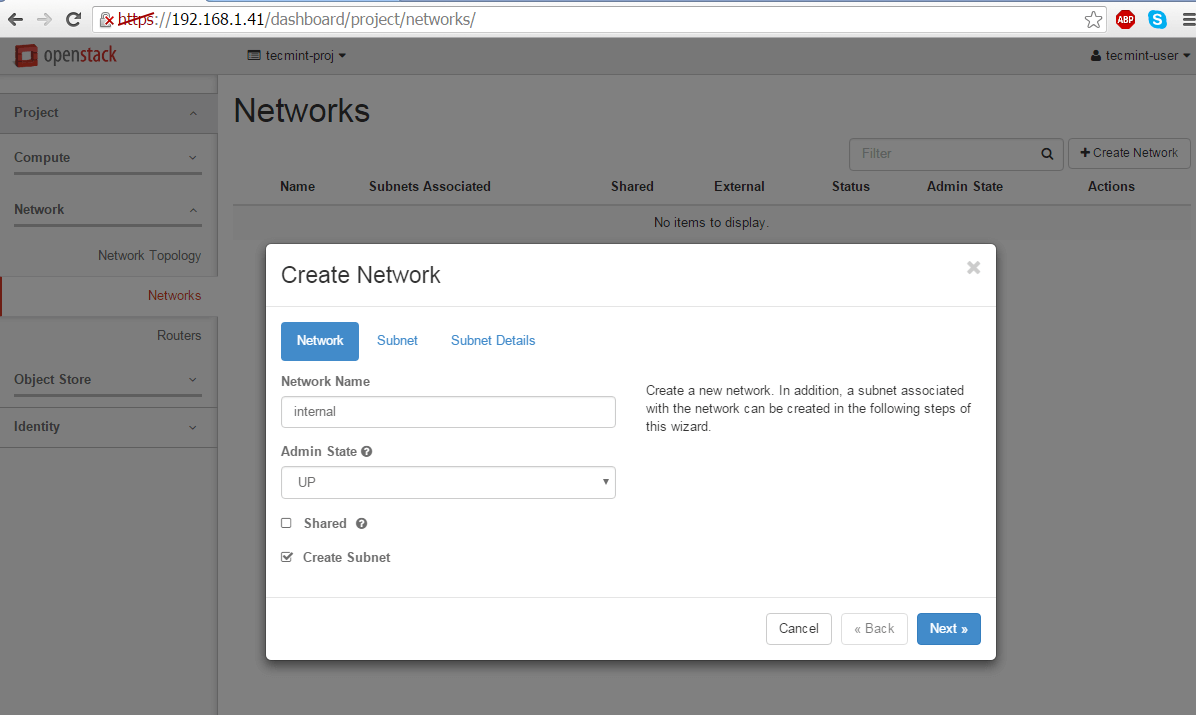
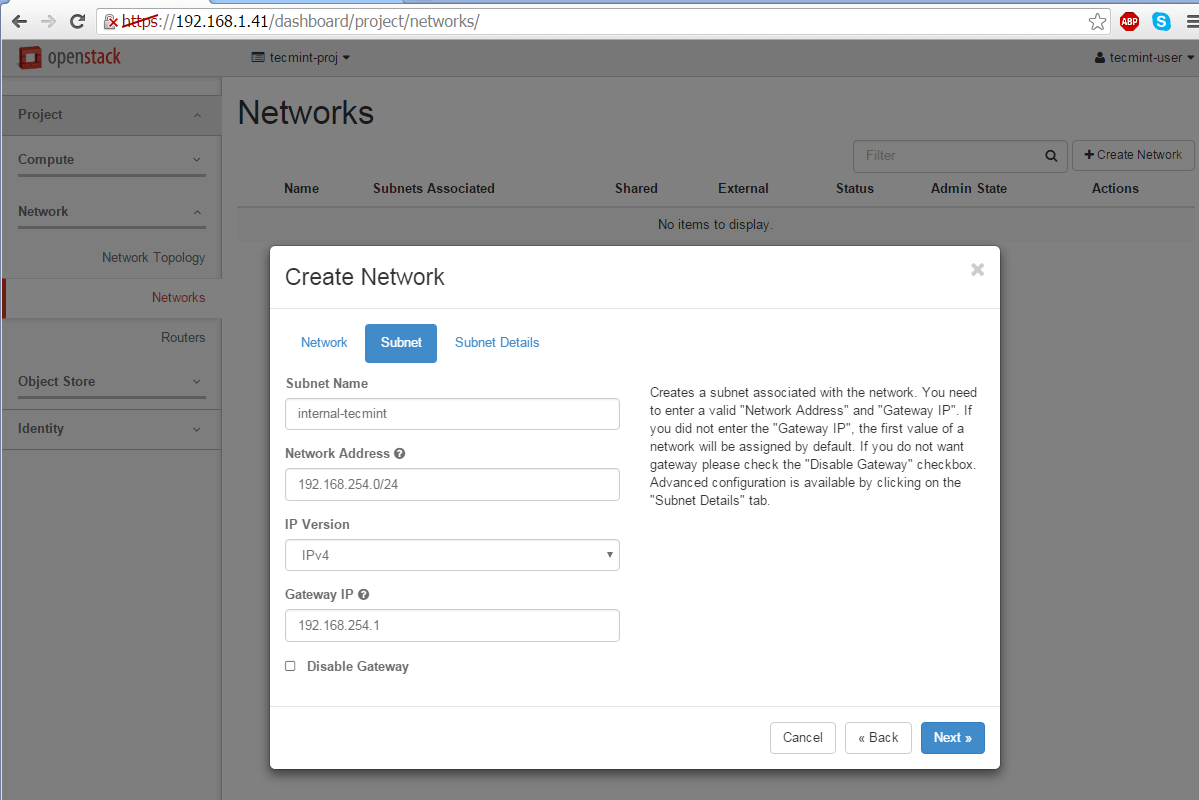
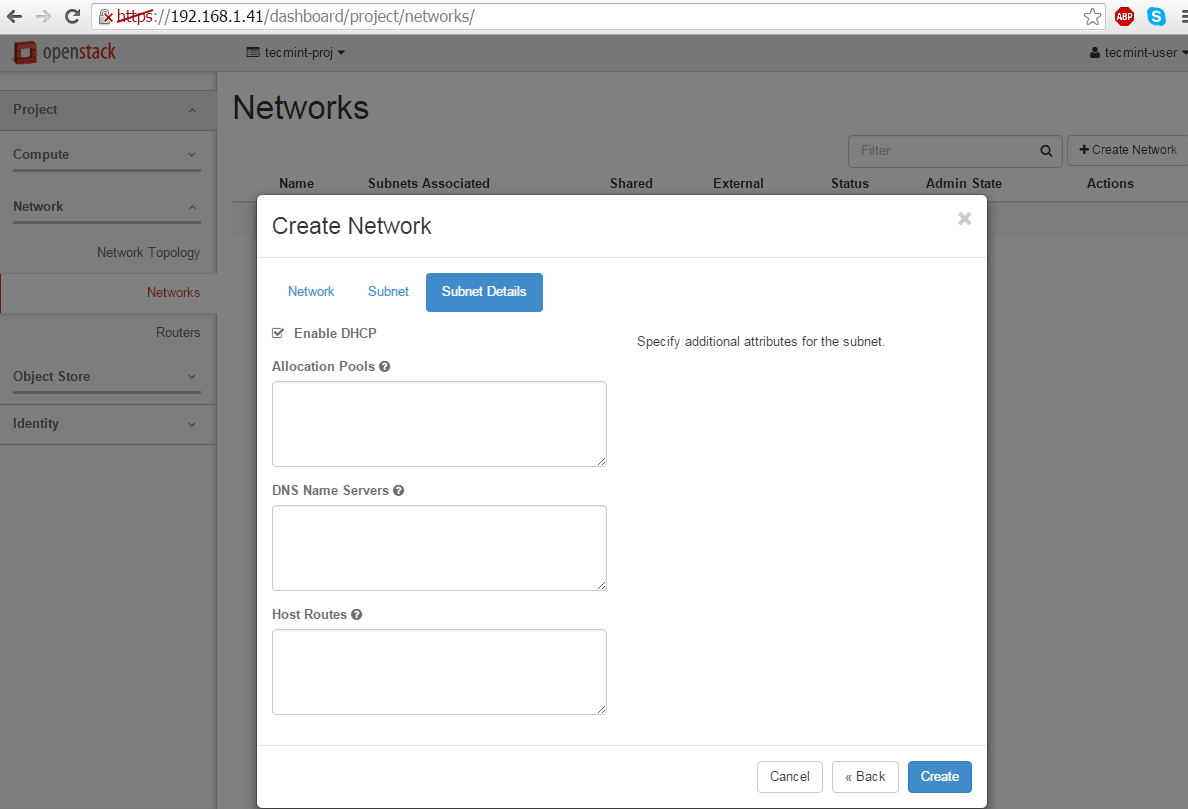
Navigate to Project -> Networks -> Create Network and setup the internal network as follows:
Network Name: internal
Admin State: UP
Create Subnet: checked

Subnet Name: internal-tecmint
Network Address: 192.168.254.0/24
IP Version: IPv4
Gateway IP: 192.168.254.1

DHCP: Enable
Use the below screenshots as a guide. Also, replace the Network Name, Subnet Name and IP addresses with your own custom settings.
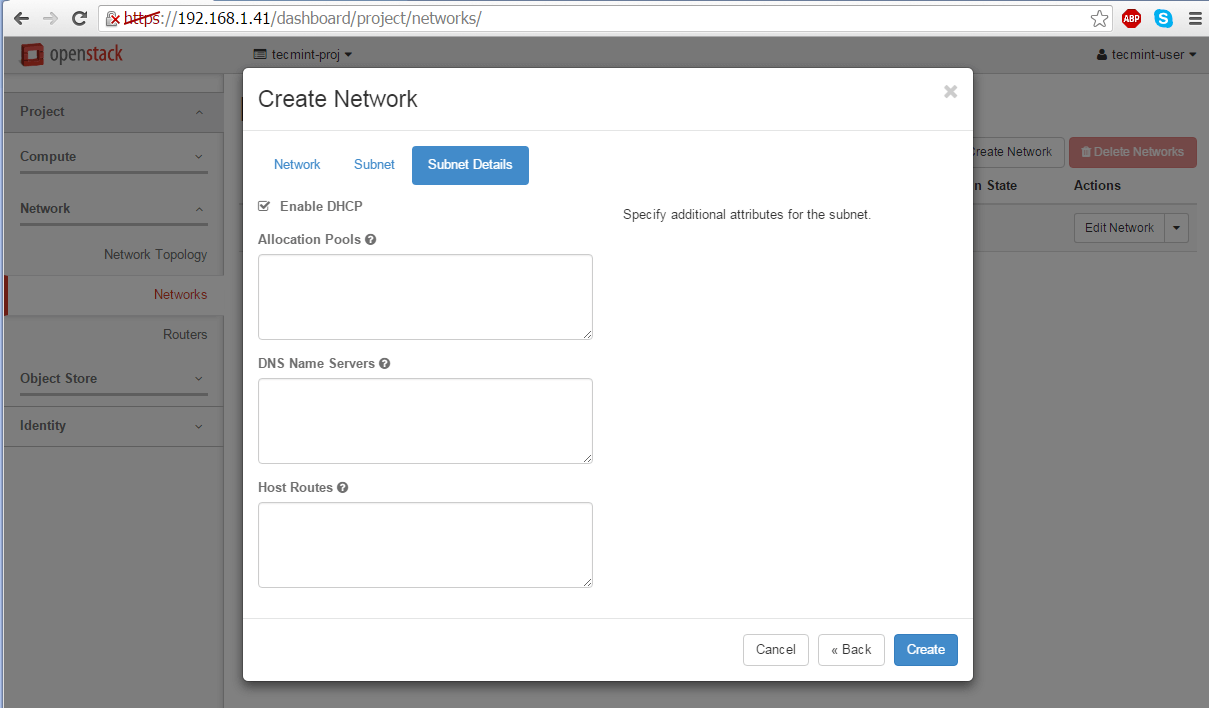
8. Next, use the same steps as above to create the external network. Make sure the IP address space for external network is in the same network range as your uplink bridge interface IP address range in order to work properly without extra routes.
Therefore, if the br-ex interface has 192.168.1.1 as a default gateway for 192.168.1.0/24 network, the same network and gateway IPs should be configured for external network too.
Network Name: external
Admin State: UP
Create Subnet: checked

Subnet Name: external-tecmint
Network Address: 192.168.1.0/24
IP Version: IPv4
Gateway IP: 192.168.1.1

DHCP: Enable
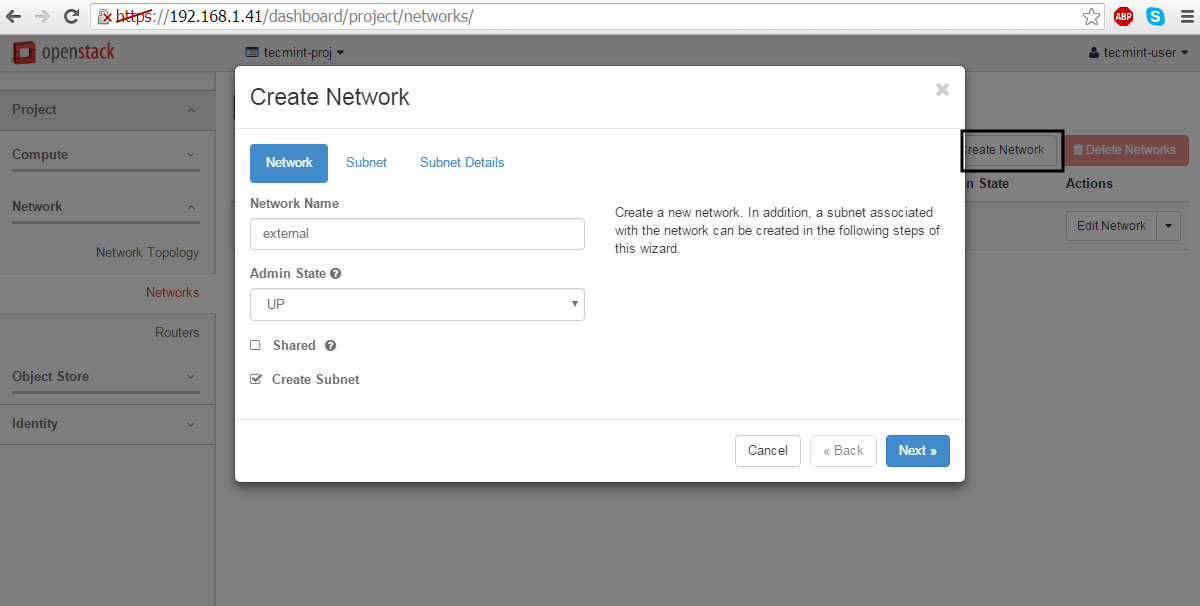
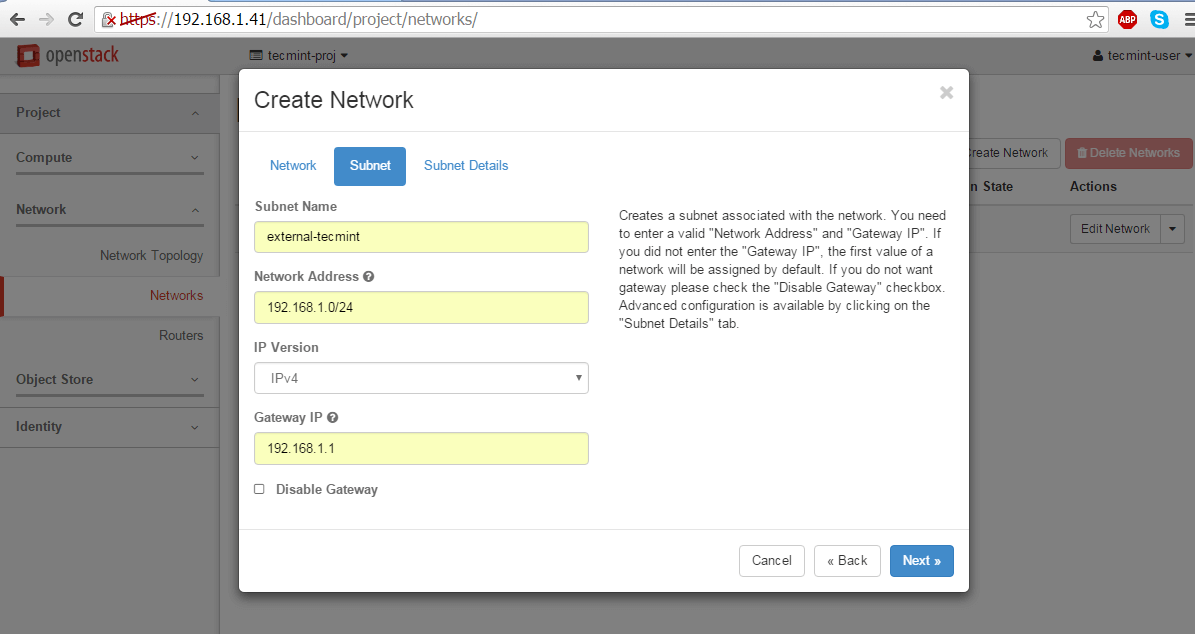
Again, replace the Network Name, Subnet Name and IP addresses according to your own custom configurations.
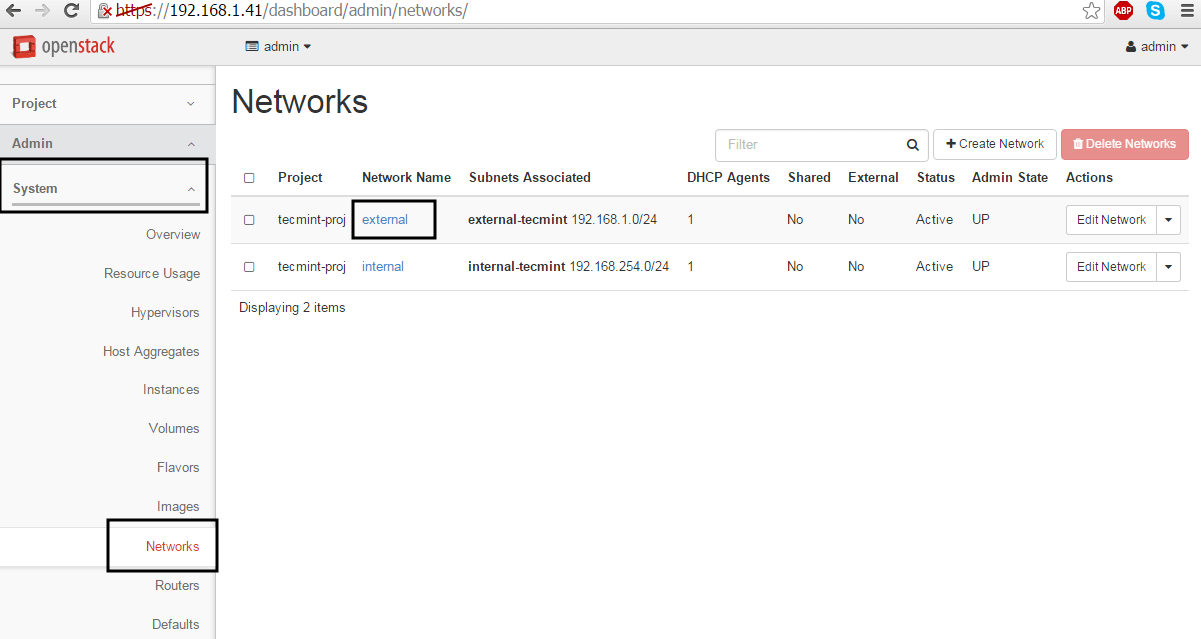
9. On the next step we need to log in OpenStack dashboard as admin and mark the external network as External in order to be able to communicate with the bridge interface.
Thus, login with admin credentials and move to Admin -> System-> Networks, click on the external network, check the External Network box and hit on Save Changes to apply the configuration.


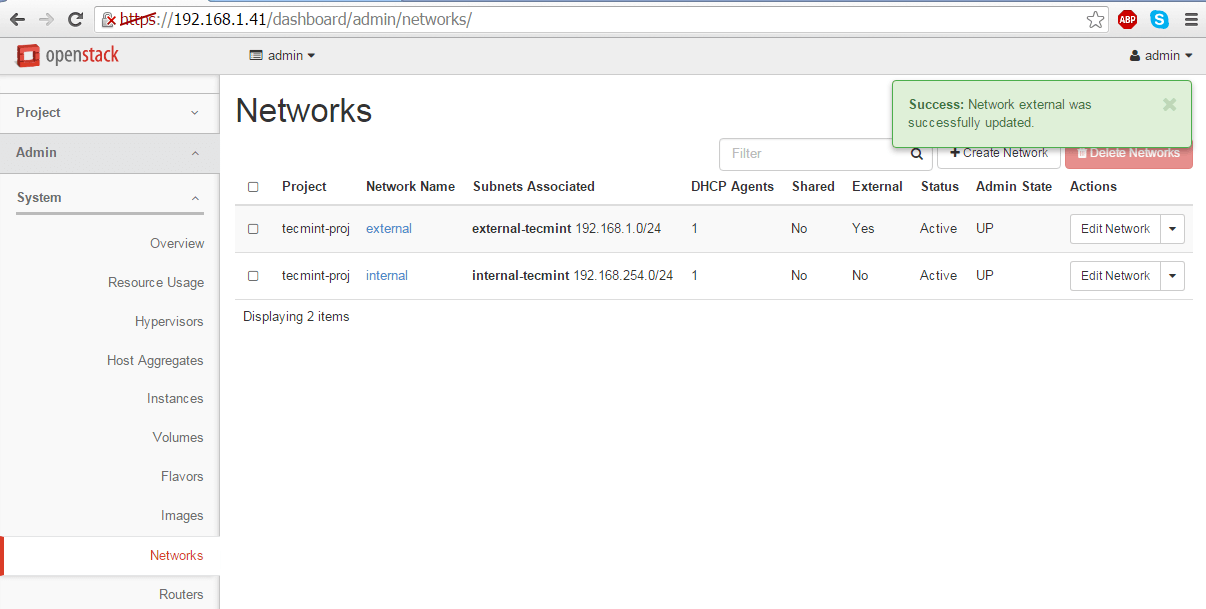
When done, logout from admin user and log in with the custom user again to proceed to the next step.
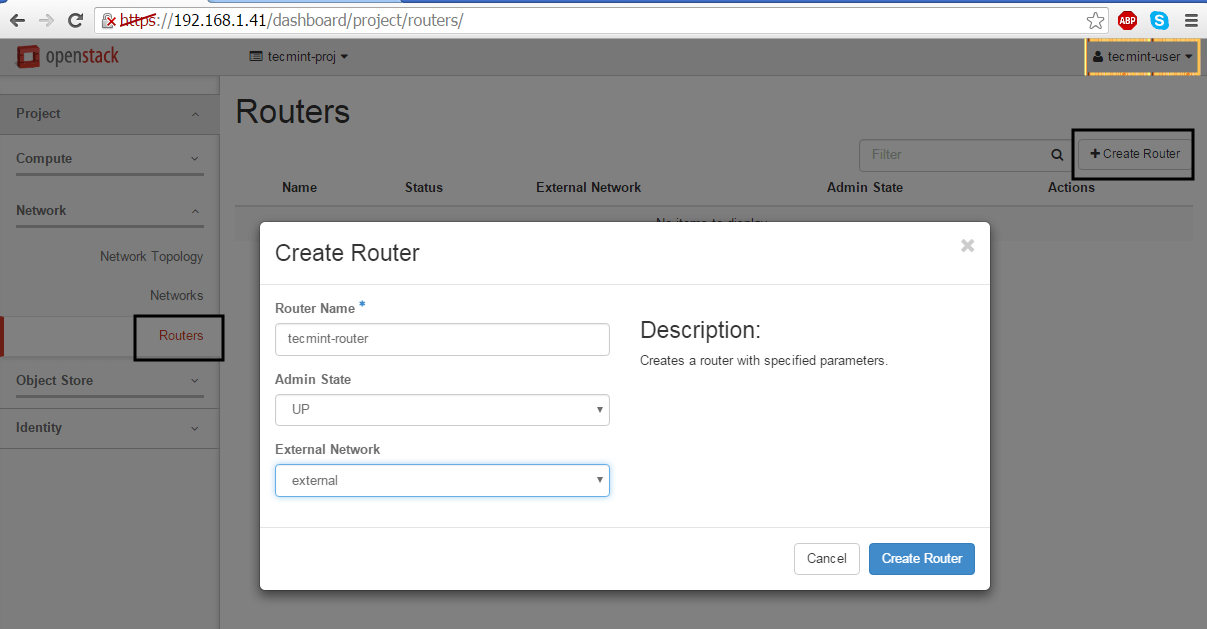
10. Finally, we need to create a router for our two networks in order to move packets back and forth. Go to Project -> Network -> Routers and hit on Create Router button. Add the following settings for the router.
Router Name: a descriptive router name
Admin State: UP
External Network: external
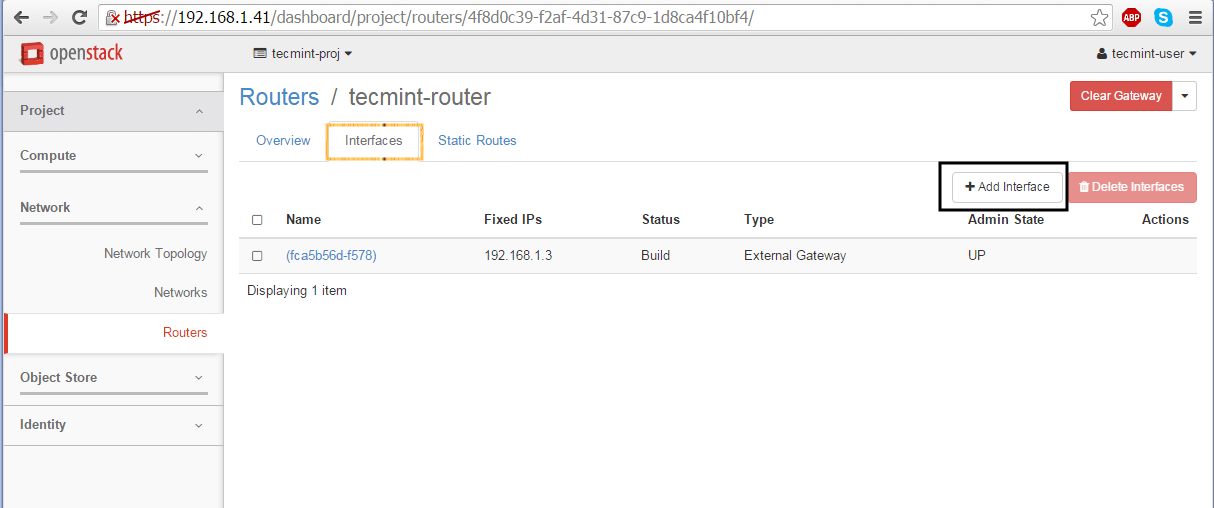
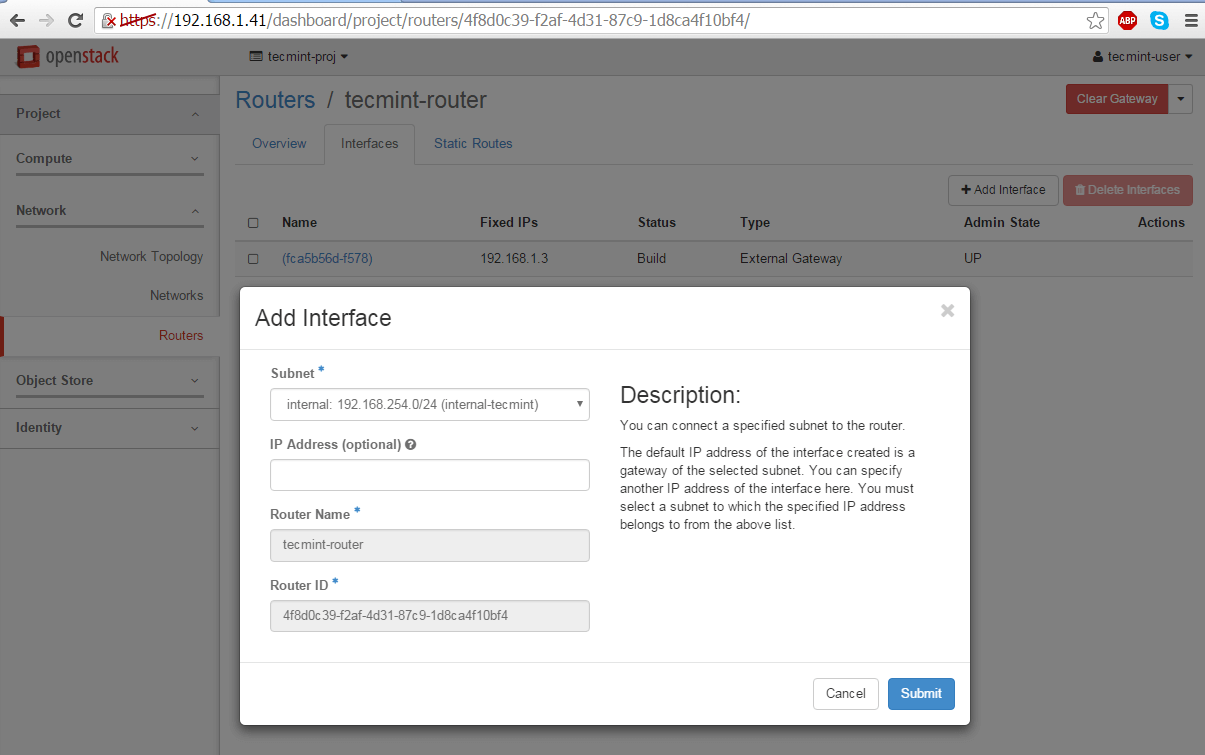
11. Once the Router has been created you should be able to see it in the dashboard. Click on the router name, go to Interfaces tab and hit on Add Interface button and a new prompt should appear.
Select the internal subnet, leave the IP Address field blank and hit on Submit button to apply changes and after a few seconds your interface should become Active.
12. In order to verify OpenStack network settings, go to Project -> Network -> Network Topology and a network map will be presented as illustrated on the below screenshot.
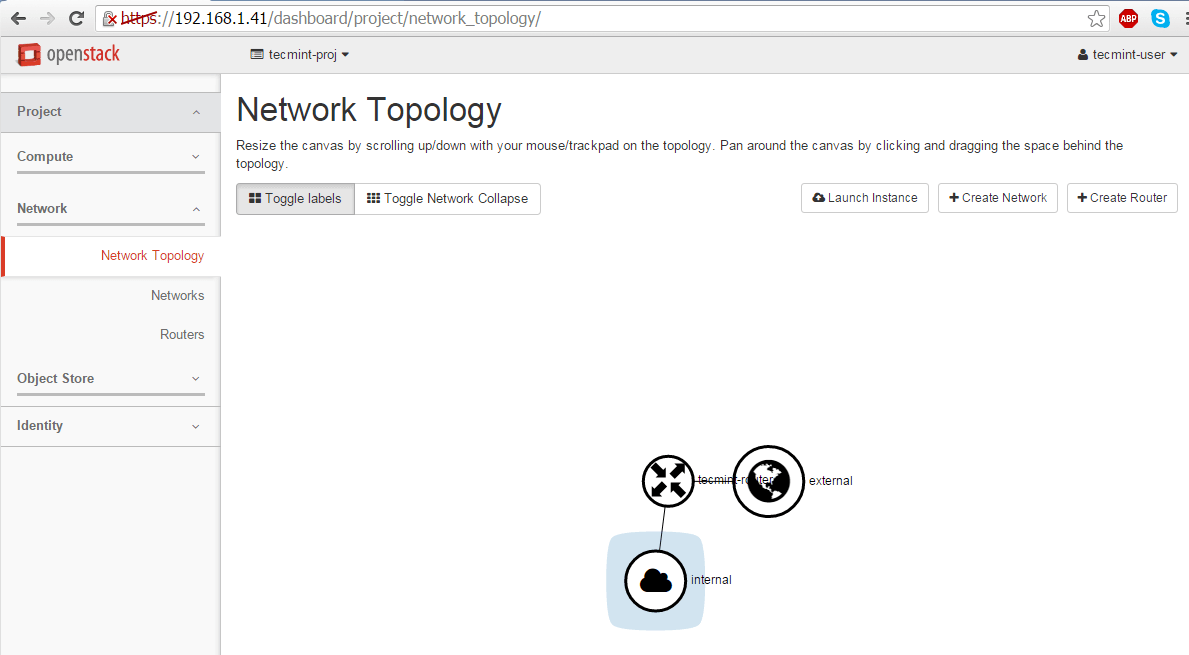
That’s all! Your OpenStack network is now functional and ready for virtual machines traffic. On the next topic we’ll discuss how to create and launch an OpenStack image instance.
Hi, I can’t ping to 8.8.8.8 from any virtual machine.
stack@openstack:~/devstack$ netstat -rn
Kernel IP routing table
Destination Gateway Genmask Flags MSS Window irtt Iface
0.0.0.0 10.0.1.15 0.0.0.0 UG 0 0 0 br-ex
10.0.1.0 0.0.0.0 255.255.255.0 U 0 0 0 br-ex
10.0.1.0 0.0.0.0 255.255.255.0 U 0 0 0 enp0s8
10.0.2.0 0.0.0.0 255.255.255.0 U 0 0 0 enp0s3
10.0.2.2 0.0.0.0 255.255.255.255 UH 0 0 0 enp0s3
Any idea??
Appreciate your efforts in the above tutorial.
Thanks
Adrian
@Adrian,
Change the Network Adaptor to Bridged in your VM network settings…
Following this to a tee, my “router” is selecting an external address, and an internal one, but I can’t ping the external address from the host running OpenStack, or any other host on the subnet – I can’t see the address assigned anywhere using ifconfig or ‘ip addr‘ either – is there a step missing here?
I cannot fix this with a hetzner subnet I lose connection and need to reinstall the server, is there anyone to help me with this?
This manual could work only on bridge interface in virtual box,but will not work in host only network. If you don’t have internet connection in later stage,you will not be able be to access the instance using floating IP.
Hello author,
Why did not you tell that users need to install ovs bridge first? Without it your manual does not work and service network shows an error: network is unavailable! I have wasted two days to find the root cause of this error!
You should understand that there not all users are so much experienced like you that is why you need mention all details in your manual to avoid any questions why it does not work who followed it but did not do that you did not write but what should be done in order to make it work!
Hello kostya_h, I am facing same issue, i am new to Linux can you tell me how have you resolved this issue ?
Hello,
Sorry for the last answer. Just already have noticed your reply.
I was not able to make it work (ovs-bridge) using this manual.
I used little bit another config files for interfaces (here they are):
[ifcfg-br-ex]
=Ethernet
BOOTPROTO=none
DEFROUTE=yes
NAME=br-ex
DEVICE=br-ex
ONBOOT=yes
IPADDR=192.168.176.130 -your IP
PREFIX=24
GATEWAY=192.168.176.2 -your GATEWAY ( check it with “route -n”, it will be it the 1-st output line under the GATEWAY column)
PEERDNS=no
NM_CONTROLLED=no
[ifcfg-ens33]
DEVICE=ens33
ONBOOT=yes
DEVICETYPE=ovs
TYPE=OVSPort
OVS_BRIDGE=br-ex
I have used the following command to make it work:
sudo ovs-vsctl add-port br-ex ens33; systemctl restart network –general command which adds port to the mentioned bridge
(this command does not work for me and i was forced to do next):
sudo ovs-vsctl del-port ens33 –delete existing port
systemctl restart network —–restart network to apply changes
sudo ovs-vsctl del-br br-ex –delete existing bridge
systemctl restart network —–restart network to apply changes
sudo ovs-vsctl add-br br-ex —–adding ovs bridge
systemctl restart network —–restart network to apply changes
and finally:
sudo ovs-vsctl add-port br-ex ens33 —–adding port to mentioned bridge where ‘ens33’ is my network interface. In your case it may be another, for example etho, enp123 e.t.c, it depends of VM that you are using. VmWare default naming is like this one.
sudo service network restart —-aplying changes again.
checking:
ip a —- checking network configuration. you should see something like this:
2: ens33: mtu 1500 qdisc pfifo_fast master ovs-system state UP qlen 1000
[admin@cloud network-scripts]$ route -n
Kernel IP routing table
Destination Gateway Genmask Flags Metric Ref Use Iface
0.0.0.0 192.168.176.2 0.0.0.0 UG 0 0 0 br-ex
169.254.0.0 0.0.0.0 255.255.0.0 U 1002 0 0 ens33
169.254.0.0 0.0.0.0 255.255.0.0 U 1013 0 0 br-ex
192.168.176.0 0.0.0.0 255.255.255.0 U 0 0 0 br-ex
if everything is fine you can open openstack dashboard http://192.168.176.130/dashboard/ and be able to ‘ping 8.8.8.8’
When i followed tecmint guide my network stopped to work and i lost external internet connection until i founded another working solution.
I hope it will help you.
little remark:
[ifcfg-br-ex]
TYPE=Ethernet
You are a superstar, long live tecmint.
Hello Matei,
You are awesome..
I have one query. Can we create multiple routers & multiple networks (Priv/Pub) on the above same setup.
Like Priv1 10.0.0.0/8 Pub1 192.168.60.0/24 & Priv2 172.16.0.0/16 Pub2 192.168.61.0/24
Public network range is our local subnets/ vlans .
Any idea??
Appreciate your efforts in above tutorial.
Thanks
Investigate your logs (mysql, keystone, glance) maybe there’s a clue on what might went wrong and post a topic on openstack specialized forums. Also, try a system reboot.
At the end of step 3.3 I lost access to the dashboard. I got the following message on the browser: “Unable to establish connection to keystone endpoint.” I’ve double checked interfaces config, and it seems right. Can you share any ideas to what might be wrong? Thanks! Keep up the good work!
Even for me also lost server ssh connection after changing network scripts and bounced network services. Lost connection and able to work only in physical machine only.
@karthiraja: how did you recover this?