Parrot Security (ParrotOS, Parrot) is a free and open-source Debian-based Linux distribution, which is designed for security experts, developers, and people who care about privacy.
It comes with a complete set of tools for IT security, digital forensics, and everything that you need to develop your own programs or protect your privacy online.
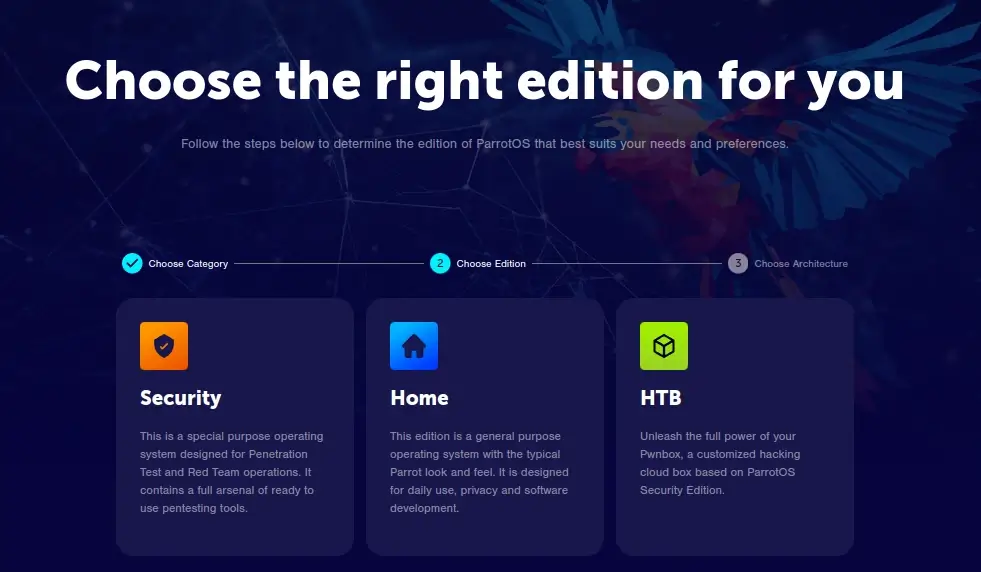
Parrot OS is available in three main editions: Security, Home, and HTB (Hack The Box). You can also use it as a Virtual Machine (with Virtual Box, Parallels, and VMware), on a Raspberry Pi, or with Docker.
The default desktop environment is MATE, but you can install other desktop environments if you prefer.
Choosing the Right Edition: Security, Home, or HTB
It comes in various editions, including Security, Home, and HTB (Hack The Box) editions, and each edition caters to different needs:
- Security Edition: Includes advanced tools for penetration testing and security assessments.
- Home Edition: Designed for everyday use with a focus on privacy and productivity.
- HTB Edition: Tailored for Hack The Box enthusiasts with additional hacking tools and resources.
System Requirements
Before you begin the ParrotOS installation, ensure that your system meets the following minimum requirements:
- Processor: 64-bit processor
- RAM: At least 2 GB (4 GB recommended).
- Storage: Minimum of 20 GB of free disk space (40 GB or more recommended).
- Graphics: A graphics card capable of 1024×768 resolution.
- USB Drive: For installation media.
This guide will help you install ParrotOS Home Edition (the latest version – Parrot OS 6.2) on your computer step-by-step through the default official installer: Calamares.
Downloading Parrot OS
Go to the Parrot OS download page, choose the edition you want to download (Security, Home, or HTB), and click on the download link to download the ISO file.
Once the ISO file is downloaded, you can verify the integrity of the downloaded ISO file using the checksums provided on the download page.
sha256sum Parrot-home-6.2_amd64.iso
Creating Parrot OS Bootable Media
After downloading the ISO image, insert your USB stick into your computer and create a bootable image using the USB creation tool or use a tool like the dd command as shown.
sudo dd if=Parrot-home-6.2_amd64.iso of=/dev/sdX bs=4M status=progress && sync
Replace /dev/sdX with the path of your USB drive (like /dev/sdb). If you’re unsure, you can use the lsblk command to list all drives and partitions connected to your Linux computer.
Installing Parrot OS
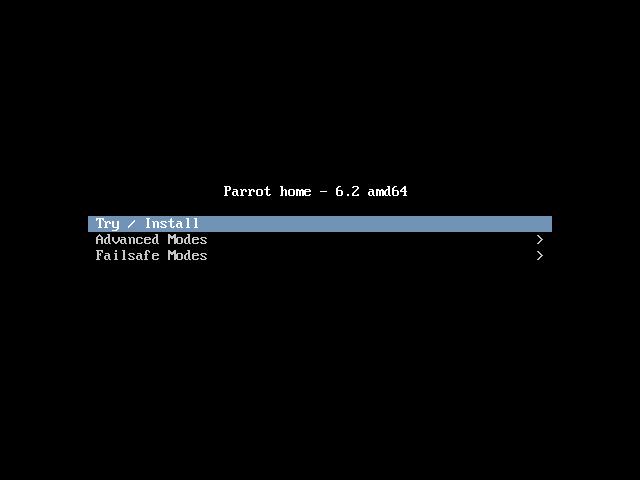
Since you’ve made a bootable USB drive, you need to start your computer from it. To do this, restart your computer and press F2, F12, or the Del key (depending on your computer). Then choose the USB Drive as the device to start from.
After booting from the USB drive, start the installation by selecting the “Try/Install” option.
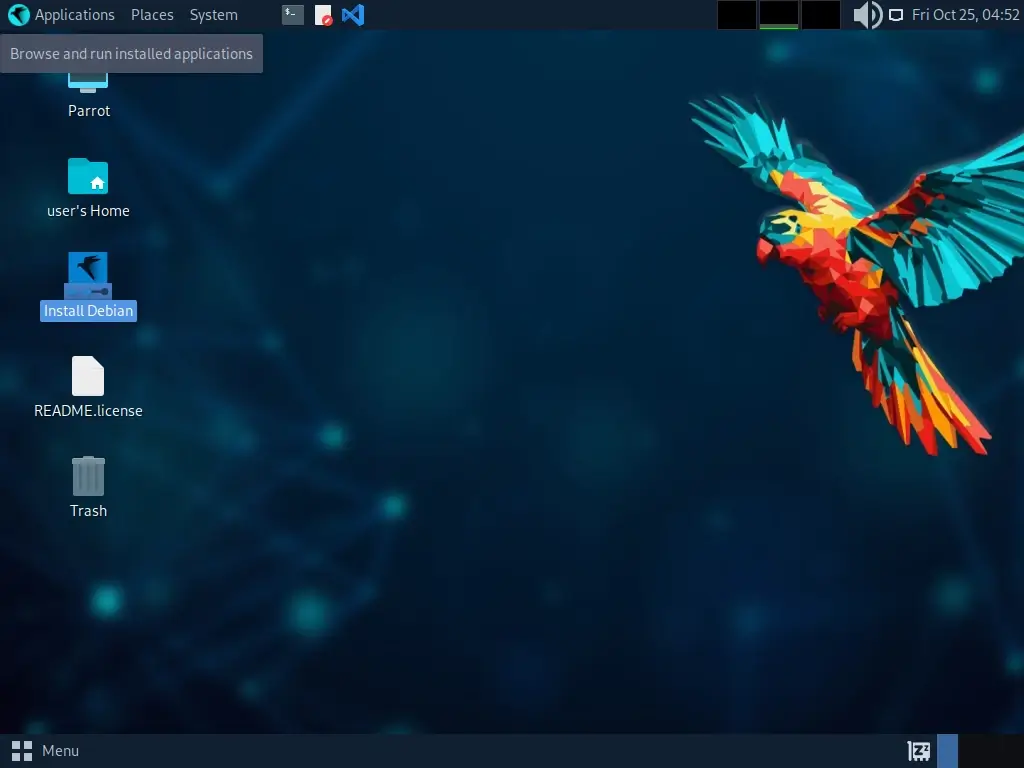
Once the OS loads, you’ll see a live preview of Parrot OS. You can explore and test everything in this preview. When you’re ready to install, just click the ‘Install Parrot‘ button.
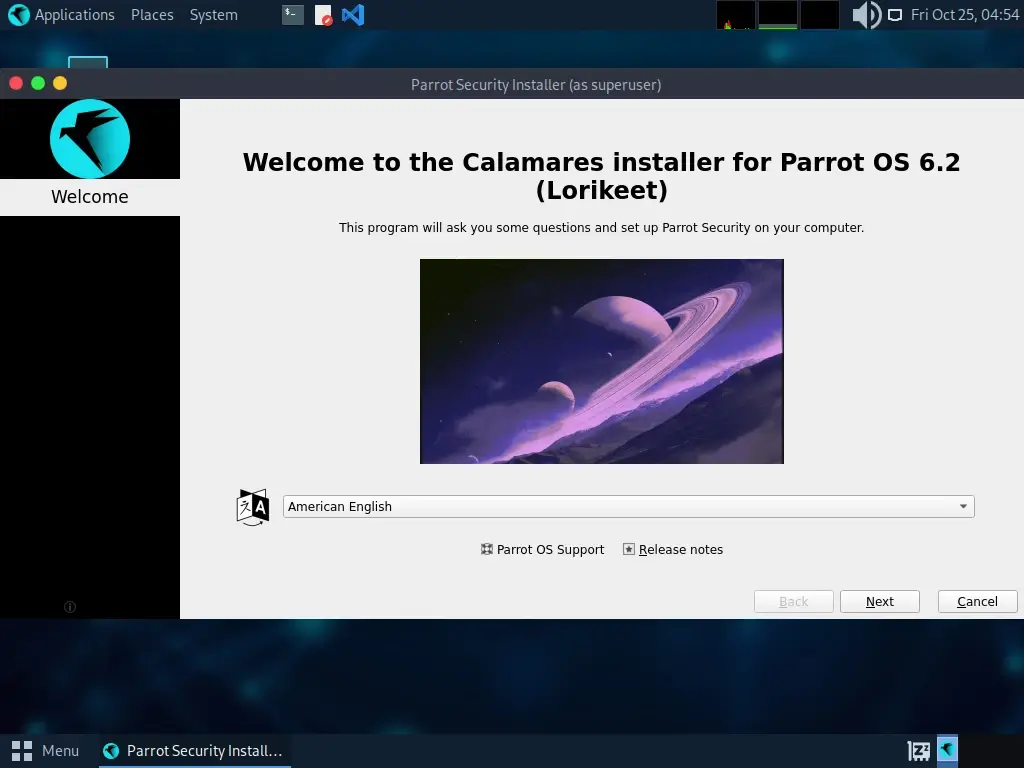
Next, select your preferred system language and click Next to continue.
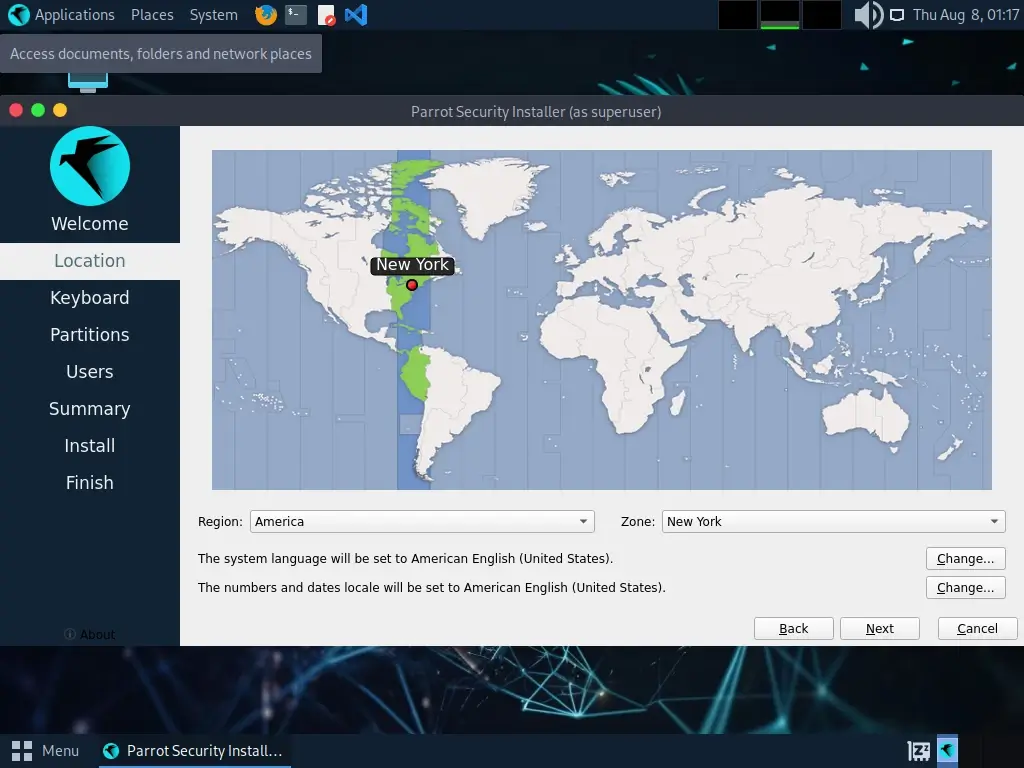
Then select your Region and Zone.
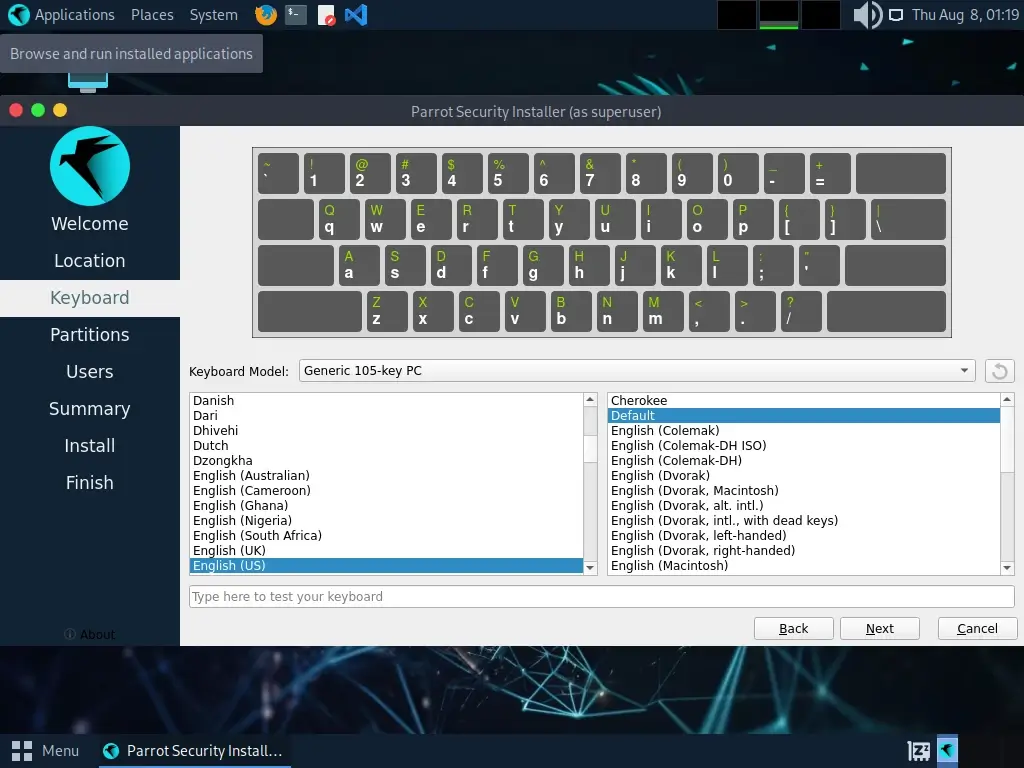
Now, you can choose your keyboard layout based on your preferences.
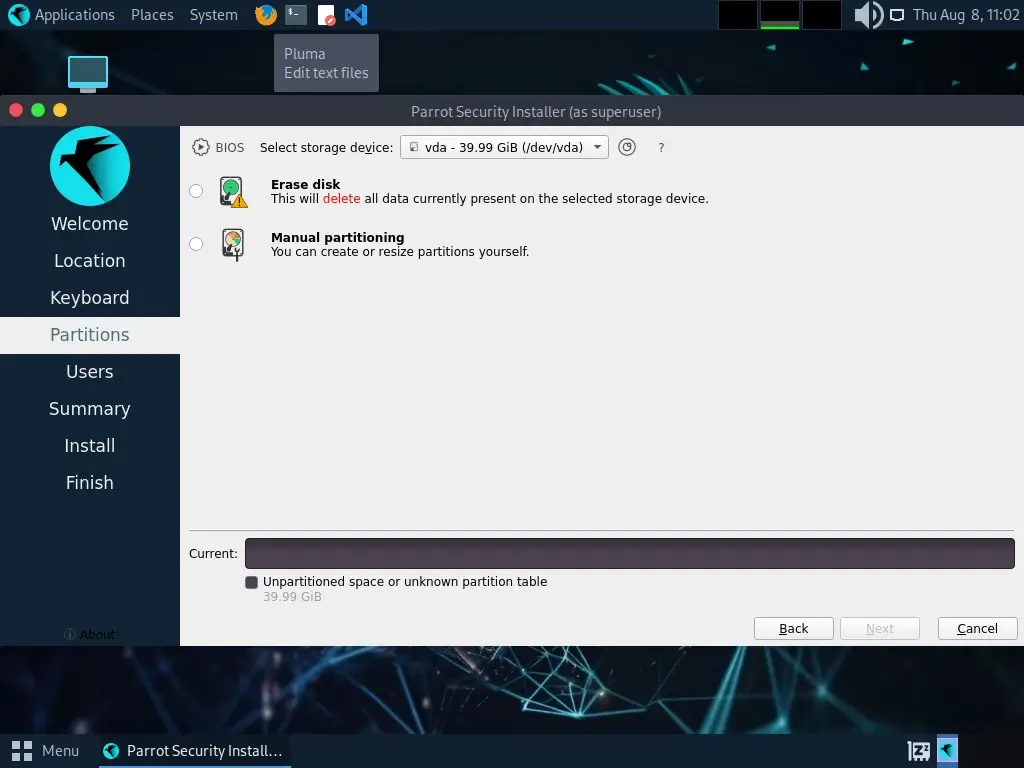
Choose the disk where you want to install Parrot OS. You can either use the entire disk or create a custom manual partition scheme.
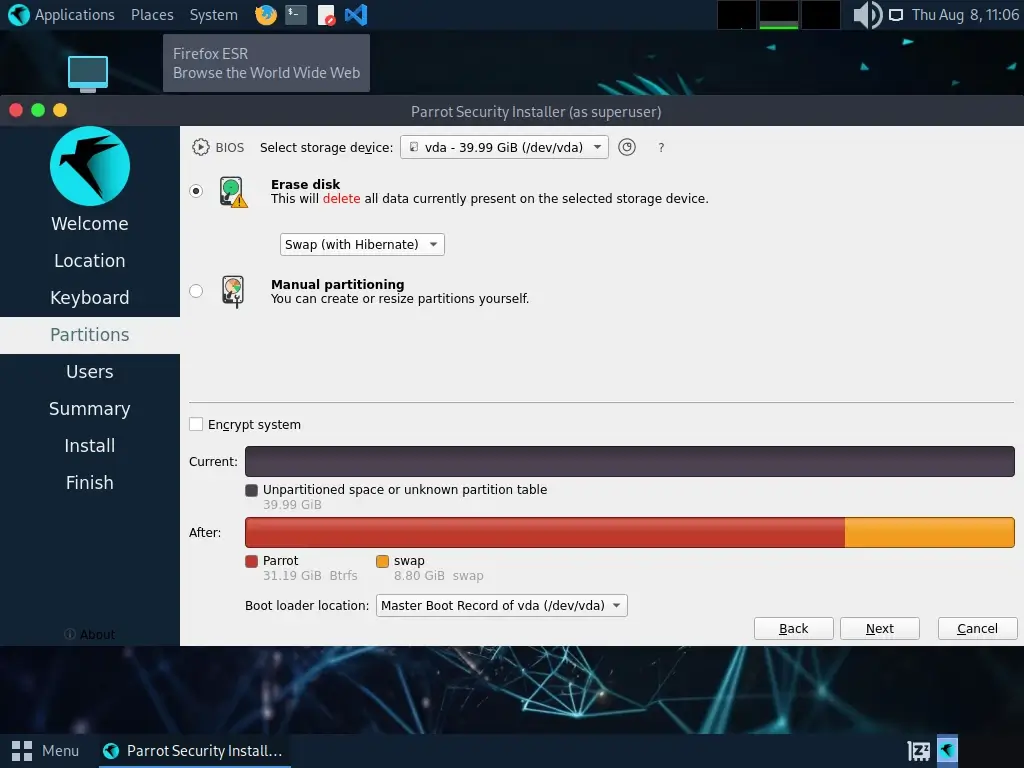
Here, I’m choosing the ‘Erase disk’ option with swap, which will automatically set up the partitions for me.
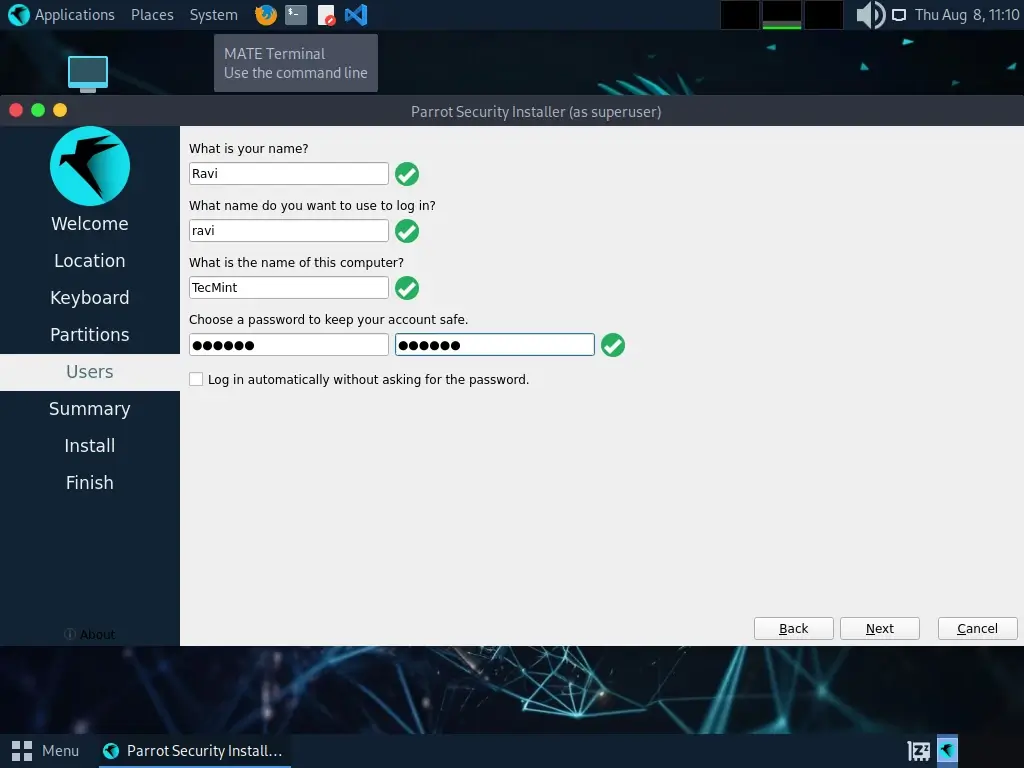
Next, create a user account, which will be used for logging into Parrot OS.
Finally, a summary of the choices made during the procedure.
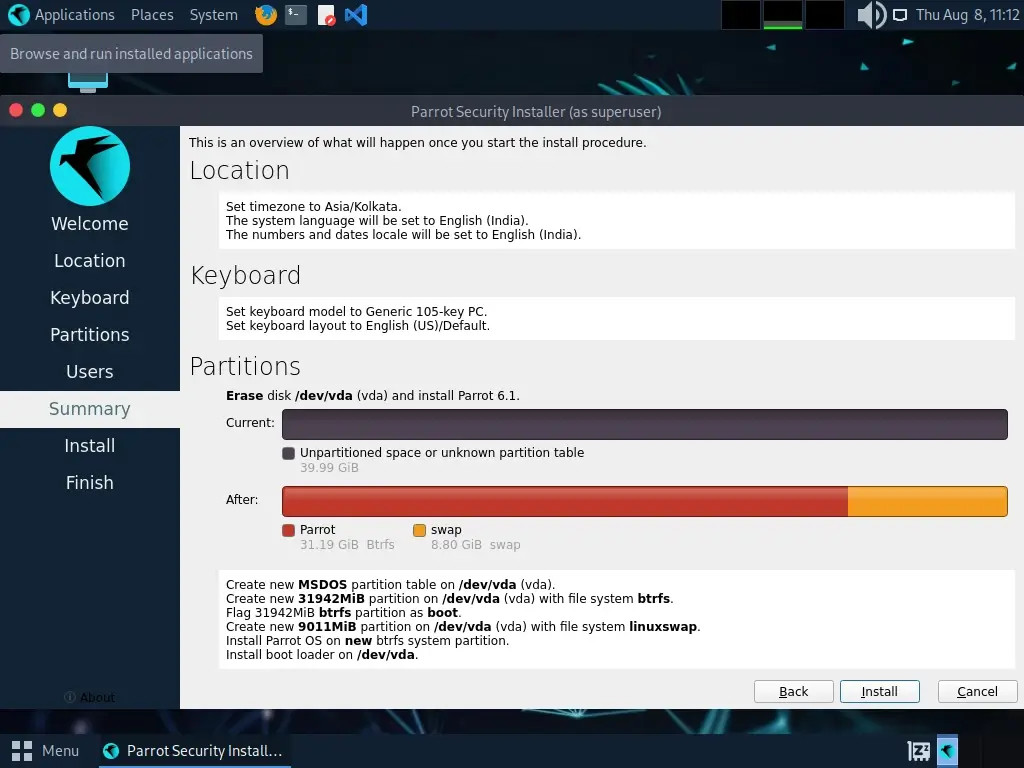
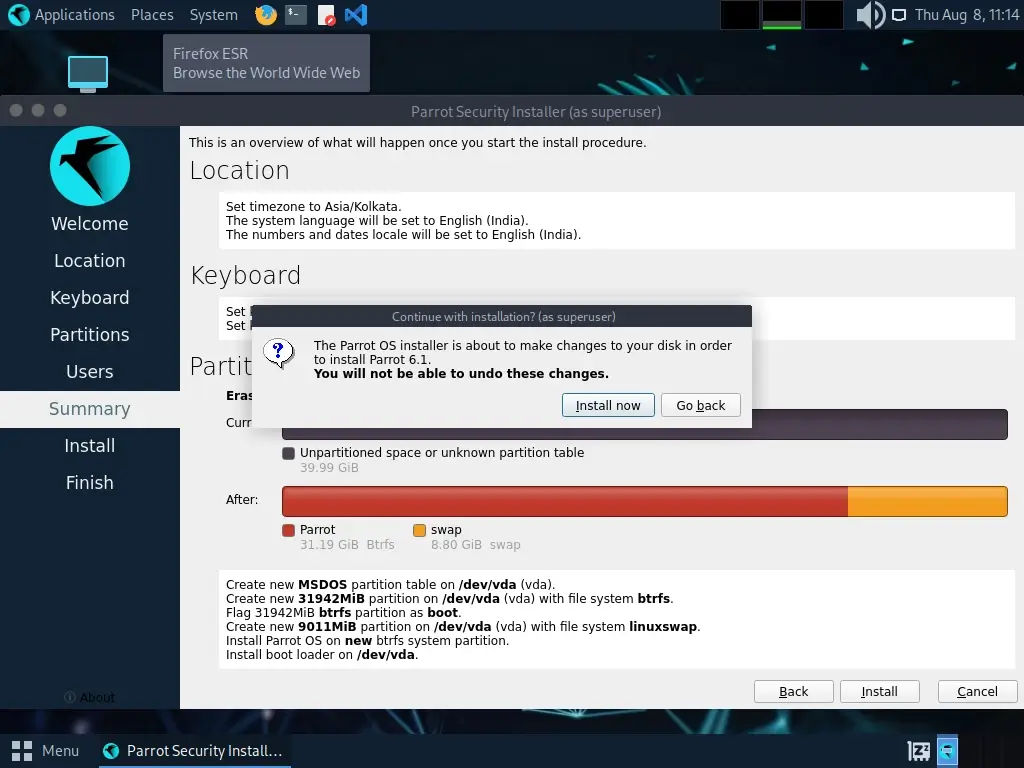
Next, review your partition setup and apply the changes, the installer will format the disk and create the necessary partitions by clicking Install now button.
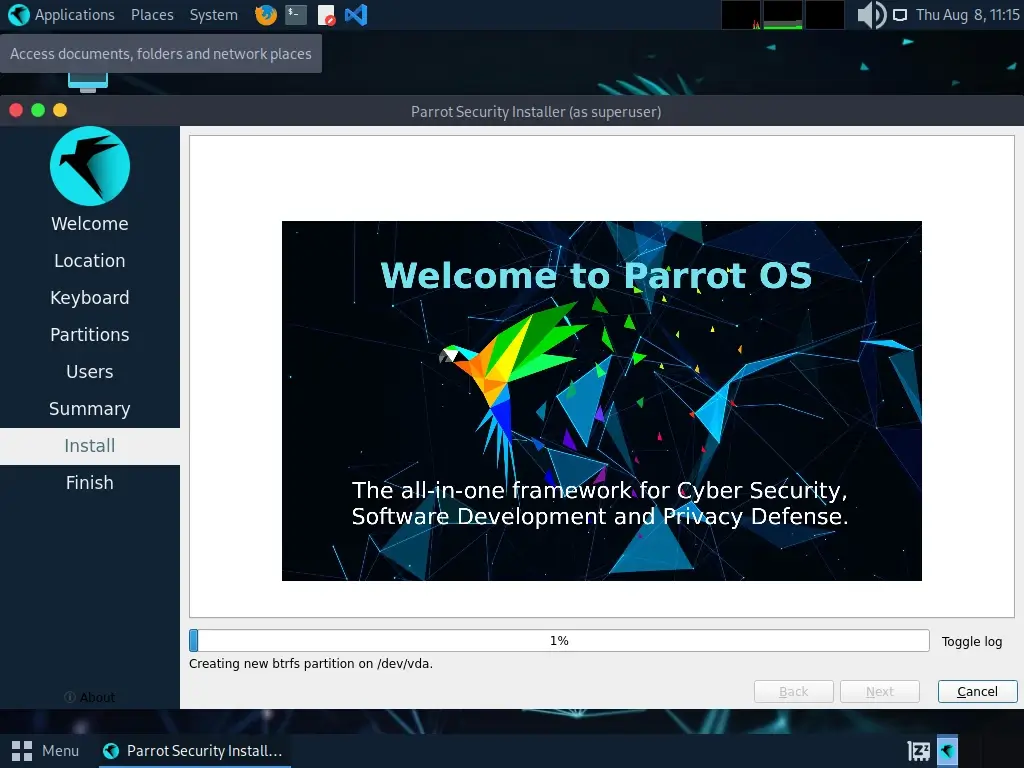
The installer will now copy files and install the base system, it will take some time, depending on your hardware and internet speed.
Once the installation is complete, the installer will prompt you to reboot your computer.
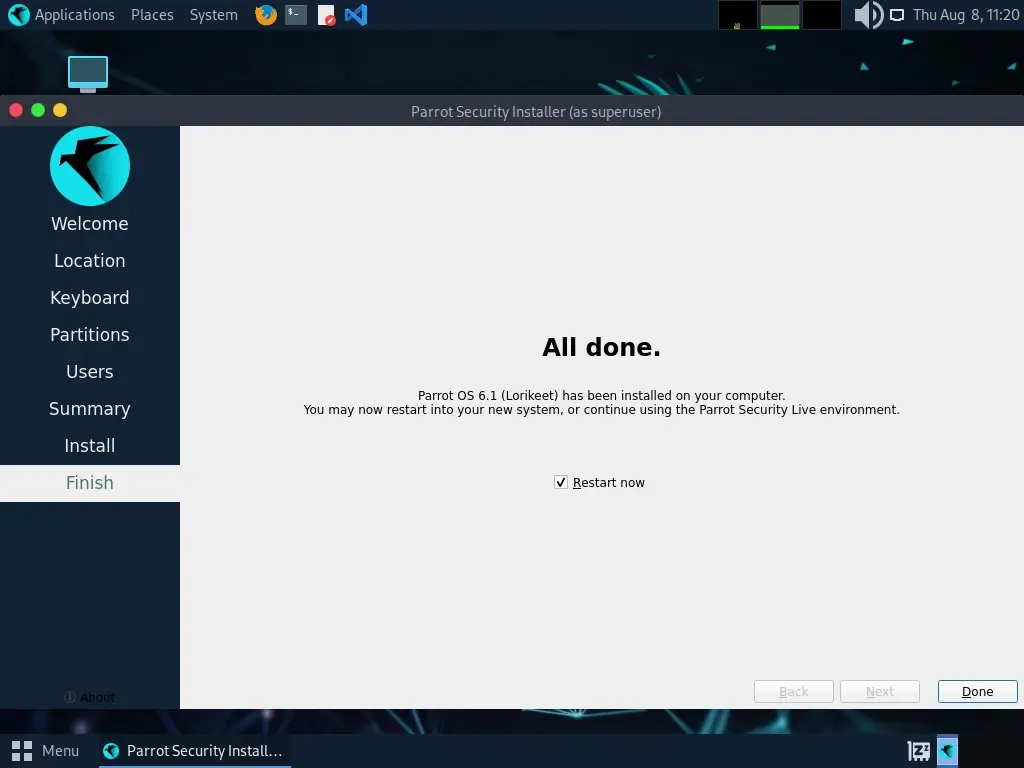
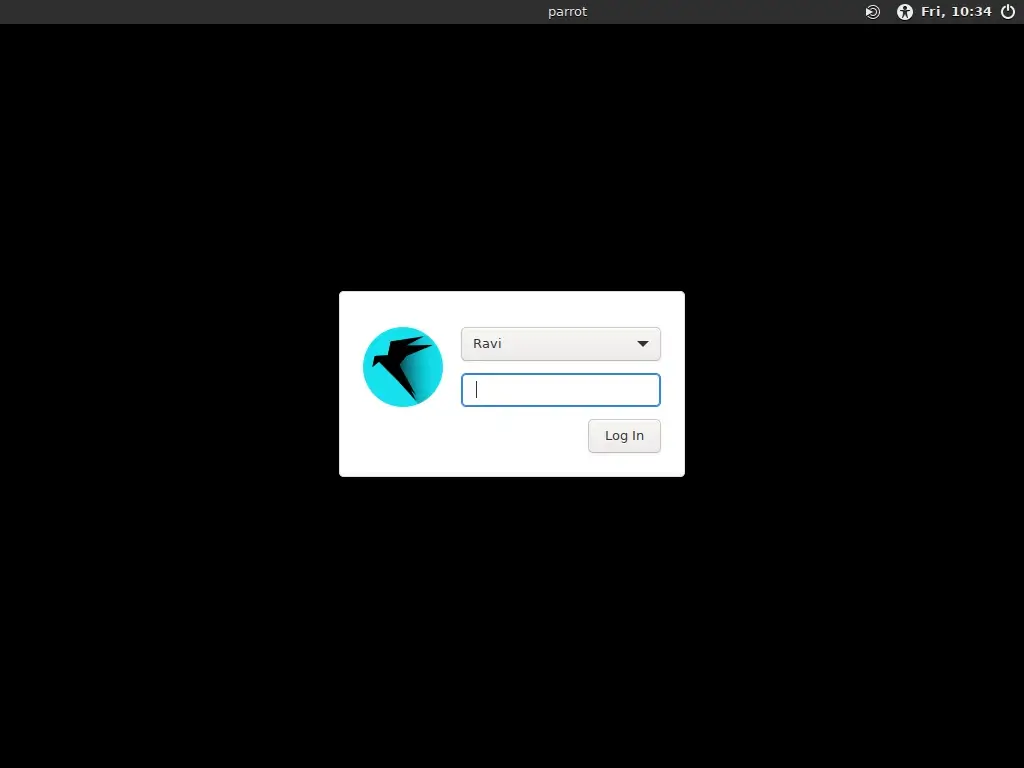
Your computer should now boot into Parrot OS. Log in with the user account you created during installation.
Conclusion
Congratulations! You have successfully installed Parrot OS on your computer, which is a powerful operating system used for ethical hacking, security testing, or general computing tasks.

Thanks you a lot!!!
Thank you for the steps was very helpful when I got confused.
@Netvine
Thanks for the useful feedback.
When I write something in the terminal, when the line ends it don’t comes to the second line it again go back to the first line and when I hit the backspace it delete the first line in the terminal.
So better suggestion what to do
Hi, I’m following your instructions and receive an error. After partitioning the disk as you suggest, I get the error “Failes to create file system: the ext4 file system in partition #1 of SCSI1 (0,0,0) (sda) failed. I’m booting from a USB drive onto a Dell laptop. Any ideas what happened?
Very helpful and easy to understand
@Simba
Okay, thanks for the feedback.
It is super OS
@Zain
Okay, thanks for sharing your thoughts with us.
Sir, may i know what kind of usb boot maker you used for it ?
Thank You Sir.
@Nana,
You can use any USB boot makers as shown here: https://www.fossmint.com/3-best-gui-enabled-usb-image-writer-tools-on-linux/
Is it possible to install alongside the windows 10?
@Abdulhalim
Yes, you can run a dual boot with Windows 10.
I have seen a couple ways of doing the install. I am putting it on a virtualbox. I can use it live but when I try to install I go through the prompts but I don’t get a root password. I get a user password instead.
After I go through everything it quits at like 30% every time. I am doing the guided partition using the whole disc and following the noob prompts. I have tried like ten times, following videos and even the guide on the parrot site. They all get a root password and I get a non root user. dell inspiron 15 64bit windows 8.1 with virtualbox 5.0
@Paul
Try out this guide and follow the steps carefully, you should be able to setup both root user and a normal user account.
The problem is that I don’t get a step 8, it goes from 7 right to 9. I have tried changing the settings in the virtualbox, downloading and installing the additions pack for the virtualbox, and it makes no difference.
I can use it live, and save it but can’t install it. When I get to step 17 it takes really long and stops at 30% where a screen pops up saying installation failed. I even tried downloading a new iso image and it does the same thing.
@Paul
This is an interesting issue, try to consult the developers of Parrots Sec OS using this email address: [email protected]
Ok, thanks. At least I can use it as a live system, better than nothing. It just sucks that I cant save any settings or files. I will email the developers, I am sure they will want to know about this. Thank you.
Also, I’m trying to install Parrot on my Desktop, which had a dual-boot between Windows and Ubuntu 15.10, but the Ubuntu boot damaged, and it only shows a command prompt to which I cannot provide any input.
Weird stuff is: I tried reinstalling Ubuntu 15.10, when the CD starts, it just shows me the very same empty command prompt to which I cannot provide input. Now even weirder stuff, if I start the Parrot Live version from the USB, it shows me the same command prompt that takes no input. If I start the install option, instead, it just shows a bunch of text and freezes. WTF, help!?
@Alejandro
Your situation is a little tricky. Did you create a partition for Parrot OS before installing it? If not, you possibly installed it on the Ubuntu partition, thus damaging it. But, still, if you installed grub/grub 2 boot loader in the process, it should have loaded well allowing you to access Windows and Parrot OS.
I believe you should be able to re-install Ubuntu 15.10, after inserting the CD, press the BIOS key on your machine(varies for one manufacturer to another), for accessing a list of bootable devices, then choose DVD/CD drive and press [Enter] to boot into Ubuntu.
Check out this guide for installing Windows alongside Ubuntu: https://www.tecmint.com/install-ubuntu-16-04-alongside-with-windows-10-or-8-in-dual-boot/
Thanks.
Hey I’m trying to install this OS, but it’s simply impossible. I’m trying it on my dell laptop. I hit install and get to the point of “Loading additional content“. It gives me then an error saying disk image is damaged.
I tried downloading and re-imaging a USB, same error every time. I’m asking this from a live version of Parrot booted from the same USB with which I was trying to install the OS. If I try to install from the Live USB, it just freezes. Any suggestions?
Very Helpful Thanks. Is this a fresh install ?
@Ethan
Yes, it is a fresh installation.
how can i install all tools in to home edition…
@roshan
Simply install the operating system, all tools should be in there. If you need new tools, upgrade the system.
I have installed Parrot without problems from USB (image-writer) on Dell E4300 with SSD and the entire disk is encrypted. Thank you to the authors of the Parrot for trouble-free installation.
@Danny
Sure it’s installation is absolutely easy, same with Kali Linux(more or less the same steps).
when i am installing the parrot OS i found the error in ” installing the system”.
at your tutorial point 14, when i entered 30 GB then always an error occur. the limit size is too large
@abc
Make sure the size you set doesn’t exceed the actual available space. This could be the possible cause of the problem.
Thanks for going out if your way for complete strangers! Nice to know we still have good people out here! Namaste
i have installed parrote os 3.2 in virtual box
hay bro can i try pen testing in virtualbox with parrote3.2?
How to install from pen drive. When I m try to install, after choose the keyboard it display a message like CD/DVD drive not found or mount. Please help me.
mount -f vfat
reinstall with dd commands on terminal, that worked out for me, i had initially tried mounting usb as cdrom but the error became persistent.
@Mike
Many thanks for sharing this tip.
I’ve tried installing this.. everything goes smoothly till after partitioning. then in the installation phase i get the error that installation step failed. i really don’t know the cause of this and i need to install this os badly.
My laptop specs : 128gb ssd hard drive, DDR3 8gb ram, 2.6ghz quad core. intel core i5. I’m installing it on an external hard disk and I’ve been having this issue consistently. parrot os 3.1 to be precise. is there any fix or work around or anything I’m doing wrong?
I can’t not tell what the problem really is at this point, try to contact the developers of parrot os: https://www.frozenbox.org
thanks. however i think the cause of the problem was in the process of downloading the os, initially, because it paused when the network connectivity was bad and later resumed. i guess that’s where the glitch is from.
@Enigma
Thanks for getting back, i was actually wondering about the possible cause of the installation process failure as everything else went on well as per your description above.
Try to get a new ISO and observe what happens.
I also remember recently coming across this distro and hearing it was mostly based on Kali. It would be nice to hear what makes it a “cloud-oriented” pentesting distro.
Is it any better compared to Kali Linux?
I see that installation instructions are the same as for any other Linux OS, did you really have to write an dedicated article for it? The title is a bit misleading really, I expected more coverage of the features/comparison with Kali perhaps.
@Tomas
Firstly, we always offer dedicated Linux installation how-tos and guides to our followers whether the steps covered are similar or slightly distinct for each distribution. We target all sorts of Linux users, with a keen interest in beginners who may not have prior know-how or experience in installation of several Linux distributions.
Secondly, Kali Linux still remains on top of the list of best security and penetration testing operating systems at the moment. However, i have seen seen some few features in Parrot Security OS that i suppose are not in Kali Linux such as Arnonsurf: a OS mode for surfing anonymously , TorChat, an upgrade manager, complete Office suite including few document viewers, therefore users can process documents from within plus many others.
But it being better than Kali Linux is actually based on an individual’s experience and expectations, therefore you can give it a try to find that out.
Lastly, above all, thanks for your feedback, we highly appreciate it.
Fair enough Aaron. It might be worth changing the headline to “Installation of Parrot Security OS” so that people keep their expectations low, good installation instructions otherwise.
With regards to giving the Parrot Sec OS a try, well, I wish I had time for that. So far nothing attracted my interest, therefore I’m sticking with Kali Linux, at least for now.