Parted is a renowned command-line utility designed to facilitate the management of hard disk partitions in a user-friendly manner.
With Parted, you can effortlessly perform tasks such as adding, deleting, shrinking, and extending disk partitions, while also managing the file systems associated with them.
Over time, Parted has undergone significant development and evolution, introducing various enhancements and changes to its functionality. Certain features have been retired, while new capabilities have been introduced, rendering it a versatile tool for partition management.
This tutorial aims to provide a comprehensive introduction to Parted, covering its fundamental concepts and demonstrating practical examples. If you are new to Parted, it is essential to note that any modifications made using Parted are immediately written to the disk.
Therefore, it is crucial to exercise caution while attempting to modify your disk partitions to avoid unintended consequences or data loss. Throughout this tutorial, we will guide you step-by-step, ensuring that you grasp the basics of Parted and understand the potential implications of your actions when working with disk partitions.
If you intend to experiment with Parted, it is recommended to utilize a virtual machine or an old computer/laptop that does not contain any critical data. When making modifications to a disk partition, it is crucial that the partition is not actively in use.
In the case of primary partitions, you may consider booting into rescue mode, which provides a safe environment for performing partition-related tasks without interference from the running operating system. This precautionary approach ensures the integrity of your valuable data and minimizes the risk of unintended consequences during partition manipulation.
Note: You will need to have root access to the machine you will be working on in order to use parted.
How to Install Parted on Linux
On many Linux distributions, parted comes pre-installed. If it is not included in your distro, you can install it with:
$ sudo apt install parted         [On Debian, Ubuntu and Mint]
$ sudo yum install parted         [On RHEL/CentOS/Fedora and Rocky/AlmaLinux]
$ sudo emerge -a sys-apps/parted  [On Gentoo Linux]
$ sudo apk add parted             [On Alpine Linux]
$ sudo pacman -S parted           [On Arch Linux]
$ sudo zypper install parted      [On OpenSUSE]
Once you have made sure that parted is installed, you can proceed further to check out some real-world examples of parted command in the rest of this article.
1. Check Parted Version
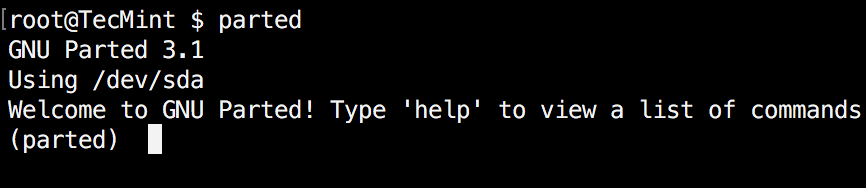
To observe a similar message as depicted in the image below, execute the following command. Please note that the output may differ slightly depending on your specific version of Parted. By default, Parted will operate on your primary drive, typically identified as /dev/sda, unless otherwise specified.
$ parted
If you want to exit parted, simply type:
$ quit
2. List Disk Partitions in Linux
Now that parted is started, let’s list the partitions of the selected hard disk. As mentioned earlier, parted chooses your first drive by default. To see the disk partitions run print.
(parted) print
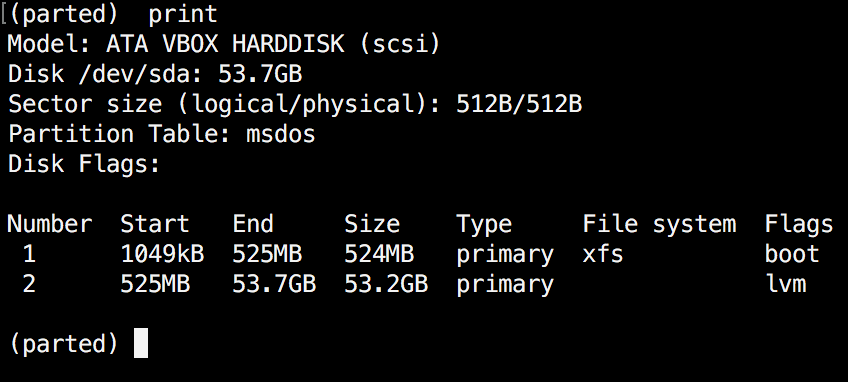
When running print, it will also display the hard disk information and model. Here is an example from a real hard disk (not virtual as shown in the image above) :
(parted) print

Model: ATA TOSHIBA MQ01ACF0 (scsi)
Disk /dev/sda: 320GB
Sector size (logical/physical): 512B/4096B
Partition Table: msdos

Number  Start   End    Size   Type      File system  Flags

 1      1049kB  256MB  255MB  primary   ext2         boot
 2      257MB   320GB  320GB  extended
 5      257MB   320GB  320GB  logical                lvm
In the example above, you can see the disk model, capacity sector size, and partition table.
3. Change or Switch Partition in Linux
If you have more than one hard disk, you can easily switch between disks, by using the “select” command. In the example below, I will switch from /dev/sda to /dev/sdb which is a secondary drive on my system.
To easily switch between disks you can use:
(parted) select /dev/sdX
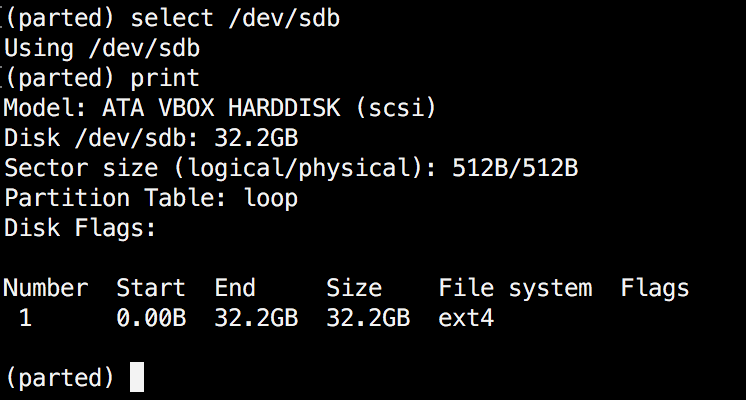
Change "X" with the letter of the disk to which you wish to switch.
4. Create Partition in Linux
The parted can be used to create primary and logical disk partitions. In this example, I will show you how to create a primary partition, but the steps are the same for logical partitions.
To create a new partition, parted uses “mkpart“. You can give it additional parameters like "primary" or "logical" depending on the partition type that you wish to create.
Before you start creating partitions, it’s important to make sure that you are using (you have selected) the right disk.
Start by using print:
(parted) print
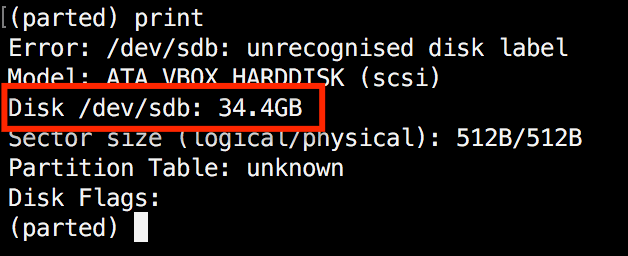
As shown in the above image, we are using a virtual drive of 34 GB. First, we will give the new disk a label and then create a partition and set a file system on it.
Now the first step is to give the new disk a label name with:
(parted) mklabel msdos
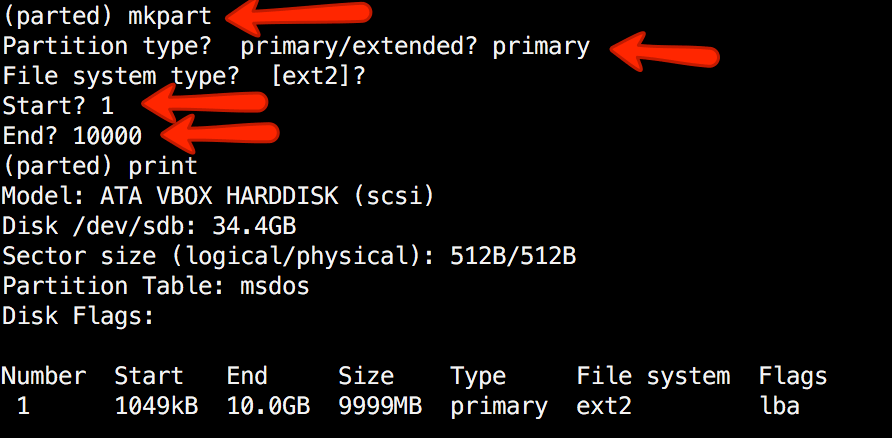
Now create the new partition with mkpart. The listed units are in megabytes (MB). We will create a 10 GB partition starting from 1 to 10000:
(parted) mkpart

Partition type?  primary/extended? primary
File system type?  [ext2]?
Start? 1
End? 10000
(parted) print
Model: ATA VBOX HARDDISK (scsi)
Disk /dev/sdb: 34.4GB
Sector size (logical/physical): 512B/512B
Partition Table: msdos
Disk Flags:
Number  Start   End     Size    Type     File system  Flags
 1      1049kB  10.0GB  9999MB  primary  ext2         lba
Next, exit parted with "quit" command. We will format our new partition in the ext4 file system using mkfs. To make this happen run the following command:
# mkfs.ext4 /dev/sdb1
Note: It’s important to select the right disk and partition when executing the above command!
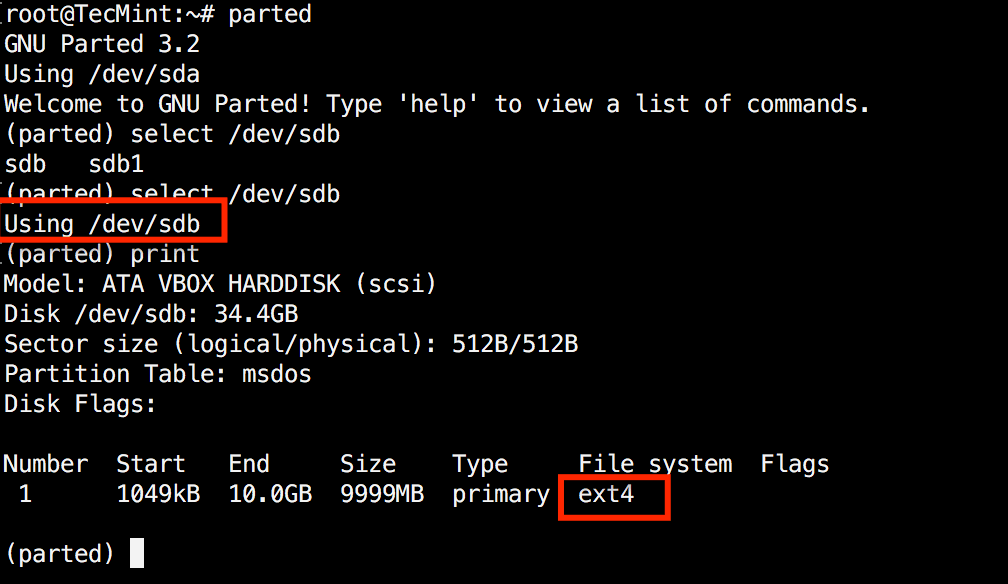
Now let’s verify our results, by printing the partition table on our secondary disk. Under file system column, you should see ext4 or the file system type that you have decided to use for your partition:
5. Resize Linux Disk Partition
Parted includes multiple useful functions and one of them is "resizepart". As you have probably figured this out by now, "resizepart" helps you resize a partition.
In the example below, you will see how to resize an existing partition. For the purpose of this example, we will be using the earlier created partition.
First, you will need to know the number of the partition that you will be resizing. This can be easily found by using "print":
(parted) print
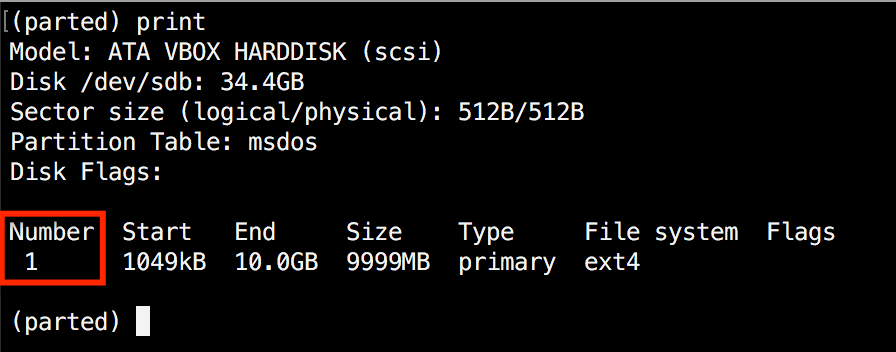
In our example, the partition number is "1". Now run the resizepart command:
(parted) resizepart
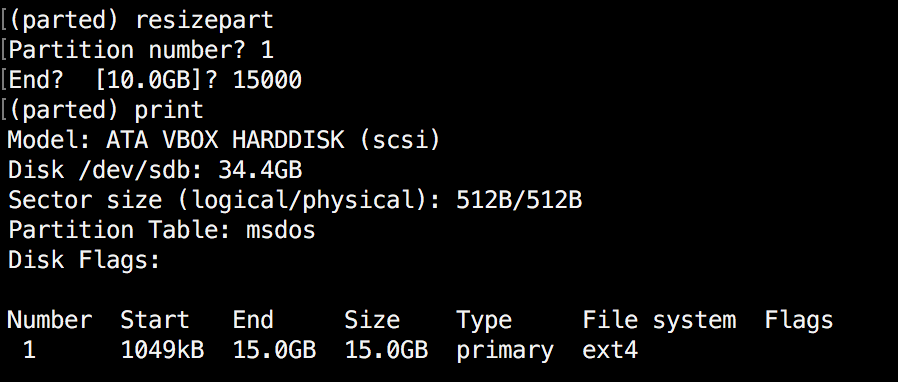
You will be asked for the number of the partition that you will resize. Enter its number. After that, you will be asked to set the new ending point for this partition. Remember that by default the units are in MB. In our example, we have set the new partition size to 15 GB:
(parted) resizepart
Partition number? 1
End?  [10.0GB]? 15000
Now verify the results with "print":
(parted) print
6. Delete Linux Partition
The next thing you will learn is how to delete a partition from your hard drive. To do this, you will need to use the rm command within parted. To delete a disk partition you will need to know its number.
As mentioned earlier, you can easily obtain this number by using "print". In our example, we will delete the partition with a number 1 from our secondary drive /dev/sdb1:
(parted) rm 1
Verify the results by printing the partitions table:
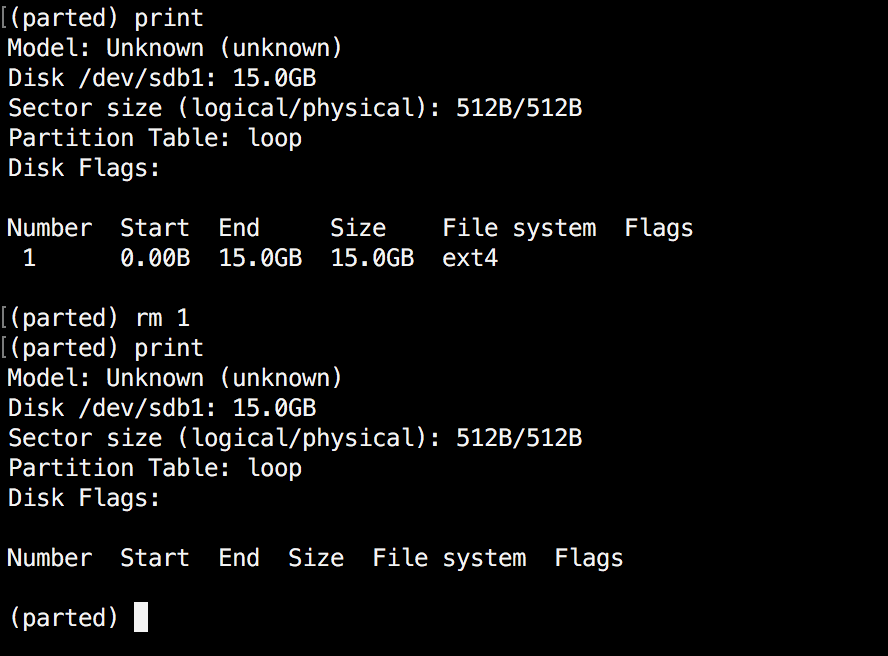
7. Rescue Linux Disk Partition
Parted supports a “rescue" utility that helps you recover a lost partition between a starting and ending point. If a partition is found within that range, it will attempt to restore it.
Here is an example:
(parted) rescue
Start? 1
End? 15000
(parted) print
Model: Unknown (unknown)
Disk /dev/sdb1: 15.0GB
Sector size (logical/physical): 512B/512B
Partition Table: loop
Disk Flags:

Number Start End Size File system Flags
1 0.00B 15.0GB 15.0GB ext4
8 Change Linux Partition Flag
Using parted, you can change the state of a flag for disk partitions. The supported flags are:
- boot
- root
- swap
- hidden
- raid
- lvm
- lba
- legacy_boot
- irst
- esp
- palo
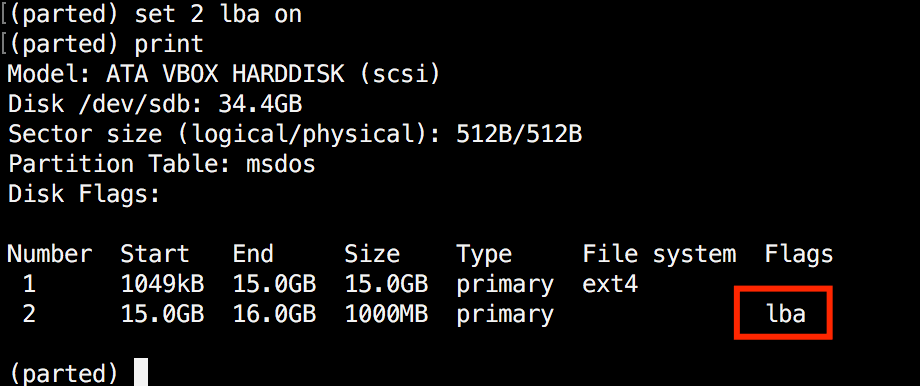
The states can be either "on" or "off". To change a flag simply run "set" command within parted:
(parted) set 2 lba on
The above command sets lba flag to on for the second partition. Verify the results with print:
Conclusion
Parted is a useful and powerful utility that can help you manage your disk partitions in Linux systems. As always, when working with disk partitions you need to be extra careful.
It is strongly recommended to go through parted man pages to learn how you can customize its output and find more information about its capabilities.
If you have any questions or comments, please do not hesitate to use the comment section below.


Do I need to unmount the partition when I resize it?
*unmount command.
You can update the below point as well.
parted command mainly use to create a partition larger than 2Tb which we can’t do with fdisk.
Parted is not a Linux command is a GNU command due it’s part of GNU project please be specific about this issue
What if I forgot to mention mklabel in parted will it cause any issues ?
Do you need free space or unallocated space to resize a partition? i want to resize a partition but all space is allocated to some partitions or another
Uhh, before resizepart, don’t you need to run resize2fs first to shrink the data?
can you provide an example how to embed “resize2fs” in the parted commands shown above? Thanks!
Thanks!
GNU Parted 3.1
This version don’t have resizepart command!!
@Henry,
Thanks for updating us, but whats the alternative command to resizepart in GNU Parted 3.1?
resizepart not working in 2.1 edition. why it so?
Version 2.1 is an older one and the option in there is called “resize”. See below:
$ parted -v
parted (GNU parted) 2.1
$ parted -h | grep resize
resize NUMBER START END resize partition NUMBER and its file
It’s always a good practice to check command’s manual and help list and look for additional options you may need.
resize and resizepart aren’t included in the RHEL/CentOS versions of parted, for whatever reason.
For RHEL, resize function was added in version 3.1-29
* Thu Aug 10 2017 Brian C. Lane – 3.1-29
– Add support for NVMe devices
Resolves: rhbz#1316239
– Backport partition resize command
Resolves: rhbz#1423357
Hey
I tried to resize my primary partition and it worked, the only problem i run into now is that linux thinks the whole partition is full but I know it’s all free space… How can I allocate this free space on my HD into the primary partition and use it as free space?
Hello Ino,
Do you mean that the new partition is showed as allocated? If the whole partition is free, did you try to format it? Alternatively, you may try to run resize2fs on the partition you are resizing and see if this resolves the issue for you.
Hi,
Very nice article
Thanks a lot
Useful list of parted functions. Resizing, particularly, needed when os has been updated repeatedly. Thanks