In order for system administrator to identify or troubleshoot a problem on a CentOS 7 or RHEL 7 server system, it must know and view the events that happened on the system in a specific period of time from log files stored in the system in the /var/log directory.
The syslog server on a Linux machine can act a central monitoring point over a network where all servers, network devices, routers, switches and most of their internal services that generate logs, whether related to specific internal issue or just informative messages can send their logs.
On a CentOS/RHEL 7 system, Rsyslog daemon is the main log server preinstalled, followed by Systemd Journal Daemon (journald).
Rsyslog server in build as a client/server architecture service and can achieve both roles simultaneous. It can run as a server and collect all logs transmitted by other devices in the network or it can run as a client by sending all internal system events logged to a remote endpoint syslog server.
When rsyslog is configured as a client, the logs can be stored locally in files on the local filesystem or can be send remotely rather than write them in files stored on the machine or write events log files locally and send them to a remote syslog server at the same time.
Syslog server operates any log message using the following scheme:
type (facility).priority (severity) destination(where to send the log)
A. The facility or type data is represented by the internal system processes that generates the messages. In Linux internal processes (facilities) that generate logs are standardized as follows:
- auth = messages generated by authentication processes (login).
- cron= messages generated by scheduled processes (crontab).
- daemon = messages generated by daemons (internal services).
- kernel = messages generated by the Linux Kernel itself.
- mail = messages generated by a mail server.
- syslog = messages generated by the rsyslog daemon itself.
- lpr = messages generated by local printers or a print server.
- local0 – local7 = custom messages defined by an administrator (local7 is usually assigned for Cisco or Windows).
B. The priority (severity) levels are standardized also. Each priority is assigned with a standard abbreviation and a number as described below. The 7th priority is the higher level of all.
- emerg = Emergency – 0
- alert = Alerts – 1
- err = Errors – 3
- warn = Warnings – 4
- notice = Notification – 5
- info = Information – 6
- debug = Debugging – 7
Special Rsyslog keywords:
- * = all facilities or priorities
- none = the facilities have no given priorities Eg: mail.none
C. The third part for the syslog schema is represented by the destination directive. Rsyslog daemon can send log messages to be written in a file on the local filesystem (mostly in a file in /var/log/ directory) or to be piped to another local process or to be send to a local user console (to stdout), or send the message to a remote syslog server via TCP/UDP protocol, or even discard the message to /dev/null.
In order to Configure CentOS/RHEL 7 as a central Log Server, first we need to check and ensure that the /var partition where all log file are recorded is large enough (a few GB minimum) in order to be able to store all the log files that will be sent by other devices. It’s a good decision to use a separate drive (LVM, RAID) to mount the /var/log/ directory.
Requirements
How to Configure Rsyslog in CentOS/RHEL 7 Server
1. By default, Rsyslog service is automatically installed and should be running in CentOS/RHEL 7. In order to check if the daemon is started in the system, issue the following command with root privileges.
# systemctl status rsyslog.service

If the service is not running by default, execute the below command in order to start rsyslog daemon.
# systemctl start rsyslog.service
2. If the rsyslog package is not installed on the system that you intend to use as a centralized logging server, issue the following command to install the rsyslog package.
# yum install rsyslog
3. The first step that we need to do on the system in order to configure rsyslog daemon as a centralized log server, so it can receive log messages for external clients, is to open and edit, using your favorite text editor, the main configuration file from /etc/rsyslog.conf, as presented in the below excerpt.
# vi /etc/rsyslog.conf
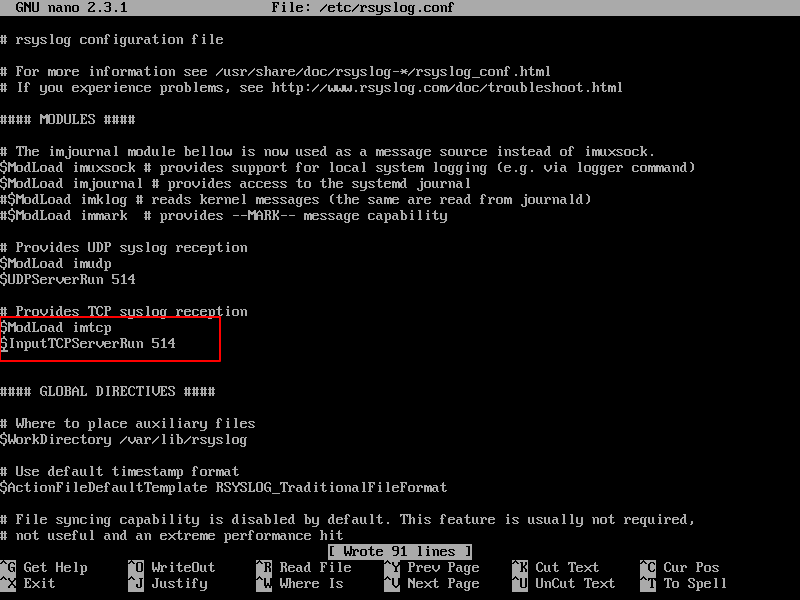
In the rsyslog main configuration file, search and uncomment the following lines (remove the hashtag # sign at the line beginning) in order to provide UDP transport reception to Rsyslog server via 514 port. UDP is the standard protocol used for log transmission by Rsyslog.
$ModLoad imudp
$UDPServerRun 514
4. UDP protocol does not have the TCP overhead, which make it faster for transmitting data than TCP protocol. On the other hand, UDP protocol does not assure reliability of transmitted data.
However, if you need to use TCP protocol for log reception you must search and uncomment the following lines from /etc/rsyslog.conf file in order to configure Rsyslog daemon to bind and listen a TCP socket on 514 port. TCP and UDP listening sockets for reception can be configured on a Rsyslog server simultaneously.
$ModLoad imtcp
$InputTCPServerRun 514
5. On the next step, don’t close the file yet, create a new template that will be used for receiving remote messages. This template will instruct the local Rsyslog server where to save the received messages send by syslog network clients. The template must be added before the beginning of the GLOBAL DIRECTIVES block as illustrated in the below excerpt.
$template RemoteLogs,"/var/log/%HOSTNAME%/%PROGRAMNAME%.log"
. ?RemoteLogs & ~
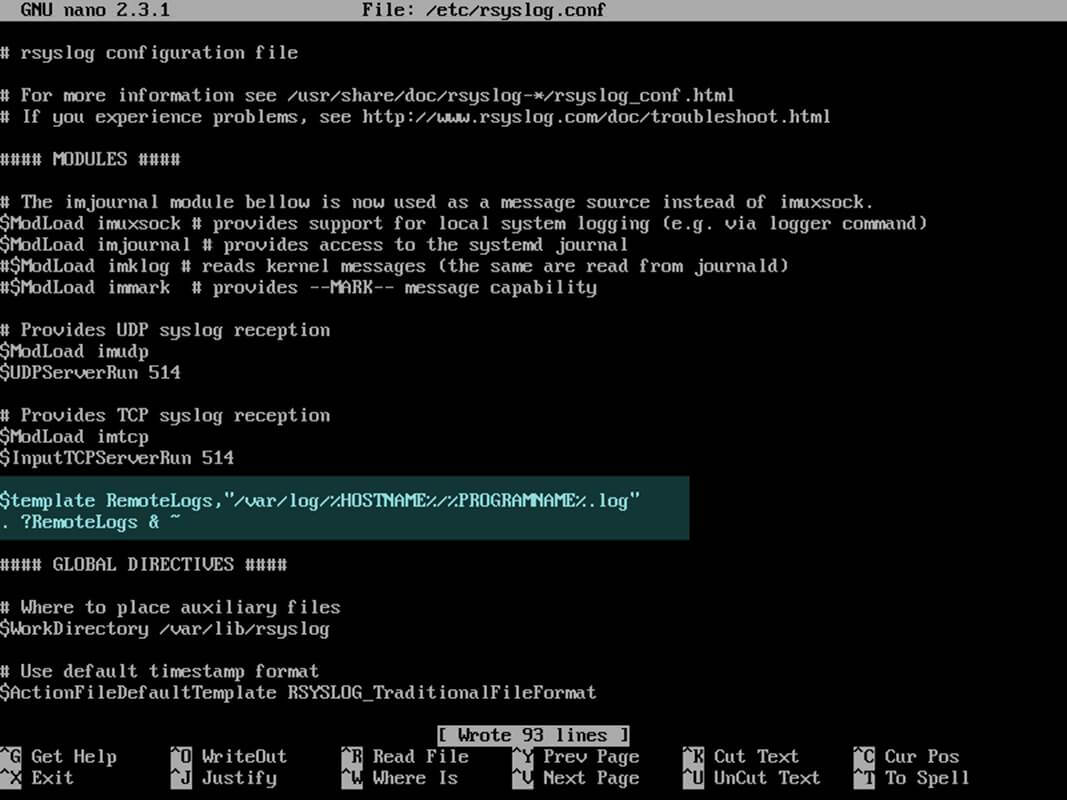
The above $template RemoteLogs directive instructs Rsyslog daemon to collect and write all of the received log messages to distinct files, based on the client machine name and remote client facility (application) that generated the messages based on the defined properties presents in the template configuration: %HOSTNAME% and %PROGRAMNAME%.
All these log files will be written to local filesystem to a dedicated file named after client machine’s hostname and stored in /var/log/ directory.
The & ~ redirect rule instructs the local Rsyslog server to stop processing the received log message further and discard the messages (not write them to internal log files).
The RemoteLogs name is an arbitrary name given to this template directive. You can use whatever name you can find best suited for your template.
In order to write all received messages from clients in a single log file named after the IP Address of the remote client, without filtering the facility that generated the message, use the below excerpt.
$template FromIp,"/var/log/%FROMHOST-IP%.log"
. ?FromIp & ~
Another example of a template where all messages with auth facility flag will be logged to a template named “TmplAuth“.
$template TmplAuth, "/var/log/%HOSTNAME%/%PROGRAMNAME%.log"
authpriv.*   ?TmplAuth
Below is an excerpt form a template definition from Rsyslog 7 server:
template(name="TmplMsg" type="string"
         string="/var/log/remote/msg/%HOSTNAME%/%PROGRAMNAME:::secpath-replace%.log"
        )
The above template excerpt can also be written as:
template(name="TmplMsg" type="list") {
    constant(value="/var/log/remote/msg/")
    property(name="hostname")
    constant(value="/")
    property(name="programname" SecurePath="replace")
    constant(value=".log")
    }
To write complex Rsyslog templates, read the Rsyslog configuration file manual by issuing man rsyslog.conf command or consult Rsyslog online documentation.
6. After you’ve edited the Rsyslog configuration file with your own settings as explained above, restart the Rsyslog daemon in order to apply changes by issuing the following command:
# service rsyslog restart
7. By now, Rsyslog server should be configured to act a centralized log server and record messages from syslog clients. To verify Rsyslog network sockets, run netstat command with root privileges and use grep to filter rsyslog string.
# netstat -tulpn | grep rsyslog

8. If you have SELinux enabled in CentOS/RHEL 7, issue the following command to configure SELinux to allow rsyslog traffic depending on network socket type.
# semanage -a -t syslogd_port_t -p udp 514
# semanage -a -t syslogd_port_t -p tcp 514
9. If the firewall is enabled and active, run the below command in order to add the necessary rules for opening rsyslog ports in Firewalld.
# firewall-cmd --permanent --add-port=514/tcp
# firewall-cmd --permanent --add-port=514/udp
# firewall-cmd –reload
That’s all! Rsyslog is now configured in server mode and can centralize logs from remote clients. In next article, we will see how to configure Rsyslog client on CentOS/RHEL 7 server.
Using Rsyslog server as a central monitoring point for remote log messages you can inspect log files and observe the clients health status or debug client’s issues more easily when systems crash or are under some kind of attack.


This article falls flat because it lacks any test procedure. How can the administrator run some command-line program to generate a Syslog message and show that it was received by rsyslogd? What can go wrong, and how does one diagnose the problem?
You could test that it works by configuring a device on your network to send its logs to the newly configured Syslog server. Lots of things can go wrong, misconfiguration, firewall, a bug in the software, bad routing between the sending and receiving devices, corrupted packet, etc. and any trouble-shooting would be based on the problem being presented. I think that much information would be best suited for a separate article.
Is there a difference in the configuration file between ipv6 and ipv4?
It only works for me in Ipv4.
Very useful article, short and simple to understand.
thanks!!
Has anyone created a logging server on CentOS 8 yet? The rsyslog.conf file is very different. Thanks
@Gator,
The same instructions provided here for CentOS 7, works with CentOS 8 as well. Give a try and see, if you face any issues do ask your query here.
@Gator,
As per your request, I have created an article on setting up Centralized Log Server with Rsyslog in CentOS/RHEL 8 – https://www.tecmint.com/create-centralized-log-server-with-rsyslog-in-centos-8/
how to creat a folder in syslog where all log are come
In step 8, your semanage command is incorrect as of RHEL/CentOS 7.4. The correct command is: semanage port -a -t syslog_port_t -p udp 514. You are missing the first “port” option.
Also, if you are using a basic install of RHEL/CentOS, you need to install semanage with: yum install policycoreutils-python.
If I set up rsyslog server how can I set it up so that only certain clients can send log messages to it?
Setup a firewall to allow only the addresses or address range to send logging messages on that port.
I have added below in my /etc/rsyslog.conf :
But after restarting rsyslog service status is showing below error :
invalid character in selector line – ‘;template’ expected [v8.24.0-34.el7]
error during parsing file /etc/rsyslog.conf, on or before line 23: errors occu…2207 ]
Great tutorial thanks.
awesome blog
You referenced TCP twice in your firewall statement. One of those should be UDP.
@Rob,
Thanks for pointing out that error, corrected in the writeup..
rsyslog syntax has changed somewhat since this article was written. The
"~"character has been deprecated in favor of STOP.The rsyslog developers also recommend a statement like the one below on the client to forward records.
*.* action (type="omfwd" target="192.0.2.2" port="514" protocol="tcp"
                   action.resumeRetryCount="100"
                   queue.type="linedList" queue.size="10000)
The problem is inertial, and many of the deprecated methods are listed on websites. There doesn’t appear to be a single good website with the new methods listed.
It seems in v8.33.1 there are some changes:
When I restart Syslog server I got:
Shutting down system logger: [ OK ]
Starting system logger: rsyslogd: error during config processing: STOP is followed by unreachable statements! [v8.33.1 try http://www.rsyslog.com/e/2207 ]
[ OK ]
Hi, I tried your directives but they just caused an error. Any ideas?
rsyslogd: version 8.4.2, config validation run (level 1), master config /etc/rsyslog.conf
rsyslogd: invalid character in selector line – ‘;template’ expected
rsyslogd: error during parsing file /etc/rsyslog.conf, on or before line 13: errors occured in file ‘/etc/rsyslog.conf’ around line 13 [try http://www.rsyslog.com/e/2207 ]
/etc/rsyslod.conf
$ModLoad imsolaris # for Solaris kernel logging
$ModLoad imtcp
$InputTCPServerRun 514
$ModLoad imudp.so # provides UDP syslog reception
$UDPServerRun 514 # start a UDP syslog server at standard port 514
$UDPServerAddress * # listen to all IP addresses
$template RemoteLogs,”/var/log/%HOSTNAME%/%PROGRAMNAME%.log”
. ?RemoteLogs & ~
$WorkDirectory /var/spool/rsyslog # where to place spool files
$template FromIp,”/var/log/%FROMHOST-IP%.log”
. ?FromIp & ~
The last two lines of rsyslog should be as shown in the below excerpt:
Thanks for reply..
Changed to read:
&stop
The point 5 code lines should shoud have the following conetent:
$template RemoteLogs,”/var/log/%HOSTNAME%/%PROGRAMNAME%.log”
*.* ?RemoteLogs
&~
and the next template:
$template FromIp,”/var/log/%FROMHOST-IP%.log”
*.* ?FromIp
&~
Hellow Matei:
netstat’s deprecation <– in Centos 7 from minimal Install
Apparently in CentOS 7 netstat, which is part of the package net-tools has been officially deprecated, so you should be using ss (part of the package iproute2), going forward.
# ss -tulpn | grep rsyslog udp UNCONN 0 0 *:514 *:* users:(("rsyslogd",pid=10339,fd=3)) udp UNCONN 0 0 :::514 :::* users:(("rsyslogd",pid=10339,fd=4)) tcp LISTEN 0 25 *:514 *:* users:(("rsyslogd",pid=10339,fd=5)) tcp LISTEN 0 25 :::514 :::* users:(("rsyslogd",pid=10339,fd=6))Bye
There is a little typo on Step 1, probably resulted of copy-paste.
The command to start rsyslog is # systemctl START rsyslog.service instead of STATUS.
@Mauro,
Thanks for pointing out that typo, yes it should be START, corrected in the article..:)