In the previous two guides, we’ve discussed how to install cluster, creating a cluster and adding nodes to the cluster, also we’ve studied how cluster.conf appears to be after the necessary configurations are done.
Today, in this third part of clustering series, we are going to discuss about what is fencing, failover and how to configure them in our setup.

First of all let’s see what is meant by Fencing and Failover.
What is Fencing?
If we think of a setup with more than one nodes, it is possible that one or more nodes can be failed at some point of time. So in this case fencing is isolating the malfunctioning server from the cluster in order to protect and secure the synced resources. Therefore we can add a fence to protect the resources shared within the cluster.
What is Failover?
Imagine a scenario, where a server has important data for an organization which the stakeholders need the organization to keep the server up and running without any down time experienced. In this case we can duplicate the data to another server (now there are two servers with identical data and specs) which we can use as the fail-over.
By any chance, one of the servers goes down, the other server which we have configured as the fail-over will take over the load and provides the services which were given by the first server. In this method, users will not be experienced the down time period which was caused to the primary server.
You can go through the Part 01 and Part 02 of this clustering series here:
- What is Clustering and Advantages/Disadvantages – Part 1
- Setup Cluster with Two Nodes in Linux – Part 2
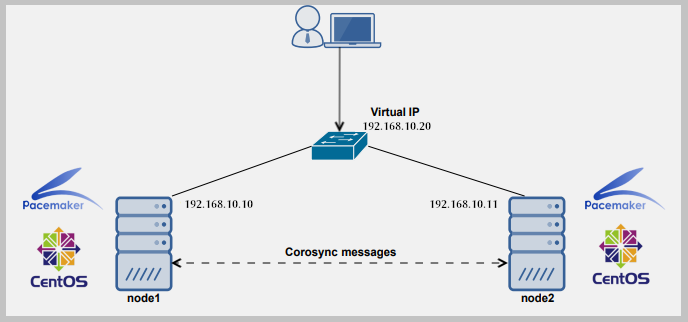
As we’ve already discussed about our testing environment setup in last two articles, that we’re using three servers for this setup, the first server act as a Cluster server and other two as nodes.
Cluster Server: 172.16.1.250
Hostname: clserver.test.net

node01: 172.16.1.222
Hostname: nd01server.test.net

node02: 172.16.1.223
Hostname: nd02server.test.net
Step 1: How to Add Fencing to Cluster Server
1. First we have to enable fencing on the cluster server, for this I will use below two commands.
# ccs -h 172.16.1.250 --setfencedaemon post_fail_delay=0
# ccs -h 172.16.1.250 --setfencedaemon post_join_delay=10

As you can see we use ccs command to add the configurations to cluster. Following are definitions of the options I have used in the command.
- -h: Cluster host IP address.
- –setfencedaemon: Applies the changes to the fencing daemon.
- post_fail_delay: Time in seconds which the daemon waits before fencing a victim server when a node has been failed.
- post_join_delay: Time in seconds which the daemon waits before fencing victim server when a node has joined the cluster.
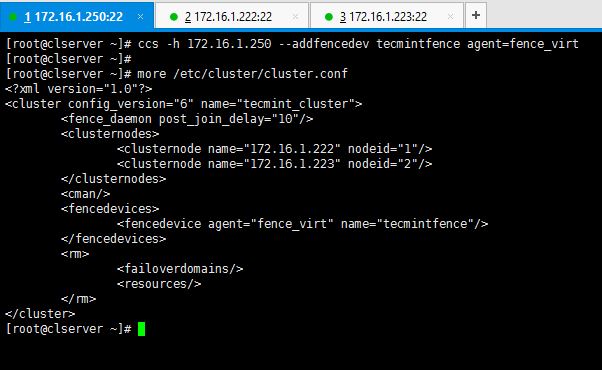
2. Now let’s add a fence device for our cluster, execute below command to add a fence device.
# ccs -h 172.16.1.250 --addfencedev tecmintfence agent=fence_virt
This is how I executed the command and how the cluster.conf file looks like after adding a fence device.
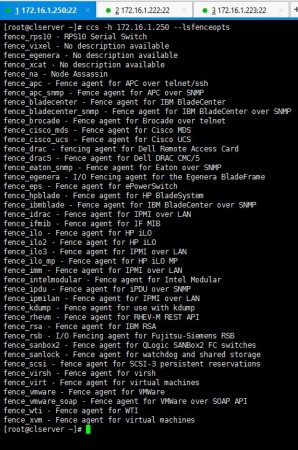
You can execute below command to see what kind of fence options you can use to create a fence device. I used fence_virt since I use VMs for my setup.
# ccs -h 172.16.1.250 --lsfenceopts
Step 2: Add Two Nodes to Fence Device
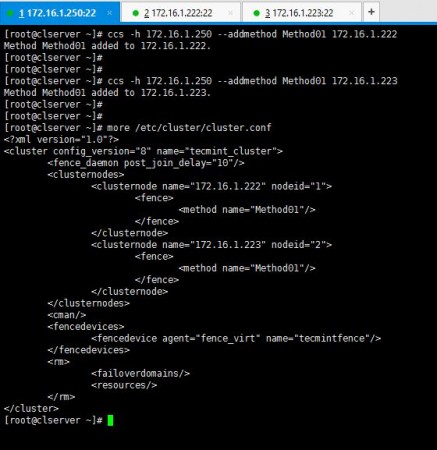
3. Now I’m going to add a method to the created fence device and add hosts in to it.
# ccs -h 172.16.1.250 --addmethod Method01 172.16.1.222
# ccs -h 172.16.1.250 --addmethod Method01 172.16.1.223
You have to add the methods you have created while ago for the both nodes you have in your setup. Following is how I added methods and my cluster.conf.
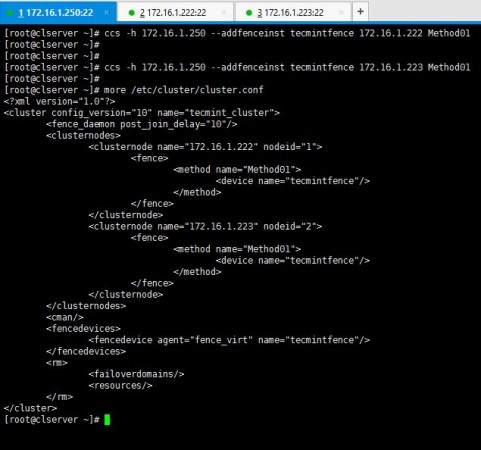
4. As the next step, you will have to add the fence methods you created for the both nodes, to the fence device we created namely “tecmintfence”.
# ccs -h 172.16.1.250 --addfenceinst tecmintfence 172.16.1.222 Method01
# ccs -h 172.16.1.250 --addfenceinst tecmintfence 172.16.1.223 Method01
I have successfully associated my methods with the fence device and this is how my cluster.conf looks like now.
Now you have successfully configured fence device, methods and added your nodes to it. As the last step of part 03, I will now show you how to add a failover to the setup.
Step 3: Add Failover to Cluster Server
5. I use below syntax of commands to create my fail-over to the cluster setup.
# ccs -h 172.16.1.250 --addfailoverdomain tecmintfod ordered
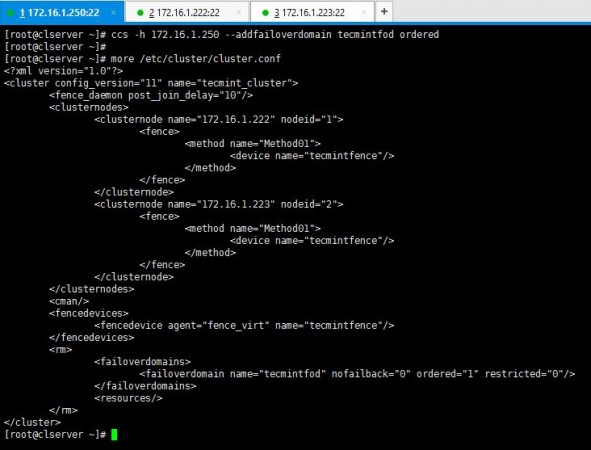
6. As you have created the fail-over domain, now you can add two nodes to it.
# ccs -h 172.16.1.250 --addfailoverdomainnode tecmintfod 172.16.1.222 1
# ccs -h 172.16.1.250 --addfailoverdomainnode tecmintfod 172.16.1.223 2
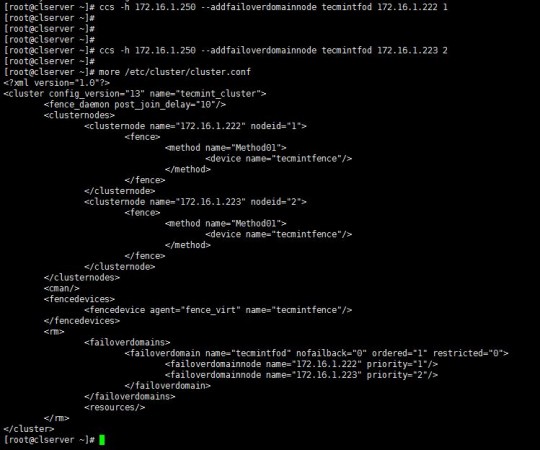
As it is shown above, you can see cluster.conf bears all the configurations I have added for the fail-over domain.
Hope you have enjoyed the Part 3 of this series. Last part of the Clustering guide series will be posted soon which will teach you to add resources to the cluster, sync them and start-up the cluster. Keep in touch with Tecmint for the handy HowTos.

This is the first time i am using Linux cluster so i need your help.
I had setup vcs and sun cluster before, i have a doubt here how to setup up a quorum disk in centos 7. I have a requirement to setup in prod box which is in physical server it will be a 2 node cluster and few shared lun for the data.
I am stuck in the quorum. I cannot see no one mentioning shared disk for quorum ( 500MB normally which we give ) to setup. Hope you understand my requirement and my understanding.
Is the part 4 already available sir?
Hi CHristian,
Here is the link for part – 4
https://www.tecmint.com/sync-cluster-configuration-and-verify-failover-setup-in-nodes/
Do you have the part 4 yet?
Hi Thilina,
Do you have notes for fencing on Centos 7 for 2 Nodes Cluster
Rakesh,
It’s pretty much the same with RedHat. You an use the same guide.
Rakesh,
Currently I don’t. but I will try preparing one for you through tecmint.
Hi ,
CMAN service started fine in Node1 and Node2 but while starting cman at Master server it is getting fail.
saying Node name cannot found.But the tags for both nodes are present .
Has anyone came across such error.
Rakesh,
can you post the error? Did you check that CMS can resolve the node IPs?
Hi Thilina,
Below is the error:
[root@master cluster]# service cman start
Starting cluster:
Checking if cluster has been disabled at boot… [ OK ]
Checking Network Manager… [ OK ]
Global setup… [ OK ]
Loading kernel modules… [ OK ]
Mounting configfs… [ OK ]
Starting cman… Cannot find node name in cluster.conf
Unable to get the configuration
Cannot find node name in cluster.conf
cman_tool: corosync daemon didn’t start Check cluster logs for details
[FAILED]
Stopping cluster:
Leaving fence domain… [ OK ]
Stopping gfs_controld… [ OK ]
Stopping dlm_controld… [ OK ]
Stopping fenced… [ OK ]
Stopping cman… [ OK ]
Unloading kernel modules… [ OK ]
Unmounting configfs… [ OK ]
Server details:
10.91.18.145 master.uic.com – Management node
10.91.18.143 node1.uic.com
10.91.18.144 node2.uic.com
/etc/hosts (10.91.18.145):
127.0.0.1 localhost localhost.localdomain localhost4 localhost4.localdomain4
::1 localhost localhost.localdomain localhost6 localhost6.localdomain6
10.91.18.143 node1.uic.com node1.uic.com
10.91.18.144 node2.uic.com node2.uic.com
10.91.18.145 master.uic.com master.uic.com
cluster.conf (10.91.18.145):
All the nodes (management node i.e. master.uic.com, node1, node2 can ping each other.
Please help.
My cluster.conf(10.91.18.145) is:
Thankyou for this article.
can we use this article to setup cluster in centos 7 ?
Thanks Vinay. Ofcourse you can.
Thankyou so much for your response but using this article we are not able to setup cluster on centos 7 becuase of package difference and there is lots of different in configuration as well.
Vinay, Your question has been raised by another user in Part two. RHEL/CentOS 7 have deprecated the packages I’ve mentioned in the article. But that doesn’t mean you cannot do this in RHEL or CentOS 7.You can use corosync, pacemaker and pcs instead.
Thank you so much, this post gave me a better knowledge about clustering than thousands writing out there. However, I still wondering what fence options you can use to create a fence device if you used real machines for your setup?
And, what is the point of method in fencing? Can you please put more explanation or references resource that I can work to understand them?
Again, thank you so much for your work.
Hi Trung,
Thanx for nice comments. I don’t really understand what you have meant by “real machines”. If I’m correct you’re referring to physical machines other than VMs. If so, it doesn’t really matter it being a VM or a physical machine to set these configurations up. You can use the command “ccs -h –lsfenceopts” to view the fencing options you can use.
You can refer RedHat site for more details on Fencing
https://access.redhat.com/documentation/en-US/Red_Hat_Enterprise_Linux/5/html/Cluster_Suite_Overview/s2-fencing-overview-CSO.html
Hi Thilina,
Fist of all, thanyou very much for this article…it so much helpfull.
i can´t find the Part4 and…can you post the lisnk pls.
Best regards.
PS, sorry for my english.
No worries Ariel. Here it is.
https://www.tecmint.com/sync-cluster-configuration-and-verify-failover-setup-in-nodes/
when the continuation?
Hi Aza,
It’s already there.
https://www.tecmint.com/sync-cluster-configuration-and-verify-failover-setup-in-nodes/
Hi Thilina,
Thanks for providing this valuable document. awaiting for your next post.
Hi Arjun,
You’re welcome. Will let you know when the last part is out.
Hi Arjun,
Part 04 is now available
Hi TecMint,
The concept of clustering had always baffled me. However, this tutorial has cleared up all my doubts.
Thank you for sharing this.
Hi Raj,
You’re mostly welcome.
Hi Mr.Uvindasiri
Thank you very much for your sharing,
I am waiting for your last post for this serie.
I hope you will post it soon.
Thank you again
Good job !
Hi Nguyen,
Part 04 will be posted very soon. Sorry for the delayed posting of the last part. Anyways, thank you for your interest :)
Hi Nguyen,
Part 04 is available now
Thank you so much for all the parts ( Linux clustering with two nodes).I like the way it was explained very systematic step by step. waiting for its last part and final part with resource such as webserver,NFS etc.
Hi Ashish,
Thank you very much. Last part will be posted soon.
Thank you so much my friend for this third part. I have a question: I tried to set a fence virtual device in a virtual environment, but it doesn’t work for me, in some part of my configuration the node doesn’t come back to the cluster after a failure. So i have added a quorum disk, and finally my cluster works ok (the node goes down and after the failure come back to the cluster), so my question is: what is the difference between a fence device and a quorum disk in a virtual environment?
Hi Daniel,
First of all you should know that a quorum disk is more useful in clusters which contains lesser nodes than a multiple node cluster which in case of a node fails. But of course having a quorum disk in any cluster would be great for its well being. In your case, what you have gone through is identified as a “fencing war” in the tech world. What i will do is, I will post a new article about the scenario you have faced in near future. It will answer all your questions and will help to understand more about fencing and quorum disks. Will put a comment here when the article is ready or send me your email and i will inform you. Thanx for your interest and nice comments.
Hi Daniel,
Last part is out now
Hi Danielle. The situation you have experienced is explained in this articel
https://www.tecmint.com/what-is-quorum-disk-and-a-fencing-wars/
Thank you very much for your new post about clustering. I am very much enjoying and waiting for your next post. I would like to request you that if you may have time then please make a series about “Redhat OpenStack”. Actually the world is now moving towards “Cloud Technology” and now we have to learn those cloud technology.
Hi Islam,
Will definitely consider your request. Thanx for the nice comments :)