In this tutorial we will discuss how protect and drastically accelerate the load speed of a WordPress website using W3 Total Cache plugin and CloudFlare CDN networks for free.
In order to accomplish this full setup you’ll will need a bare-metal server, a virtualized machine or a virtual private server running the latest release of CentOS 7, with LAMP (Linux, Apache, MariaDB & PHP) stack deployed and a mail server (Postfix or other) that will allow WordPress to send out comment notifications.
However, the Apache web server must operate with a TLS free Certificate granted by Let’s Encrypt CA and WordPress web blogging framework needs to be installed on top of LAMP with W3 Total Cache plugin.
You will also need to sign-up for a CloudFlare free account. The full requirements and steps for configuring Apache with WordPress + W3 Total Cache + CloudFlare on a CentOS server starting from scratch are as described below.
Get Your WordPress Blog Installed With LAMP + W3CACHE + Cloudflare CDN [$50]
If you don’t want to go through all these complex configurations yourself, I will integrate your WordPress website for faster load time using LAMP (Linux, Apache, MariaDB and PHP) or LEMP (Linux, Nginx, MariaDB and PHP) stack with Postfix, W3 Total Cache, Free SSL Let’s Encrypt and CloudFlare CDN on a VPS Server or on a shared hosting providers with all required DNS and SSL configurations. The service can be completed in a few hours at price of $50 one time fee with 14-day free support. Contact: [email protected]
Requirements:
- A public domain name already registered – In this guide we’ll use www.linuxsharing.com domain as the test domain.
- A CentOS 7 server freshly installed configured with SSH remote access in case of a VPS or direct console access.
- LAMP stack deployed on top of CentOS 7.
- Let’s Encrypt TLS Certificates deployed in Apache web server.
- WordPress fully functional and installed on top of LAMP stack.
- W3 Total Cache plugin installed and enabled in WordPress.
- A CloudFlare Free Account.
In case you have a WordPress website already up and running with SSL Certificates purchased from a Certificate Authority or your website is hosted on a Shared Web Hosting plan provider, then you can skip the first five points mentioned above and continue with the last two requirements, configured with slight modifications depending on the hosting provider.
Step 1: Install and Configure LAMP Stack
1. After you’ve purchased a CentOS 7 VPS or you’ve installed CentOS 7 on your own bare-metal server or into a virtual machine, login to the system directly from console or via SSH service with root privileges and update the system, by issuing the following command.
# yum update
2. Next, setup the hostname of your machine as follows. Replace the hostname variable to match your own requirements. You may also need to reboot your sever to apply the new hostname accordingly.
# hostnamectl set-hostname server.yourdomain.com

3. Enable EPEL repository in CentOS 7 and fire-up this long command in order to fully install LAMP stack (Apache, PHP, MariaDB) in your system in one shot.
# yum install httpd mod_ssl mariadb mariadb-server php php-common php-mysql php-gd php-xml php-mbstring php-mcrypt

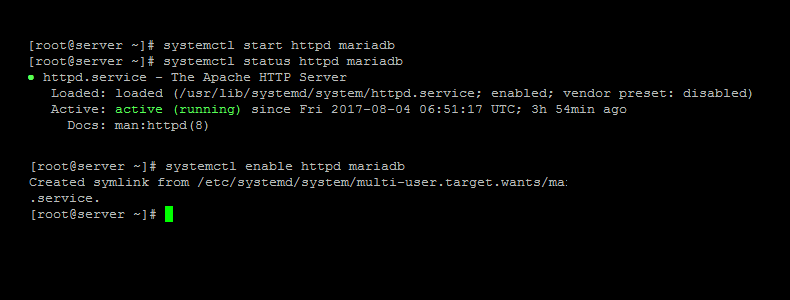
4. After LAMP stack has been installed on your machine, start Apache web server and MariaDB database, check if the services are running and make sure the daemons are enabled system-wide.
# systemctl start httpd mariadb
# systemctl status httpd mariadb
# systemctl enable httpd mariadb
5. Also, verify if Apache and MariaDB opened ports are in listening state by issuing the netstat command.
# netstat -tlp | egrep 'http|mysql'

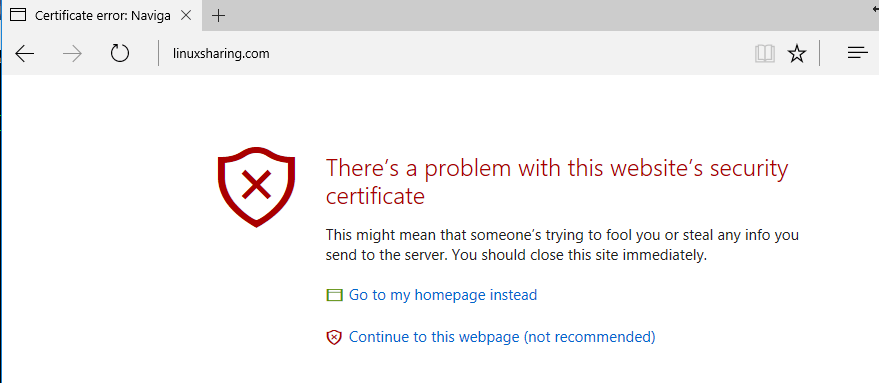
6. As final checks, open a browser and make sure your domain name is visible from internet via HTTP and HTTPS protocols.
In case of TLS protocol the browser will display a certificate error due to the fact that Apache TLS default configuration file ships with Self-Signed Certificates.
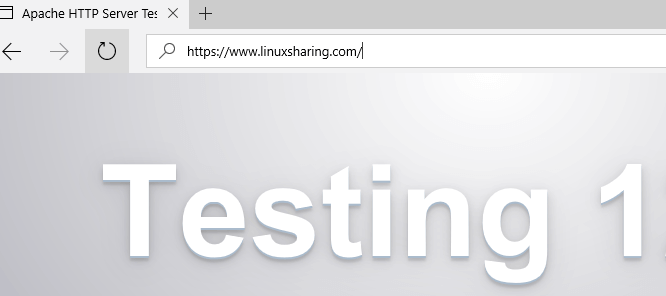
Just accept the TLS error in the browser to continue and a default web page provided by CentOS Apache package will be displayed as illustrated in the below screenshots.
http://www.yourdomain.com
https://www.yourdomain.com
7. In case the domain cannot be reached from internet you should first verify the firewall rules in the system and, then, issue the below commands to open all required ports needed to expose the HTTP and HTTPS service to outside traffic.
# firewall-cmd --add-service=http
# firewall-cmd --add-service=https
# firewall-cmd --runtime-to-permanent
8. On the next step, run the following command in order to secure MariaDB database. The following excerpt illustrates how to secure the database. Mainly, respond with yes on all questions asked by the script.
# mysql_secure_installation
NOTE: RUNNING ALL PARTS OF THIS SCRIPT IS RECOMMENDED FOR ALL MariaDB
      SERVERS IN PRODUCTION USE!  PLEASE READ EACH STEP CAREFULLY!

In order to log into MariaDB to secure it, we'll need the current
password for the root user.  If you've just installed MariaDB, and
you haven't set the root password yet, the password will be blank,
so you should just press enter here.

Enter current password for root (enter for none):
OK, successfully used password, moving on...

Setting the root password ensures that nobody can log into the MariaDB
root user without the proper authorisation.
Set root password? [Y/n] y
New password:
Re-enter new password:
Password updated successfully!
Reloading privilege tables..
 ... Success!
By default, a MariaDB installation has an anonymous user, allowing anyone
to log into MariaDB without having to have a user account created for
them.  This is intended only for testing, and to make the installation
go a bit smoother.  You should remove them before moving into a
production environment.
Remove anonymous users? [Y/n] y
 ... Success!
Normally, root should only be allowed to connect from 'localhost'.  This
ensures that someone cannot guess at the root password from the network.
Disallow root login remotely? [Y/n] y
 ... Success!
By default, MariaDB comes with a database named 'test' that anyone can
access.  This is also intended only for testing, and should be removed
before moving into a production environment.
Remove test database and access to it? [Y/n] y
 - Dropping test database...
 ... Success!
 - Removing privileges on test database...
 ... Success!
Reloading the privilege tables will ensure that all changes made so far
will take effect immediately.
Reload privilege tables now? [Y/n] y
 ... Success!
Cleaning up...
All done!  If you've completed all of the above steps, your MariaDB
installation should now be secure.
Thanks for using MariaDB!
Step 2: Install and Configure Let’s Encrypt
9. Next, replace Apache Self-Signed certificate with a public TLS certificate offered for free by SSL Labs through Let’s Encrypt service. Install Python Let’s Encrypt utility for Apache in your system, through which you will automate the process of generating and obtaining a certificate for your domain, by issuing the following command.
# yum install python-certbot-apache
10. Before starting to obtain a Let’s Encrypt TLS certificate, run the following command to get Apache default web root for your domain.
# grep DocumentRoot /etc/httpd/conf.d/ssl.conf

This path represents the a directory where all your website files will be physically hosted. If you haven’t changed anything in Apache configuration file, by default, the DocumentRoot path should point to /var/www/html/ directory.
This is important because Let’s Encrypt will use this directory as webroot path to process domain verification by creating a hidden directory with the name .well-known/acme-challenge/. This directory will be automatically created by Let’s Encrypt utility.
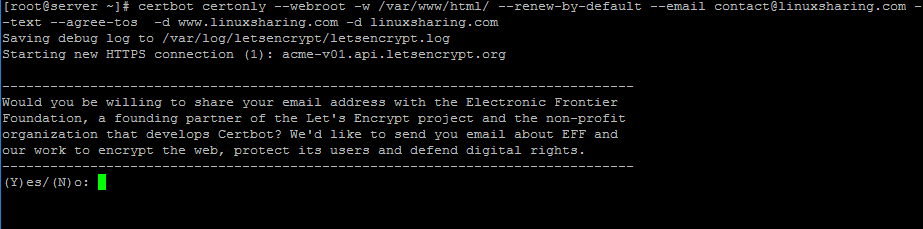
11. Next, generate Let’s Encrypt certificates by issuing certbot command against the name of your domain. Add your www and non-www domain using the -d flag and specify the server web root path by appending the --webroot -w options as illustrated in the below example.
# certbot certonly --webroot -w /var/www/html/ --renew-by-default --email [email protected] --text --agree-tos -d www.yourdomain.com -d yourdomain.com
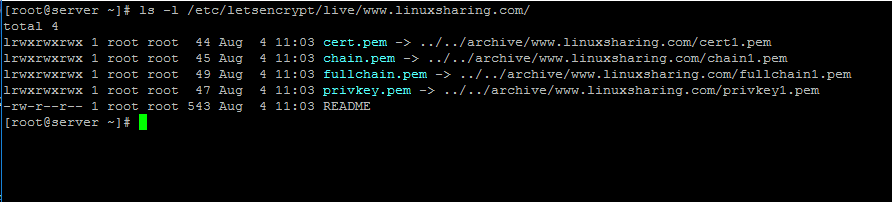
12. Let’s Encrypt certificates and keys are located in the following system path: /etc/letsencrypt/live/www.yourdomain.com/ . Use ls command to display a list of all generated certificates in order to get their names.
# ls /etc/letsencrypt/live/www.yourdomain.com/
13. In order to automatically update Let’s Encrypt certificates before they expire, schedule a cron job to run every Sunday as described below.
# crontab -e
Add the following line at the bottom of the file.
0 0 * * 0 /usr/bin/certbot renew >> /var/log/certbot-renew.log
In case of any issues with obtaining the certificates inspect the content of /var/log/certbot-renew.log file in order to debug the problem.
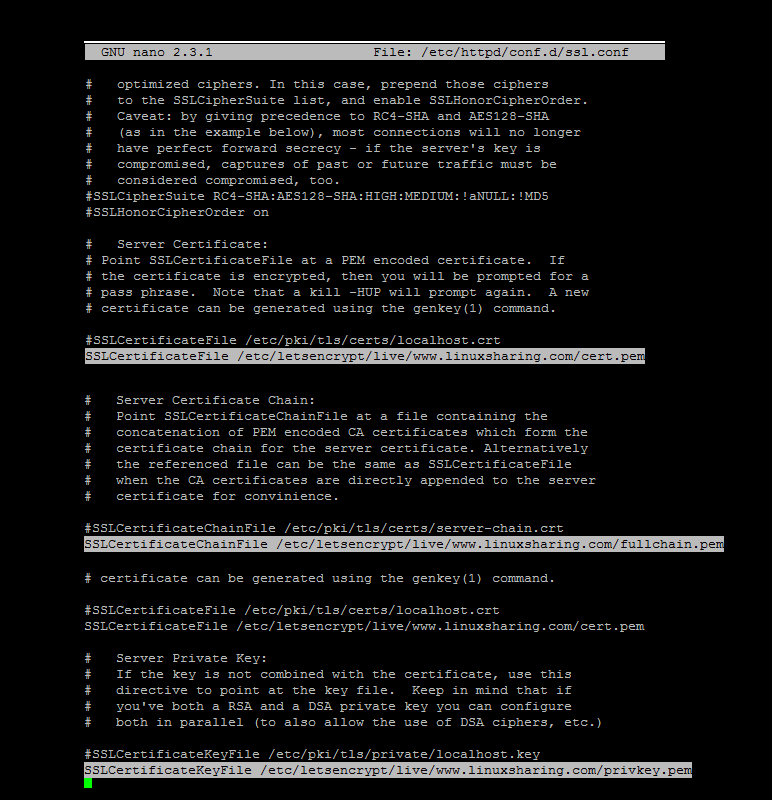
14. Next, you need to update Apache TLS configuration file and add the proper certificates obtained for free from Let’s Encrypt. Open /etc/httpd/conf.d/ssl.conf file, locate and change the following lines and make sure they point to Let’s Encrypt certificates as presented in the below example.
SSLCertificateFile /etc/letsencrypt/live/www.yourdomain.com/cert.pem
SSLCertificateKeyFile /etc/letsencrypt/live/www.yourdomain.com/privkey.pem
SSLCertificateChainFile /etc/letsencrypt/live/www.yourdomain.com/fullchain.pem
15. Also, add the following lines if they do not exist in the TLS conf file or search and update the following lines if you want to fix some common vulnerabilities found recently in SSL protocol.
SSLProtocol all -SSLv2 -SSLv3
SSLCipherSuite          ECDHE-RSA-AES128-GCM-SHA256:ECDHE-ECDSA-AES128-GCM-SHA256:ECDHE-RSA-AES256-GCM-SHA384:ECDHE-ECDSA-AES256-GCM-SHA384:DHE-RSA-AES128-GCM-SHA256:DHE-DSS-AES128-GCM-SHA256:kEDH+AESGCM:ECDHE-RSA-AES128-SHA256:ECDHE-ECDSA-AES128-SHA256:ECDHE-RSA-AES128-SHA:ECDHE-ECDSA-AES128-SHA:ECDHE-RSA-AES256-SHA384:ECDHE-ECDSA-AES256-SHA384:ECDHE-RSA-AES256-SHA:ECDHE-ECDSA-AES256-SHA:DHE-RSA-AES128-SHA256:DHE-RSA-AES128-SHA:DHE-DSS-AES128-SHA256:DHE-RSA-AES256-SHA256:DHE-DSS-AES256-SHA:DHE-RSA-AES256-SHA:AES128-GCM-SHA256:AES256-GCM-SHA384:AES128-SHA256:AES256-SHA256:AES128-SHA:AES256-SHA:AES:CAMELLIA:DES-CBC3-SHA:!aNULL:!eNULL:!EXPORT:!DES:!RC4:!MD5:!PSK:!aECDH:!EDH-DSS-DES-CBC3-SHA:!EDH-RSA-DES-CBC3-SHA:!KRB5-DES-CBC3-SHA
SSLHonorCipherOrder     on
SSLOptions +StrictRequire

# Disable preloading HSTS in case of issues with CloadFlare
Header always set Strict-Transport-Security "max-age=63072000; includeSubdomains"
Header always set X-Frame-Options DENY
Header always set X-Content-Type-Options nosniff
Be aware that some of the configurations presented here might break compatibility with some old browsers. Use them in production after some preliminary tests had been done.
16. Finally, check if Apache configuration file is properly edited and restart httpd service by issuing the below commands.
# apachectl -t
# systemctl restart httpd

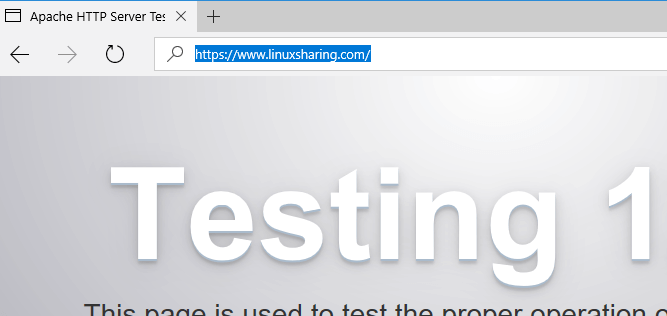
17. Visit your domain from browser via TLS. The secured http page should load by now without displaying an error. That means your web server is ready for installing WordPress via HTTPS protocol.
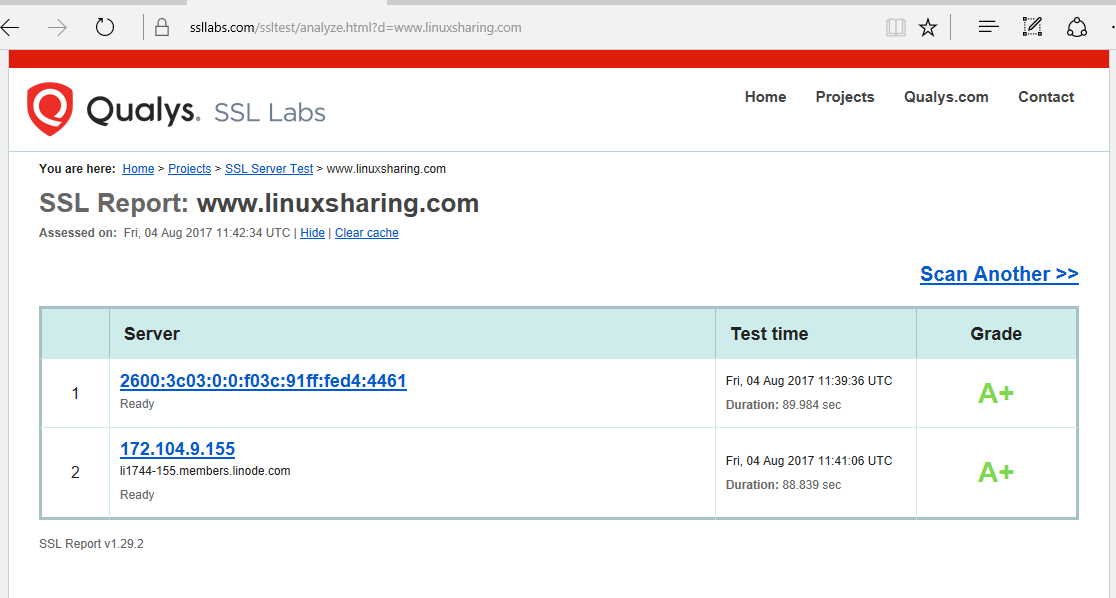
18. You can also conduct a SSL test in order to verify your domain SSL strength and report the domain vulnerabilities. If Apache TLS configuration file has been edited as presented in this tutorial will should obtain at least a class A overall rating grade.
Step 3: Install and Configure WordPress
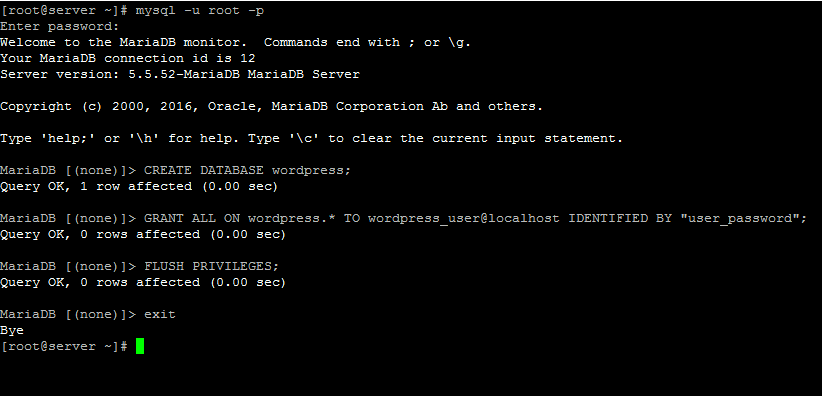
19. Next, login to MariaDB and create a database for WordPress installation alongside with the corresponding user used for installing and managing the database, by issuing the below commands.
# mysql –u root -p
MariaDB [(none)]&gr; CREATE DATABASE wordpress;
MariaDB [(none)]&gr; GRANT ALL ON wordpress.* TO wordpress_user@localhost IDENTIFIED BY "user_password";
MariaDB [(none)]&gr; FLUSH PRIVILEGES;
20. In the next step install wget utility, grab the latest WordPress installation compressed archive and extract it to your webserver webroot by issuing the below commands.
# yum install wget
# wget http://wordpress.org/latest.tar.gz
# tar xfz latest.tar.gz
# cp -rf wordpress/* /var/www/html/
# ls /var/www/html/
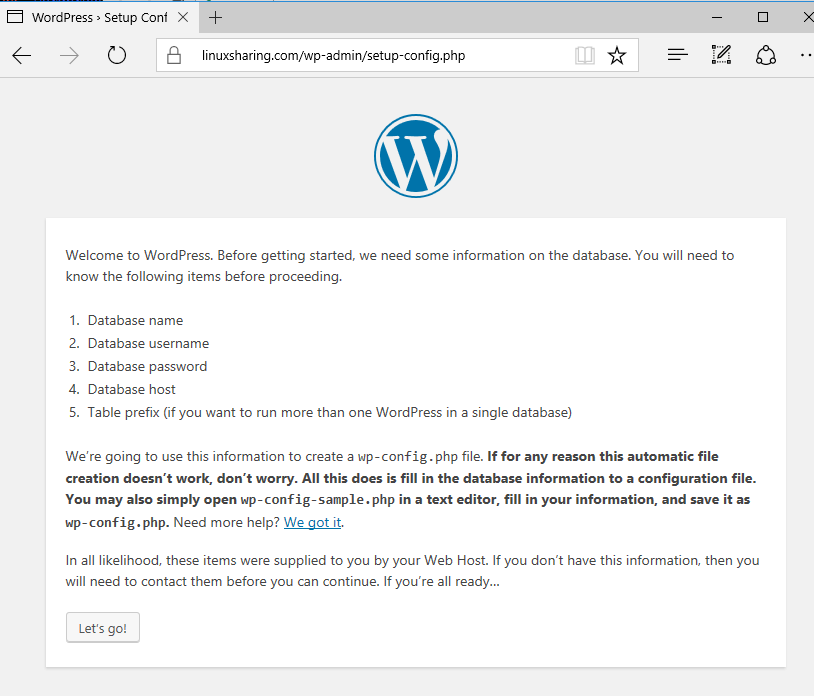
21. To install WordPress, open a browser and navigate to your domain using HTTPS protocol. On the first screen hit on Let’s go button to start the installation.
https://www.yourdomain.com
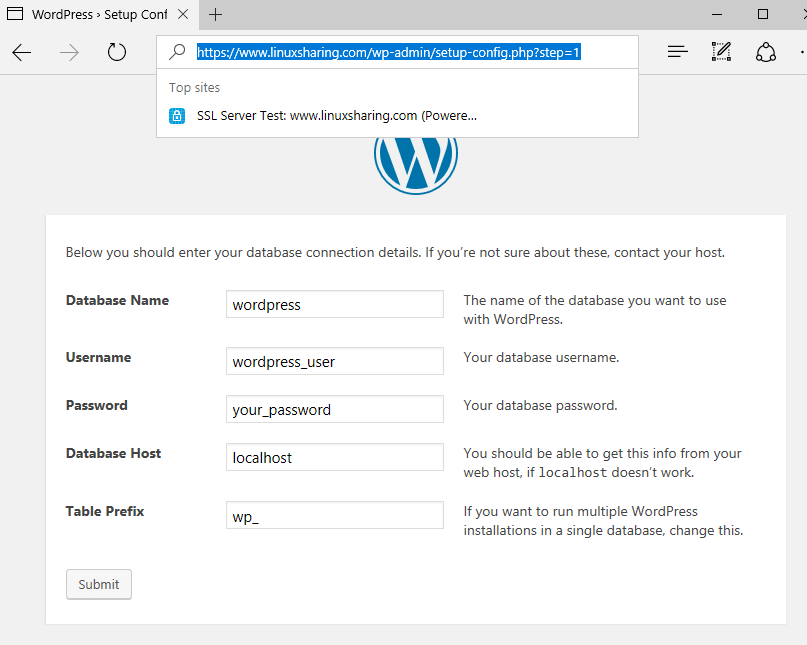
22. Supply the name, credentials and the host of the database created earlier for WordPress and hit Submit to continue.
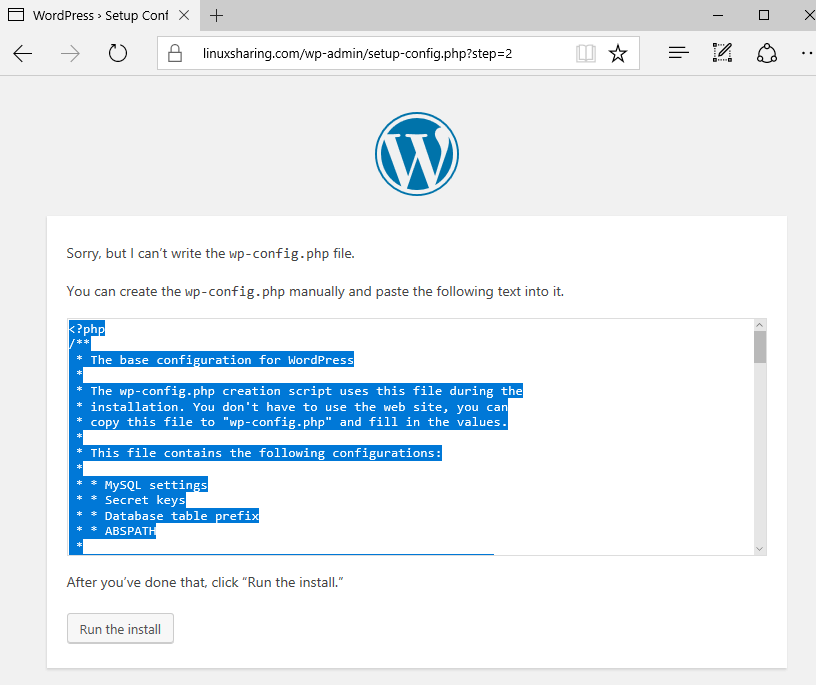
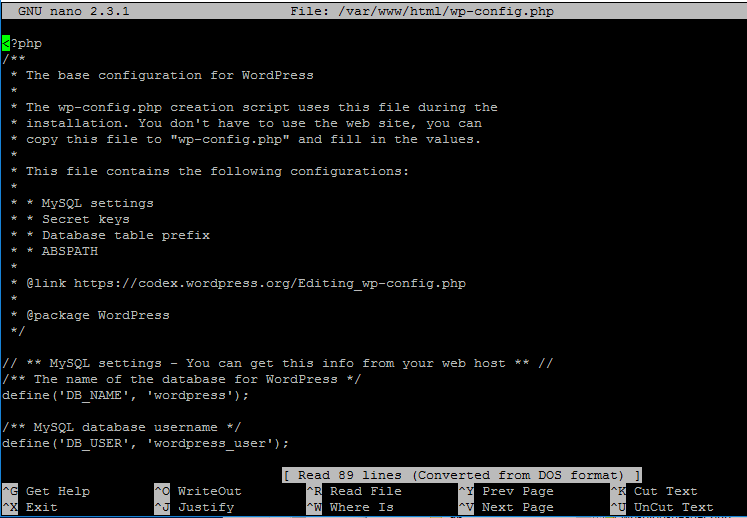
23. Next, copy the content of wp-config.php file from the screen and manually create this configuration file from your server console by entering in command line.
# nano /var/www/html/wp-config.php
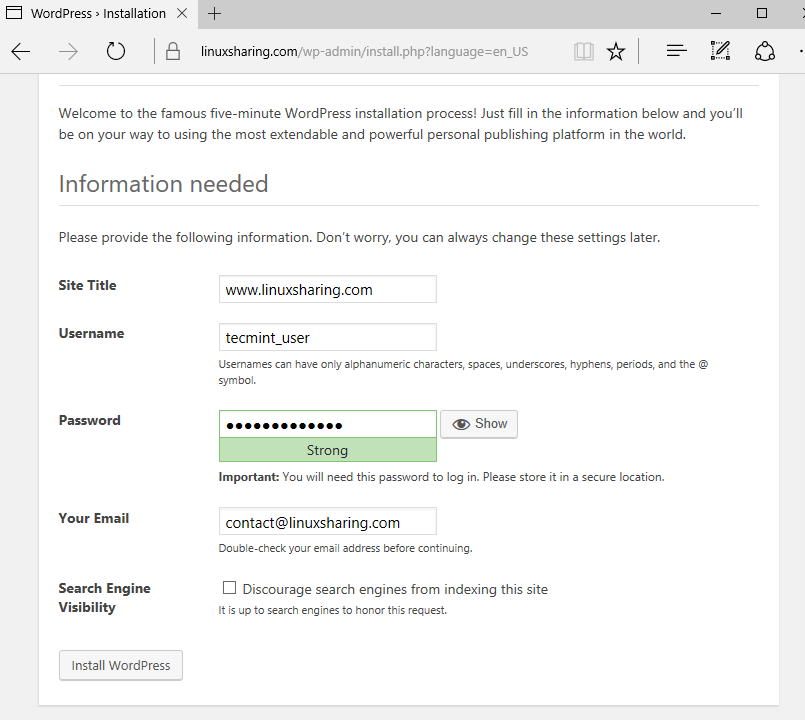
24. Next, go back to browser and supply a website title, the credentials and an email address for your website and hit Install WordPress button to complete the installation process.
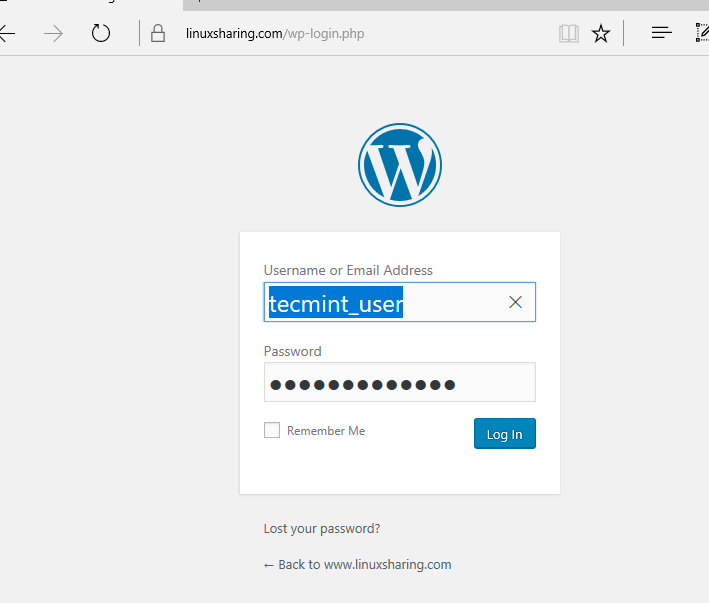
25. Finally, after the installation process finished, login into WordPress dashboard panel to confirm that everything is working properly.
Step 4: Install FTP for WordPress Theme and Plugin Install
26. In order to be able to install WordPress plugins or make other configurations from the web dashboard you need to run a FTP server on your system. From console issue the below commands to install Proftpd package, start and enable the service and add a new user and assign the new FTP user (tecmint_ftp in this case) to apache system group.
# yum install proftpd
# systemctl start proftpd.service
# systemctl enable proftpd.service
# useradd -md /var/www/html tecmint_ftp
# passwd tecmint_ftp
# usermod -aG apache tecmint_ftp
27. Next, assign the following permissions to /var/www/html/wp-content directory. You will grant apache group write permissions to this directory. The tecmint_ftp user will also have write permissions to this directory because it was previously added to apache system group.
# chmod -R 775 /var/www/html/wp-content/
# chown -R root:apache /var/www/html/wp-content/
# ls -l /var/www/html/wp-content/
28. If the firewall is enabled in your system make sure you open required firewall ports for FTP service.
# firewall-cmd --add-service=ftp
# firewall-cmd --runtime-to-permanent
In some cases you should open ephemeral ports also in order to be able to run the passive FTP service properly.
# firewall-cmd --permanent --add-port=1024-65535/tcp
# firewall-cmd --runtime-to-permanent
However, after installing all WordPress plugins your website might require, it’s advisable you stop and disable the FTP service provided by the proftpd daemon in order to increase your server security and reduce attack vectors via this network service.
Important: Be aware that the FTP service runs unencrypted and your credentials will be sent in plain text and can be intercepted by a man in the middle during protocol communication or data transfer.
Step 5: Install W3 Total Cache for WordPress
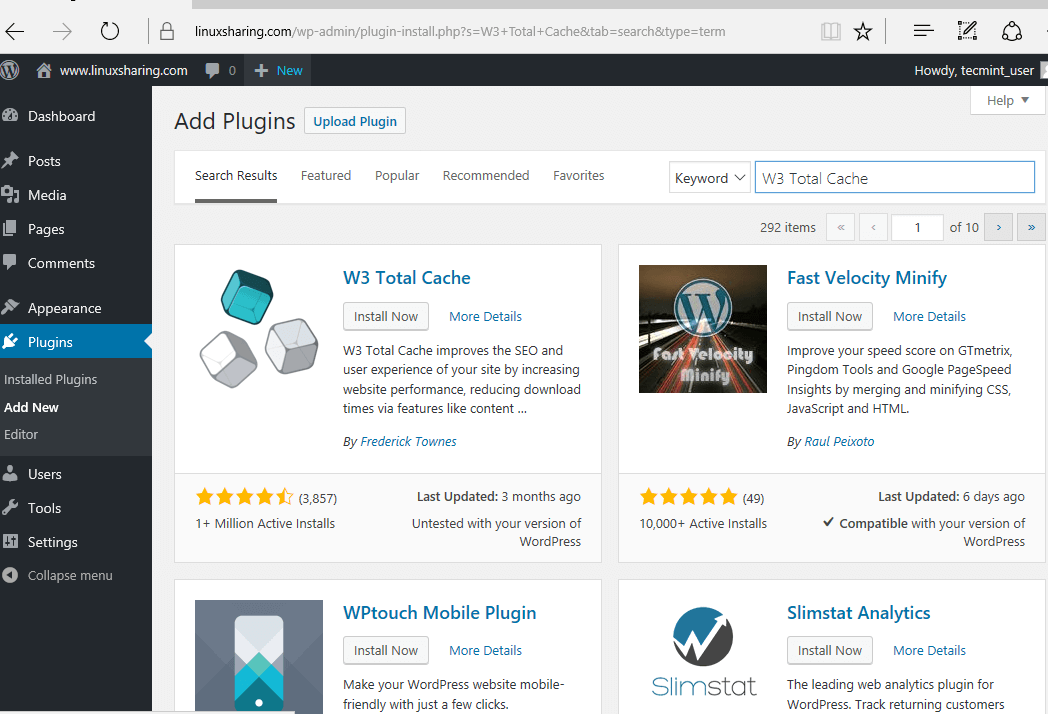
29. Next, install W3 Total Cache. Navigate to WordPess dashboard, hit on Plugins -> Add New and search and install the W3 Total Cache plugin as illustrated in the following image.
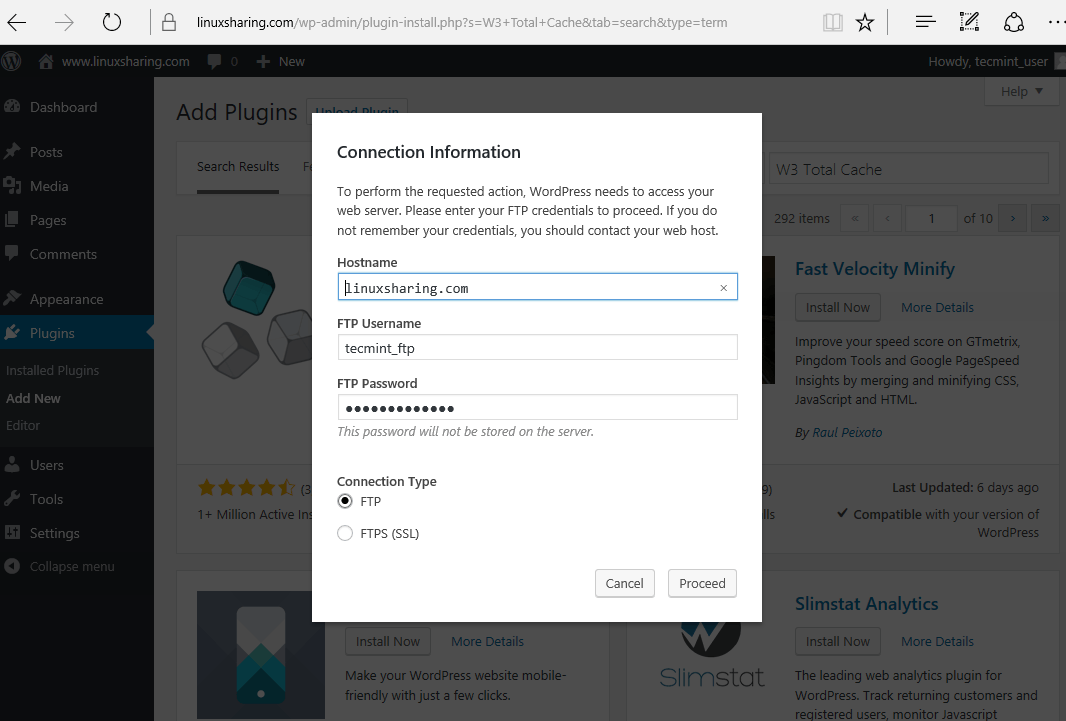
30. While installing, on the pop-up prompt provide your FTP connection information and Proceed with plugin installation.
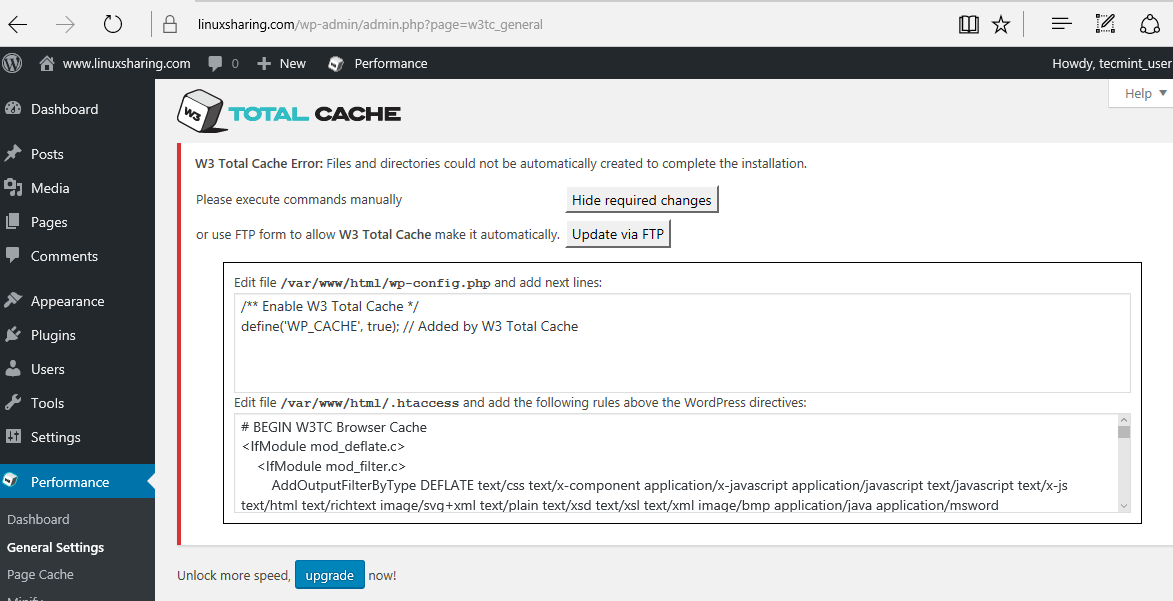
31. Activate W3 Total Cache plugin and assign the following permissions to /var/www/html/ path in order to create the directories and files required by this plugin to function properly. The plugin will be accessed from WordPress dashboard and will write the configuration files via FTP.
# chmod -R 775 /var/www/html/
# chown -R root:apache /var/www/html/
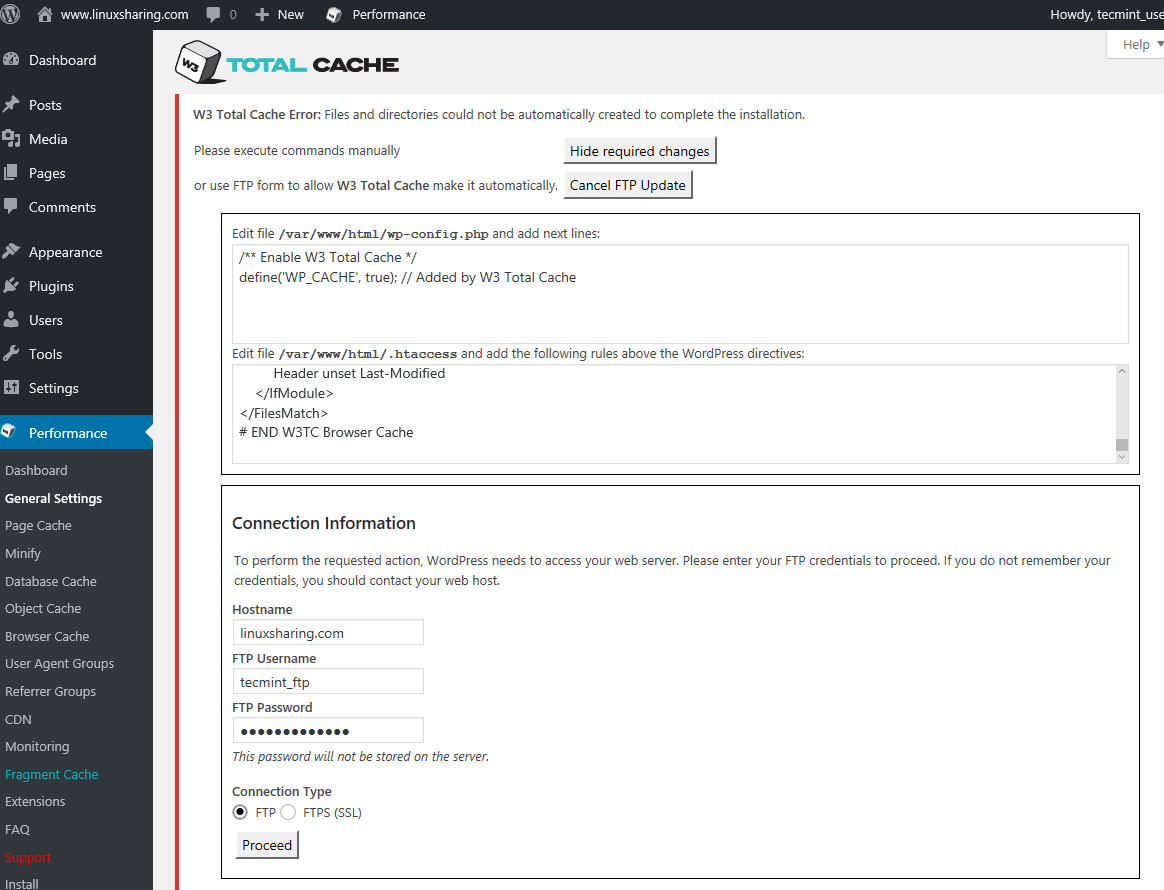
32. Next, hit on update the configuration via FTP, supply your FTP login information and hit on Proceed button to start the updating process.
33. After all required files and directories have been successfully created, go back to your server console and revert permissions by issuing the below commands.
# chmod -R 755 /var/www/html/
# chmod -R 775 /var/www/html/wp-content/
Step 6: Configure W3 Total Cache Plugin for WordPress
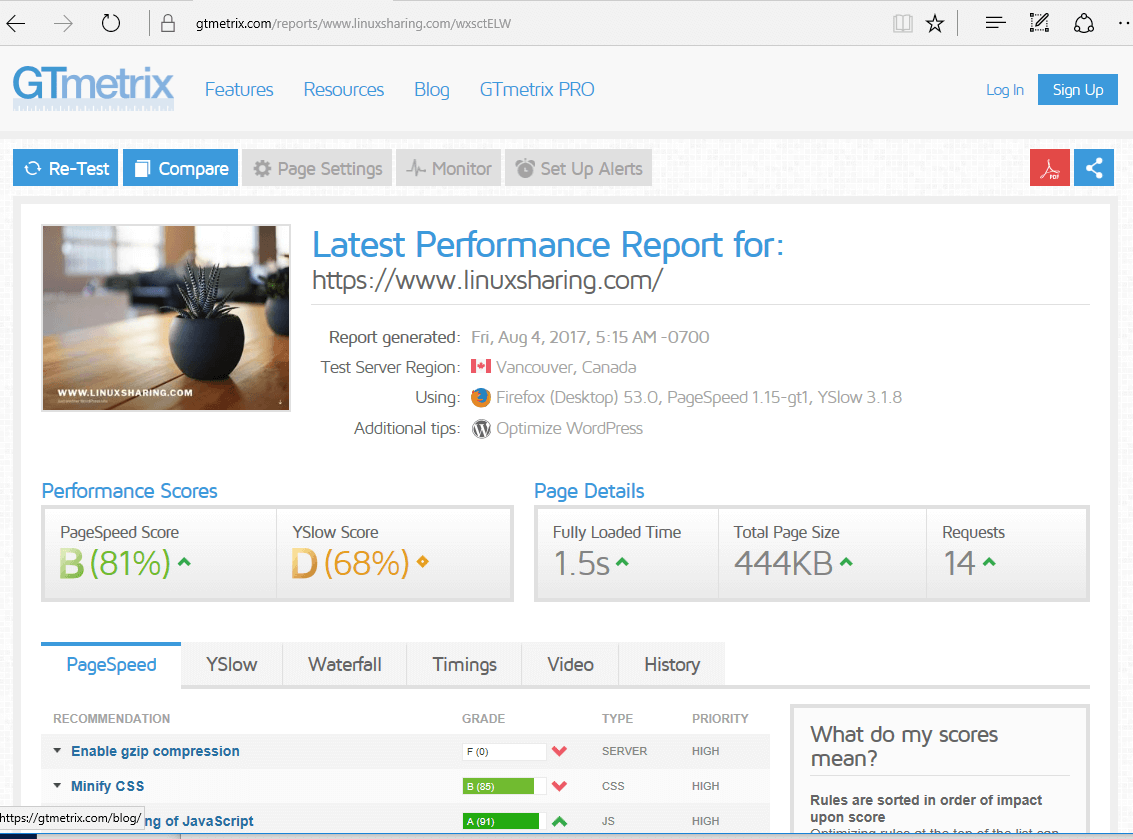
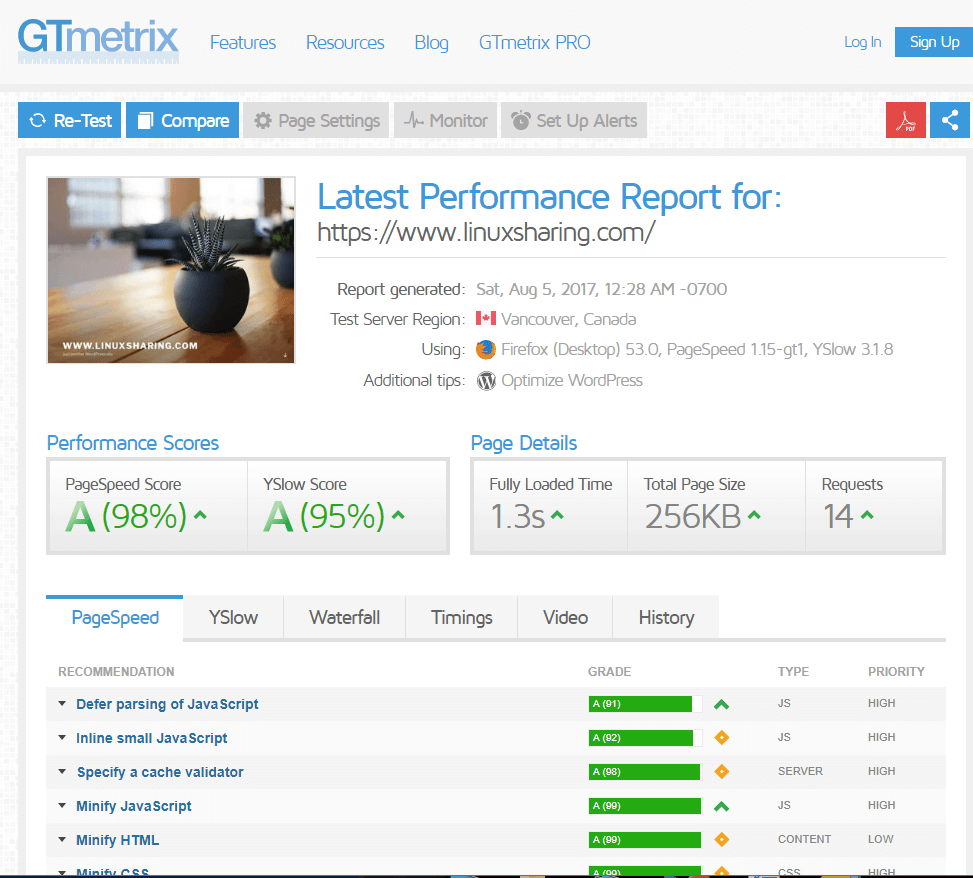
34. Before starting to setup W3 Total Cache Plugin, go to https://gtmetrix.com/ website and analyze your website speed in order to compare the results after enrolling into CloudFlare CDN networks.
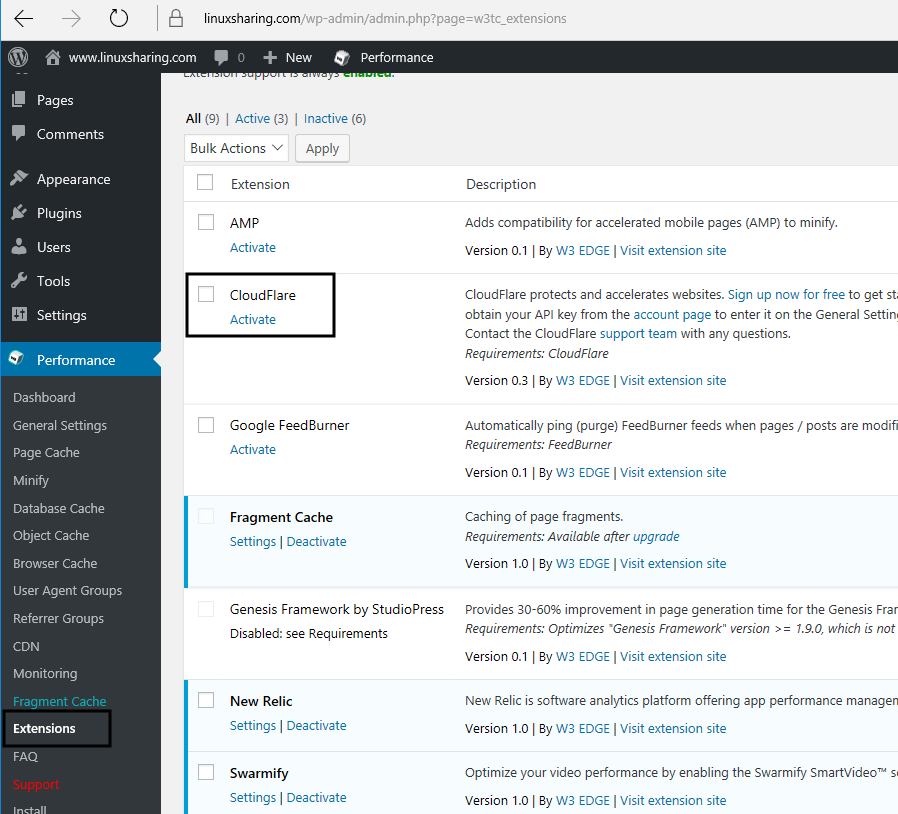
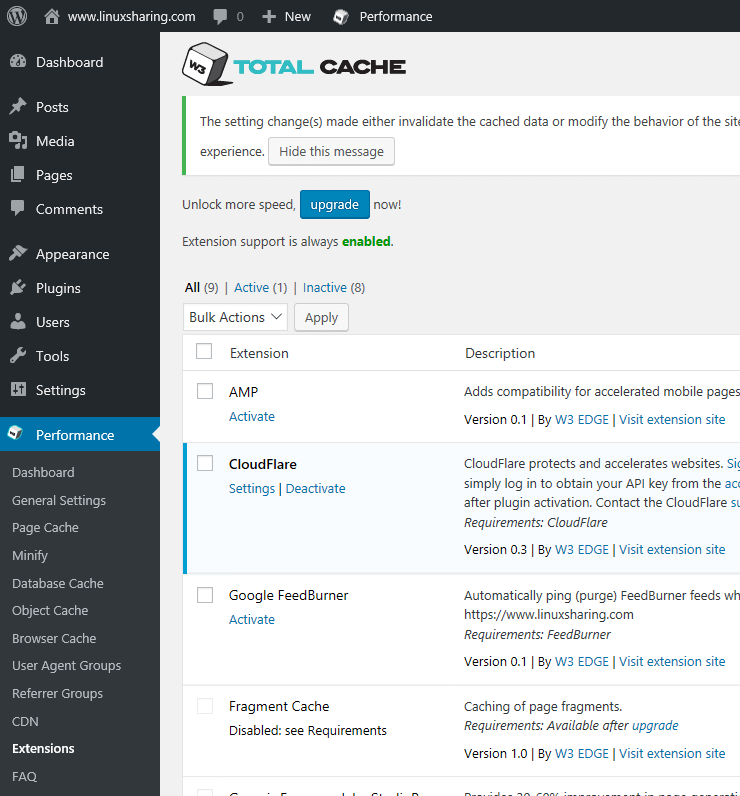
35. Now, configure W3 Total Cache as follows. In WordPress dashboard go to Performance -> Extensions from left menu and activate CloudFlare extension.
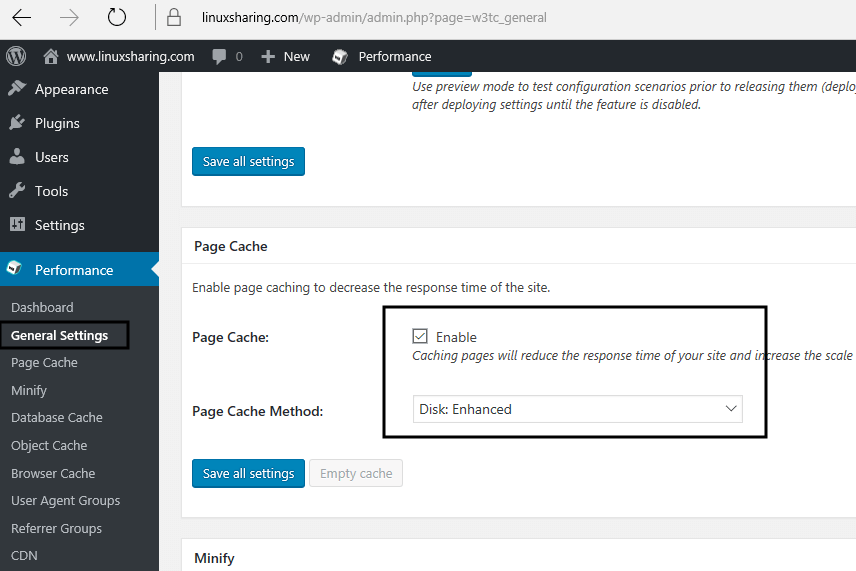
36. Navigate to General Settings and put Page Cache option to Enable with Disk:Enhaced page cache method.
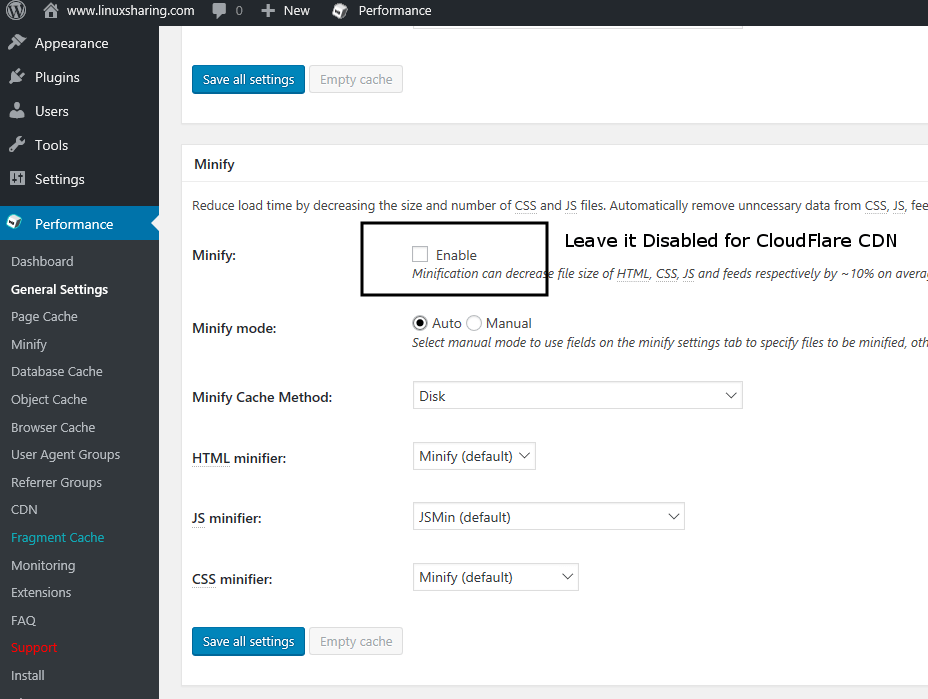
37. Next, scroll down and disable Minify, Database Cache and Object Cache as illustrated on the below screenshots.
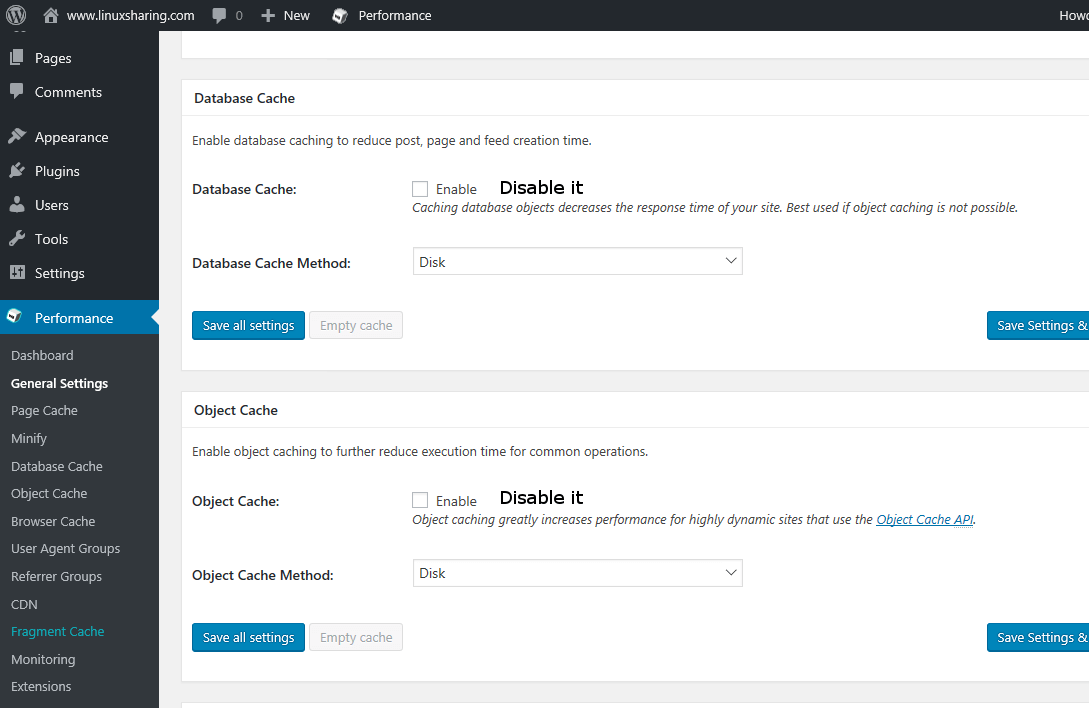
It’s advisable to disable Database Cache especially if your website is hosted in a shared hosting environment. If your website is hosted on a dedicated server or a VPS you can enable this option and conduct some tests to measure the performance impact.
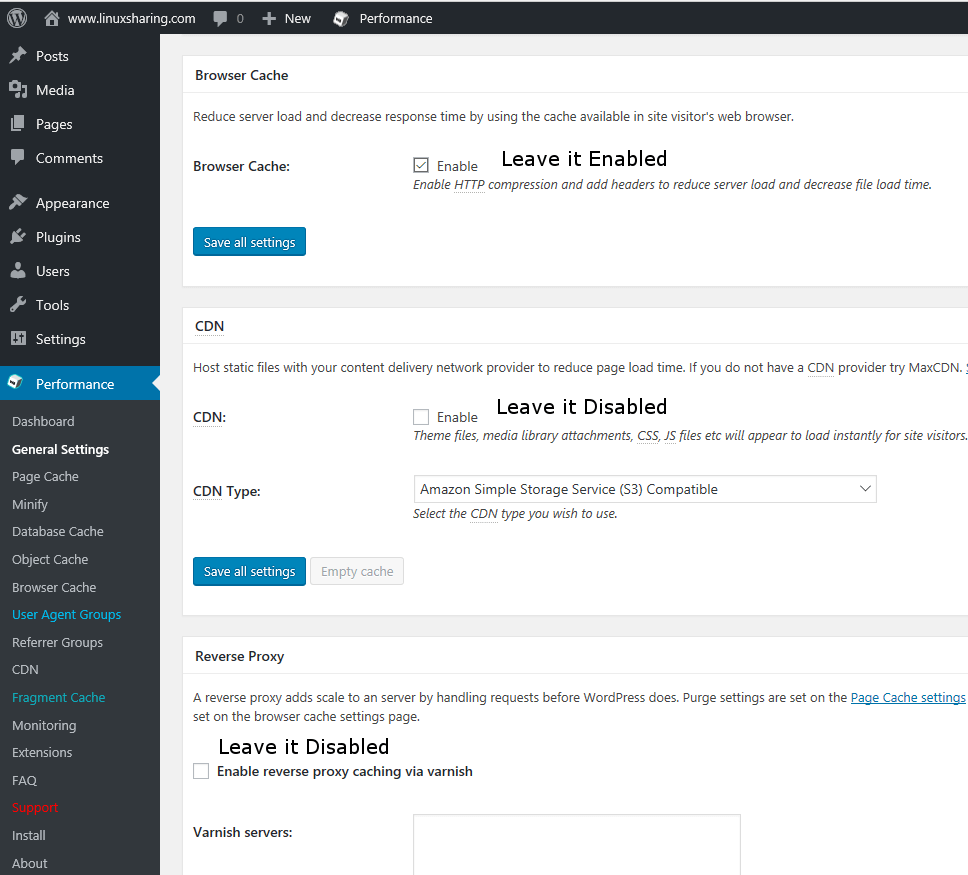
38. Next, scroll down and make sure you enable Brower Cache and disable CDN and Reverse Proxy. Use below images as a guide.
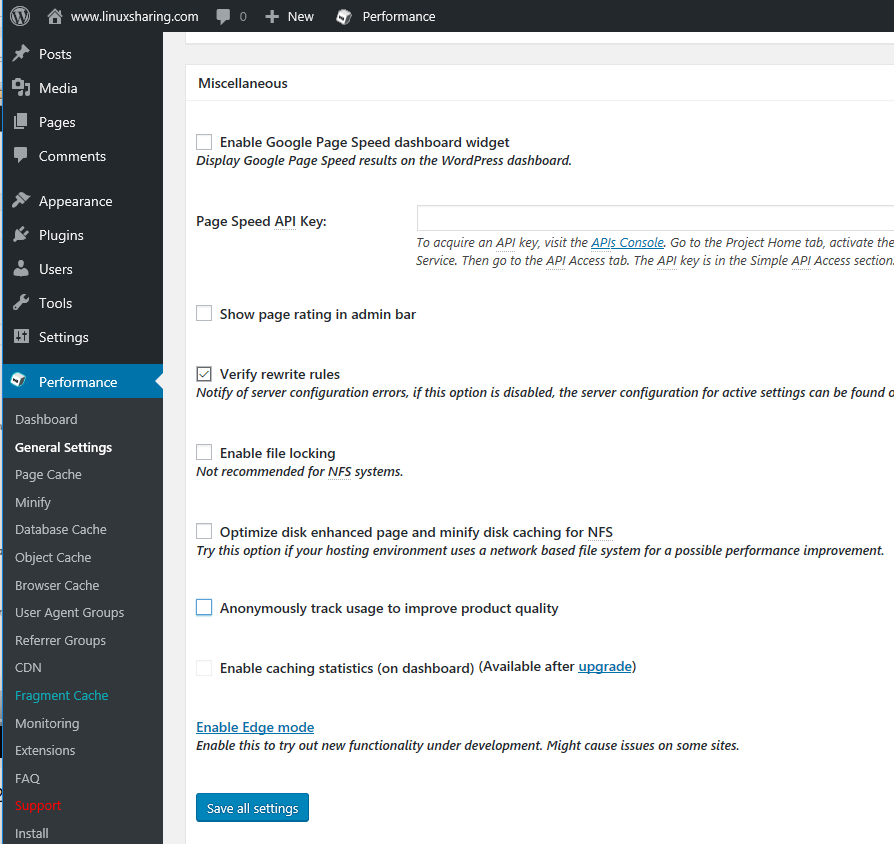
39. Scroll down and enable only Verify rewrite rules in Miscellaneous tab. Leave the other options disabled.
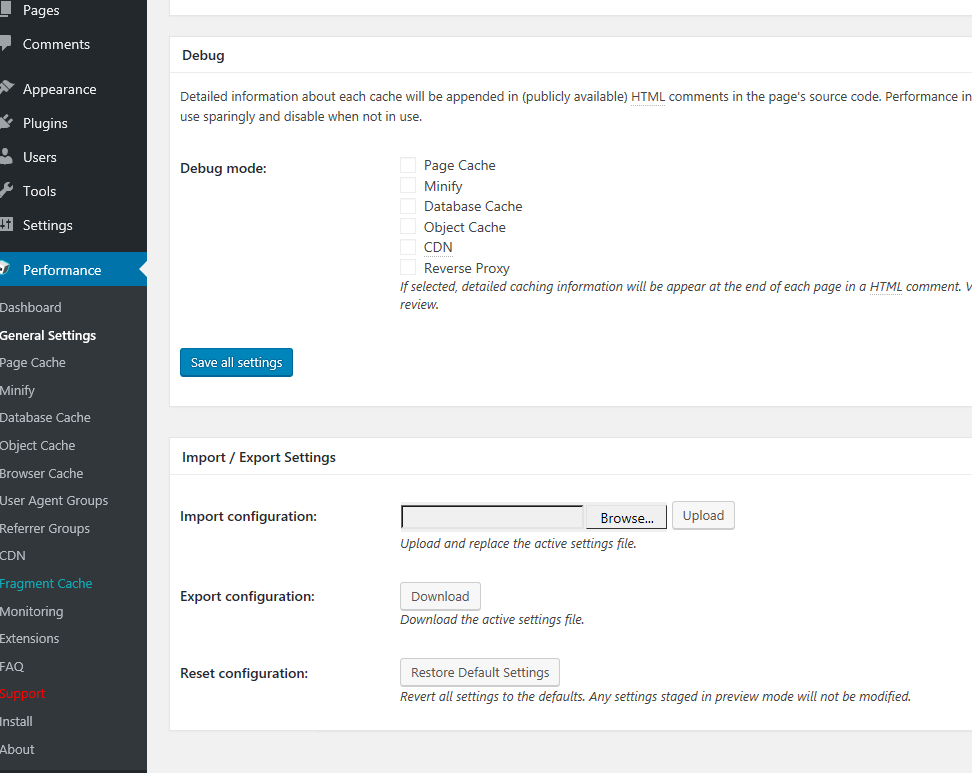
40. Next, scroll down and leave all Debug options disabled and, finally, click on Save all settings to apply the configuration.
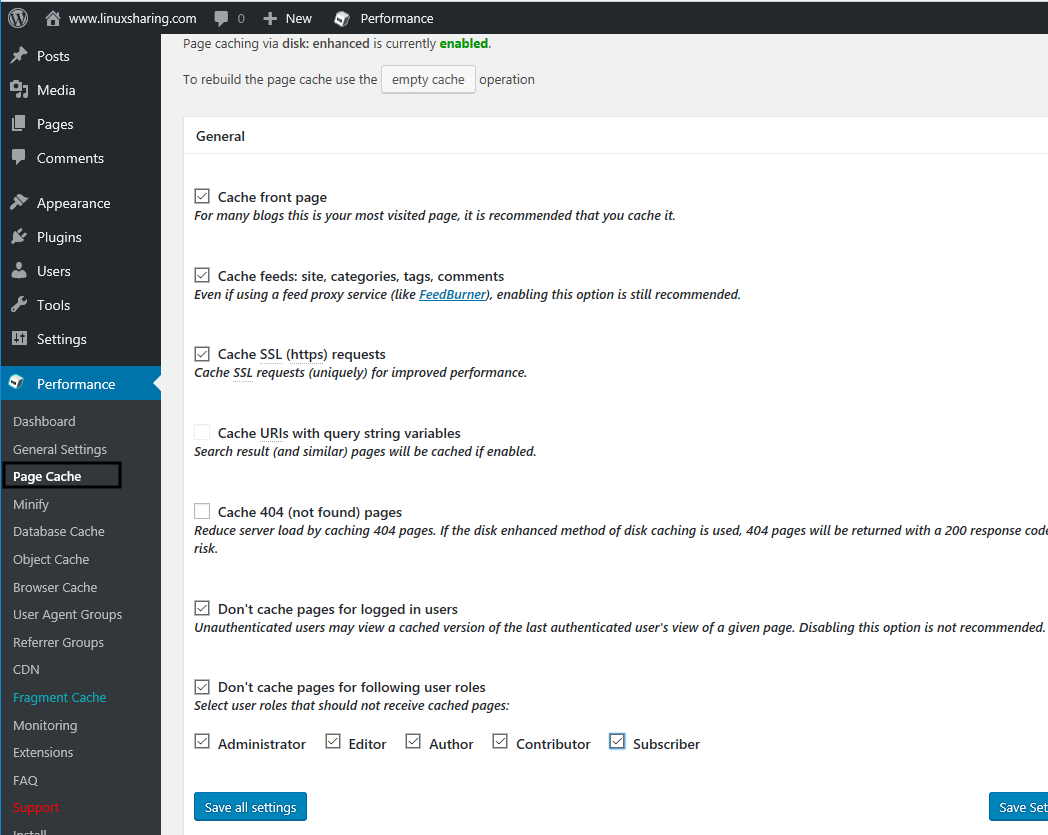
41. Now, move to Page Cache from the left menu and enable only the options as shown in the following screenshot.
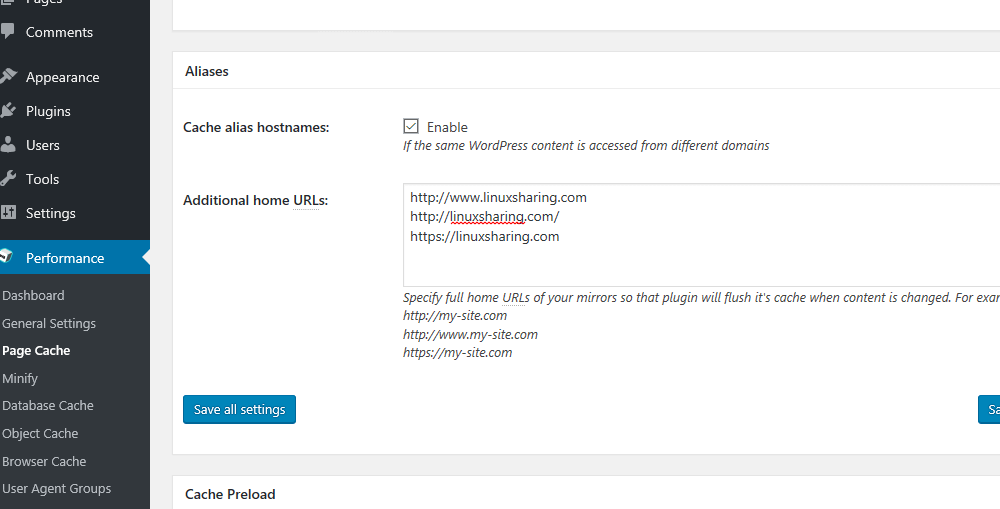
42. Next, scroll down and enable Cache alias hostnames and add all your website aliases (www and non-www) in Additional home URLs, as illustrated in the below image.
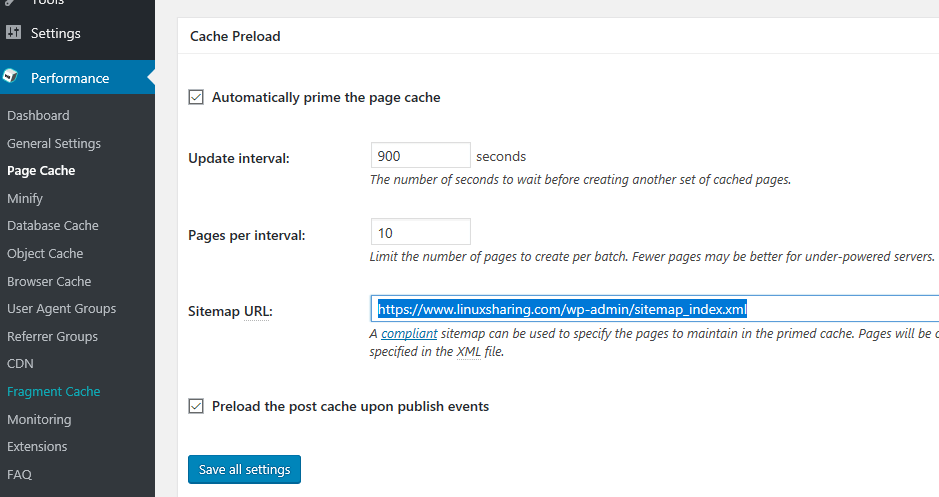
43. Scroll down and enable Automatically prime the page cache. Leave the values for Update interval and Pages per interval to their default values and add the XML URL sitemap of your website. Also enable Preload the post cache upon publish events option.
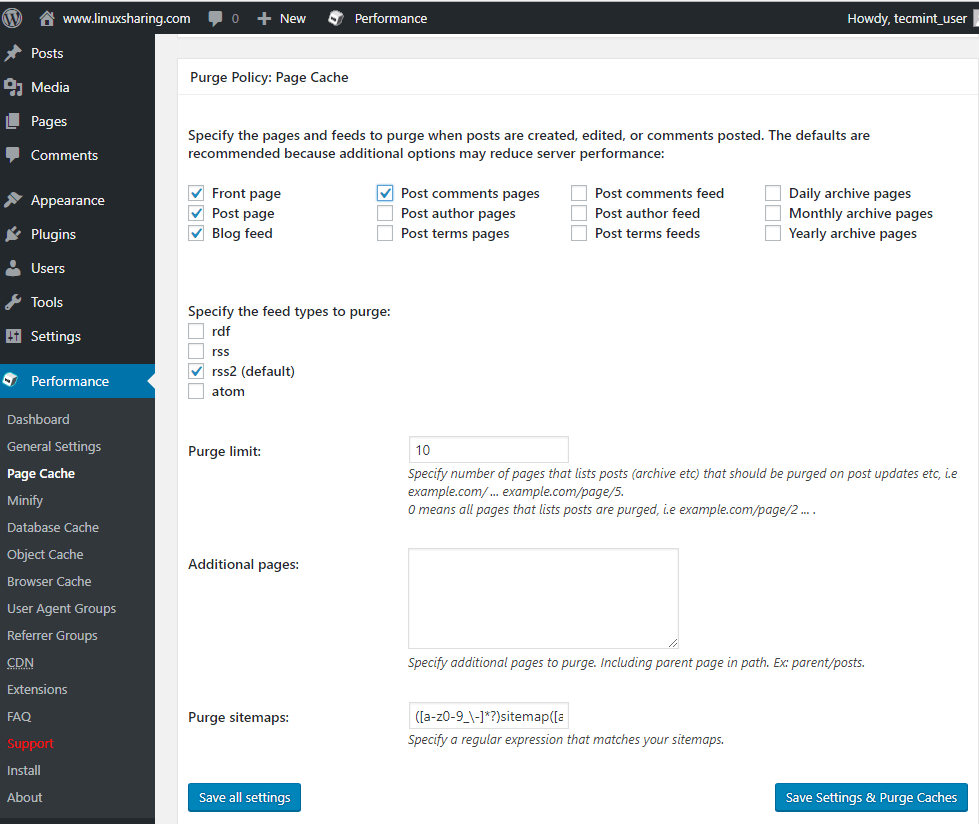
44. Scroll down and enable Front page, Post page, Blog feed, Post comments pages and rss2 options from Purge Policy: Page cache tab.
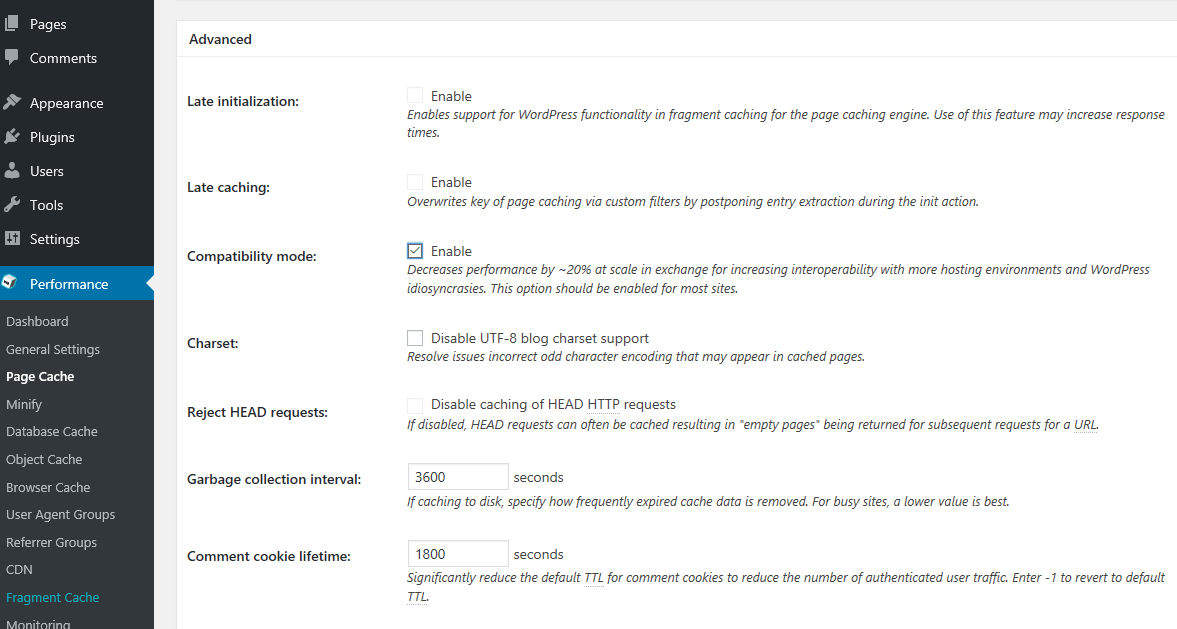
45. Finally, scroll down and leave all options to their default but enable Compatibility mode from Advanced tab. Hit on Save all settings button to apply configuration.
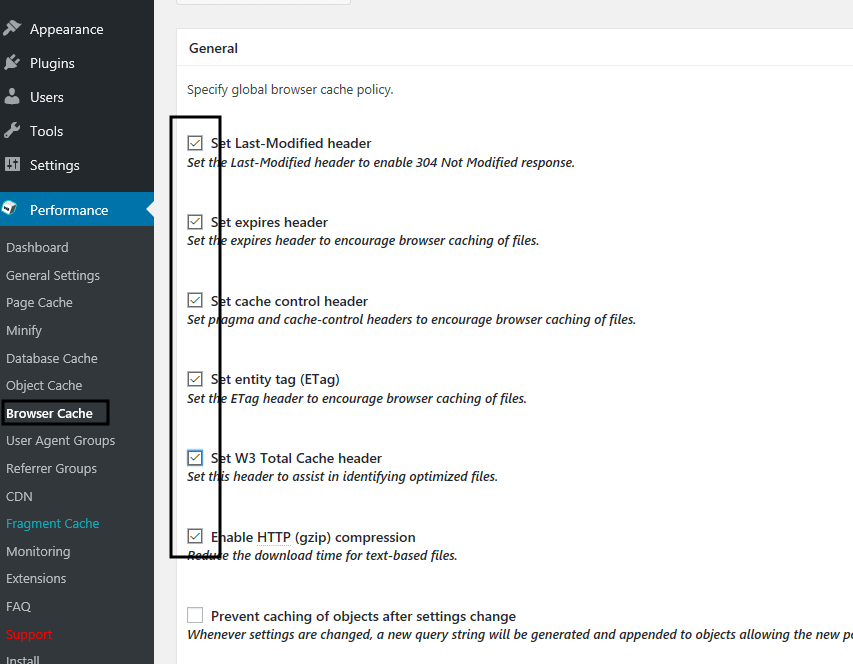
46. Next, move to Browser Cache from left menu and enable the following options as presented in the below screenshot.
47. Scroll down and make the following changes as illustrated in the below screenshots for CSS & JS, XTML & XML and Media & Other Files tabs. For all three make sure you select cache with max-age and validation (“max-age=EXPIRES_SECONDS, public, must-revalidate, proxy-revalidate”) in Cache Control policy option.
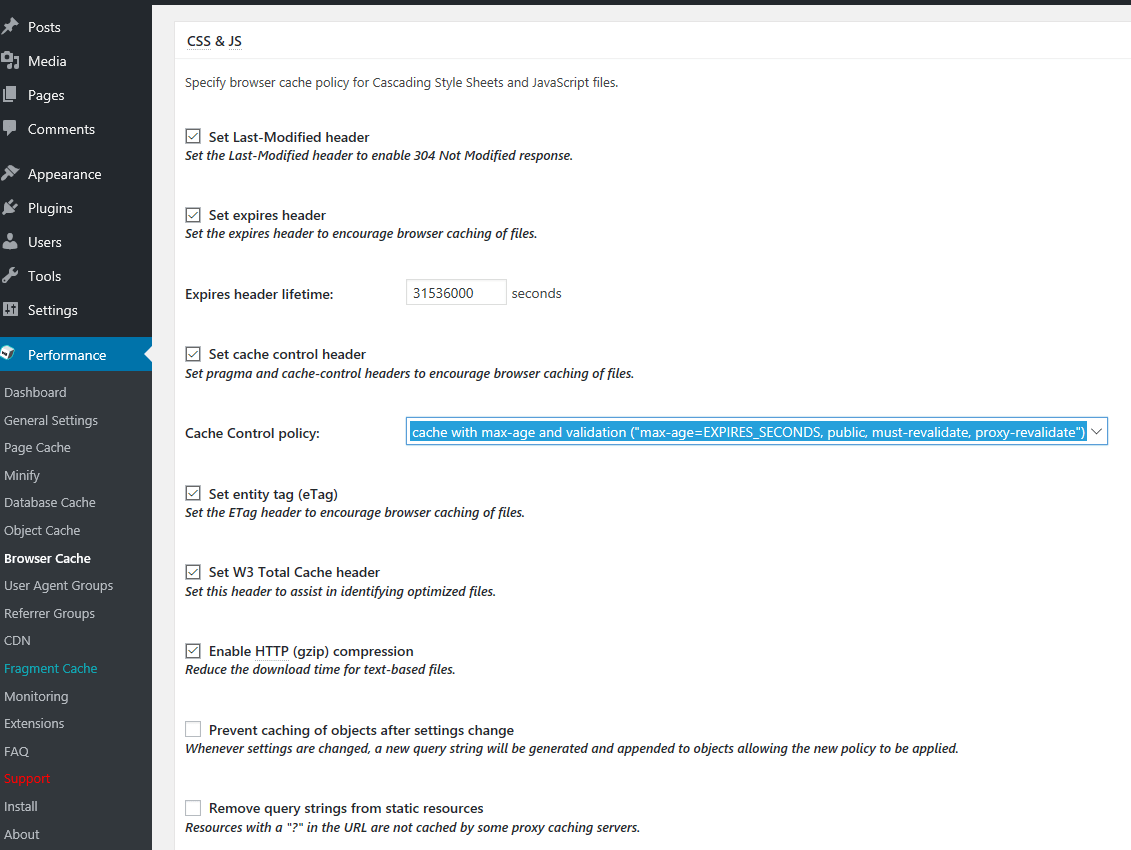
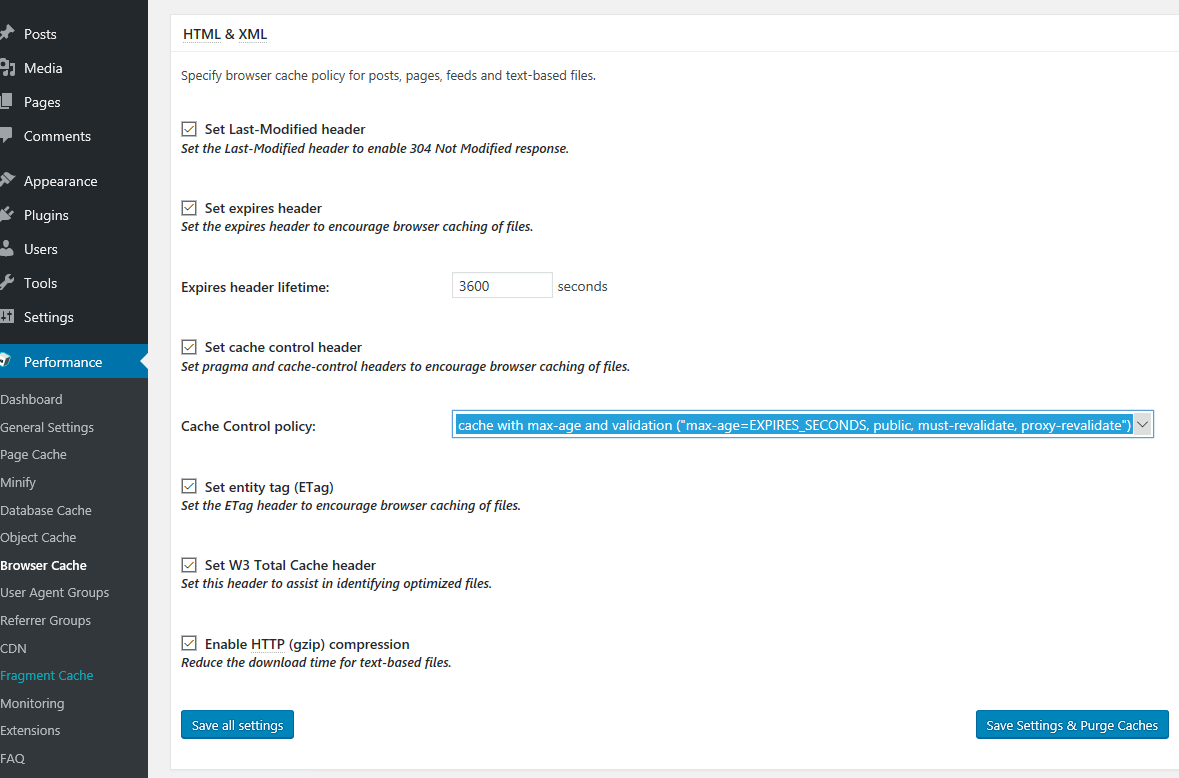
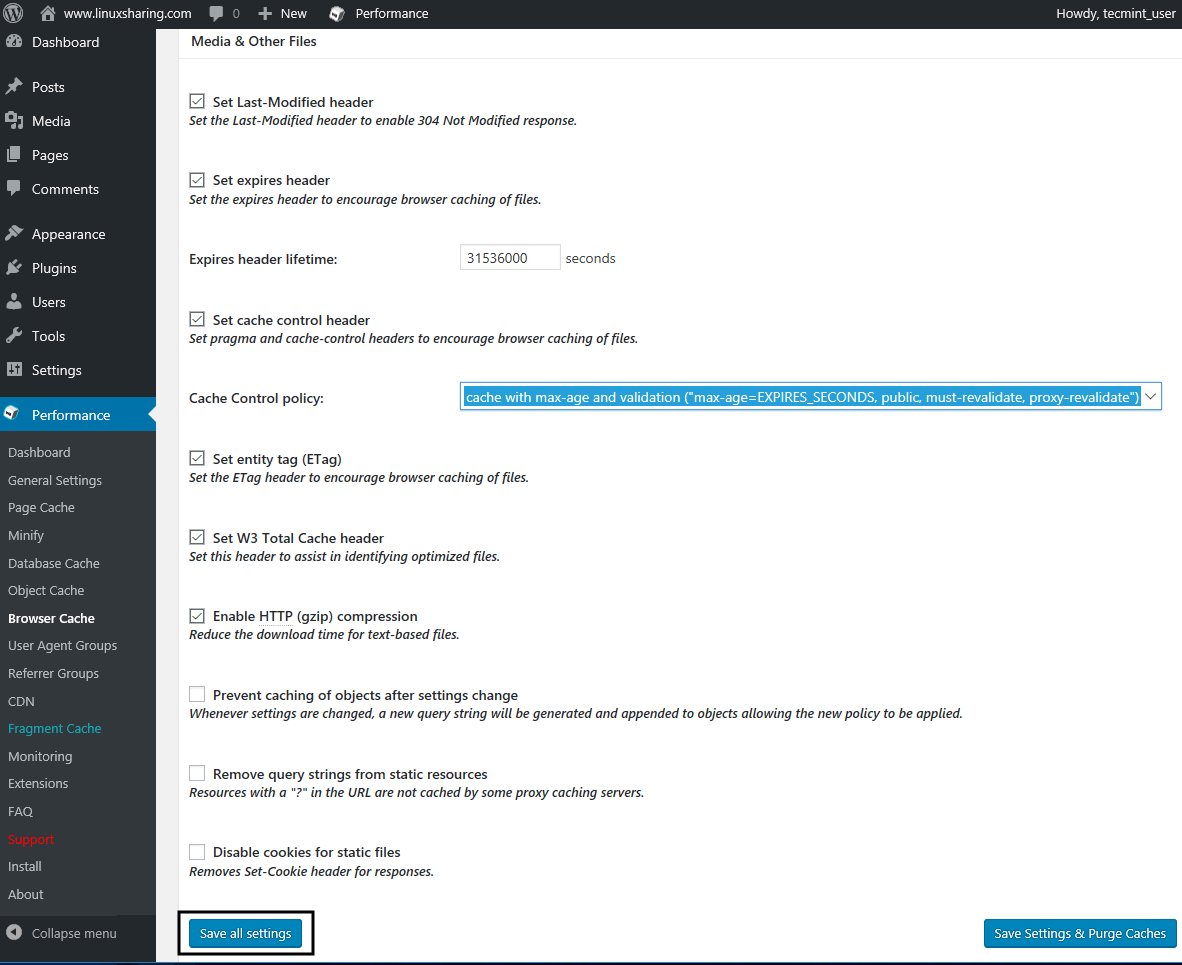
After you finish, hit on Save all settings button to apply configuration. For now we’re done with configuring W3 Total Cache plugin. However, be aware that the settings presented here are optimized mainly for this particular setup with Apache installed on VPS CentOS 7 server and some of the settings might be different in case your website is located on a shared hosting plan. I suggest you tweak and test the settings accordingly to your own server.
Step 7: Configure CloudFlare CDN for WordPress
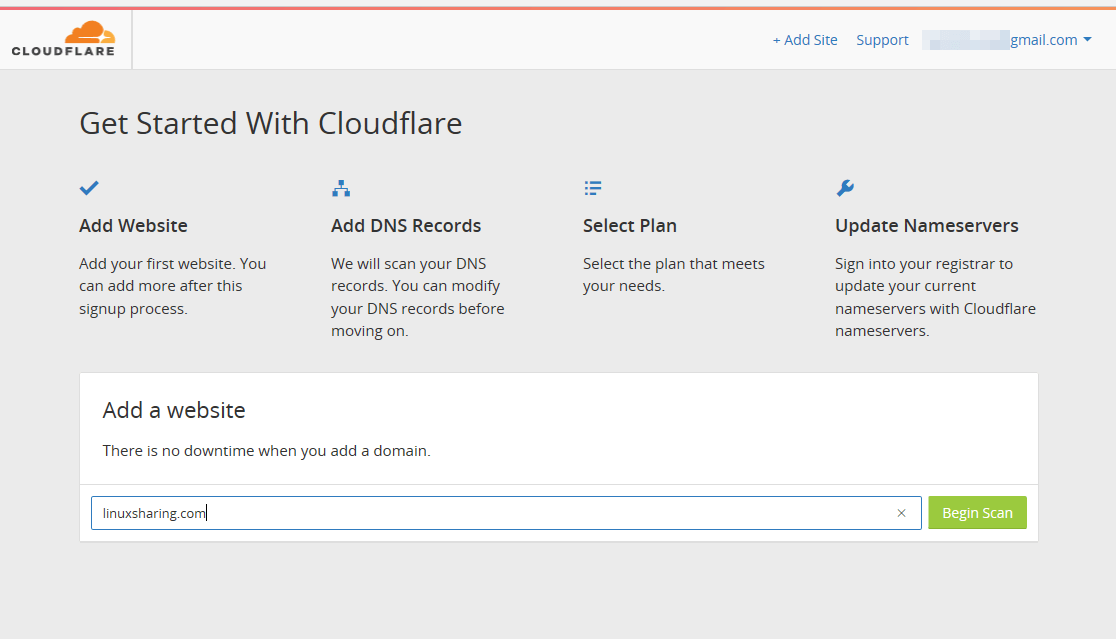
48. Cloudflare represents the CDN service with the highest number of Internet exchange points currently. CloudFlare acts as an accelerator reverse-proxy for a website, offering DNS and security services for the websites it caches.
To enroll a website into CloudFlare networks all you need is to sign-up for a free account and begin scanning your domain as illustrated in the below screenshot.
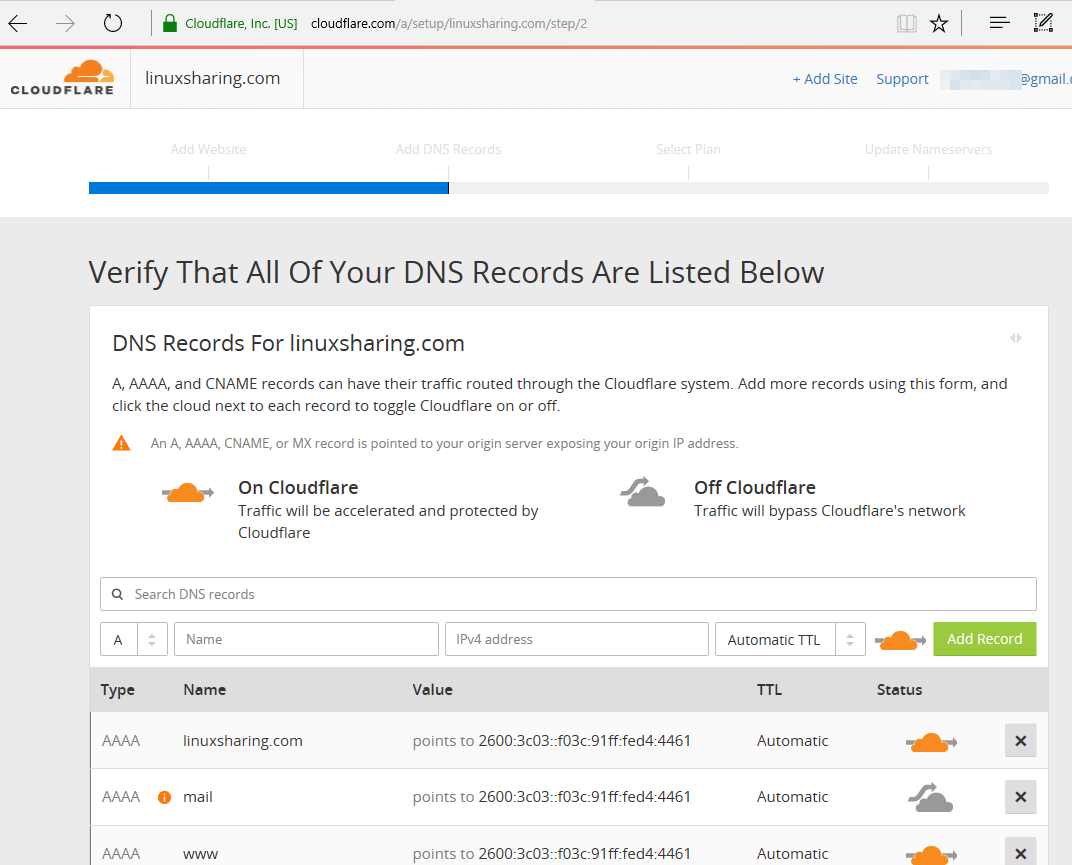
49. After your domain DNS records are scanned while the video is playing, hit on the green Continue button and verify on the next screen if your DNS records are listed. If all records are properly detected hit on Continue button again to move further.

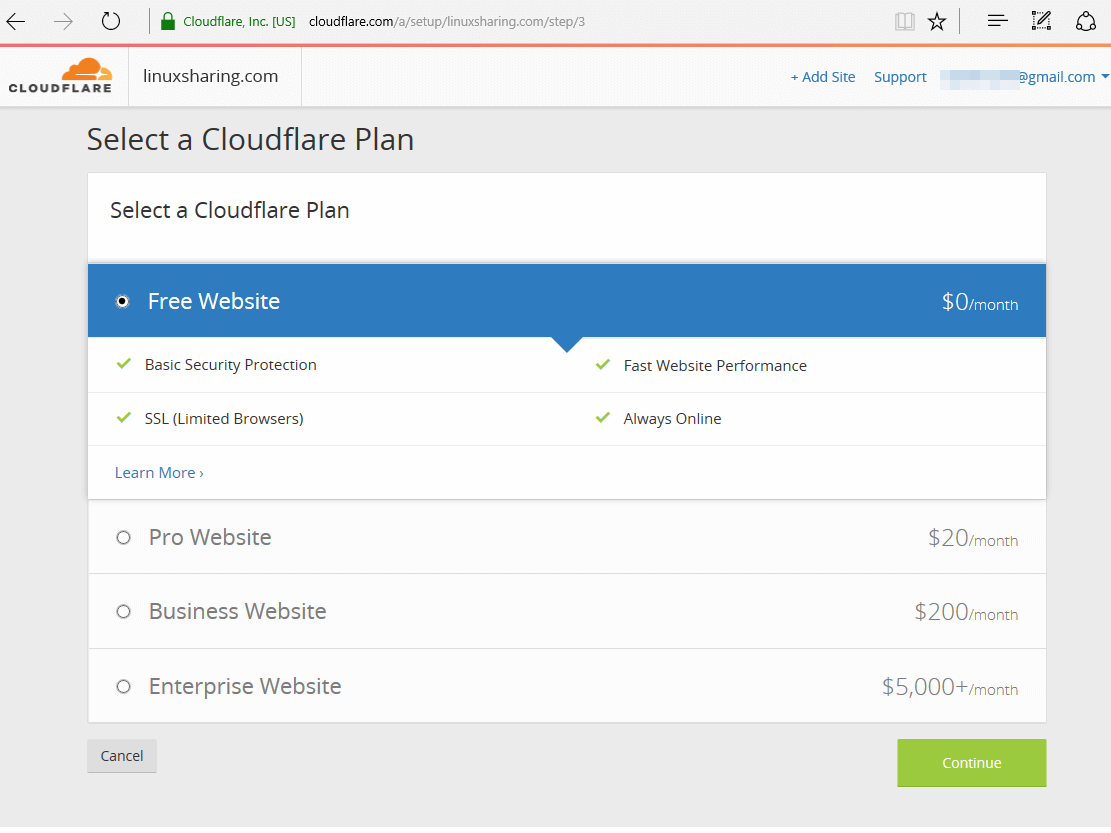
50. On the next screen select a CloudFlare plan for your website and hit Continue button.
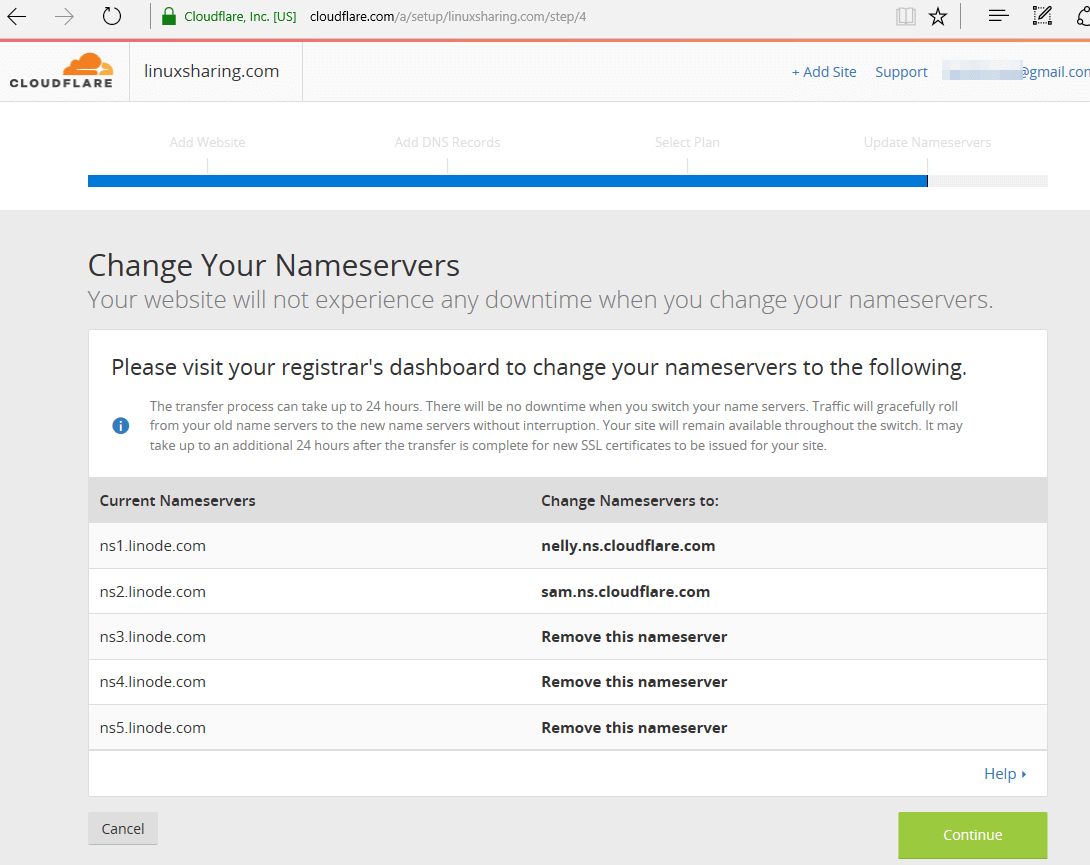
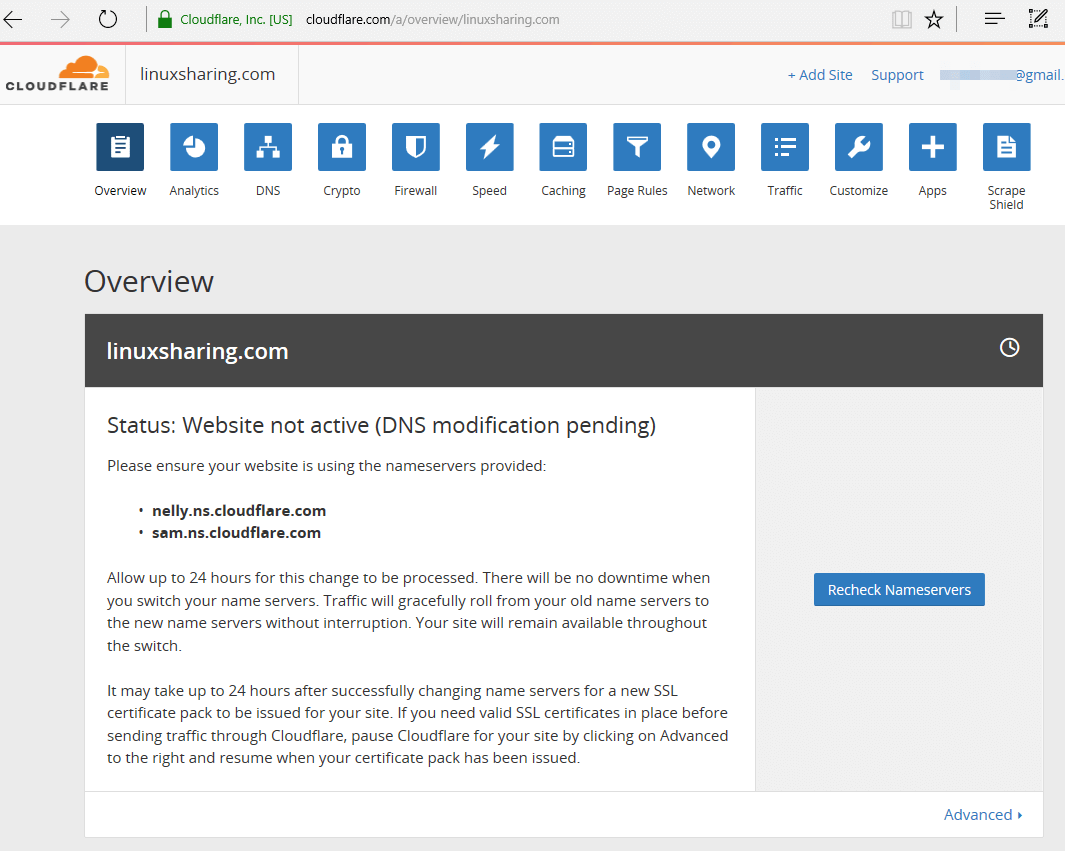
51. Next, a list of CloudFlare nameservers will be displayed. In order to use Cloudflare services visit your domain registrar and change your domain nameservers to point back to the list of nameservers provided by CloudFlare. Write down CloudFlare nameservers from the list and hit Continue button to finish the enrolling process. You should update your domain nameservers as soon as possible.
52. After you’ve updated your domain nameservers hit on Recheck Nameservers button from the main window in order to force the activation process. It can take up to 15 minutes to 24 hours for the DNS records to propagate in internet.
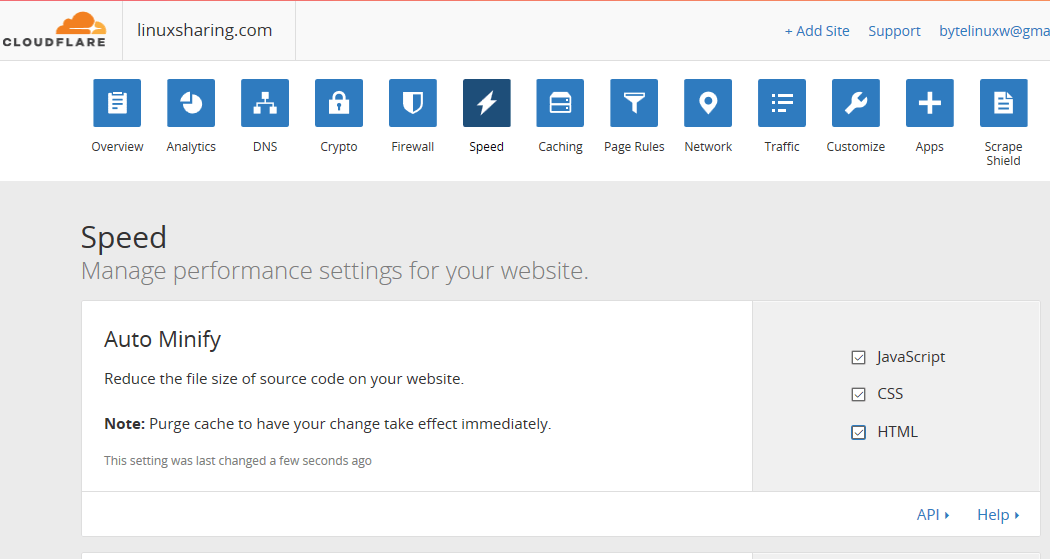
53. Meanwhile, you can tweak your domain settings from CloudFlare web panel. Navigate to Speed menu and enable JavaScript, HTML and CSS options from Auto Minify.
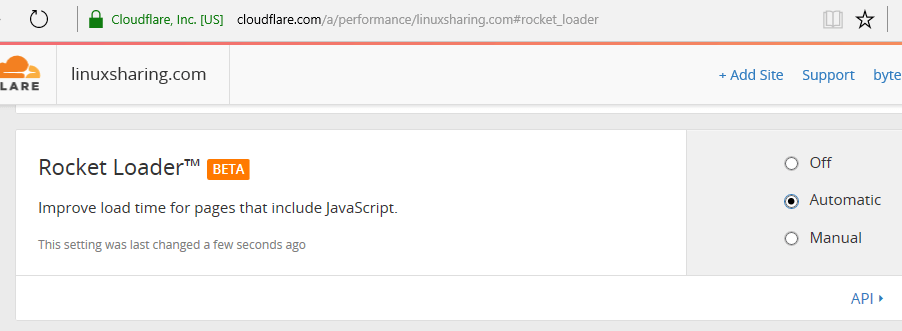
54. Scroll down and choose Automatic option form Rocket Loader setting.
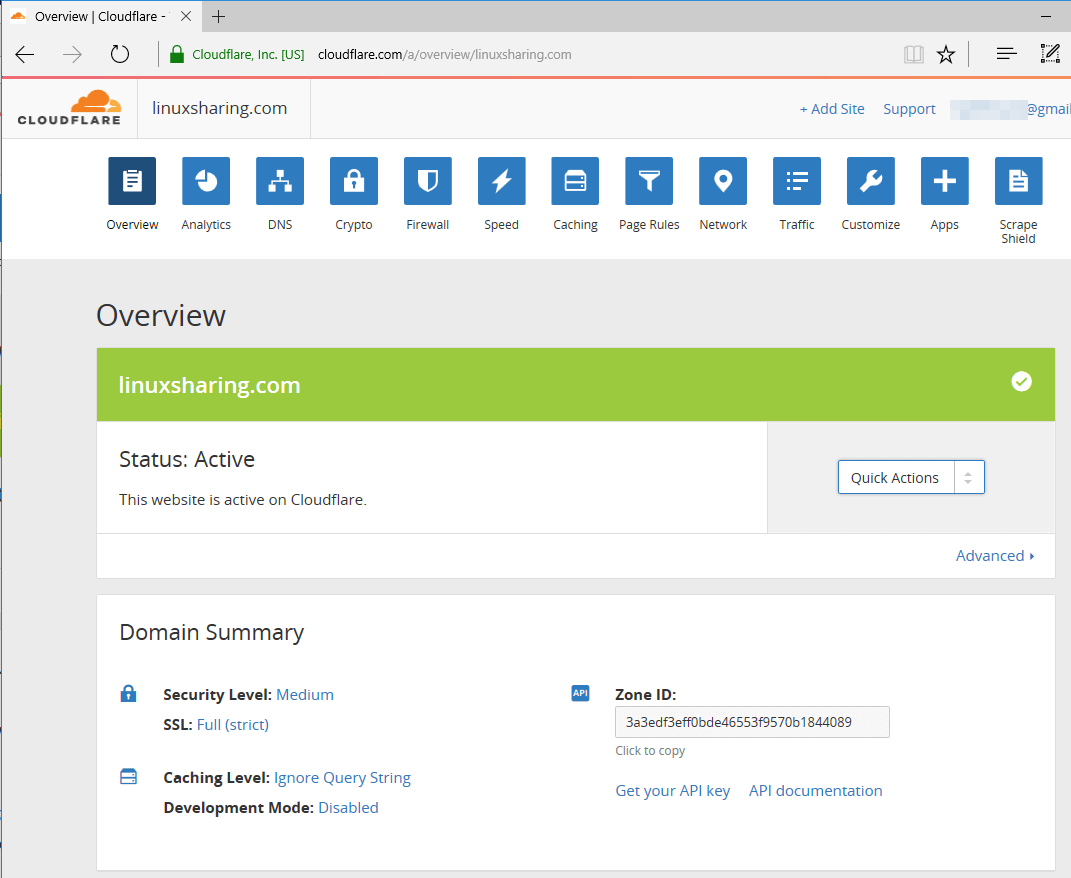
55. Next, hit on Crypto button and choose Full (strict) option from SSL setting. This setting seems to be better suited to work with Let’s Encrypt certificates.

56. Next, activate the CloudFlare extension in WordPress. Hit on your email account link from the right top of the panel, select My profile and navigate to Global API Key and click on View API key button.

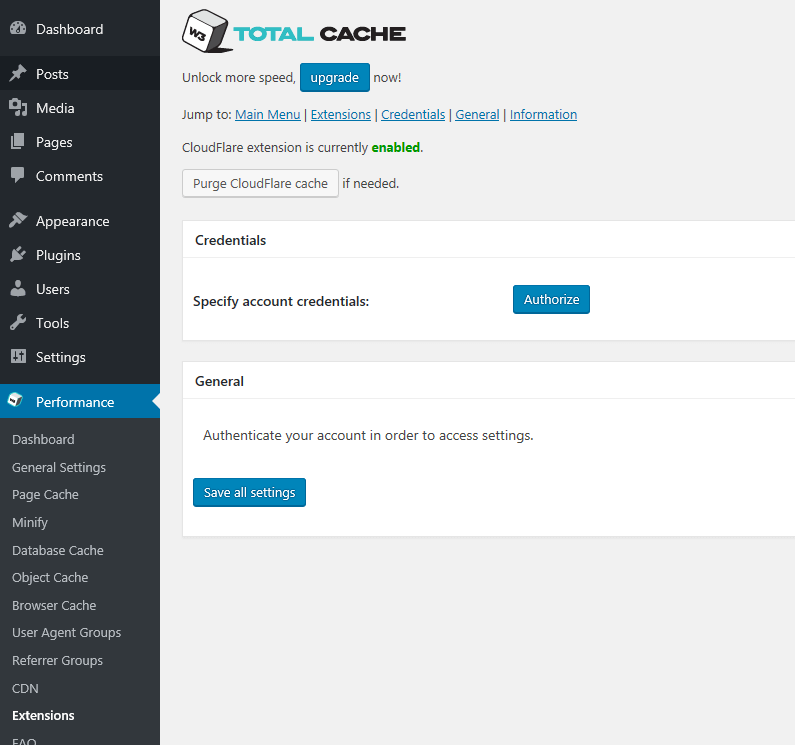
57. Copy the string from API key and go back to your WordPress website. Navigate to Performance -> Extensions -> CloudFlare and open the Settings link.
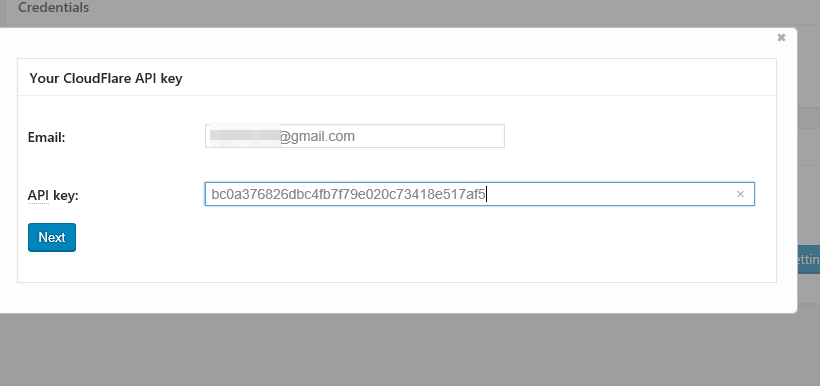
58. Hit on the Authorize button and fill the email field with the email address you signed-up to CloudFlare and paste the API key you’ve copied from Global API key. Hit Next to continue.
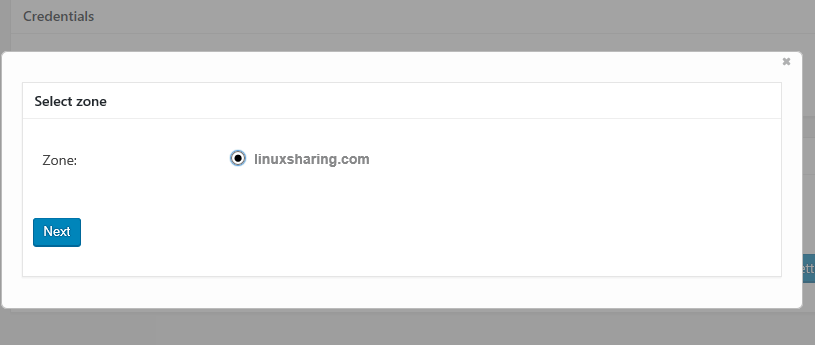
59. Finally, check your domain zone and hit Next button to finish authorization process for your domain in WordPress.
60. Wait for a few hours and then login to your CloudFlare account. Congratulations! Your website should be actively reversed-cached by CloudFlare by now.
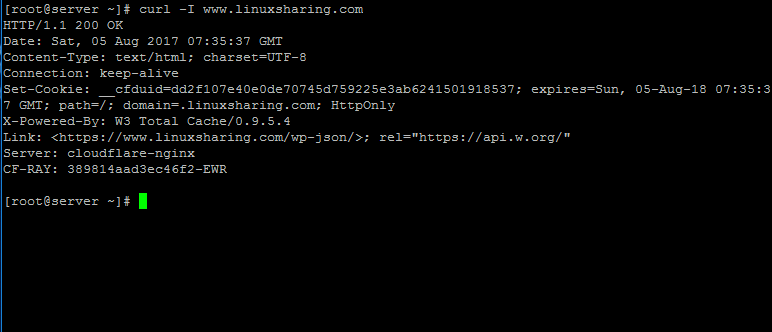
Running the curl command from server’s console will reveal the headers of your domain, exposing the fact that your website is actively cached by a variant of CloudFlare Nginx server and uses W3 Total Cache plugin.
# curl -I www.yourdomain.com
61. Conduct some tests again at https://gtmetrix.com website and compare your website results with the initial test done before enrolling to CloudFlare.
The general performance and the load time of your website should be drastically improved. Tweak the settings from your CloudFlare account, especially the Page Rules options, in order to determine which are the best suited configurations for your server.
Step 3: Install Postfix Mail Server to Send WordPress Notifications
62. Before installing Postfix mail service to send mail for WordPress email notifications. You will first need to add the necessary DNS MX and A records for your mail server and domain at the CloudFlare DNS section.
Once DNS MX and A records has been added, you can install Postfix mail server using following command.
# yum install postfix
63. Now open /etc/postfix/main.cf configuration file and add these following values.
mailbox_size_limit = 0
recipient_delimiter = +
inet_interfaces = loopback-only
Now go ahead and write a dummy post. Then add a comment using the form at the bottom. You, as an author, should start receiving wordpress notifications in no time. If not, check the mail server logs (/var/log/maillog or /var/log/mail.log ).
Final Notes
A few things you should take into consideration after your website was successfully added to CloudFlare CDN.
- Once you bind your domain to CloudFlare nameservers, after the DNS records finish propagating in internet, you might experience downtime in accessing some services in the origin server.
- If you ping your domain you will observe that your domain will respond with an IP address belonging to CloudFlare CDN.
- If you use SSH or FTP services to remotely administer your server you won’t be able to connect via those services using the name of your domain anymore because the
Arecord of your domain and thewwwrecord will be redirected to an IP address which belongs to CloudFlare CDN infrastructure.
To circumvent this unpleasant event you have two options: either create a new DNS A record by using CloudFlare DNS section from the web panel (add a record such as ssh.yourdomain.com or ftp.yourdomain.com for example) and point the A record to the IP address of your backend server or either use the IP address of the origin server to directly connect into those specific services.
Get Your WordPress Blog Installed With LAMP + W3CACHE + Cloudflare CDN [$50]
If you don’t want to go through all these complex configurations yourself, I will integrate your WordPress website for faster load time using LAMP (Linux, Apache, MariaDB and PHP) or LEMP (Linux, Nginx, MariaDB and PHP) stack with Postfix, W3 Total Cache, Free SSL Let’s Encrypt and CloudFlare CDN on a VPS Server or on a shared hosting providers with all required DNS and SSL configurations. The service can be completed in a few hours at price of $50 one time fee with 14-day free support. Contact: [email protected]