Linux Mint 20 has been released in wild by the Linux Mint project development team as a new long term support edition which will receive support and security updates until 2025.
This tutorial will guide you on how you can install Linux Mint 20 in dual-boot with a variant Microsoft Operating System, such as Windows 8, 8.1 or 10, on machines with EFI firmware and a pre-installed version of Microsoft OS.
If you’re looking for a non-dual-boot installation on Laptop, Desktop, or Virtual Machine, you should read: Installation Guide of Linux Mint 20 Codename ‘Ulyana’.
Assuming that your laptop or desktop system comes pre-installed with Windows 10 or Windows 8.1 or 8 you should enter the UEFI menu and disable the following settings: Secure Boot and Fast Boot features.
If the computer has no pre-installed OS and you intend to use Linux and Windows in dual-boot, first install Microsoft Windows and then proceed with Linux Mint 20 installation.
Download Linux Mint 20
- Linux Mint 20 ISO images – https://www.linuxmint.com/download.php
In case you own a UEFI computer stay away from the 32-bit version of Linux Mint because it will only boot and work with BIOS machines, while the 64-bit ISO image can boot with BIOS or UEFI computers.
Step 1: Shrink HDD Space for Dual-Boot
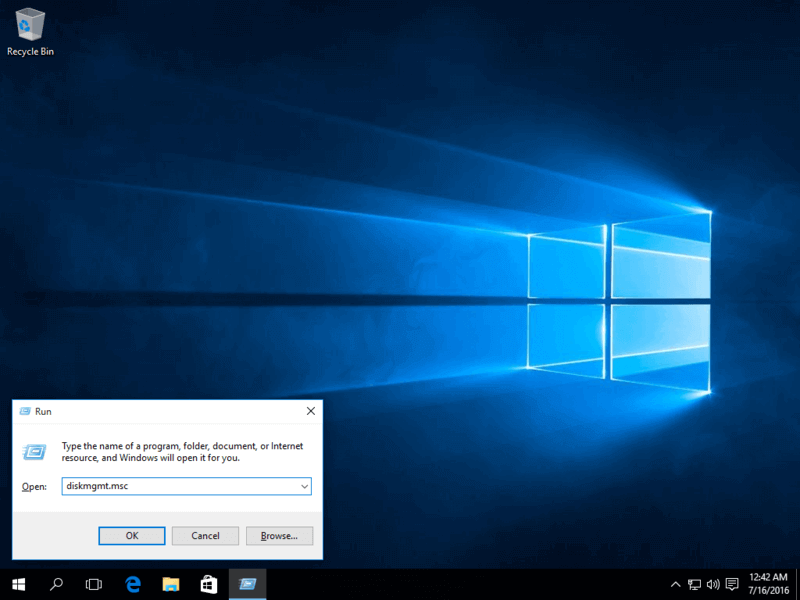
1. In case your computer comes pre-installed with Microsoft Windows on a single partition, logon to Windows system with a user who has administrator privileges, press [Win+r] keys to open run prompt and type the following command in order to open Disk Management tool.
diskmgmt.msc
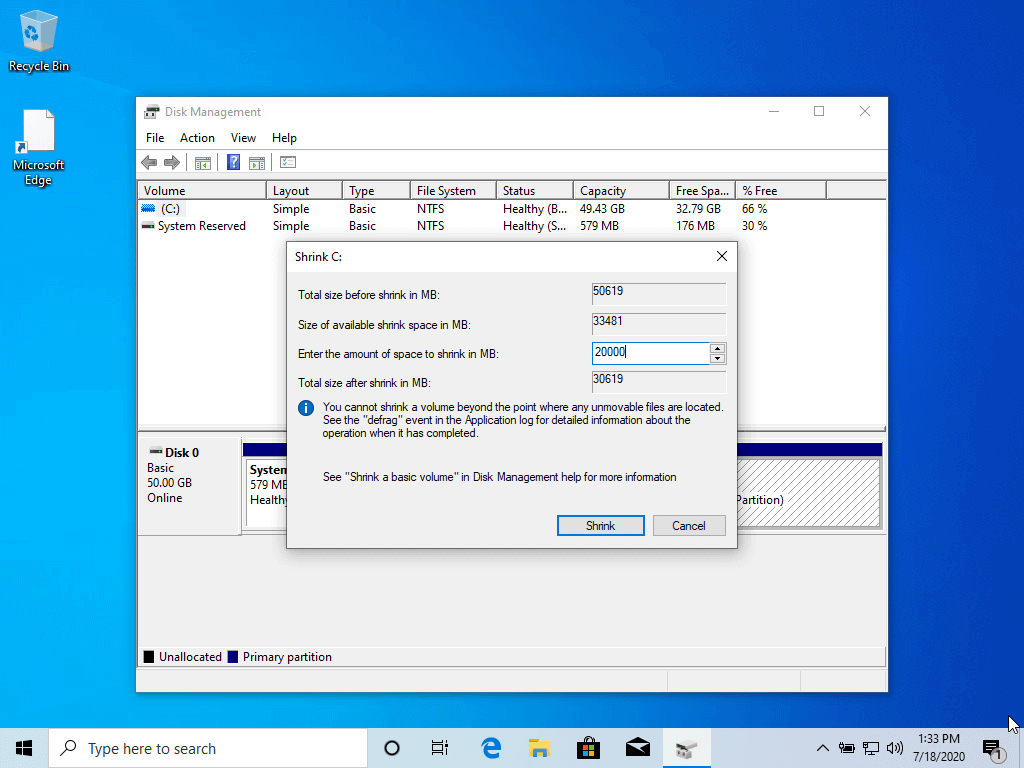
2. Right-click on C: partition and select Shrink Volume in order to resize the partition. Use a value best-suited for you, depending on your HDD size, on the amount of space to shrink MB field (minimum 20000 MB recommended) and hit Shrink button to start the process of resizing the partition.
3. When the process finishes a new unallocated space will appear on the hard drive.
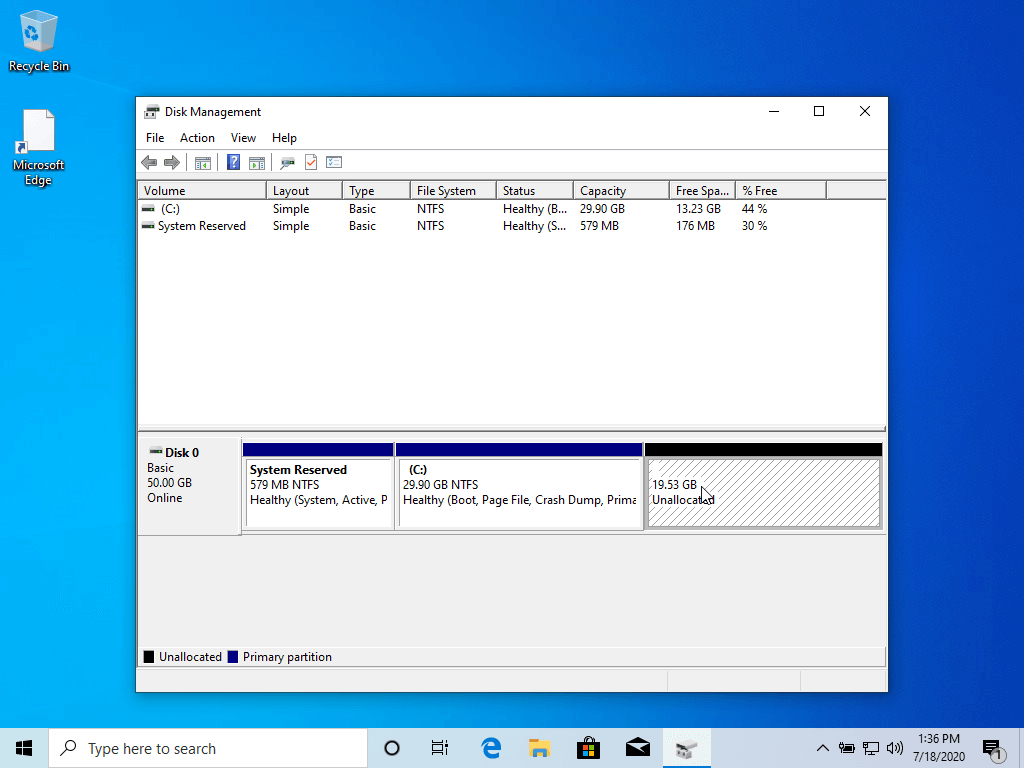
Close Disk Management utility, place Linux Mint DVD or USB bootable image in the appropriate drive, and reboot the computer in order to start with Linux Mint 20 installation.
In case you’re booting Linux Mint for installation from a USB dive in UEFI mode make sure you’ve created the bootable USB stick using a utility such as Rufus, which is UEFI compatible, otherwise your USB bootable drive won’t boot.
Step 2: Installation of Linux Mint 20
4. After reboot, press the special function key and instruct the machine firmware (UEFI) to boot-up from the appropriate DVD or USB drive (the special function keys usually are F12, F10 or F2 depending on the motherboard manufacturer).
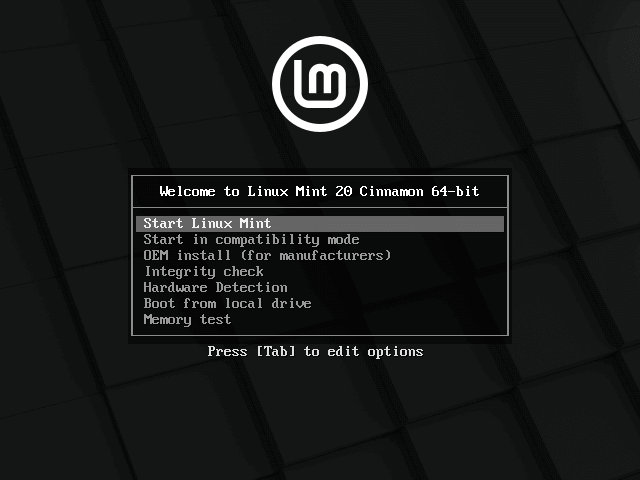
Once the media boot-up a new screen should appear on your monitor. Choose Start Linux Mint 20 Cinnamon and hit Enter to continue.
5. Wait until the system loads into RAM in order to run in live-mode and open the installer by double-clicking on Install Linux Mint icon.
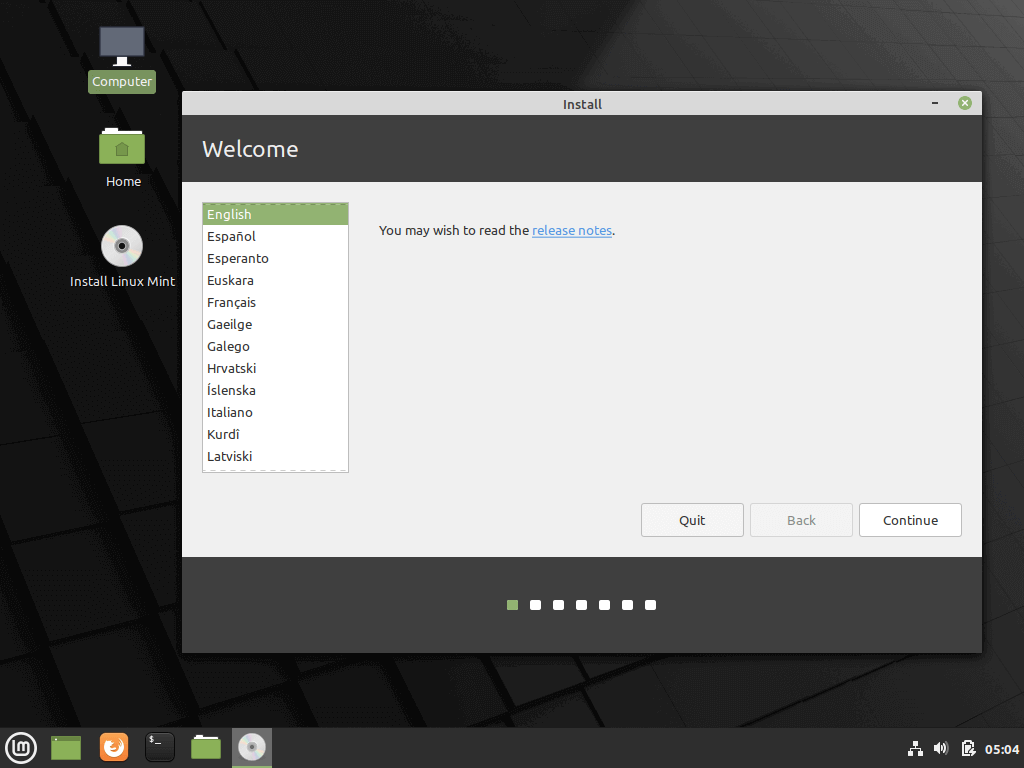
6. Choose the language you wish to perform the installation and click on the Continue button to proceed further.
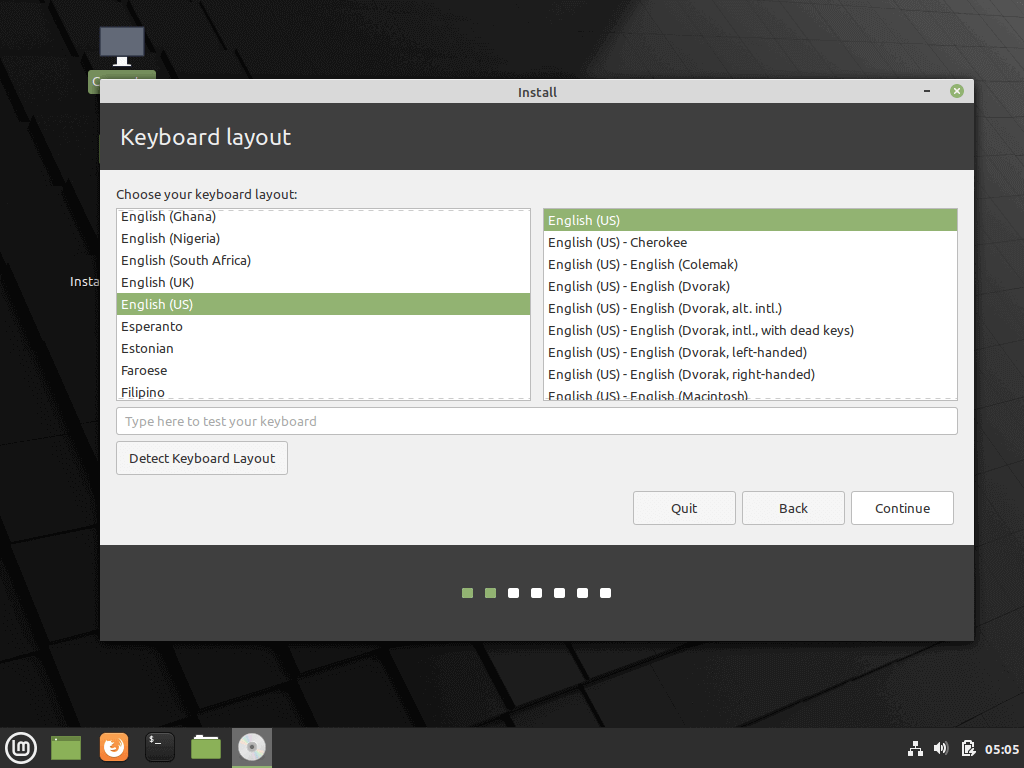
7. Next, you should select your keyboard layout and click on the Continue button.
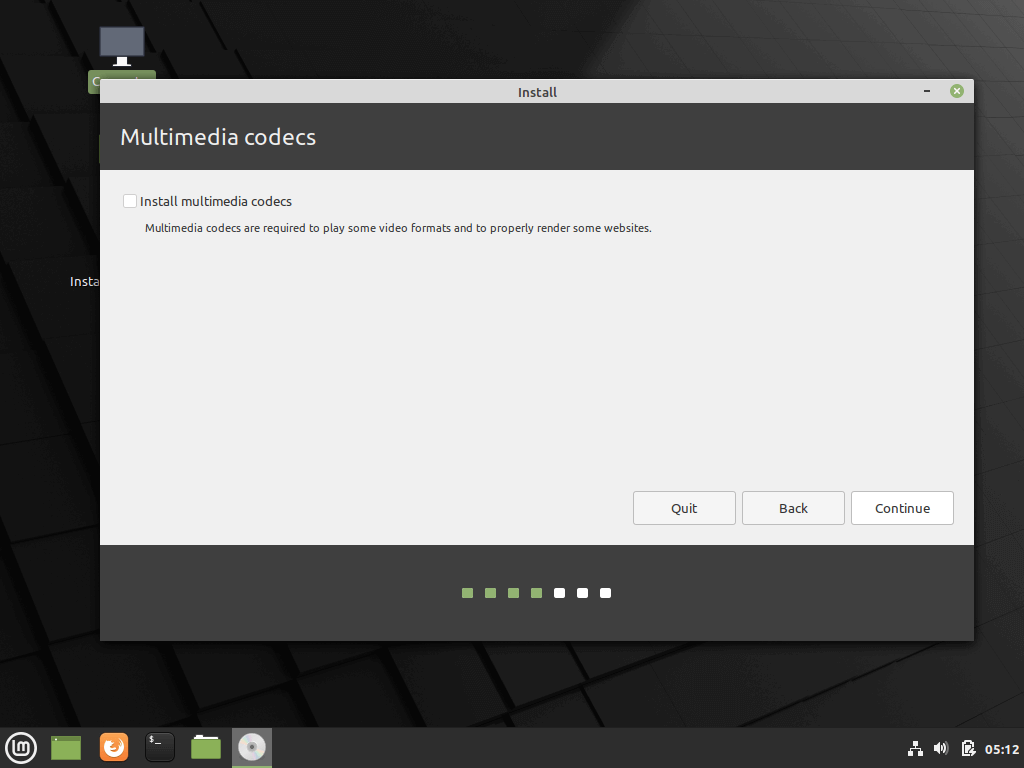
8. On the next screen hit on the Continue button to proceed further. Third-party software (multimedia codes) can be automatically downloaded and installed on this step by checking the check-box.
The recommendation would be to leave the box unchecked for the moment and manually install proprietary software later after the installation process completes.
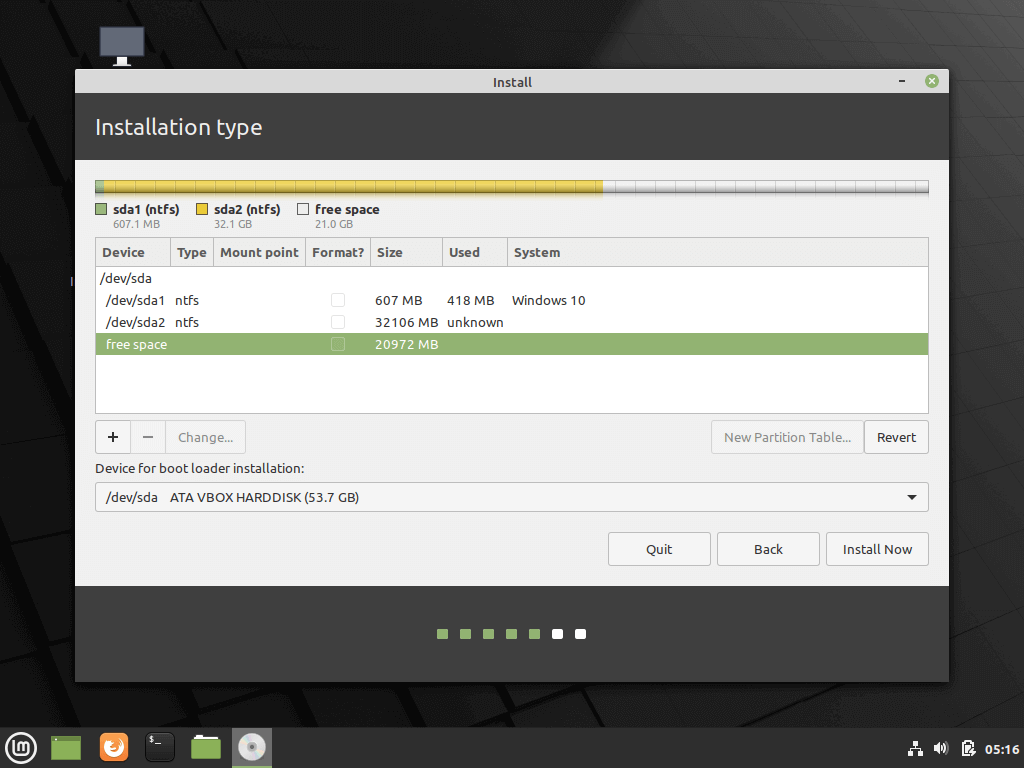
9. At the next screen, you can choose the Installation Type. If Windows Boot manager is automatically detected you can choose to Install Linux Mint alongside Windows Boot Manager. This option ensures that the HDD will be automatically partitioned by the installer without any data loss.
The second option, Erase disk and install Linux Mint, should be avoided for dual-boot because is potentially dangerous and will wipe out your disk.
For a more flexible partition layout, you should go with Something else option and hit on the Continue button to proceed further.

10. Now let’s create the partition layout for Linux Mint 20. I would recommend that you create three partitions, one for / (root), one for /home accounts data and one partition for swap.
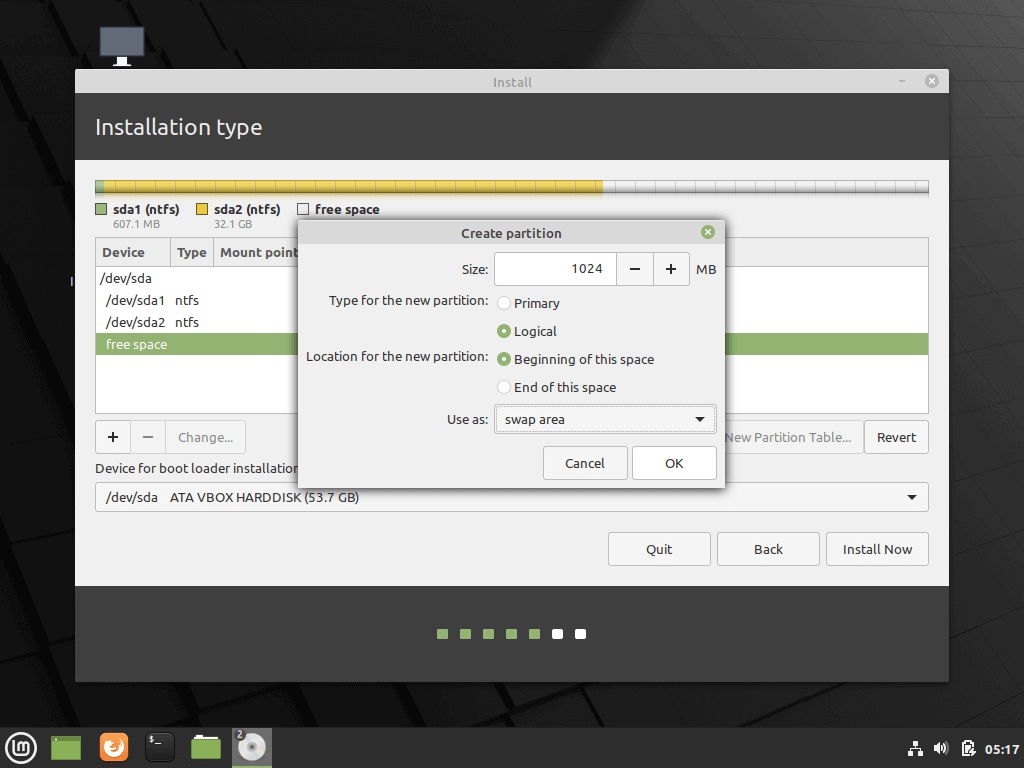
First, create the swap partition. Select the free space and hit on the + icon below. On this partition use the following settings and hit OK to create the partition:
Size = 1024 MB
Type for the new partition = Primary
Location for the new partition = Beginning of this space
Use as = swap area
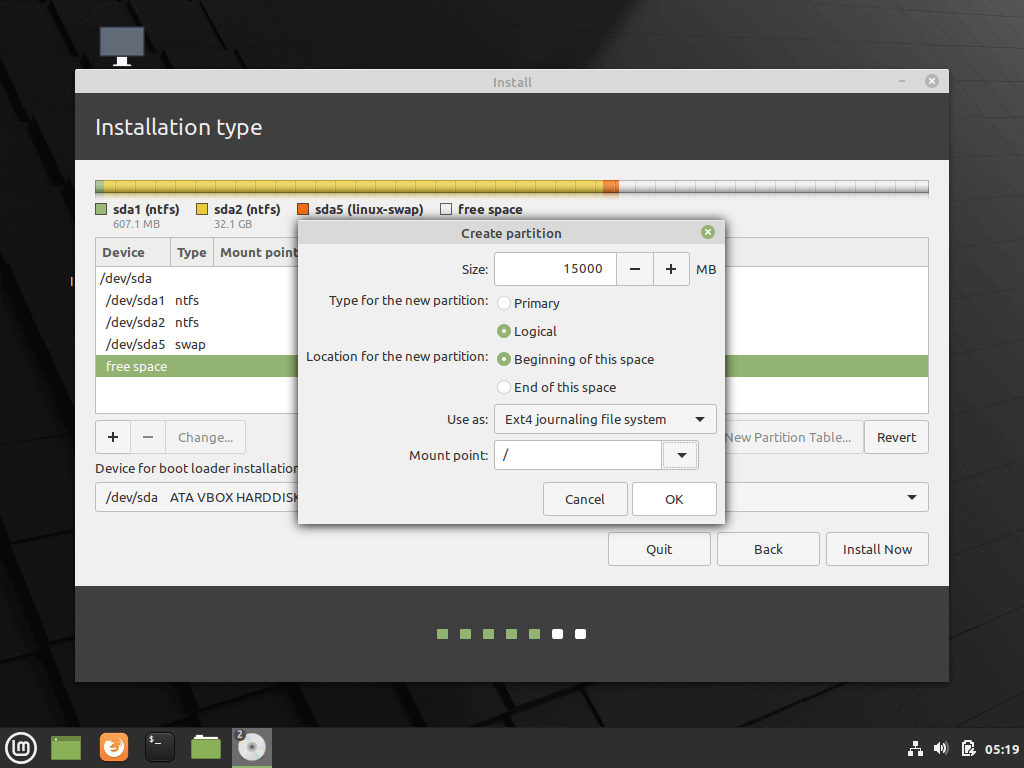
11. Using the same steps as above create the /(root) partition with the below settings:
Size = minimum 15 GB
Type for the new partition = Primary
Location for the new partition = Beginning of this space
Use as = EXT4 journaling file system
Mount point = /
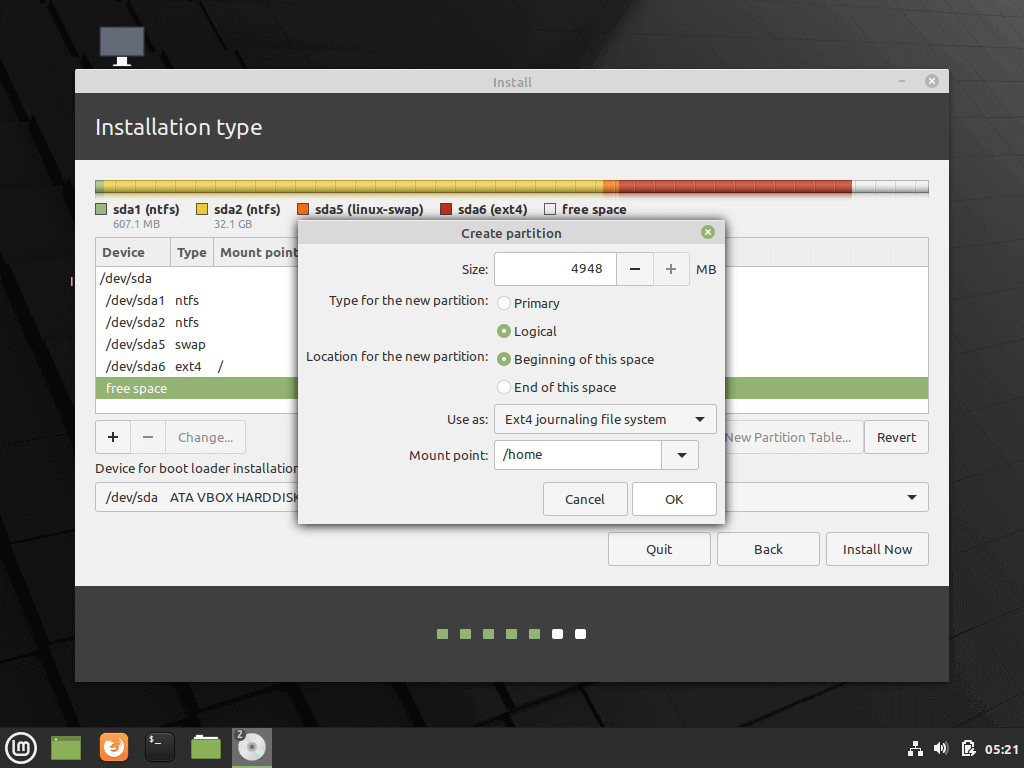
12. Finally, create the home slice with the below settings (use all the available free space to create home partition).
Home partition is the place where all documents for user accounts will be stored by default, except the root account. In case of system failure, you can reinstall the operating system for scratch without touching or losing the settings and documents of all users.
Size = remaining free space
Type for the new partition = Primary
Location for the new partition = Beginning
Use as = EXT4 journaling file system
Mount point = /home
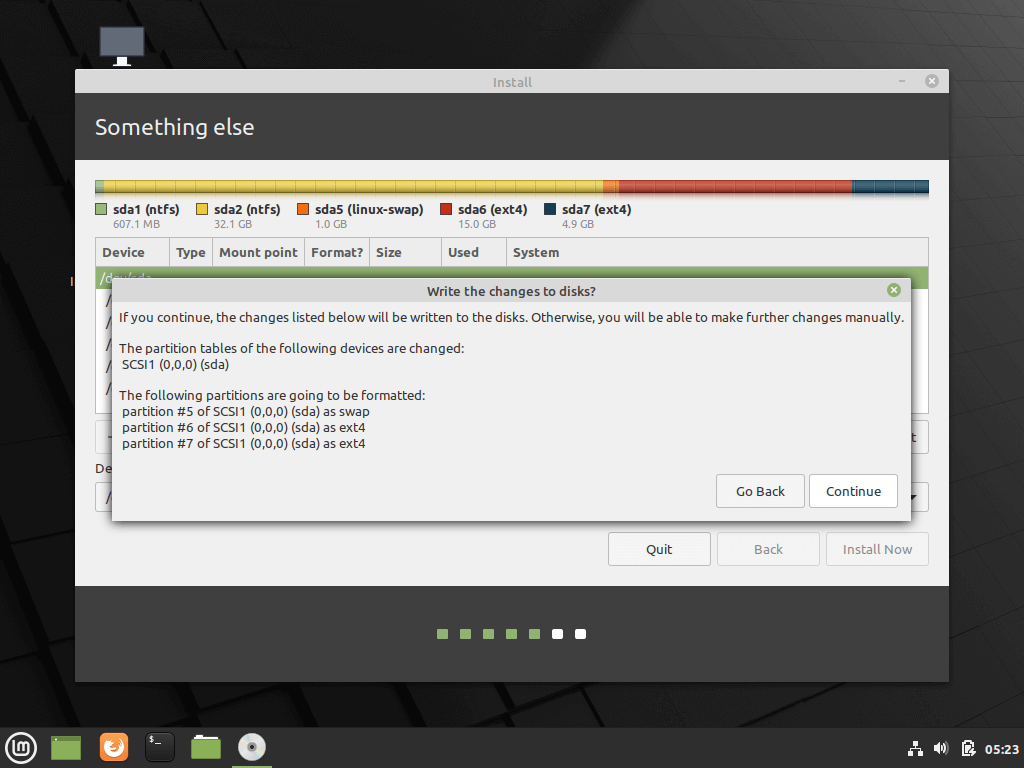
13. After finishing creating the partition layout, select the Windows Boot Manager as the device for installing the Grub boot loader and hit on Install Now button in order to commit changes to disk and proceed with the installation.
Next, a new pop-up window will ask you if you agree with committing changes to disk. Hit on Continue to accept changes and the installer will now start to write changes to disk.

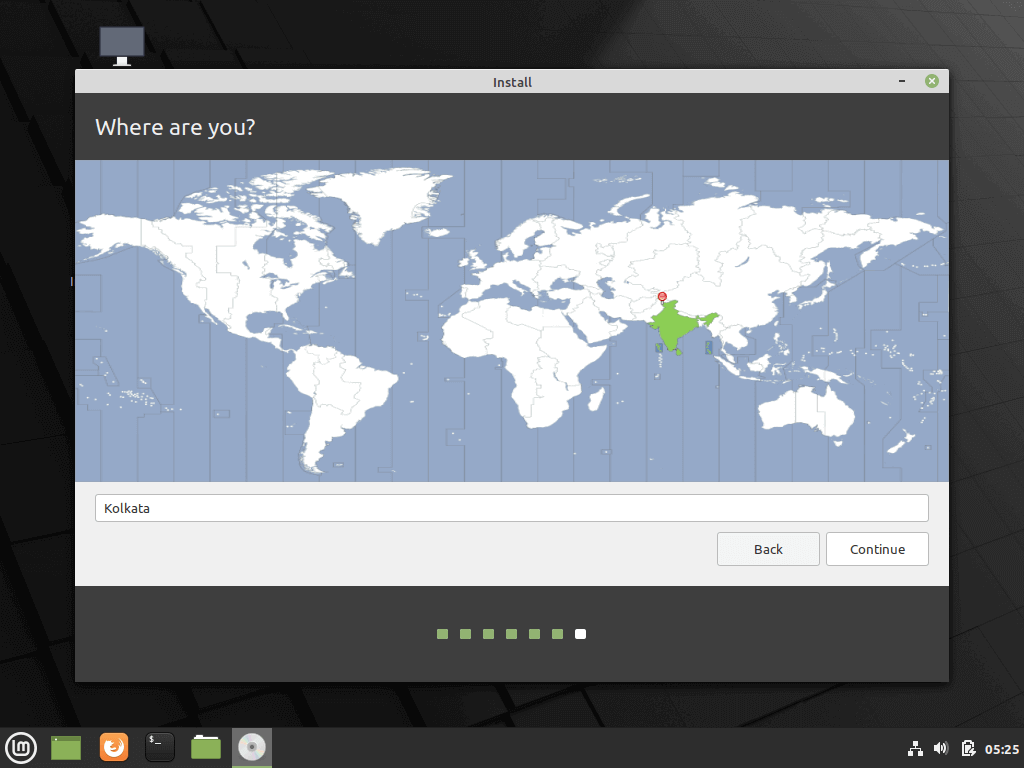
14. On the next screen choose your nearest physical location from the map and hit Continue.
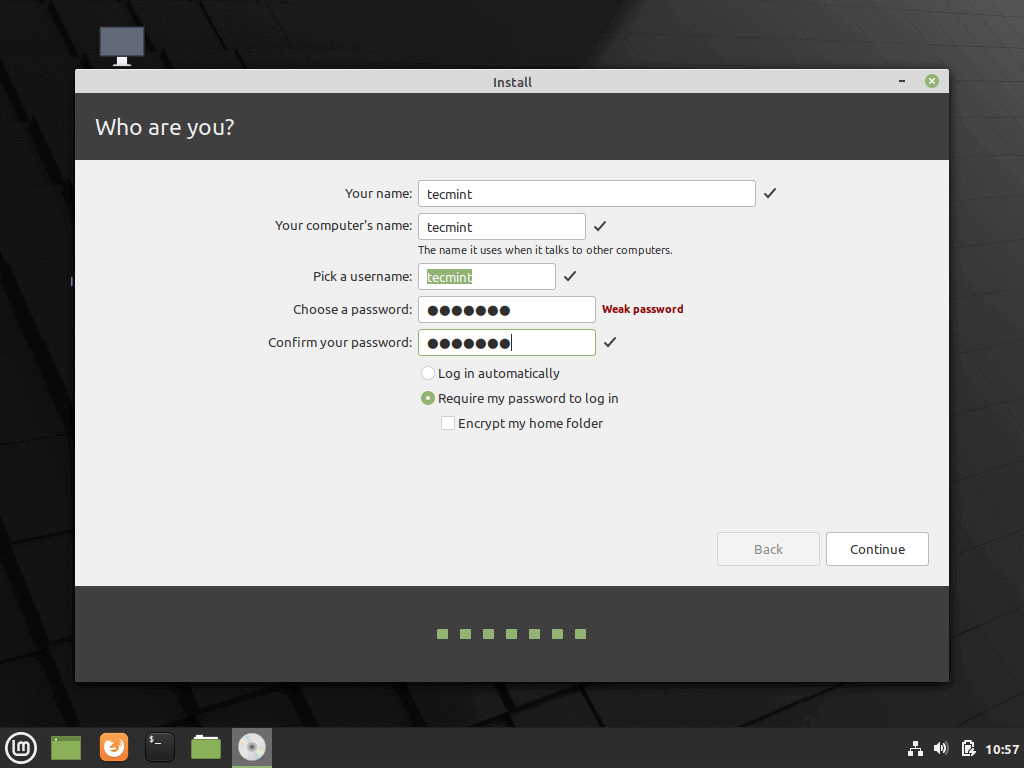
15. Enter a username and a password for the first account with root privileges, choose your system hostname by filling the computer’s name field with a descriptive value and hit Continue to finalize the installation process.
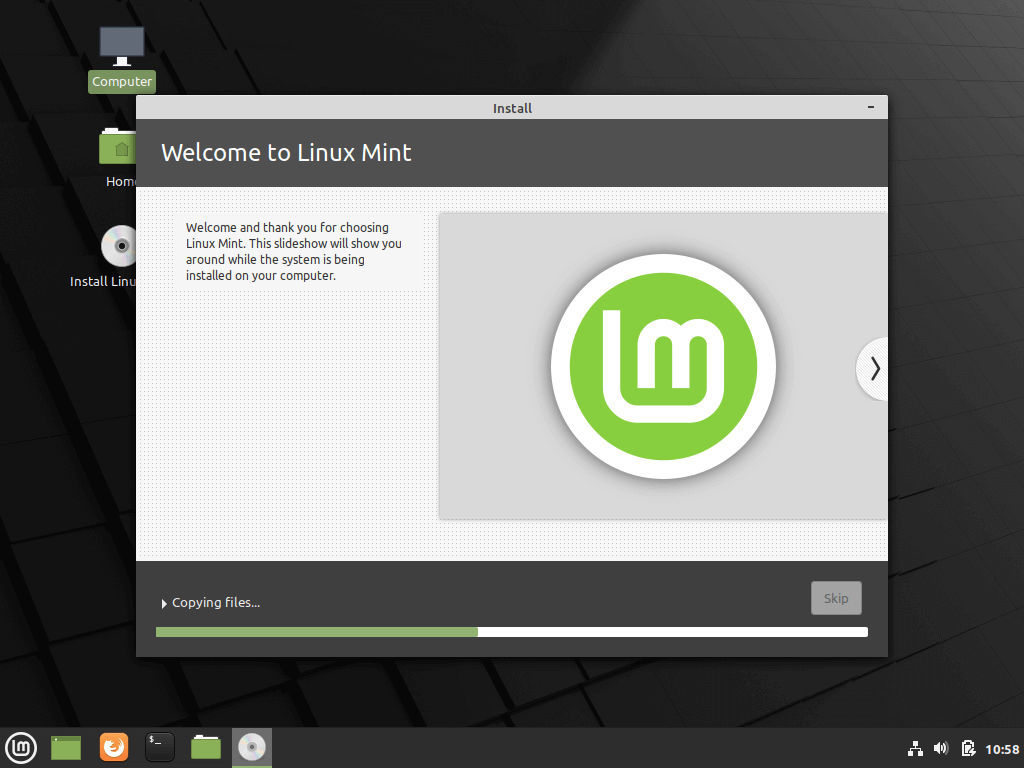
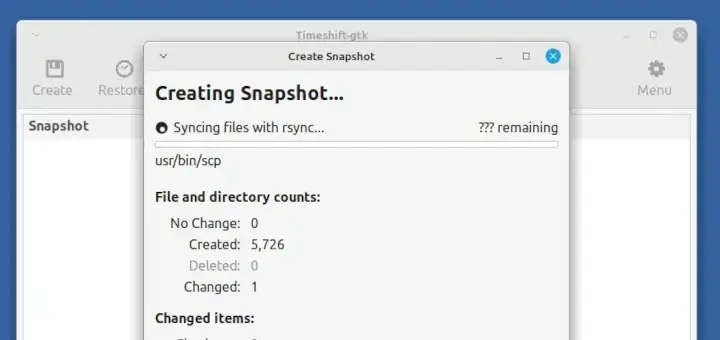
16. The installation process will take a while and when it reaches the final step it will ask you to hit on the Restart Now button to complete the installation.
17. After reboot, the system will first boot-up in Grub, with Linux Mint as the first boot option which will be automatically started after 10 seconds. From here you can further instruct the computer to boot in Windows or Linux.
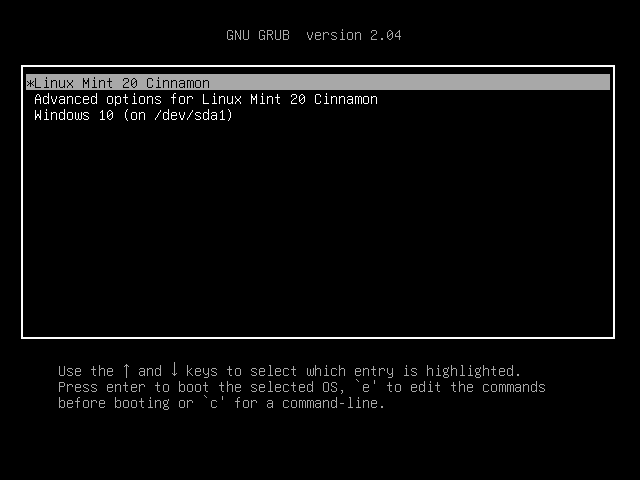
On computers, with newer UEFI firmware the Grub boot loader won’t be displayed by default and the machine will automatically boot-up in Windows.
In order to boot into Linux, you must press the special function boot key after the restart and from there to further select what OS you wish to start.
In order to change the default boot order enter UEFI settings, select your default OS and save the changes. Review the vendor’s manual in order to detect the special function keys used for boot or for entering UEFI settings.
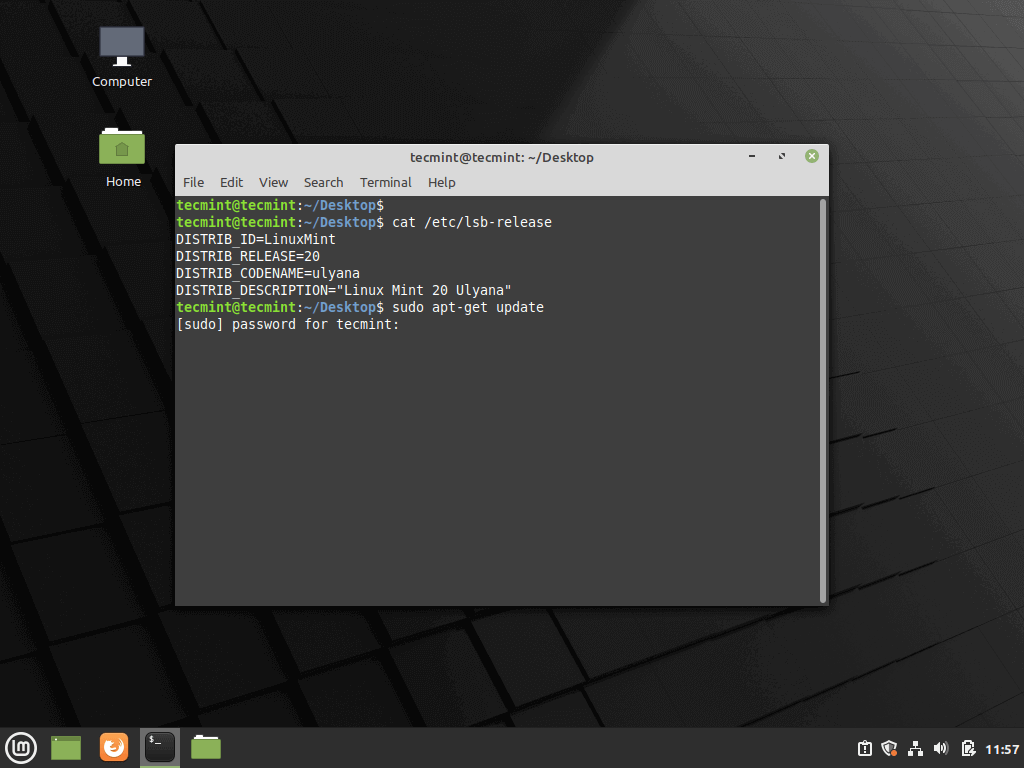
18. After the system finishes loading, log in to Linux Mint 20 by using the credentials created during the installation process. Fire-up a Terminal window and start the update process from the command line by running the following commands:
$ sudo apt-get update
$ sudo apt-get upgrade
That’s it! You have successfully installed the latest version of Linux Mint 20 on your device. You will find the Linux Mint platform to be very robust, fast, flexible, enjoyable, easy to use, with a ton of software required for a normal user already installed and very stable.
Great “how to,” Thanks!
I boot to USB through Win10, > choose device > “USB.
(Reason, I do it that way is because my bios are NOT allowing legacy, and only UEFI, so no choose the BIOS!)
I choose the “install mint” icon on the Mint desktop!, then no choice but to install it alongside Windows. NONE!
So I choose something else, and go thru choices, Language, etc., and SKIP WIFI, and SKIP media thingy’s, to INSTALL, and see the little ROUND spinning thingy for 30 Minutes and go back to Win10 UGH!.
I did have Grub2 with Mint as Starting OS and Win10 bootloader choice until I tried to install Winland to have. Android on Mint screen! And good ole Winland totally messed up Grub2 so the only CHOICE I have now is Win10.
luck!
Hi. I’ve installed Linux loads of times on old machines to dual-boot with Windows. This is my first go with a new machine, and I’m really struggling.
The drive doesn’t have an MBR partition, but a UFEI one. I’m not sure if that’s the problem, but in the Installation type window, there is a list of 4 partitions.
When I select it, the
+button is greyed out, and I can’t set up home, root, or swap.I can’t proceed without doing so, and I can’t do it.
Any suggestions were very welcome. Usually, this takes me 2 hours. I’m on my third day now.
@Paddy,
If you use Fast Shutdown or Fast Boot on your Window system, the hardware drives that were in use avoid getting unmounted, due to this the Linux system is unable to use those drivers as they are still used by Windows. This might be the issue.
The instructions were clear and helpful; thank you. The downside to dual-booting is not having the Grub bootloader loading by default as it is a bit awkward using the special function keys to get to the boot options to select the OS.
In section 13, you say “After finishing creating the partition layout, select the Windows Boot Manager as the device for installing the Grub boot loader and hit on Install Now button…”
As you know, Linux needs a /boot partition, and if the machine is UEFI, it will require a /boot/efe partition, otherwise, the install cannot continue.
Are you suggesting using /dev/sda1 for a combined boot partition with EFI?
This is not UEFI!
Where is the gpt partition table?
Where is the EFI partition?
Hi, I am having difficulty loading Linux mint alongside windows. I followed these instructions but hit a few problems. When I came around to setting the swap and root files, if I selected “Primary” the free space became unusable, if I left it on logical it worked, however, whilst your instruction said “Primary“, you picture said “Logical” so that confused me.
Then, have made all three partitions, the last command is: “select the Windows Boot Manager as the device for handling grub” this was not in the drop-down list, just a load of dev addresses… anyway, I hit install and got an EFI error message saying that it will wipe the drive and may not boot, so I’m lost again… but- great instructions, it’s just, it didn’t work for me.
Thank you so much for your time in creating this wonderful article. It was great!!! Greetings from Venezuela.
Linux Mint 20+ mate and cinnamon are both installed on the sdd and dual boots without a problem. the windows 10 partition is now history, as well as the Microsoft image and dell recovery partitions.
my question is; is it safe to delete the Microsoft reserved partition(2)? it’s only 128 MB. I’d like to be rid of everything on the drive that even remotely hints at Microsoft or windows.
@John,
Later if in case you want to install Windows again, then this partition is needed or if you want to completely switch to Linux.
You can remove it, but I suggest you make changes to the Grub menu using https://launchpad.net/grub-customizer – It has options of setting grub listing order or hiding menu items in the grub menu.
I installed a second HDD and then installed Mint alongside Windows 10. In the BIOS boot section, I see both the Windows disk and the Linux (ubuntu) disk UEFI options. If I save BIOS with the Windows UEFI as primary then it boots to Windows, as expected. But if I change BIOS to boot to Linux UEFI as primary it will sometimes boot to a terminal with a GRUB command prompt and sometimes to the GRUB menu.
I don’t know what to do with the GRUB command prompt so I reboot until I get the GRUB menu. Sometimes it takes 2 or 3 reboots.
When I have the GRUB menu, if I select Mint then it goes to the Mint logo screen and hangs, and hangs, and hangs…..
I have tried disabling the Secure boot option in the BIOS but it makes no difference.
How can I correct this?
I have a dual boot system – Windows 10 and Linux Mint. Is there a way that I can install Mint on the entire hard drive – i.e erase Windows – from within the Linux OS already installed?
@Jeff,
You must need a Live Linux Mint ISO image to do that, during installation it will ask you the option of “erase windows and install Linux Mint”.
Hi Ravi.
I suspected that was the case. I was just hoping for another solution. I have a live ISO image, so no problems.
Thanks for the reply.
Before I read this article, on a UEFI system I selected the “Install Linux Mint alongside Windows 10” option rather than the “Something Else” recommended here. The install completed OK, but it always boots directly into Windows instead of booting into GRUB, so I can’t select Linux Mint.
Thanks, David
P.S. This is a resend with typos corrected and my correct email address
On a UEFI-based system, I selected “Install Linux Mint alongside Windows 10” before I read this article which recommends “Something else”. My install completed OK, but the system does not boot into GRUB – it goes directly to windows.
Thanks,
David
This is not UEFI!
Where is the gpt partition table?
Where is the EFI partition?
etc.
Hello, When I create the swap partition, The free space becomes unusable. Meaning I can’t create the other partitions (root and home).
Your drive (partition table) is probably not GPT but Msdos.
Hello,
Thanks for the manual.
I am just curious. In your instructions, you suggest the type of partition as “primary“, but in the photos always appears “logical“. In the end, which one should we use? What’s the difference between them?
Thanks again
@Juan,
Go with the ‘Primary‘ partition and follow the given instructions. About screenshots, just ignore them…
I have an issue that the grub window is missing. I can’t go back to windows as something went wrong…
Ravi, thank you for your valuable contribution. In section 13, you say “After finishing creating the partition layout, select the Windows Boot Manager as the device for installing the Grub boot loader and hit on Install Now button…”
As you know, Linux needs a
/bootpartition, and if the machine is UEFI, it will require a/boot/efepartition, otherwise, the install cannot continue.Are you suggesting to use
/dev/sda1for a combined boot partition with EFI?I have a very simple question. In step 12, what do I choose for the location of the GRUB boot loader? I have tried the Mint root and the
/dev/sdapartitions (yes, I know the latter is not a partition but rather an entire hard drive device). Neither one allows me to get the GRUB menu screen when rebooting afterward.All of the remaining choices are W10 partitions. As I want to avoid messing up the Windows install (causing even more trouble), I don’t want to write to the wrong partition. Two of the choices seem logical.
W10 Disk Manager says that the first is a 650MB EFI partition (“partition 1”) which is first on the list. As I understand it, EFI is a FAT32 filesystem for boot loaders and applications. The other possibility is called the “OS C:” partition containing “Boot, Page File, Crash Dump, Primary Partition”. Obviously, this is the main W10 partition. It would seem that one of these two is the one I want. Which?
New out-of-box dell Inspiron 14 5000 series (model 5491) with win 10 pre-installed.
I was able to boot Linux Mint 19.2 from USB but unable to see the hard drive. I could install Linux Mint to an external hard drive. I resized the os(drive C) then formatted part of the unused partition as NTFS.
When I boot with Linux Mint 19.2 USB it still does not see the HD. how do I get it to see the hard drive partition I created?
Also I tried to disable UEFI in bios but then the Linux Mint USB hangs and won’t boot.
Hello and thanks for the tutorial!
I have just followed it to install Linux Mint 19.3 with a dual boot on a laptop with win10. It worked well but one thing is very strange.
When on Linux, I can access every file on my Windows partitions. Linux can access everything that is in all the partitions on both of my HDDs. Whereas on Windows everything is as it should be I guess, I can only see what’s in the partitions I allocated to windows.
Do you have any idea what I did wrong and how I can fix this? I mean, I intended to have a shared file between the two OS but this seems a bit dangerous, I don’t want to accidentally delete important windows files.
@David,
It is comparatively easier to access the Windows partitions from Linux, but not the other way round, it is because of different file system formats…
To access Linux partitions from Windows, you need third-party tools called Ext2Fsd and Ext2explore.
https://www.howtogeek.com/112888/3-ways-to-access-your-linux-partitions-from-windows/Google is your friend
I have Acer Nitro 5 laptop with 8GB ram 240GB SSD and 1TB HDD preinstalled with windows 10. I’m trying to install Linux mint cinnamon 19 in dual boot mode. I have disabled secure boot and fast boot. I have created a partition of 35 GB in my SSD. But while choosing free space the SSD isn’t recognized. I have tried many solutions but none of them is working for me.
Where is the problem?
Thanks in advance.
What solutions did you try?
Does this apply to you?
You’ve got a single SSD set up in RAID mode, and the Ubuntu installer won’t recognize your SSD until you switch your disk setting in the BIOS from RAID to AHCI.
https://askubuntu.com/questions/932997/why-cannot-the-ubuntu-installer-recognize-my-ssd
Problem solved. I had to enable Uefi and install it again. Thanks anyway!
Thanks for the tutorial. I did all the steps up to 17. Unfortunately after restarting I got a black screen with a flashing cursor. I entered settings and re-enabled UEFI but still, the only available OS option is Windows 10. Is there any other way to access Linux mint?
This simply doesn’t work. I’ve set up many dual boots with Mint and Windows 10, but something has changed. I never had to make a new partition for Mint before, but even doing this, it only gives the option of formatting the entire disk, thus wiping out Windows.
Hey, great easy to follow tutorial, I encountered one issue after creating swap and root, the remaining partition became unusable. Any idea why?
@Brek01,
Better give whole partition size to
/rootpartition.How can I modify this instructional if my laptop has 3 partitions? It has a large “D” data partition, and two other smaller partitions “C” for the windows operating system and another for something else, which I can’t remember.
@Everick,
Shrink the
Dpartition and install Linux Mint on shrinked partition.The content of the article is inaccurate.
In step 9 the partition is not Primary is Logical.
A good day.
Thanks a lot!
Step 1. says to shrink the Windows partition while in Windows 10. Question can I use GParted while running from Linux Mint Live Boot USB instead?
Should i remove my Flashdisk? When it restart?
@mak,
Yes, you must remove the disk, before restarting the system.
I am going to install Xubuntu 18.04 LTS on my old Acer Travelmate B-113. The Windows 10 are overall a good system and I like using them, but they got too slow for me to work comfortably. I already have dual-boot with Windows 7 on an even older netbook. Hopefully all goes well this time on my main machine. This tutorial is very useful!
Hey, I am unable to create a partition more than 2000 MB. The disk management isn’t allowing me. What should I do?
“You need to defrag this drive before you start.”
“You can only make a partition with a contiguous space. Any file fragments would reduce that available space.”
Hi after installing Linux mint on my hp pavilion notebook, cannot boot on it. No selection on what OS to use. Can someone help me on how to show OS selection on the startup of my laptop?
Trying this with Windows 10. When choosing how to partition it’s showing 5 sda and 3 separate free space sections, the biggest being 900mb. I did the shrink hdd instructions and I’m pretty sure it created the sda5 (based on size) but that’s also showing it’s mostly used.
Did I do something wrong? Should I try the “alongside windows” option? Or try redoing the hdd shrink?
Lads be careful when trying to do this. I have lost my Windows install about 10 times now trying to get Linux on. When I get to the stage for selecting my area the install fails and wipes my windows partition as well as the ones I have created.
I’m now thinking it won’t install. In every case I never have network connection. It’s a nightmare and I’ve worked in IT for 15 years. I’m ready to give up on Linux like I did 22 years ago.
I had Windows 10 pre-installed with 52428 MB free space. After I set up the swap partition, the remaining free space (51404 MB) show as unusable and I cannot proceed. Can anyone help me?
@Jerryl,
You should create a logical partition from disk manager for Ubuntu installation to show up as free space while installing Ubuntu.
Disk manager shows that I have a 122GB unallocated block on my drive. Is this a logical partition? If not, how do I use disk manager to make it into a logical partition for installing Ubuntu?
@Jerryl,
Follow the step Shrink HDD Space for Dual-Boot in the article, that shows how to use disk manager to shrink or create a new logical partition for Ubuntu installation.
I am worried about my windows 10, if I install Linuxmint with windows 10 so my windows will be damaged or not?
@Abdul,
No it can’t, just follow the instructions and install Linux Mint alongside with Windows 10..
Does these steps work for windows 7 with mbr partition scheme?
@Rio,
I think so, give a try and see..
I install Linux mint along with Windows 10 on my Acer aspire e5. After step 17 my laptop doesn’t want to boot to Linux or show the grub options. Any solution?
there is no option to select ‘windows boot manager’ ??
I ran into this problem when trying to follow this for Windows 10/Linux Mint 19 dual boot install. I selected /dev/sda (the hard drive, rather than any partition) and it is working (entering GRUB on startup with options which OS to boot).
Hey so I boot into Linux Mint KDE. When I start install it says I only have 7.8 GB available space on my USB. Do I have to get a bigger USB? I don’t even want to install it on my USB but thats the only disk it can find.
I already have some unallocated space saved for Linux Mint (around 100gb) on my SSD. I was wondering what the issue would be.
Boot the Linux Mint iso in UEFI mode and check disk partitions with fdisk command.
So i seem to partially figure out that problem it seems it was mainly caused by my Dell xps15 BIOS UEIF mode. i still have a small problem.
If you wanna have look at my post here :
https://askubuntu.com/questions/1040328/kubuntu-ubuntu-18-04-ubi-partman-failed-with-exit-code-141-does-not-detect-my-d
This is the first article that I have read in Months which for the first time gave me the right instructions to install Linux Mint along side windows 10.
I have seen at least 50 videos on Youtube, and all of them failed to work. I also looked on the Ubuntu page and didn’t find an article which succeeded. And even Linux Mint made me waste hours without any positive results….
Therefore I must write this to tell you that this article solved my problems in five minutes…
Hi, I didn’t select Windows boot manager while installing. How do I change it?
Nice tutorial but don’t work for me based on the raid controller..
I can install everything if I switch from RAID to AHCI in bios settings, but after this windows will not boot anymore only Linux.
Switching back from AHCI to RAID Windows will boot fine but Linux doesn’t..
Do you have a solution for this problem?
Install Linux using the same BIOS setting for your storage as used while installing Windows
After I complete the step to create the 1024MB swap file the remaining 494982MB is marked unusable and the disk manager won’t let me create any other partitions. Recommendations?
@Mike,
The disk space was marked as unusable during the Linux Mint installation because, we can only have 4 primary partitions in the hard drive and I think you have created 5th partition for Linux Mint installation.
The only solution is to limit the number of primary partitions to 4 on the hard drive. For this you have to delete a one parition (example D or E drive on Windows) from the Windows Disk Management Utility, but do remember to take a backup of your important files before deleting the partition.
Once you deleted the (example D or E drive on Windows), then allocate space for Linux Mint installation.
Thanks, I was just booting into the new install to make sure it works, sorry I didn’t post this sooner, making swap and root logical and home primary worked.
Best Regards,
Mike
@Mike,
Thanks for updating us, an I hope you will enjoy new Linux Mint, as me myself using Linux Mint since last 3 years and I must say one of the best stable OS so far.. and far better than Ubuntu.
Thanks Ravi, I’m glad to hear it’s stable, and I’m looking forward to using it.
I did some reading and found that with legacy (non UEFI) bios you can only have 4 primary partitions, Windows 10 was using 3 o them, so I created the swap and home directories as logical and made home primary. Works great.
Thank you very much for a very thorough guide.
I think you are talking about the Legacy bios. Better take a closer look before posting erroneous comments
I have no clue what you’re talking about, I installed Mint using exactly the approach I described.
After a month of usage, can i delete the Windows 10 partition if i like Linux Mint and allocate the free space in Linux Mint again?
Doesn’t work. My windows 10 machine refuses to boot into Linux no matter what I do.
After stage 6 it showed just black screen
Your VGA cart is not supported for new applet in mint.
Maybe you test with another vga
Why are we using windows disk management, rather than the linux mint “install alongside windows” option?
For flexibility. It allows to manually partition and use my own scheme.
Great walkthrough. Had to change options in UEFI bios to eliminate the legacy option prior to loading the mint DVD; the ‘install alongside windows’ option would not appear.
I wondered why this didn’t show up for me. I needed to enable the legacy option to for the usb stick to boot, but then I didn’t have the “install alongside windows” option. On occasion it has appear – so it’s good to know it’s just a BIOS (mis)configuration.
Also of note, selected any boot loader does not work. The default first partition (1MB) on my NVME drive just leaves me at a grub prompt with no help. (so now I’m reinstalling and surfing the inter while I’ll wait).
I can see in the screenshot that that second partition matches my second partition (104MB with 33MB free) so I’m trying that now. If it works I won’t be back, but if it fails I’ll be back here to update (since I’ll have some time to kill during the next re-install).
Thank you very much.
Following these instructions, I managed to install LinuxMint 18.2 along with Windows, on a PC with Windows 10 and UEFI.
I opted to reduce the space of the
C:partition using the “Disk Administrator” of Windows. Later, during the installation, I chose the option that allowed me to size the partitions to create in the free space for the LM installation.In this step of creating partitions, it is necessary, before pressing “continue”, do not forget to select in “Device Boot Loader Installation”, “Windows Boot” Manager”.
Best regards
Dear all,
I have a doubt that I will appreciate clarifying, If on the screen to choose the type of installation, Linux Mint automatically detects the Windows boot manager, and I select this option and also the Install Linux Mint along with Windows Boot Manager.
The installer will automatically create the partitions in the unallocated space, or on the
(C:)? Disk.If the hard drive has some unallocated space, minimum 10G, then ubuntu will use that space for the installation. However, if the space is smaller or there is no unused space on the disk, then, according to an algorithm, it will automatically shrink some of your hard drive partitions, create partitions and install Linux Mint alongside Windows.
Why using Windows diskmgmt instead of Gparted from the “live” session, which is much faster and safer?
Why creating partitions from the installer instead of using Gparted? It is also much safer. Installer can mess up partitions table. Especially ntfs one.
Why is not mentioned that you need firstly disabling this nasty “fast start” mode in Windows? If this is enabled, Linux won’t be able to mount some of its own partitions. Hibernation and suspend can be also disabled (turned off).
The grub goes always into the partition marked as “EFI“, because not always is labeled as “windows boot manager”.
And the last one.. The safest way is to boot the machine into the Linux live session from the windows “safe uefi mode“. Tap restart, tap and hold shift key and hit restart. Hold shift key until the “light blue screen” pops up.
Then go into the menu and select “use a device” -> “uefi usb device”. Or something similar. This is much safer because the uefi “keeps an eye” on the entire boot process. Normal mode can sometimes be a cause for the future problems with the uefi setup.
Dear All.
I have upgraded Windows 7 to Windows 10 and try to install LinuxMint18 now. For this I realized a reduction of 127GB in the disk (C :) leaving it as “not signed”. When I try to install LinuxMint18, it detects the following partitions:
Next I selected the partition without assignment, and it does not let me use “+”, neither format nor do anything.I will be grateful for your suggestions.
It look like your hard drive in partitioned in MBR style scheme and all four partitions are primary. You need to delete the last partition and create a third partition as extended and then other logical partitions. But first backup data! And what’s the deal with that space between sdb2 and sdb3? is that a partition or what? It has a ntfs label there.
Did all of the above, but the system STILL boots into Win-10 only.
re “In order to boot into Linux you must press the special function boot key after restart and from there to further select what OS you wish to start.”
WHERE is this “special function boot key”?
I have a 100 MB efi partition as sda2, the Win-10 is in sda5,
and my Mint system is on sda6,7, and 8.
I’ve tried using Rescatux to somehow fix the GRUB, but once all bootable devices are removed, the system still only sees Win-10
Excuse my frustration- it’s the first time I came across a UEFI-enabled PC. I’m used to old BIOS systems! ;-)
And, over several years, I have installed dual Ubuntu / Windows systems often so I’m not a newbie. Except when it comes to this UEFI partition stuff! Guess it’s time I came up to speed. ;-)
Consult motherboard documentation to find out the boot-up special key.
Please don’t tell me you mean the Del key to access the BIOS. Or, on some mainboards the F10 or F1 key. I’ve been tweaking BIOSes for 10+ years.
Right now, my messing around with Rescatux has screwed up booting the PC completely. Neither Linux NOR Win-10 boot!
Caution- Rescatux does not seem to have much UEFI support.
So I’ll keep looking for..
Be aware that on some laptop models you can access BIOS/UEFI by inserting a needle in a small hole (orifice) from a sideway of the laptop. https://www.youtube.com/watch?v=8pBBnBv8wws
Note here that ALL my UEFI problems have been solved by wiping the whole physical disk clean, changing the laptop’s BIOS to UEFI ONLY, and then re-installing.
1- Win-10 (latest insider Preview)
2- Ubuntu Mate 17.04
Systems now boots into Grub on the Windows EDI partition, and then offers me a choice of either Ubuntu Mate or Win-10.
Goodbye, old BIOS!
AND!
DO NOT trust Rescatux! It was the problem- converting my initial UEFI into the old BIOS format, and causing my EXT4 and Swap partitions to suddenly change into the old format i.e “free space” ready for an extended partition.
I tried the manual install. Got all the way to the end and it would not let me select the windows boot option. Went back and select the install alongside windows option.
nice, thanks for this. super easy to follow
got it working nice thanks for the tutorial.
It worked like a charm for me thanks
Thanks a lot, it worked perfectly!
How about one of you actually show us using the actual “Install Linux alongside Windows 10” option! instead of going right to the “Something else”.
Instead of ‘free space’ in the installation, it is showing ‘unusable’. I am not able to add partitions in the memory. Any help will be appreciated.
It looks like the HDD is using MBR scheme and you’ve exhausted the four primary partitions. You have the options to delete the fourth partition and create a new extended partition and in that partition create other logical partition or convert the HDD partition layout from MBR to GPT. You can use a live Linux live CD with Gparted tool to tamper partitions.
I am having the opposite problem and I have grub working and booting mint but windows 10 is not in the list
The superb article my first installation of Linux ever went flawlessly! :)
One question though after this install do I have to manually install drivers/update them?
After a day of use, I encountered login loop issue when tried to log into os.
Had to remove it….
UEFI settings -> Boot Options -> BBS Priorities. From there, on some UEFI machines, you can setup what OS should be loaded by default by the motherboard
I am not able to boot into Linux as the system is directly booting into Windows 10 and I am not getting any option to boot into Linux in the UEFI settings.
There is only one option and it is for WINDOWS, what should I do now?
My BIOS settings are same as mentioned in the TOPIC…!!
Hold down shift when you choose to restart windows, this will bring up a special menu. Should see boot USB/Another OS option at that point.
Go to UEFI settings, boot order, BBS priorities. From there you can choose what OS should boot by default.
Hi. I installed Mint 18.1 alongside with Windows 8 in a ASUS laptop but when I finished the process and reboot the laptop doesn’t enters grub, instead, it starts the Windows normally just the way it did like if I hadn’t made any change to the laptop… when did I get wrong?
Read article from start to finish, please.
Hi Cezar,
I get stuck at the step 10. After I create the / (root) partition, the remaining free space shows as “unusable” and I can not access it.
I tried it for few times. I can not create the “home” space. Any idea what am I doing wrong ?
Does your HDD uses MBR partition scheme? If that’s the case I must remind you that on MBR partition style you can create only four primary partitions. You can delete the root partition and create a new partition as extended, then you can create other logical partitions. Or, better, format the HDD with GPT partition style and you can use up to 128 primary partitions.
Hi, followed tutorial perfectly until it gets to step # 12. There is NO Windows Boot Manager listed. There are 2 listings of Windows 10 Loader. What should I do next?
do not choose the windows 10 Loader, otherwise u will not able to boot to windows 10 anymore. I getting this error and trying to find the solution rather than install the whole windows again
Just download the windows os to the pendrive and run it on computer start, choose fix this computer and in the command prompt write: bootrec /fixMbr
You should be good to go.
Hi, great tutorial! Sadly I used another one and it didn’t say to set Windows boot manager for installing grub loader so I skipped that part. I don’t know if it’s directly related to my problem (but everything else I did as in your tutorial), but now Linux mint works perfectly while windows doesn’t get recognized anymore by any booting menu. even if I enable UEFI boot (i made Linux run on legacy as it was advised) the PC doesn’t see Linux anymore, nor does it see windows though. As if no OS was installed. Can you help me with this?
Have you tried to change boot order or HDD BBS from UEFI settings? Was the Linux installation performed from UEFI mode or Legacy?
Hi brah,
I have the same problem… Did you find solution? I cant see the windows in grub, but Linux works fine. I just skipped the part (set to windows boot manager).. ( Sorry for my English). :(
If Linux installation was performed from UEFI mode change the boot order or HDD BBS from UEFI settings. Also, I suggest you update the GRUB with sudo update-grub or use https://help.ubuntu.com/community/Boot-Repair
Thanks! Was missing the Boot to Windows options. This really helped!
Thank you for your tutorial, let me explain my problem. Hope you can help.
I have a HDD and a SSD inside my laptop. HDD is sda and the newer SSD is sdb. I copied my entire Windows from HDD to SDD a year ago, everything works fine. I formatted my HDD, but boot partition still remains.
When I tried to install Mint 18.1 in SSD, the boot loader always shows up in sda1, even setting up a boot partition in sdb could not help. I used “df” command to see what was wrong, it told me that /boot was mount on sdb7 which I set it up during the installation and /boot/efi was mount on sda1, really strange.
What’s more, every time I tried to load Windows in grub2 menu, it went into repairing mode straightly. I had to press F12(for DELL) to load Windows boot manager.
So I wanna make the boot partition mount on my SSD so that I can exchange my HHD. Maybe I should remove my HDD during the installation? And I wanna figure out why I can not load Windows though gurb2, because press F12 every time I boot up is every annoy.
Sorry for my bad English. Any help is appreciated.
I dont understand what you’re trying to accomplish? Install two OSes on different hard drives or install both OSes on a single hard drive? If you want to dual-boot on a single hard drive , remove the HDD and install the OSes. Else, you could try to install windows first, plug the second hard drive, install Linux and Grub in Windows boot manager.
I installed Linux Mint according to the above steps, but on starting the system when select windows 10 to load, it does not start.
Linux Mint loads into the system without any problem, but windows 10 doesn’t. I think when i selected device for boot loader installer i selected an option with windows 10 in it, and win 10 loader has been overwritten in grub menu. now how to get to start with my windows 10 os.
If you go to UEFI settings can you choose Windows as first boot option from boot order? If yes, choose that option as the first one. Or, boot to Linux and install Boot-Repair https://help.ubuntu.com/community/Boot-Repair and follow the steps to recover boot options.
I am also stuck as in same situation of dinesh. How can go to UEFI settings on windows 10 machine if I am not able to login in windows?
Is this boot repair works with mint also?
In order to go to UEFI settings you must press a special key on machine start-up (usually F2, F10, F11, F12, Esc, Del etc depending on your motherboard manufacturer specifications). Yes, Boot-Repair can be installed in Linux Mint also or under a Linux Mint Live ISO image (DVD or bootable USB drive).
What you show here is physically impossible. The drive can only have 4 primary partitions. You started with 3 in Windows and added 3 more during the Linux install? That can’t be done.
On a HDD initialized with GPT partition style you can have up to 128 primary partitions. You can have only 4 primary partitions for on a HDD with MBR partition scheme. Anyway, you can install Linux even on logical partitions. Only Windows require a primary partition for installation.
Change EFI settings by pressing the special key (F2, F11, F12 , Del depending on motherboard specifications) and choose what OS should be loaded by default at boot time.
Also, try to run the following command from Windows with administrator privileges:
bcdedit /set {bootmgr} path \EFI\ubuntu\grubx64.efi
I can’t Find Windows Boot Mangeer
As a petition in Linux install after choosing something else
It should show you the free space without any issue. Go back to Windows and create a new NTFS partition using the unallocated space. Boot again in Linux Mint and use the last created partition.
Please help!
I have windows 8 BIOS and 500GB HDD which is divided into 4 partitions. I shirked one of them to create unallocated space of 48GB .
I want to install Linux mint 18.1 alongside windows. but after choosing “something else” it shows only C drive partition separately other three partitions are shown as whole. It does not show a free space that I shirked.
please help me asap.
Did you find the solution?
Same problem here
I have windows 10 installed Linux mint 18 alongside windows 10 and when i boot up my pc it shows the two options windows 10 and linux mint 18 it gives me no problem the thing is with some of you is you either don’t have a GIF partition hard drive.
I want to set up the remainder of my memory as FAT32 so both Linux and Windows can access it. I don’t know what the settings should be. Should it be Primary or Logical? Beginning of space or end of space (I assume this one doesn’t matter since it’s the memory thats left over). And, what do I make the mount point? I am in the middle of this right now and any help would be appreciated from anyone. Thanks, Kev
Assumig you refer to EFI partition, if you install Linux alongside Windows you shouln’t ever touch that partition. Assuming single boot, format fat32, begining and no mount point.
when i do the process of creating swap partition and hit ok then the free space becomes in-active and couldn’t be selected again. how i may create the remaining two partitions i.e. root and home.
need guideline please.
You know, if someone selects the ” Install Linux Mint alongside Windows Boot Manager.” option, this tutorial pretty much leaves them hanging after the selection.
Unfortunately i have chosen the first option ” INSTALL LINUX MINT ALONGSIDE WINDOW BOOT MANAGER” . Now its starting in Mint directly although all window partitions are intact. please guide me how do get dual boot option.
exactly, this is in my case help..
In order to show boot up menu (grub) I just had to run this in Windows as an administrator:
bcdedit /set {bootmgr} path \EFI\ubuntu\grubx64.efi
Thank you for your time and effort. I get as far as installing mint 18 kde half way in it crashes with the the message:
I can only find secure boot, should raid be switched off and I turned on.
thank you for any help jim..
Is that a hardware RAID? You should first create the RAID array from BIOS/EFI according to your specifications and then attempt to install Linux.
Hi and thank you for this tutorial.
Anyway, I’ve got something different that from there, and, before breaking anything, I’d like to ask a question.
It seems that I don’t have an “efi” partition, but a ntfs Windows 10 (loader). See my partitions here : https://framadrop.org/r/xh9J0CqOgU#DG8G9pdwiITvSoeLl65NFs8N8xEv7THdklYZeZUMiAk=
I’m wondering that, if I choose this partition for boot loader (grub ?) , it might break my startup and can’t use W10 anymore.
What should I use as boot loader partition ?
Regards,
Clement
Choose sdb (windows 10 loader) from the bottom list (Peripherique ou sera installe le programme de demarrage) as the location where the GRUB will be installed and continue the installation process normally.
I asked the same question on SuperUser : http://superuser.com/questions/1139027/dual-boot-installation-windows-10-linux-mint
I decided to follow the answer given there, and it was right. As I’m not in EFI mode, I had to save the windows 10 loader partition and install GRUB elsewhere. Now, when I startup, GRUB is displayed with linux as default and windows 10 is still working if chosen !
I leave it here if someone is in my case ( Legacy BIOS / windows 10 / mint )
Cheers !
I really need your help, after restarting, it boot up straight to windows, it doesn’t show what OS to pick, I’m using acer es1-431 windows 10 64 bit, I don’t know what special function boot key to press to boot on mint 18, you just said that newer UEFI won’t show the grub, please help..
Try F2, F12 or Del key to enter EFI settings and activate function boot key.
(Sorry if I write this here but I really want an answer, because I need this thing to study at home :'( )
Hello and thank you for sharing with us this method.
I found a problem in step 19, when I press enter in CentOs Linux 7 (Core), a black screen show up and ask me to enter the login and password. I wrote root in login and the password that I created before in step 17 (just for information, I did not create a user in step 17).
I log in, they gave me how many users tried to enter this account (because at first I did not realize that the root password was the one I created in step 17 so I tried a lot of password that didn’t work before).
After that, I click on off button to shut down my computer and tried to re-install CentOs 7. But the problem is, when I create the 3 MOUNT POINT and click on DONE, an error message show up.
The first sentence is in French because I’m French, but I hope that you get the idea about my problem from the second sentence.
What I want now is to delete everything that have a link with the CentOs 7 installation to try re-installing it again.
Thank you very much.
This is a topic dedicated to linux mint so the comment is posted wrong. Still, if you messed up your installation and you install CentOS single boot you can try to delete all previous partitions by booting a Linuxlive cd with gparted. But you can also delete partitions on the installation process by granting centos installer to automatically create them.
Wow! Nice write up, Matei! I know this isn’t win 8-10, but since I was clowning around on my HP Envy win 10, thought I’d dust off an old Dell Latitude. Works with one exception.
In step 2 item 12, for win 7 use “win 7 loader” vice “windows boot loader.” Same drive, diff name. Mines working great, dual boot and dual screens and all! Thanks for the write up, accurate screen shots and the time you spent. Helped me greatly!
Solved by following this link
http://connectwww.com/how-to-solve-realtek-rtl8723be-weak-wifi-signal-problem-in-ubuntu/4625/#comment-494237
I don’t understand it but the recipe worked. This probably explains the network issues I had during the installation process too.
Thanks for your help and patience.
I’ve managed to take a screen shot which illustrates the points I posted last time. How can I send it?
Hi again and thanks for all your help. With the laptop reset (again) to factory settings, secure boot disabled and with a Rufus-created usb of Mint18 xfce and installation completed, I can boot into Mint, as you say, via esc, f9, and choice of options, Ubuntu or EfI.
There is definitely something odd about the internet connectivity. When using the live version, there is no problem with connecting to the wireless router. But using the installed version is frustratingly slow and erratic. Eg-
It does connect to my home network (WPA2 encryption, download speed 15Mbs) but the speed is very slow. Downloading the package files for updating gives at best 500kbs.
Clicking on ‘connection info’ shows the interface as wlp13s0 and security as WPA/WPA2. However, iwconfig wlp13s0 shows that encryption key is ‘off’. Also I would have expected to see wlan0 as the interface.
Clicking ‘edit connections’ shows the ‘mode’ options as client, hotspot and adhoc but what I am looking for is ‘infrastructure’ surely.
I would add screenshots but I am writing this on a different computer because of the frustration of the connection on my newer machine. It has taken over an hour to install the updates to linux since the installation. I’m not a command line person but I can follow simple instructions.
Matei Cezar
September 30, 2016 at 12:18 pm
Disable Secure Boot option from UEFI settings and repeat the procedure.
Reply
cat1092
September 30, 2016 at 1:49 pm
Also use Rufus for this purpose, and be sure to select GPT partitioning for UEFI. Rufus is a free portable tool that can be used to create bootable ISO’s the way we need these.
https://rufus.akeo.ie/
If the bootable USB drive not UEFI/GPT, it’s not going to work. Rufus is a super easy to use app.
Good Luck!
Thanks for the advice. Secure boot was disabled, I did use Rufus to create usb boot images and learned that mbr option was no good so changed to gpt. After several attempts trying Mint17, Xubuntu, Mint18, resetting the partitions between each, I managed to get Mint18 to install.
But in order to boot into it I have to hit esc on startup then F9 to enter boot options and select the Ubuntu option. That produces the list of options which I’m used to. If I choose Mint18 it then loads……. but fdisk lists about 14 ram disks as well as the partitions on the hard disk and the wifi connection doesn’t seem to remember how to connect to an existing network. So this is a long way from where my comfort zone ends.
There should be an option to boot into UEFI card w/out any distro name. I know, just reinstalled Linux Mint MATE today, and yes, there were several options, including ubuntu in lowercase, to choose from. It should also say FAT32 in the description, or was the case with me. If I’m not mistaken, was the last option.
Remember that every MB may report this differently.
Well I followed the instructions to install mint18 on my new hp250 g4 with 1tb and windows 10 preinstalled. First problem was windows would not let me shrink the windows partition to less than 500 gb. I carried on and all went ok until I hit the error message
‘grub installation failed
the grup-efi-amd64-signed package filed to install into /target/’
I ok had the message and the computer then stopped with the message
‘Installer crashed ……….bug report….attend to the problem as soon as possible’
the system froze.
Help and advice would be much appreciated. I’ve been dual booting various computers over the years and never had this problem.
Beginning with Windows 10, OEM’s has the right not to allow other bootloaders reside on the system, as well with notebooks, to take away the option to disable Secure Boot.
This may be what you’re experiencing. I hope that you made a drive image before doing all of this, and didn’t touch your Recovery partition, as now one can have tp to 128 Primary partitions with UEFI/GPT. So there’s no need to delete anything to make room for an ‘extra’ primary.
Also, you MUST place Grub on the same partition that says ‘Windows Boot Loader’, this option is given during formatting at the bottom of that dialog. It’s a drop down option, just select the same as Windows Boot Loader & you should be in business, unless the OEM has removed any options to install other OS’s. Which is what the Linux Community has feared since UEFI became mandatory.
Now many that eventually ‘buttered up’ to the idea of UEFI may now think of it was warned, though the content was taken down, so I can’t link it.
Thanks for these observations.I did try to be careful about the points you raise. The installer seemed to take ages to progress when it reached the message about installing language packs so I started to look at the detail list as it continues. Perhaps wrongly, I think the installer seemed to have difficulty in accessing some Ubuntu repositories when it reached the grub install stage but I cant see how to access the log of progress. I’m going to try with a different distribution and see what difference that might make.
Ive been trying different approaches unsuccessfully for a week now but it is very frustrating to find a procedure which has been straightforward for years has bcome so complicated. Your point about oem blocking is interesting.
Disable Secure Boot option from UEFI settings and repeat the procedure.
Also use Rufus for this purpose, and be sure to select GPT partitioning for UEFI. Rufus is a free portable tool that can be used to create bootable ISO’s the way we need these.
https://rufus.akeo.ie/
If the bootable USB drive not UEFI/GPT, it’s not going to work. Rufus is a super easy to use app.
Good Luck!
For an installation on an ACER Aspire S13, I had to follow these additional steps :
http://askubuntu.com/questions/627416/acer-aspire-e15-will-not-dual-boot
Do you pull the install cd before reboot or do you change to boot priority on the bios? Thanks I keep getting errors at this point.
After intalling the system you eject the installation media, reboot and change boot priority(if necessary).
Great article, simple to understand! Wonder why the folks on the tech forums doesn’t spell it out so easily?
One thing that I’d like to ask the writer of this article, if possible, is the btrfs file system any better than ext4 on a SSD? Only my root partition is going to SSD, /home is going to HDD because I have lots of virtual machines, plus can use the entire drive, a 500GB WD RE4 of the previous gen (which according to many reviewers is better than the newer SATA-3 version). May consider a 1GB Swap, though would prefer it on the HDD, with 32GB RAM, one would think that Swap isn’t needed, though have always went with 512MB to 1024MB to be safe.
The reason why I ask about btrfs, is that I have a new, ‘gumstick’ 512GB Samsung 950 Pro M.2 SSD, and I don’t want to mess it up with Linux formatting. Actually would prefer installing root to a lesser used SSD, or find a 60-64GB model at a very low price, and as always, leave 10% unformatted. While I know that some SSD’s have inbuilt over-provisioning, it’s not always clear which models has or doesn’t have this feature.
However, at the same time, I also realize that Linux since kernel 3.3 (around the time of Linux Mint 13/Ubuntu 12.04 LTS) has NVMe support. Back then, many consumers didn’t know these drives existed, as always, the places where fast high tech devices are needed gets the first shot at new technologies, am hearing of ‘U2’ SSD rumors now.
Thanks to the author for the great article!
Is there a reason why you would need to use btrfs instead of ext4, especially on a desktop version. As far as I know, btrfs is not very stable yet and not so suitable for production, while ext4 is a very robust, stable, mature and well tested file system. Here is a good article concerning Linux file system benchmarkig (btrfs, ext4, zfs): https://blog.pgaddict.com/posts/friends-dont-let-friends-use-btrfs-for-oltp
I suggest that you add or move the swap partition to SSD for better performance.
Matei Cezar, Thanks for answering my question, guess that I’ll stick with the tried & true ext4, which has served me well for years, and will place my small Swap partition on the SSD. I prefer stuffing RAM to the max, as I’m a believer that there’s no such thing as ‘wasted’ RAM, plus having 32GB allows me to create & run VM’s with 12GB RAM allocated easily. BTW, with 32GB RAM, I suppose it’ll do no harm to place Swap on the SSD, because swapping rarely happens anyway on my computers. On the one setup for my wife, there is no Swap, and with only 8GB RAM, however she uses it casually, not in the same manner as myself.
As far as btrfs is concerned, don’t know if it was intentional, or was tired when installing & forgot, once had an entire Linux Mint system formatted as this for several months, noticed only when clean installing Linux Mint 17 LTS, don’t recall any issues. At the same time, don’t recall any noticeable performance improvements either. If so, I suppose that I’d never had asked the initial question in the beginning.
Thanks for the added link, a great comparison of Linux file systems! Please keep the great Linux articles coming in.;-)
Building a freshly purchased laptop right now (Gigabyte P15), which came pre-installed with Win10 with UEFI. Some notes here that may help future readers…
1) Laptop had a second HDD (Win pre-installed on an M2 128GB SSD). What was on it was irrelevant, so I re-partitioned to a 750 Win data drive and kept 250GB-or-so free.
2) In Windows, I had to turn off FastBoot (control panel->startup
3) Installed Lin Min 18 using Win32DiskImager. Originally had the USB image created with Unebutin, which I think would have worked. But tried Win32DiskImager when I had a problem (described below) which I still had initially with the Win32DiskImager created image.
4) When getting the UEFI boot option to be available, and booting from the USB stick, it would hang on the splash screen. Turning off the ‘quiet splash’ options in Grub, i got a TTY login. I could actually login to the terminal (using mint/no-pwrd), but startx failed.
4a) To get to be able to boot from USB, login to Windows, and at the start menu -> power menu -> hold shift + click restart. This brings to the Windows troubleshooting/uefi options page. From there there was an option to select the device to reboot from, and I selected the USB drive. THAT then allowed Lin Mint to boot properly.
5) Once the Live Mint booted, started an installation, and chose the “install alongside windows” option. That automatically created the / and swap partitions in that unallocated space on my second HDD.
My system now is configured to UEFI boot into the Linux, which has Grub. Grub gives me the option to boot to Mint or Windows Boot Manager. Seems to work great.
Hope that helps a future reader.
You can use an external USB drive for this matter to run Linux Mint in live-mode.
Nice guide. Mind making one about installing Mint to an External Hard Drive and being able to run on a UEFI WIndows computer? Been interested in doing something like that, but don’t know if it will work. Also, will it work without grub on the PC? want to just go to windows directly if I don’t have any ext hdd plugged, and access mint by pressing the boot options button on windows boot manager.
Sounds like a good idea to me, as long as in this case, Grub doesn’t show when the computer is booted w/out the external drive.
Otherwise, it may be best to boot from an 8GB USB stick as needed with a 4GB persistence file & apply Level 1 & 2 updates only. While I’ve heard that it’s possible to create one with a larger than 4GB persistence, have never seen it in action. A 32GB USB stick that’s fast & running from a USB 3.0 port would be great for this, as long as it’ll boot from USB 3.0. Some models will only boot from USB 2.0 ports, this includes install DVD’s, meaning one may have to use an external optical drive just to reinstall Windows.
My Samsung (2012 model Series 7) is this way, plus it’s a no-no to run Linux on the PC. Will cause the firmware to fail unless every option is set to Legacy & who wants that? This isn’t the Windows XP/2000 days, it’s Ubuntu 16.04/Linux Mint 18 time.;-)