Whether it’s in the home or the enterprise, physical security is always a foundational component of an all encompassing security policy. The usage of security cameras tends to be a corner stone of a physical security monitoring solution.
One of the biggest challenges with cameras tends to be the management and the storage of the video feeds/images. One of the best known open source solutions for addressing this task is Zone Minder.
Zone Minder presents users with a large number of solutions for monitoring, managing, and analyzing the video feeds from security cameras. Some of the highlights of Zone Minder include:
- Free, Open source and constantly updating.
- Works with most IP cameras (even ones with special functionality like PTZ, night vision, and 4k resolutions).
- Web based management console.
- Android and iOS applications for monitoring from anywhere.
To see more features of Zone Minder please visit the project’s home page at: https://zoneminder.com/features/
This article will cover the installation of Zone Minder on Debian 9 Stretch and another article will cover the configuration of Zone Minder to monitor security camera feeds.
Zone Minder Lab Setup Diagram
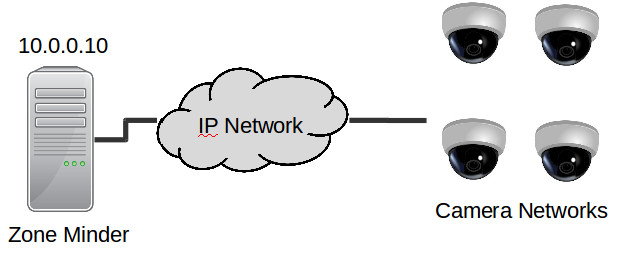
While this is a simplification of most IP camera installations, the concepts will still work assuming that the cameras have network connectivity to the Zone Minder server.
This article will assume that the reader already has a minimal base install of Debian 9 Stretch up and running. A bare install with SSH connectivity is all that is assumed.
A graphical environment is not needed on the server as everything will be served through the Apache web server to the clients connecting to the Zone Minder web interface.
Please see this article on Tecmint for installing Debian 9: https://www.tecmint.com/installation-of-debian-9-minimal-server/.
Server Specifications:
Since Zone Minder will potentially be saving lots of video/images, the biggest components necessary for this server will be network and storage capacity. Other items to take into consideration are the number of cameras, the quality of the images/video being sent to the server, number of users connecting to the Zone Minder system, and viewing the streams live through the Zone Minder system.
Important: The server being used in this guide, while old, is not the typical home user system. Please make sure to thoroughly evaluate usage requirements before setting up a Zone Minder system.
Zone Minder wiki article for Specs: https://wiki.zoneminder.com/How_Many_Cameras
System Specs:
- 1 HP DL585 G1 (4 x Dual core CPU’s)
- RAM: 18 GB
- 1 x 1Gbps network connections for IP cameras
- 1 x 1Gbps network connection for management
- Local Storage: 4 x 72GB in RAID 10 (OS only; ZM images/video will be offloaded later)
- 1 x 1.2 TB HP MSA20 (Storage of Images/Videos)
Installation of Zone Minder
The installation of Zone Minder is very straight forward and assumes root or sudo access on the particular server that Zone Minder is being installed.
Debian Stretch doesn’t have Zone Minder 1.30.4 in the repositories by default. Luckily a newer version of Zone Minder is available in Debian Stretch backports.
To enable backports in a clean installation of Debian, issue the following command:
# echo -e “\n\rdeb http://ftp.debian.org/debian stretch-backports main” >> /etc/apt/sources.list
Once backports have been enabled, the system will likely have a series of updates that will need to occur. Run the following commands to update the packages in preparation for the rest of this article.
# apt-get update
# apt-get upgrade
# apt-get dist-upgrade
The first step for the installation and configuration of Zone Minder is to install the necessary dependencies for with the following commands:
# apt-get install php mariadb-server php-mysql libapache2-mod-php7.0 php7.0-gd zoneminder
During this installation process, the MariaDB server installation may prompt the user to configure a root password for the database, **DO NOT FORGET THIS PASSWORD**.
Once the installation is complete, it is strongly suggested that the database be secured using the following command:
# mysql_secure_installation
The above command may prompt for the root password created during the MariaDB installation first and then will ask the user several security questions about disabling a test user, remote root login to the database, and removing testing databases. It is safe and suggested that ‘Yes’ be the answer to all of these questions.
Now the database needs to be prepared and a Zone Minder user for the database. The Zone Minder package provides the necessary schema for import. The import will create the user ‘zmuser’, the database ‘zm’, and setup a default password on the system *See below on how to change this*.
The following commands will prompt the user for the MariaDB database root user password.
# mariadb -u root -p < /usr/share/zoneminder/db/zm_create.sql
# mariadb -u root -p -e "grant all on zm.* to ‘zmuser’@localhost identified by ‘zmpass’;"
This part is only needed if the user wants to change the default user/password for the database! It may be desirable to change the database name, username, or password for the database.
For example, say the admin wanted to use a different user/password combination:
User: zm_user_changed
Password: zmpass-test
This would change the above MariaDB user command to:
# mariadb -u root -p -e "grant all on zm.* to ‘zm_user_changed’@localhost identified by ‘zmpass-test’;"
By doing this though, Zone Minder will need to be made aware of the changed database and user name. Make the proper changes in the ZM configuration file at ‘/etc/zm/zm.conf’.
Locate and change the following lines:
- ZM_DB_USER = zmuser ← Change ‘zmuser’ to the new user above. ‘zm_user_changed’
- ZM_DB_PASS = zmpass ← Change ‘zmpass’ to the new password used above. ‘zmpass-test’
The next step is to fix ownership of the Zone Minder configuration file so that it can be read by the apache user (www-data) using the following command:
# chgrp www-data /etc/zm/zm.conf
The www-data user also needs to be a part of the ‘video’ group on this system. To accomplish this the following command should be used:
# usermod -aG video www-data
It is also necessary to set the proper time zone in the php.ini file locate at ‘/etc/php/7.0/apache2/php.ini’. Find the proper time zone and then using a text editor, locate the follow line and append the timezone information.
# nano /etc/php/7.0/apache2/php.ini
Change the line ‘;date.timezone =‘ to ‘date.timezone = America/New_York’.
Now Apache needs to be configured to serve out the Zone Minder web interface. The first step is to disable the default Apache page and enable the Zone Minder configuration file.
# a2dissite 000-default.conf
# a2enconf zoneminder
There are also some Apache modules that need to be enabled for Zone Minder to function properly. This can be accomplished with the following commands:
# a2enmod cgi
# a2enmod rewrite
The final steps are to enable and start Zone Minder! Use the following commands to accomplish this:
# systemctl enable zoneminder.service
# systemctl restart apache2.service
# systemctl start zoneminder.service
Now if everything went well, navigating to the server’s IP and Zone Minder directory should yield the Zone Minder management console as such:
http://10.0.0.10/zm
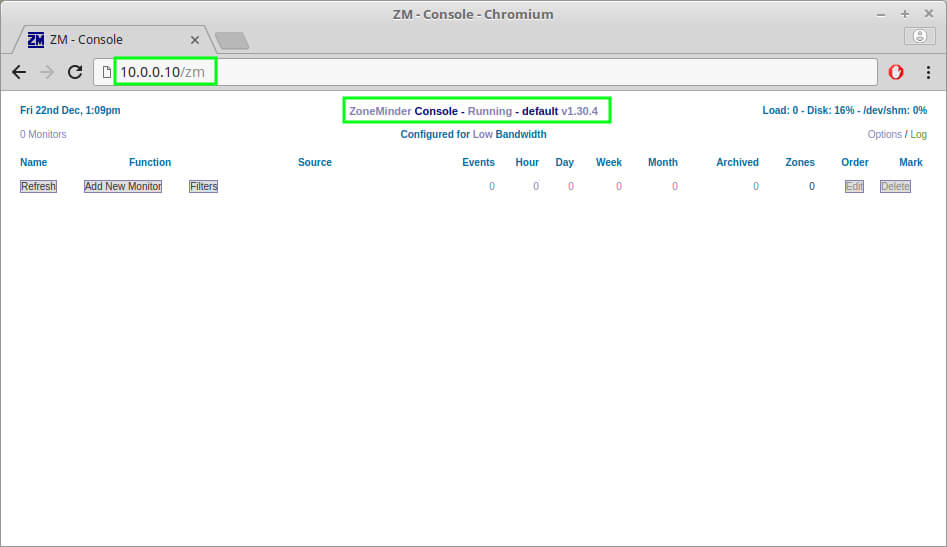
Congratulations! Zone Minder is now up and running on Debian 9. In next upcoming articles we will walk through the configuration of storage, cameras, and alerts within the Zone Minder console.
# usermod -aG video www-datada
this line has a typo
Tyler,
Good catch. I’ll ask the editor to correct that. Thank you.
@Tyler and @Rob,
Corrected the command in the article..
Thanks for the tutorial, however…
Sorry to say, setting up the database throws an error 1046 (Syntax error) on my fresh Debian 9 install.
Works up till “mariadb -u root -p < /usr/share/zoneminder/db/zm_create.sql"
Next command, does throw the above error.
TKS
Norbert,
Just double checked on a clean install here and the command is working fine. I noticed in your post though you have double quotes and a semi-colon for some reason. Please do not use though the command should be:
Too bad there isn’t a camera database on their site listing what camera work with Zoneminder. That would be really useful before a wasted attempt at setting up a server installation.
Ed,
There is… I have another article coming up when actually talking about the configuration of the cameras. If you need it now though, here it is: https://wiki.zoneminder.com/Hardware_Compatibility_List