In an earlier article, the installation of the security monitoring system Zone Minder on Debian 9 was covered. The next step in getting Zone Minder working is to configure storage. By default Zone Minder will store camera information in /var/cache/zoneminder/*. This could be problematic for systems that don’t have large amounts of local storage.
This part of the configuration is primarily important for individuals wishing to offload the storage of the recorded imagery to a secondary storage system. The system that is being setup in this lab has approximately 140GB of storage locally. Depending on the amount, quality, and retention of videos/images being taken by Zone Minder, this small amount of storage space can quickly be exhausted.
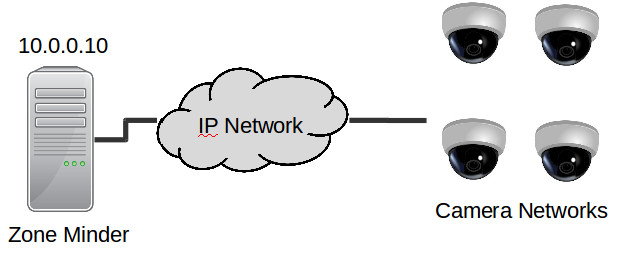
Zone Minder Lab Environment
While this is a simplification of most IP camera installations, the concepts will still work assuming that the cameras have network connectivity to the Zone Minder server.
Server Specifications:
Since Zone Minder will potentially be saving lots of video/images, the biggest components necessary for this server will be network and storage capacity. Other items to take into consideration are the number of cameras, the quality of the images/video being sent to the server, number of users connecting to the Zone Minder system, and viewing the streams live through the Zone Minder system.
Important: The server being used in this guide, while old, is not the typical home user system. Please make sure to thoroughly evaluate usage requirements before setting up a Zone Minder system.
Zone Minder wiki article for Specs: https://wiki.zoneminder.com/How_Many_Cameras
System Specs:
- 1 HP DL585 G1 (4 x Dual core CPU’s)
- RAM: 18 GB
- 1 x 1Gbps network connections for IP cameras
- 1 x 1Gbps network connection for management
- Local Storage: 4 x 72GB in RAID 10 (OS only; ZM images/video will be offloaded later)
- 1 x 1.2 TB HP MSA20 (Storage of Images/Videos)
Changing ZoneMinder Image/Video Storage Location
Important: This step is only necessary for those wishing to move the storage of the images/videos that Zone Minder captures to another location. If this is not desired, skip to the next article: Setting up Monitors [Coming Soon].
As mentioned in the lab setup, this particular box has very little local storage but does have a large external storage array attached for video and images. In this case, the images and videos will be offloaded to that larger storage location. The image below shows the lab server’s setup.
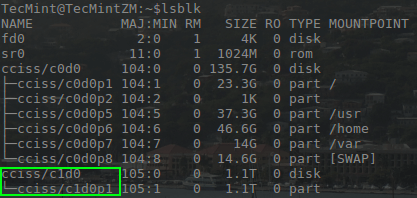
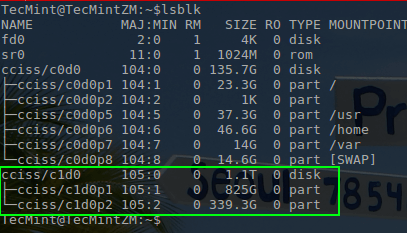
From the output of ‘lsblk’, two sets of hard drives can be seen. The second disk array (c1d0) is the large storage shelf attached to this server and ultimately where Zone Minder will be instructed to store images/videos.
To start the process, Zone Minder needs to be stopped using the following command.
# systemctl stop zoneminder.service
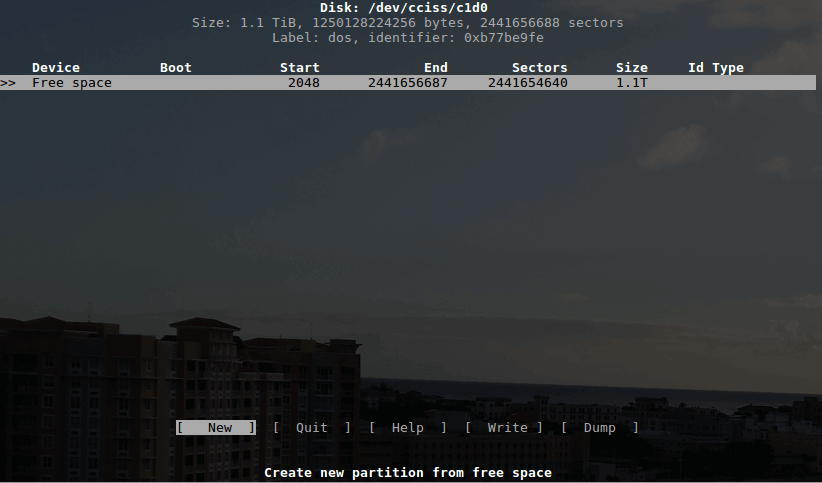
Once Zone Minder has been stopped, the storage location needs to be partitioned and prepared. Many tools can accomplish this task but this guide will use ‘cfdisk’.
The drive can be setup to use the whole space as one mount point or a separate partition can be used for each of the two Zone Minder directories. This guide will walk through using two partitions. (Be sure to change the ‘/dev/cciss/c1d0’ portion in the commands below to the proper device path for different environments).
# cfdisk /dev/cciss/c1d0
Once in the ‘cfdisk’ utility, select the partitioning type (dos is usually sufficient). The next prompt will be display the current partitions on the disk.
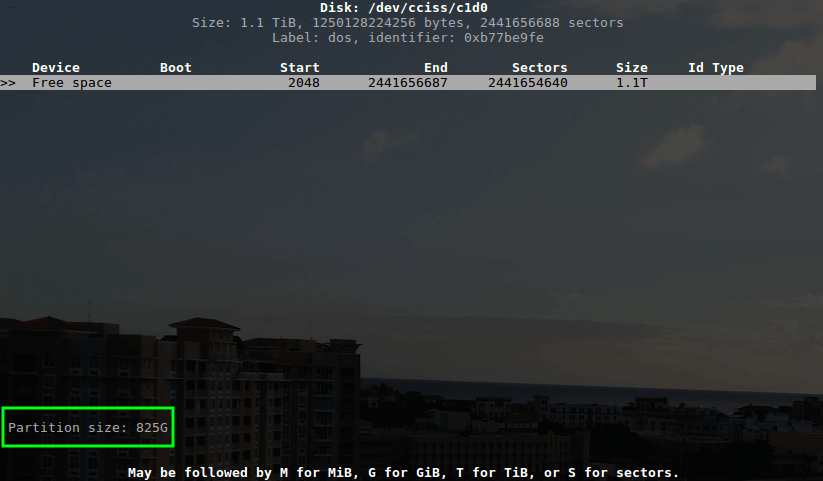
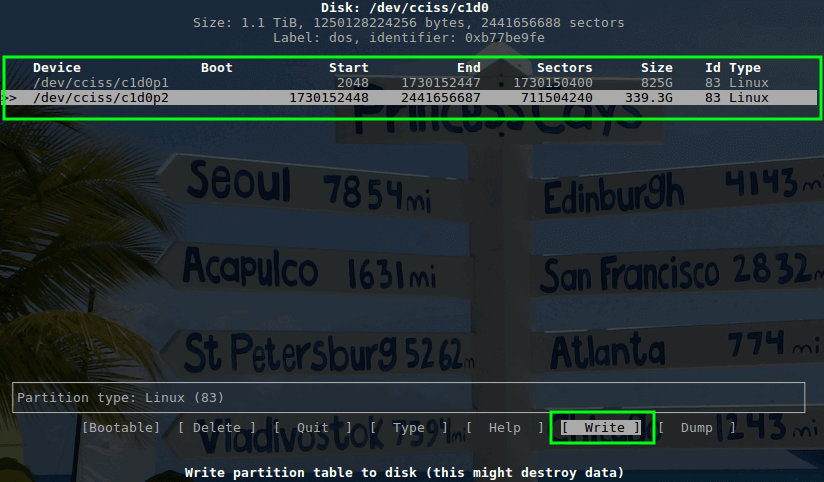
In this case, there aren’t any so they will need to be created. Planning ahead, video from the cameras is likely to take up more space than images and with 1.1 Terabytes available, a 75/25 or so split should be more than sufficient for this system.
Partition 1: ~825GB
Partition 2: ~300GB
Cfdisk is text/keyboard based, use the arrow keys to highlight the ‘[ New ]’ menu and hit the ‘Enter’ key. This will prompt the user for the size of the new partition.
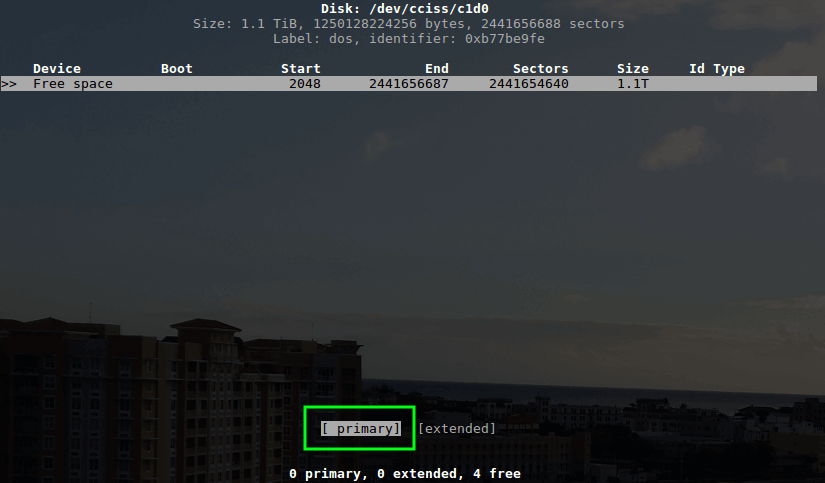
The next prompt will be for the partition type. Since only two partitions will be needed in this install, ‘Primary’ will be sufficient.
Once the partition type has been selected, cfdisk will refresh the current changes waiting to be written to the disk. The remaining free space needs to be partitioned as well by highlighting the free space and then clicking on the ‘[ New ]’ menu option again.
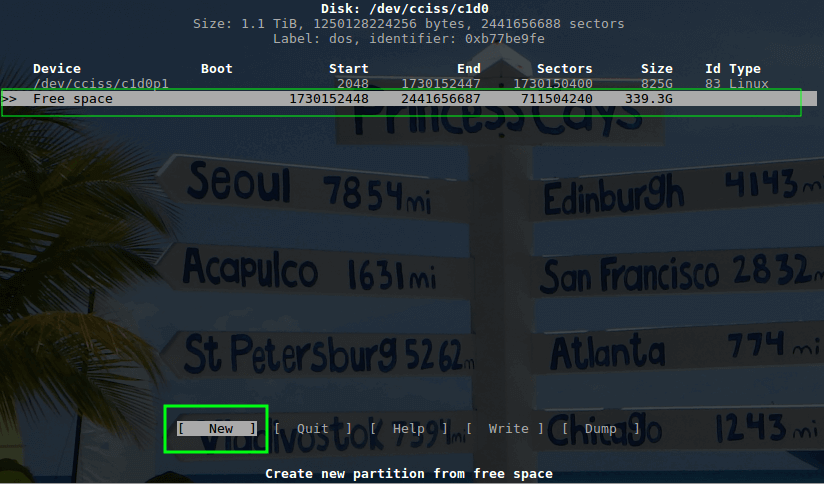
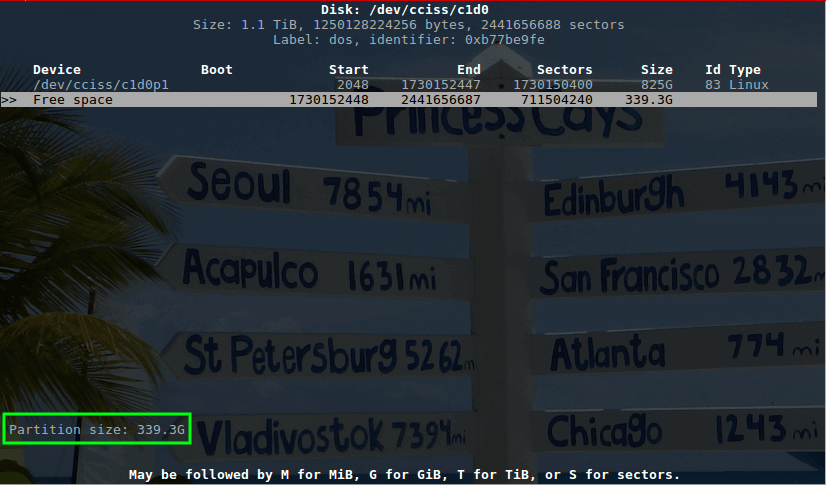
Cfdisk will automatically place the remaining free space amount in the size prompt. In this example the rest of the disk space is going to be the second partition anyways. Pressing the ‘Enter’ key, cfdisk will use the rest of the storage capacity.
Since there will only be 2 partitions on this particular unit, another primary partition can be used. Simply press the ‘Enter’ key to continue selecting a primary partition.
Once cfdisk has completed updating the changes to the partitions, the changes will need to actually be written to the disk. In order to accomplish this, there is a ‘[ Write ]’ menu option down at the bottom of the screen.
Use the arrows to move over to highlight this option and hit the ‘Enter’ key. Cfdisk will prompt for confirmation so simply type ‘yes’ and hit the ‘Enter’ key one more time.
Once confirmed, highlight and click ‘[ Quit ]’ to exit out of cfdisk. Cfdisk will exit and it is suggested that user’s double check the partitioning process with the ‘lsblk’ command.
Notice in the image below the two partitions, ‘c1d0p1’ and ‘c1d0p2’, show up in the output of lsblk confirming that the system recognizes the new partitions.
# lsblk
Now that the partitions are ready, they need to have a filesystem written to them and mounted to the Zone Minder system. The filesystem type chosen is user preference but many people have opted to use non-journaled file-systems like ext2 and accept the potential loss of data for the speed increase.
This guide will use ext4 due to the addition of a journal and the reasonable write performance and superior read performance over ext2/3. Both partitions can be formated with the ‘mkfs’ tool using the following commands:
# mkfs.ext4 -L "ZM_Videos" /dev/cciss/c1d0p1
# mkfs.ext4 -L "ZM_Images" /dev/cciss/c1d0p2
The next step in the process is to persistently mount the new partitions so Zone Minder can use the space to store images and videos. In order to make the storage available at boot time, entries will need to be added to ‘/etc/fstab’ file.
To accomplish this task, the ‘blkid’ command with root privileges will be used.
# blkid /dev/cciss/c1d0p1 >> /etc/fstab
# blkid /dev/cciss/c1d0p2 >> /etc/fstab
Important: Make ABSOLUTELY sure the double ‘>>’ symbol is used! This will write the correct UUID information to the persistent mounts file.
This will need some clean up though. Enter the file with a text editor to clean up the necessary information. The information in red is what ‘blkid’ inserted into the file. As it stands initially, the formatting won’t be correct for the system to properly mount the directories.
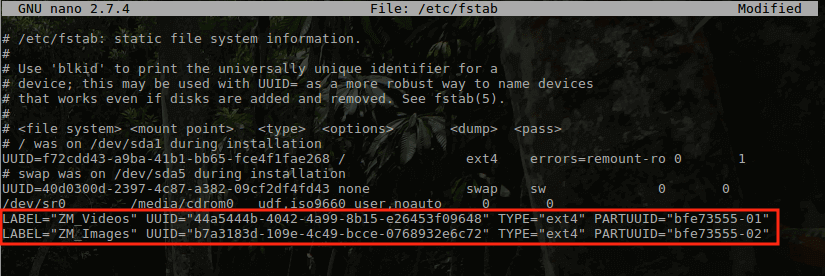
The item in red is what the two ‘blkid’ commands above placed into the file. The important parts in this output are the UUID and TYPE strings. The format of the fstab file is vary specific. The format will need to be as follows:
<UUID:> <mount point> <Fileystem type> <Options> <Dump> <fsck>
For this instance, the mount point will be the two Zone Minder directories for images and recorded events, the file-system – ext4, default options, 0 – dump, and 2 for the filesystem check.
The image below illustrates how this particular system’s fstab file is setup. Pay attention to the removed double quotes around the file-system type and UUID!
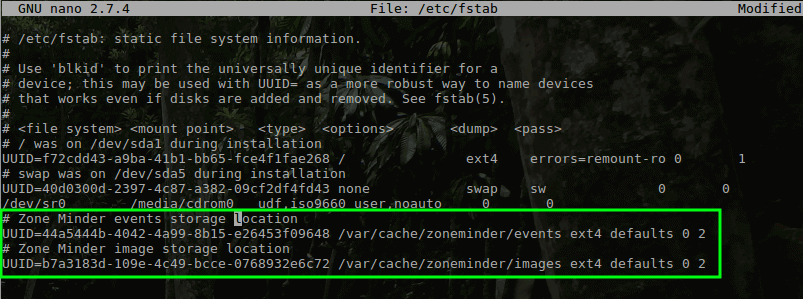
The first directory ‘/var/cache/zoneminder/events’ is the larger partition on this system and will be used for recorded events. The second directory ‘/var/cache/zoneminder/images’ will be used for still images. Once the proper changes have been made to this file, save the changes and exit the text editor.
Zone Minder will have already created these folders during installation so they should be removed before mounting the new partitions.
Caution, if following this article on an already running/configured Zone Minder system, this command will remove ALL imagery already stored! It is suggested you move the files instead.
Remove these directories with the following command:
# rm -rf /var/cache/zoneminder/{events,images}
Once the directories have been removed, the folders need to be created and mounted on the new disk space. The permissions also need set to allow Zone Minder to read/write to the new storage locations. Use the following commands to accomplish this:
# mount -a
# mkdir /var/cache/zoneminder/{images,events}
# mount -a (May be needed to mount directories after re-creation on new disk)
# chown www-data:www-data /var/cache/zoneminder/{images,events}
# chmod 750 /var/cache/zoneminder/{images,events}

The final step is to start the Zone Minder process again and begin further configuration of the system! Use the following command to start Zone Minder again and pay attention to any errors that may display.
# systemctl start zoneminder.service
At this point, Zone Minder will be storing the images/events to the much larger MSA storage system attached to this server. Now it is time to begin further configuration of Zone Minder.
The next article will look at how to configure Zone Minder monitors to interface with the IP cameras in this lab setup.