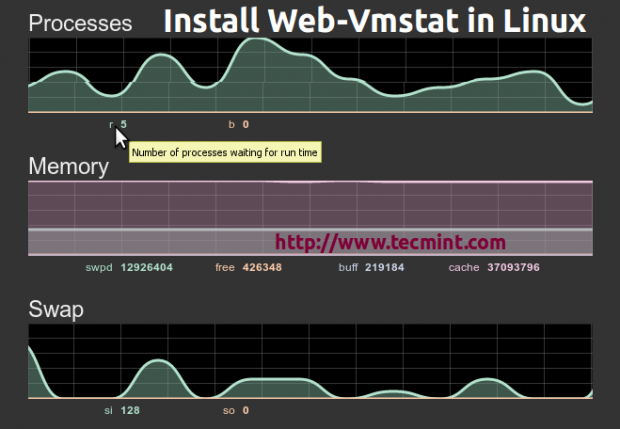
Web-Vmstat it’s a small application written in Java and HTML which displays live Linux system statistics, such as Memory, CPU, I/O, Processes, etc. taken over vmstat monitoring command line in a pretty Web page with charts (SmoothieCharts) and diagrams through WebSocket streams using websocketd program.
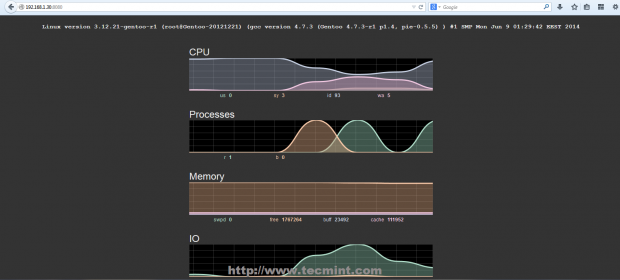
I’ve recorded a quick video review of what the application can do on a Gentoo system.
Requirements
On a Linux system the following utilities must be installed.
- A wget for retrieving files using HTTP, HTTPS and FTP protocols.
- Nano or VI CLI Text Editor.
- Unzip Archive Extractor.
This tutorial will guide you through installing Web-Vmstat application on CentOS 6.5, but the procedure is valid for all Linux distributions, the only things that differ are just the init scripts (optional), which helps you manage more easy the entire process.
Read Also: Monitor Linux Performance using Vmstat Commands
Step 1: Install Web-Vmstat
1. Before proceeding with installing Web-Vmstat, make sure you have all the above required commands installed on your system. You can use package manager such as yum, apt-get, etc command to install it. For example, under CentOS systems, we use yum command to install it.
# yum install wget nano unzip
2. Now go to Veb-Vmstat official web page at and download the latest version using Download ZIP button or use wget to download from command line.
# wget https://github.com/joewalnes/web-vmstats/archive/master.zip
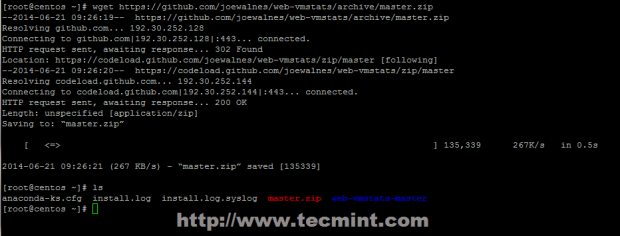
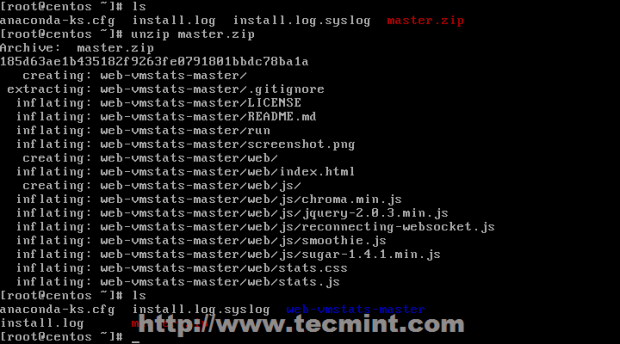
3. Extract the downloaded master.zip archive using unzip utility and enter to extracted folder.
# unzip master.zip
# cd web-vmstats-master

4. Web directory holds the HTML and Java files needed for the application to run in a Web environment. Create a directory under your system where you want to host the Web files and move all web content to that directory.
This tutorial uses /opt/web_vmstats/ to host all application web files, but you can create any arbitrary path on your system you like it, just assure you retain the absolute web path.
# mkdir /opt/web_vmstats
# cp -r web/* /opt/web_vmstats/

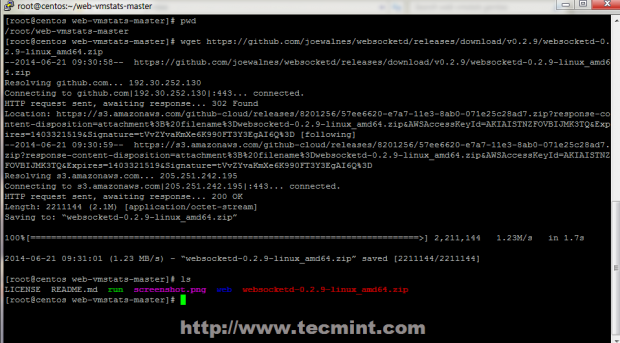
5. Next step is to download and install websocketd streaming program. Go to the official WebSocket page and download the package to match your system architecture (Linux 64-bit, 32-bit or ARM).
On 32-bit System
# wget https://github.com/joewalnes/websocketd/releases/download/v0.2.9/websocketd-0.2.9-linux_386.zip
On 64-bit System
# wget https://github.com/joewalnes/websocketd/releases/download/v0.2.9/websocketd-0.2.9-linux_amd64.zip
6. Extract the WebSocket archive with unzip command and copy websocketd binary to a system executable path to make it available system-wide.
# unzip websocketd-0.2.9-linux_amd64.zip
# cp websocketd /usr/local/bin/
7. Now you can test it by running websocketd command using the following command syntax.
# websocketd --port=8080 --staticdir=/opt/web_vmstats/ /usr/bin/vmstat -n 1
Description of the each parameter explained below.
- –port=8080: A port used to connect on HTTP protocol – you can use any port number you want.
- –staticdir=/opt/web_vmstats/: The path where all Web-Vmstat web files are hosted.
- /usr/bin/vmstat -n 1: A Linux Vmstat command which updates its status every second.
Step 2: Create Init File
8. This step is optional and only works with init script supported systems. To manage WebSocket process as a system daemon create a init service file on /etc/init.d/ path with the following content.
# nano /etc/init.d/web-vmstats
Add the following content.
#!/bin/sh
# source function library
. /etc/rc.d/init.d/functions
start() {
                echo "Starting webvmstats process..."

/usr/local/bin/websocketd --port=8080 --staticdir=/opt/web_vmstats/ /usr/bin/vmstat -n 1 &
}

stop() {
                echo "Stopping webvmstats process..."
                killall websocketd
}

case "$1" in
    start)
       start
        ;;
    stop)
       stop
        ;;
    *)
        echo "Usage: stop start"
        ;;
esac

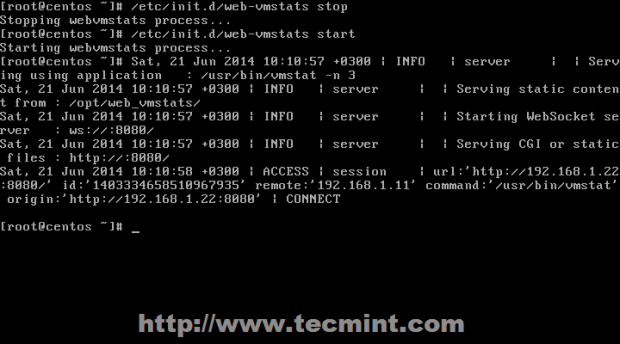
9. After the file has been created, append execution permissions and manage the process using start or stop switches.
# chmod +x /etc/init.d/web-vmstats
# /etc/init.d/web-vmstats start
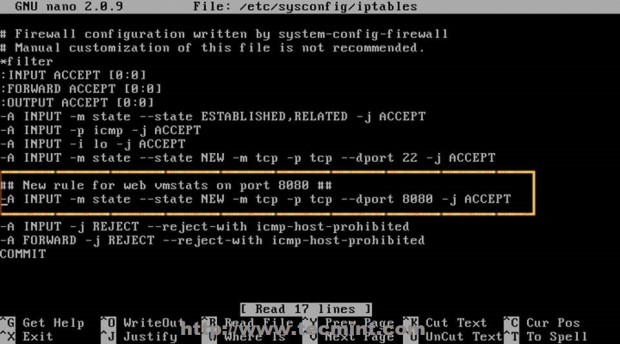
10. If your Firewall is active edit /etc/sysconfig/iptables firewall file and open the port used by websocketd process to make it available for outside connections.
# nano /etc/sysconfig/iptables
If you use port 8080 as in this tutorial add the following line to iptables file after the rule that opens port 22.
-A INPUT -m state --state NEW -m tcp -p tcp --dport 8080 -j ACCEPT
11. To finalize the whole process restart iptables service to apply the new rule.
# service iptables restart
# service web-vmstats start
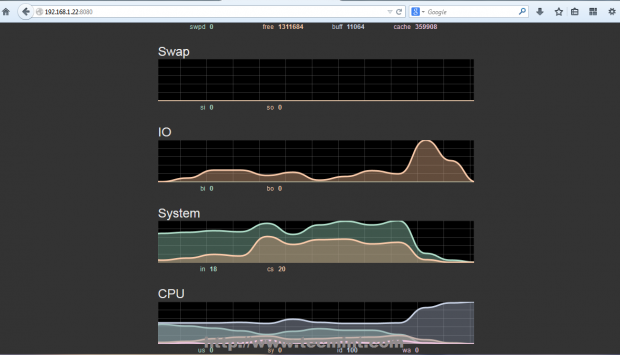
Open a browser and use the following URL to display Vmstats system statistics.
http://system_IP:8080
12. To display name, version and other details about your current machine and the operating system running on it. Go to Web-Vmstat files path and run the following commands.
# cd /opt/web_vmstats
# cat /etc/issue.net | head -1 > version.txt
# cat /proc/version >> version.txt
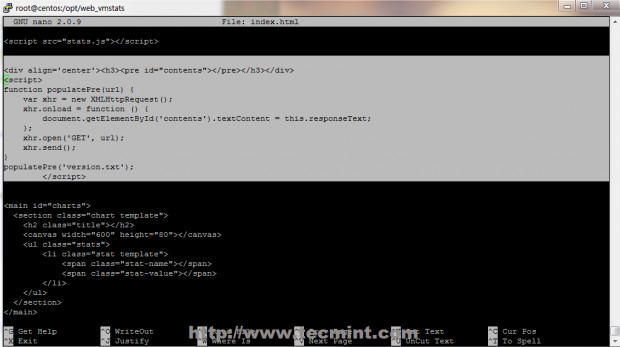
13. Then open index.html file and add the following javascript code before <main id=”charts”> line.
# nano index.html
Use the following JavaScript code.
<div align='center'><h3><pre id="contents"></pre></h3></div>
<script>
function populatePre(url) {
    var xhr = new XMLHttpRequest();
    xhr.onload = function () {
        document.getElementById('contents').textContent = this.responseText;
    };
    xhr.open('GET', url);
    xhr.send();
}
populatePre('version.txt');
                </script>
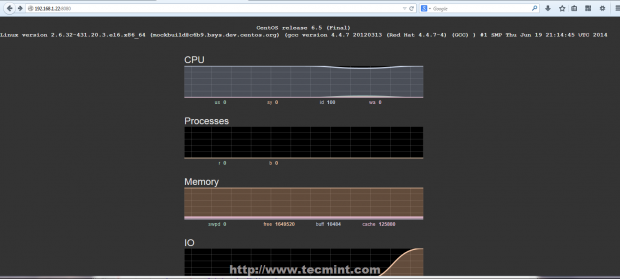
14. To view the final result refresh http://system_IP:8080 web page and you should see information and live statistics about your current machine as in the screenshots below.


I am running centos7 and there is not a /etc/sysconfig/iptables to edit.
Therefore, I can not “service iptables restart”
Any ideas?
CentOS 7 ships with firewalld. Open the port from firewalld command line:
firewall-cmd –zone=public –add-port=8080/tcp –permanent
firewall-cmd –reload
I am getting following error on downloading websocketd
wget https://github.com/joewalnes/websocketd/releases/download/v0.2.11/websocketd-0.2.11-linux_amd64.zip
–2015-12-23 20:50:31– https://github.com/joewalnes/websocketd/releases/download/v0.2.11/websocketd-0.2.11-linux_amd64.zip
Resolving github.com… 192.30.252.130
Connecting to github.com|192.30.252.130|:443… connected.
HTTP request sent, awaiting response… 302 Found
Location: https://github-cloud.s3.amazonaws.com/releases/8201256/63875c5e-1f40-11e5-99a8-0b1fe18398f0.zip?X-Amz-Algorithm=AWS4-HMAC-SHA256&X-Amz-Credential=AKIAISTNZFOVBIJMK3TQ%2F20151223%2Fus-east-1%2Fs3%2Faws4_request&X-Amz-Date=20151223T152032Z&X-Amz-Expires=300&X-Amz-Signature=1179f41ae8c1314930cb3d65c4af61428363f89dbf7808ca0bcd75086a3d6b9b&X-Amz-SignedHeaders=host&actor_id=0&response-content-disposition=attachment%3B%20filename%3Dwebsocketd-0.2.11-linux_amd64.zip&response-content-type=application%2Foctet-stream [following]
–2015-12-23 20:50:32– https://github-cloud.s3.amazonaws.com/releases/8201256/63875c5e-1f40-11e5-99a8-0b1fe18398f0.zip?X-Amz-Algorithm=AWS4-HMAC-SHA256&X-Amz-Credential=AKIAISTNZFOVBIJMK3TQ%2F20151223%2Fus-east-1%2Fs3%2Faws4_request&X-Amz-Date=20151223T152032Z&X-Amz-Expires=300&X-Amz-Signature=1179f41ae8c1314930cb3d65c4af61428363f89dbf7808ca0bcd75086a3d6b9b&X-Amz-SignedHeaders=host&actor_id=0&response-content-disposition=attachment%3B%20filename%3Dwebsocketd-0.2.11-linux_amd64.zip&response-content-type=application%2Foctet-stream
Resolving github-cloud.s3.amazonaws.com… 54.231.81.144
Connecting to github-cloud.s3.amazonaws.com|54.231.81.144|:443… connected.
HTTP request sent, awaiting response… 200 OK
Length: 2103270 (2.0M) [application/octet-stream]
63875c5e-1f40-11e5-99a8-0b1fe18398f0.zip?X-Amz-Algorithm=AWS4-HMAC-SHA256&X-Amz-Credential=AKIAISTNZFOVBIJMK3TQ%2F20151223%2Fus-east-1%2Fs3%2Faws4_request&X-Amz-Date=20151223T152032Z&X-Amz-Expires=300&X-Amz-Signature=1179f41ae8c1314930cb3d65c4af61428363f89dbf7808ca0bcd75086a3d6b9b&X-Amz-SignedHeaders=host&actor_id=0&response-content-disposition=attachment; filename=websocketd-0.2.11-linux_amd64.zip&response-content-type=application%2Foctet-stream: File name too long
Doesn’t work for me and I have no firewall on my Linux Mint 17.2. I get the following and then nothing when I go to the URL specified in this tutorial:
Sun, 13 Sep 2015 20:30:14 -0400 | INFO | server | | Serving using application : /usr/bin/vmstat -n 1
Sun, 13 Sep 2015 20:30:14 -0400 | INFO | server | | Serving static content from : /opt/web_vmstats/
Sun, 13 Sep 2015 20:30:14 -0400 | INFO | server | | Starting WebSocket server : ws://:8080/
Sun, 13 Sep 2015 20:30:14 -0400 | INFO | server | | Serving CGI or static files : http://:8080/
Any help greatly appreciated!!
Note that for Debian-based systems, on the script, the line “/etc/rc.d/init.d/functions” might need to be replaced with “/lib/lsb/init-functions”.
Awesome post.
Works fine !
Thanks !
Thanks for this! Got it on all my Unix VMs,
Cheers,
Jake