
Based on the wonderful things you have heard about Nginx, perhaps you decided to give it a try. You may have liked it so much that are considering replacing your Apache installations with Nginx after going through some of the articles on the topic that we have published on this site.
If so, I’m sure you will welcome this guide with open arms since we are going to cover 12 tips to increase the security of your Nginx servers (ranging from keeping Nginx up to date all the way to using using TLS and redirecting HTTP to HTTPS), and you will note that some of them are very similar to what you would do with Apache.
Don’t Miss:
13 Apache Web Server Security and Hardening Tips
25 Apache Htaccess Tricks to Secure Apache Web Server
Nginx Testing Environment
We will use the following environment in this guide:
- Debian GNU/Linux 8.1 (jessie).
- IP address: 192.168.0.25 (tecmintlovesnginx.com) and 192.168.0.26 (nginxmeanspower.com), as described in the IP-based virtual hosts section at
- Nginx version: nginx/1.6.2.
- For your convenience, here is the final configuration file (Pastebin link).
With that in mind, let’s begin.
TIP #1: Keep Nginx up to date
At the time of this writing, the latest Nginx versions in the CentOS (in EPEL) and Debian repositories are 1.6.3 and 1.6.2-5, respectively.
Don’t Miss: Install Latest Stable Version of Nginx from Repositories and Source
Although installing software from the repositories is easier than compiling the program from source code, this last option has two advantages: 1) it allows you to build extra modules into Nginx (such as mod_security), and 2) it will always provide a newer version than the repositories (1.9.9 as of today). The release notes are always available in the Nginx web site.
Don’t Miss:
Protect Apache Against Brute Force and DDoS Attacks Using Mod_Security and Mod_Evasive
TIP #2: Remove Unnecessary Modules in Nginx
To explicitly remove modules from Nginx while installing from source, do:
# ./configure --without-module1 --without-module2 --without-module3
For example:
# ./configure --without-http_dav_module --withouthttp_spdy_module
As you will probably guess, removing modules from a previous Nginx installation from source requires performing the compilation again.
A word of caution: Configuration directives are provided by modules. Make sure you don’t disable a module that contains a directive you will need down the road! You should check the nginx docs for the list of directives available in each module before taking a decision on disabling modules.
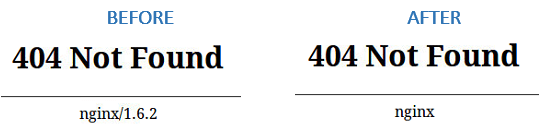
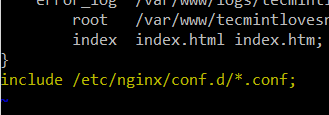
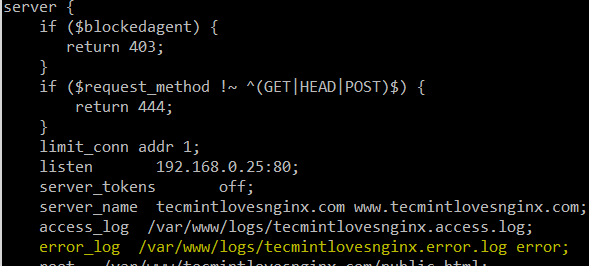
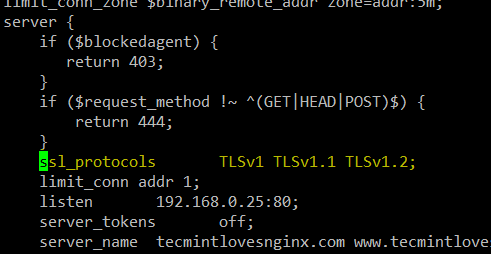
TIP #3: Disable server_tokens Directive in Nginx
The server_tokens directive tells Nginx to display its current version on error pages. This is not desirable since you do not want to share that information with the world in order to prevent attacks at your web server caused by known vulnerabilities in that specific version.
To disable the server_tokens directive, set if to off inside a server block:
server {
    listen       192.168.0.25:80;
    server_tokens        off;
    server_name  tecmintlovesnginx.com www.tecmintlovesnginx.com;
    access_log  /var/www/logs/tecmintlovesnginx.access.log;
    error_log  /var/www/logs/tecmintlovesnginx.error.log error;
        root   /var/www/tecmintlovesnginx.com/public_html;
        index  index.html index.htm;
}
Restart nginx and verify the changes:
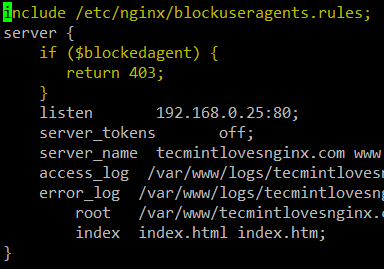
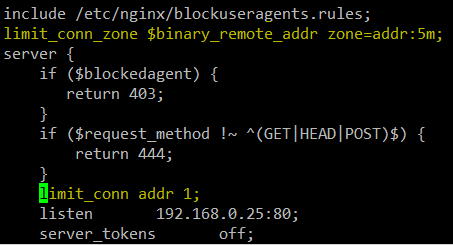
TIP #4: Deny HTTP User Agents in Nginx
A HTTP user agent is a software that is used for content negotiation against a web server. This also includes malware bots and crawlers that may end up impacting your web server’s performance by wasting system resources.
In order to more easily maintain the list of undesired user agents, create a file (/etc/nginx/blockuseragents.rules for example) with the following contents:
map $http_user_agent $blockedagent {
        default         0;
        ~*malicious     1;
        ~*bot           1;
        ~*backdoor      1;
        ~*crawler       1;
        ~*bandit        1;
}
Next, place the following line before the server block definition:
include /etc/nginx/blockuseragents.rules;
And an if statement to return a 403 response if the user agent string is in the black list defined above:
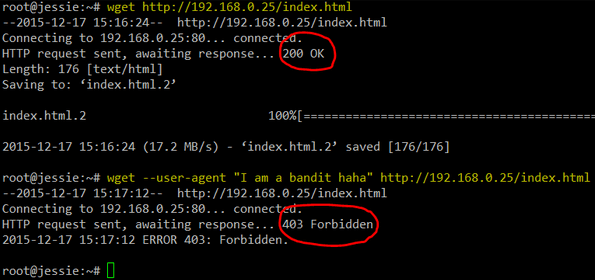
Restart nginx, and all user agents whose string matches the above will be blocked from accessing your web server. Replace 192.168.0.25 with your server’s IP and feel free to choose a different string for the --user-agent switch of wget:
# wget http://192.168.0.25/index.html
# wget --user-agent "I am a bandit haha" http://192.168.0.25/index.html
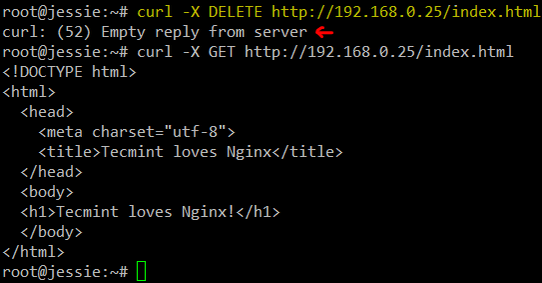
TIP #5: Disable Unwanted HTTP Methods in Nginx
Also known as verbs, HTTP methods indicate the desired action to be taken on a resource served by Nginx. For common web sites and applications, you should only allow GET, POST, and HEAD and disable all others.
To do so, place the following lines inside a server block. A 444 HTTP response means an empty response and is often used in Nginx to fool malware attacks:
if ($request_method !~ ^(GET|HEAD|POST)$) {
   return 444;
}
To test, use curl to send a DELETE request and compare the output to when you send a regular GET:
# curl -X DELETE http://192.168.0.25/index.html
# curl -X POST http://192.168.0.25/index.html
TIP #6: Set Buffer Size Limitations in Nginx
To prevent buffer overflow attacks against your Nginx web server, set the following directives in a separate file (create a new file named /etc/nginx/conf.d/buffer.conf, for example):
client_body_buffer_size  1k;
client_header_buffer_size 1k;
client_max_body_size 1k;
large_client_header_buffers 2 1k;
The directives above will ensure that requests made to your web server will not cause a buffer overflow in your system. Once again, refer to the docs for further details on what each of them does.
Then add an include directive in the configuration file:
include /etc/nginx/conf.d/*.conf;
TIP #7: Limit the Number of Connections by IP in Nginx
In order to limit the connections by IP, use the limit_conn_zone (in a http context or at least outside the server block) and limit_conn (in a http, server block, or location context) directives.
However, keep in mind that not all connections are counted – but only those that have a request processed by the server and its whole request header has been read.
For example, let’s set the maximum number of connections to 1 (yes, it’s an exaggeration, but it will do the job just fine in this case) in a zone named addr (you can set this to whatever name you wish):
limit_conn_zone $binary_remote_addr zone=addr:5m;
limit_conn addr 1;
A simple test with Apache Benchmark (Perform Nginx Load) where 10 total connections are made with 2 simultaneous requests will help us to demonstrate our point:
# ab -n 10 -c 2 http://192.168.0.25/index.html
See the next tip for further details.
TIP #8: Setup Monitor Logs for Nginx
Once you have performed the test described in the previous tip, check the error log that is defined for the server block:
You may want to use grep to filter the logs for failed requests made to the addr zone defined in TIP #7:
# grep addr /var/www/logs/tecmintlovesnginx.error.log --color=auto
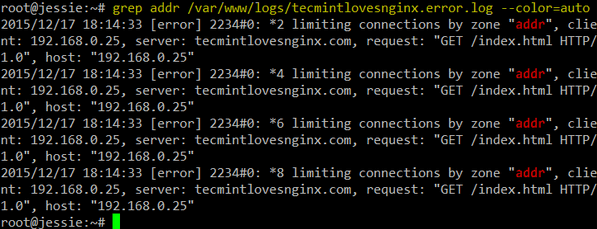
Likewise, you can filter the access log for information of interest, such as:
- Client IP
- Browser type
- HTTP request type
- Resource requested
- Server block answering the request (useful if several virtual hosts are logging to the same file).
And take appropriate action if you detect any unusual or undesired activity.
TIP #9: Prevent Image Hotlinking in Nginx
Image hotlinking happens when a person displays in another site an image hosted on yours. This causes an increase in your bandwidth use (which you pay for) while the other person happily displays the image as if it was his or her property. In other words, it’s a double loss for you.
For example, let’s say you have a subdirectory named img inside your server block where you store all the images used in that virtual host. To prevent other sites from using your images, you will need to insert the following location block inside your virtual host definition:
location /img/ {
  valid_referers none blocked 192.168.0.25;
   if ($invalid_referer) {
     return   403;
   }
}
Then modify the index.html file in each virtual host as follows:
|
192.168.0.26 |
192.168.0.25 |
| <!DOCTYPE html> <html> <head> <meta charset=”utf-8″> <title>Nginx means power</title> </head> <body> <h1>Nginx means power!</h1> <img src=”http://192.168.0.25/img/nginx.png” /> </body> </html> |
<!DOCTYPE html> <html> <head> <meta charset=”utf-8″> <title>Tecmint loves Nginx</title> </head> <body> <h1>Tecmint loves Nginx!</h1> <img src=”img/nginx.png” /> </body> </html> |
Now browse to each site and as you can see, the image is correctly displayed in 192.168.0.25 but is replaced by a 403 response in 192.168.0.26:
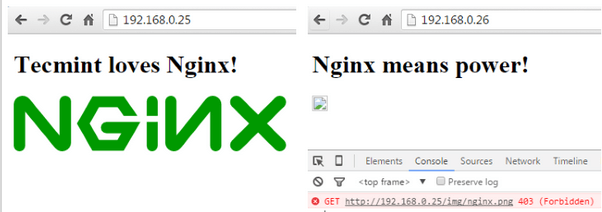
Note that this tip depends on the remote browser sending the Referer field.
TIP #10: Disable SSL and only Enable TLS in Nginx
Whenever possible, do whatever it takes to avoid SSL in any of its versions and use TLS instead. The following ssl_protocols should be placed in a server or http context in your virtual host file or is a separate file via an include directive (some people use a file named ssl.conf, but it’s entirely up to you):
ssl_protocols TLSv1 TLSv1.1 TLSv1.2;
For example:
TIP #11: Create Certificates in Nginx
First off, generate a key and a certificate. Feel free to use a different type of encryption if you want:
# openssl genrsa -aes256 -out tecmintlovesnginx.key 1024
# openssl req -new -key tecmintlovesnginx.key -out tecmintlovesnginx.csr
# cp tecmintlovesnginx.key tecmintlovesnginx.key.org
# openssl rsa -in tecmintlovesnginx.key.org -out tecmintlovesnginx.key
# openssl x509 -req -days 365 -in tecmintlovesnginx.csr -signkey tecmintlovesnginx.key -out tecmintlovesnginx.crt
Then add the following lines inside a separate server block in preparation for the next tip (http --> https redirection) and move the SSL-related directives to the new block as well:
server {
    listen 192.168.0.25:443 ssl;
    server_tokens off;
    server_name  tecmintlovesnginx.com www.tecmintlovesnginx.com;
    root   /var/www/tecmintlovesnginx.com/public_html;
    ssl_certificate /etc/nginx/sites-enabled/certs/tecmintlovesnginx.crt;
    ssl_certificate_key /etc/nginx/sites-enabled/certs/tecmintlovesnginx.key;
    ssl_protocols       TLSv1 TLSv1.1 TLSv1.2;
}
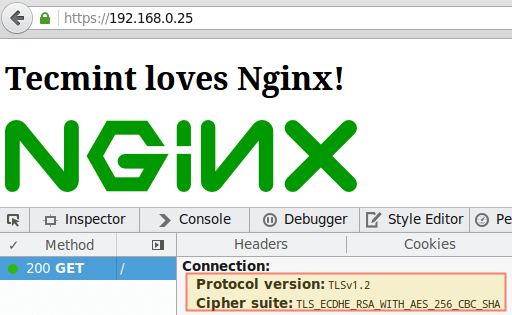
In the next tip we will verify how our site is now using a self-signed cert and TLS.
TIP #12: Redirect HTTP traffic to HTTPS in Nginx
Add the following line to the first server block:
return 301 https://$server_name$request_uri;
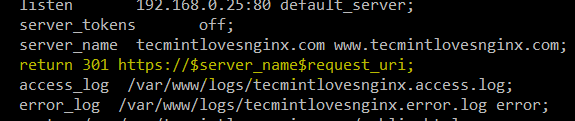
The above directive will return a 301 (Moved permanently) response, which is used for permanent URL redirection whenever a request is made to port 80 of your virtual host, and will redirect the request to the server block we added in the previous tip.
The image below shows the redirection and confirms the fact that we are using TLS 1.2 and AES-256 for encryption:
Summary
In this article we have shared a few tips to secure your Nginx web server. We would love to hear what you think and, if you have other tips that you would like to share with the rest of the community, feel free to let us know by sending us a note using the comment form below.


Please update this:
The
[S]ervermust be lower case[s]erver.@Hung,
Thanks, corrected in the article…
Hi,
Thanks for your post, highly appreciated. Have an issue when running
nginx -tto validate the configuration and send me the next error message:Any recommendations to jump this hurdle?
Best Regards
if ($request_method !~ ^(GET|HEAD|POST)$) {
   return 444;
}
is it Nginx default config, right?
If not, where it’s place to add?
anyone know how to create rewrite rules below from apache to nginx?
RewriteEngine On
RewriteRule ^([^\.]+)/([^\.]+)/?$ index.php?route=$1&sub=$2 [QSA,NC,L]
RewriteRule ^([^\.]+)/?$ index.php?route=$1 [QSA,NC,L]
There are lots of compiler options that are relevant for nginx and any webserver, that you’d want to use to achieve a real difference in security. All the stuff you’re talking about are user configs and settings after it has already been compiled. That stuff won’t do anything for most of the threats out there. Compiling with fortify source, ASLR-related, and memory-related security options is what will harden an nginx server.
@Joe,
You’re absolutely right. We will update this article and include your suggestion. Thanks for taking the time to comment and share your feedback with us and the rest of the community.
In section ‘TIP #3’ on photo You have ‘Server_tokens off;’ <- capital letter, should by lowercase.
‘Server_tokens off;’ worked for me.
#4 doesn’t add much security. As you can see from the test you ran to verify it’s working, spoofing the user agent string is pretty trivial.
@Patrick,
While it is true that #4 does not add security per se, it helps to avoid wasting resources depending on certain user agents. Yes, you can spoof the user agent string but you can also build some sort of smart blacklist to add to when you detect an undesired user agent (one with an unusual string).
PCI Compliance will fail due to using TLSv1.0
1. This one is OK in general, but the main reason for keeping software up-to-date is IMHO security updates. This goal can be usually achieved even by using Debian stable repository. If one wants up-to-date version of Nginx, there are prepared packages for Debian, RHEL, CENTOS and some derivates: http://nginx.org/en/linux_packages.html .
On the other hand, compiling Nginx from sources complicates applying security updates, as it is extra manual work that has to be done by somebody.
2. This is cost/benefit issue. I would maybe get few free RAM at cost of compiling Nginx myself and having harder times with security updates. I don’t think it is worth the cost except some few special deployments.
3. Great, I did not know this one! +1
4. Might be good to know, but I don’t know much use cases.
5. Not sure why should I bother with that. What do I get for the work?
6. Might have some performance impact, but I doubt in having positive security impact. Theoretically, there might be some undocumented assumptions of the configuration (e.g. assumption that buffer#1 ≥ buffer#2) which you might break by reconfiguring those. So, you are IMHO more likely to open a new security issue than to prevent some issue.
7. There are some large DNATs. I don’t think that number of connections per IP is something I would like to configure unless I absolutely must.
8. IMHO obvious, but OK.
9. Might be useful, but not so much. One might simply turn the referer off, see http://nginx.org/en/linux_packages.html . Rejecting requests with no referer might be somewhat controversial.
10. Good, but there is more to configure. I would rather recommend https://mozilla.github.io/server-side-tls/ssl-config-generator/ .
11. I don’t think that self-signed certificates are very useful. In fact, you can get a trusted one for free, even for a commercial website. See https://letsencrypt.org/ .
12. IMHO trivial, but OK. But I would suggest adding HSTS in such case.
Thank you for such a thorough comment!
Redirecting http to https is not wise IMO because it makes easier to steal your passwords with sslstrip.
@Mark,
Good point – but would you mind giving it a try and get back to us? I haven’t used sslstrip but I don’t think if you can actually steal passwords if no credentials are entered while in http. Note that we are not talking about having a login form on a http connection and then redirecting to a secure area, but the other way around.
@Mark,
Redirecting http to https is fine as long as you add HSTS, I suppose.