In this article, we’ll guide you on how to generate and install an SSL/TLS certificate obtained for free from Let’s Encrypt Certificate Authority that we’ll be using to secure Nginx webserver HTTP transactions on RHEL and RHEL-based distributions such as Fedora, Rocky Linux and AlmaLinux.
If you’re looking to install Let’s Encrypt for Apache on RHEL and RHEL-based distributions, follow this guide below:
[ You might also like: How to Install Let’s Encrypt SSL Certificate to Secure Apache on RHEL Systems ]
Requirements
- A registered domain name with valid
ADNS records to point back to server public IP Address. - Nginx web server installed with SSL enabled and Virtual Hosts enabled (only for multiple domains or subdomains hosting).
Our Testing Environment Setup

Step 1: Install Nginx Web Server in RHEL Systems
1. On the first step, in case you don’t have Nginx daemon already installed, issue the below commands with root privileges in order to install Nginx webserver from Epel repositories.
------------- On RHEL, Rocky & AlmaLinux 9 -------------
# dnf install https://dl.fedoraproject.org/pub/epel/epel-release-latest-9.noarch.rpm

------------- On RHEL, Rocky & AlmaLinux 8 -------------
# dnf install https://dl.fedoraproject.org/pub/epel/epel-release-latest-8.noarch.rpm

------------- Install Nginx Web Server -------------
# yum install nginx
Note: Fedora users do not need to install the epel repository.
Step 2: Install Let’s Encrypt (Certbot) in RHEL Systems
2. The fastest method of installing the Let’s Encrypt client on Linux systems is by installing certbot and python3-certbot-nginx packages from the epel repository.
# dnf install certbot python3-certbot-nginx

3. After the certbot client has been installed, verify the installed version of Let’s Encrypt software by running the below command:
# certbot --version

certbot 1.30.0
Step 3: Obtain a Free Let’s Encrypt SSL Certificate for Nginx
4. The process of obtaining a free SSL/TLS Certificate for Nginx will be done manually by using Let’s Encrypt Standalone plugin.
This method requires that port 80 must be free during the time Let’s Encrypt client validates the server’s identity and generates certificates.
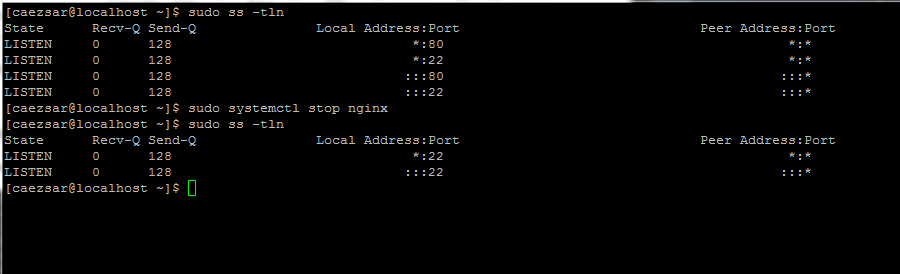
So, if Nginx is already running, stop the daemon with the following command and run ss utility to confirm that port 80 is no longer in use in the network stack.
# service nginx stop
# systemctl stop nginx
# ss -tln
5. Now it’s time to obtain a free SSL Certificate from Let’s Encrypt by running the certbot command with --nginx to initialize the fetching and configuration of Let’s Encrypt security certificate for Nginx domains.
# certbot --nginx
Or
# certbot --nginx -d example.com -d www.example.com

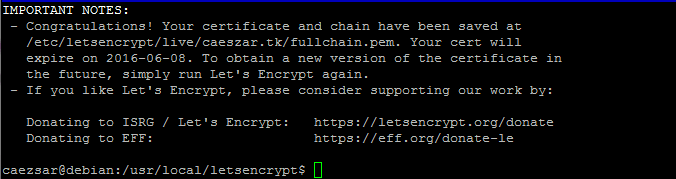
6. Finally, if everything went as it should, a congratulatory info message will be shown on your bash terminal. The message will also display when the certificate will expire.
Step 4: Install Let’s Encrypt SSL Certificate in Nginx
9. Now that you own a free SSL/TLS Certificate, it’s time to install it in Nginx webserver in order for your domain to use it.
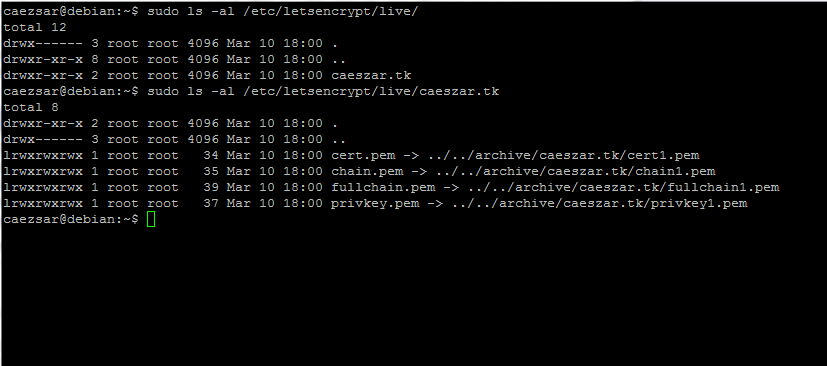
All new SSL certificates are placed in /etc/letsencrypt/live/ under a directory named after your domain name. Use ls command to list the Certificate files issued for your domain and identify them.
# sudo ls /etc/letsencrypt/live/
# sudo ls -al /etc/letsencrypt/live/your_domain.tld
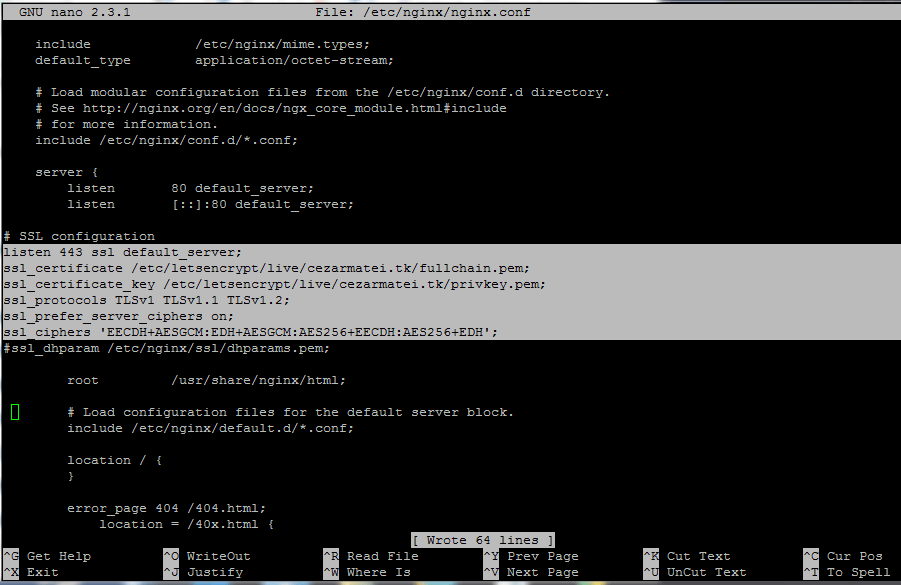
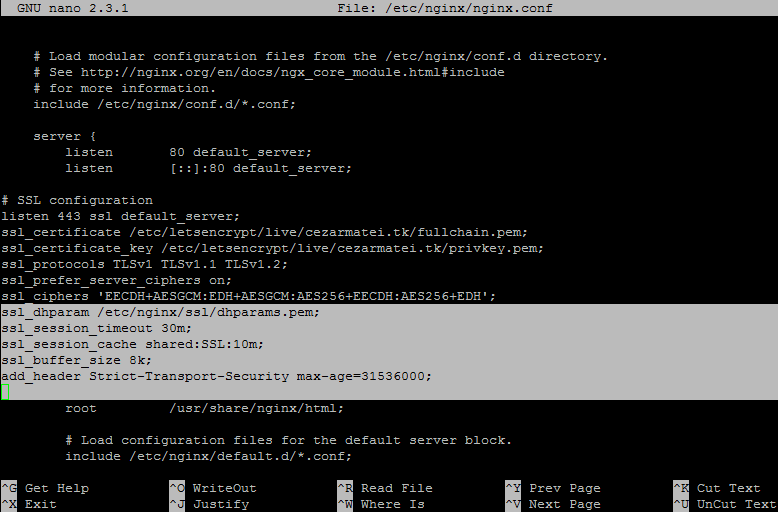
10. To install the certificate files in Nginx and enable SSL, open /etc/nginx/nginx.conf file for editing and add the below statements after the last listen line from server block. Use the below illustration as guide.
# vi /etc/nginx/nginx.conf
Nginx SSL block excerpt:
# SSL configuration
listen 443 ssl default_server;
ssl_certificate /etc/letsencrypt/live/your_domain.tld/fullchain.pem;
ssl_certificate_key /etc/letsencrypt/live/your_domain.tld/privkey.pem;
ssl_protocols TLSv1 TLSv1.1 TLSv1.2;
ssl_prefer_server_ciphers on;
ssl_ciphers 'EECDH+AESGCM:EDH+AESGCM:AES256+EECDH:AES256+EDH';
Replace the domain name string for SSL certificates to match your own domain.
11. Finally, restart Nginx service and visit your domain via HTTPS Protocol at https://yourdomain. The page should load smooth, without any certificate error.
# systemctl restart nginx
# service nginx restart
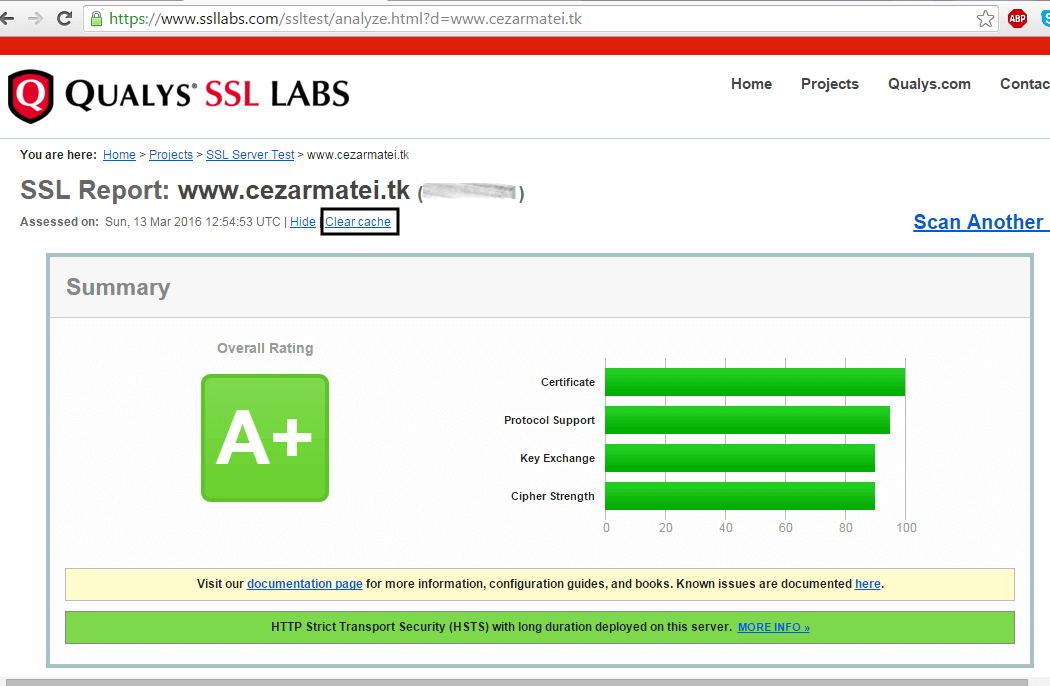
12. In order to verify the SSL/TLS certificate and its straightness visit the following link:
https://www.ssllabs.com/ssltest/analyze.html
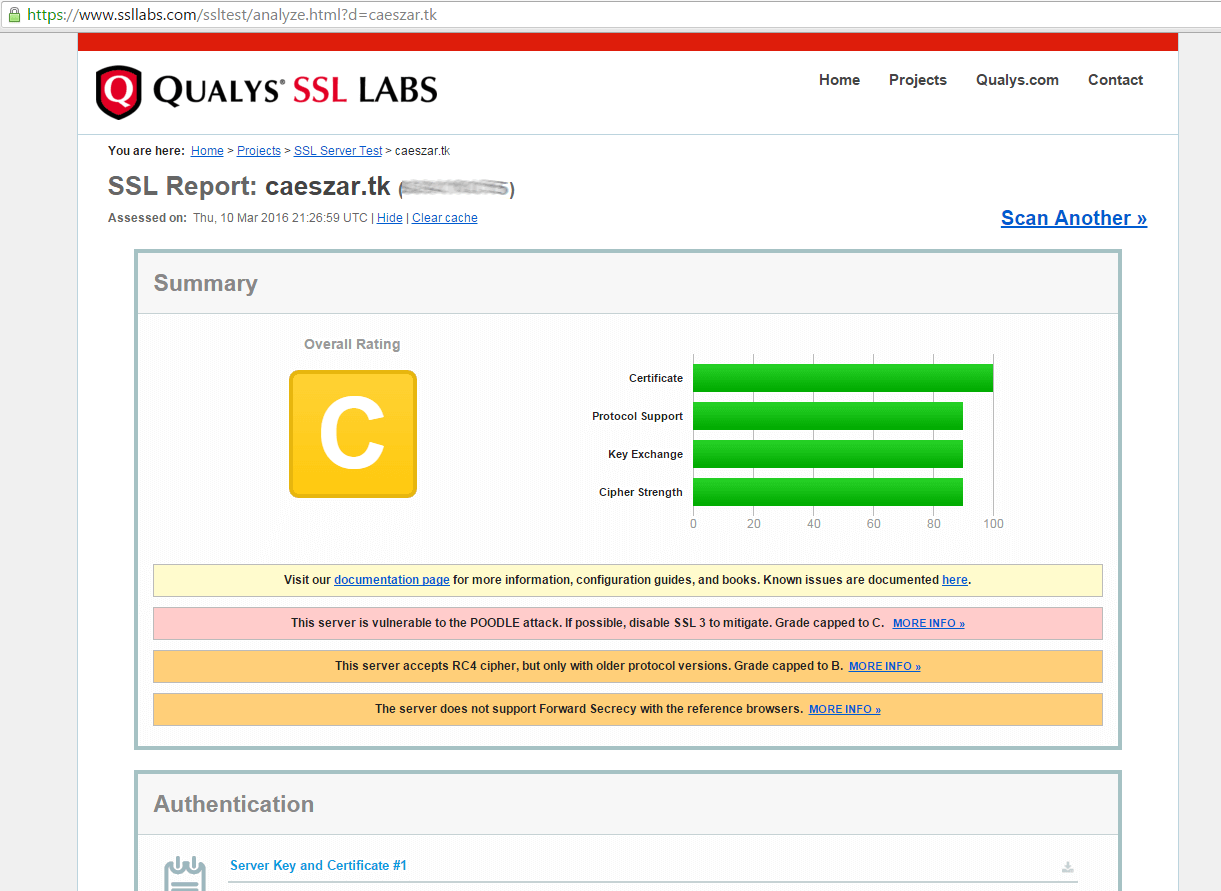
13. In case you get a notification that your server supports a weak DH key exchange and an overall rating of B grade, generate a new Diffie-Hellman cipher in /etc/nginx/ssl/ directory to protect your server against the Logjam attack by running the following commands.
# mkdir /etc/nginx/ssl
# cd /etc/nginx/ssl
# openssl dhparam -out dhparams.pem 4096
In this example we’ve used a 4096 bit key, which actually takes a long time to generate and puts an extra overhead on your server and on SSL handshake.
In case there’s no explicit need to use a key this long and you’re not to paranoid, you should be safe with a 2048 bit key.
14. After DH key has been generated, open Nginx configuration file and add the below statements after ssl_ciphers line in order to add the DH key and rise the security level of your domain to an A+ grade.
# vi /etc/nginx/nginx.conf
Add following block excerpt to Nginx.conf:
ssl_dhparam /etc/nginx/ssl/dhparams.pem;
ssl_session_timeout 30m;
ssl_session_cache shared:SSL:10m;
ssl_buffer_size 8k;
add_header Strict-Transport-Security max-age=31536000;
15. Restart Nginx service to apply changes and retest your SSL certificate by clearing the previous result cache from the link mentioned above.
# systemctl restart nginx
# service nginx restart

Step 5: Auto Renew Nginx Free Lets Encrypt SSL Certificates
16. Let’s Encrypt CA releases free SSL/TLS certificates valid for 90 days. Certificates can be manually renewed and applied before expiration using the webroot plugin, without stopping your web server, by issuing the below commands:
# certbot --nginx -d example.com -d www.example.com
# systemctl reload nginx
When running the above command make sure you replace the example.com to match your domain.
17. In order to auto-renew the certificate before it expires create the cron job to an existing crontab file.
# crontab -e
Add the following cron job at the bottom of the file, which will run every day at noon to check the certificate expiry and renew it. The --quiet option tells certbot not to generate output.
0 12 * * * /usr/bin/certbot renew --quiet
That’s all! Now, Nginx server can deliver secure web content with a free SSL/TLS Let’s Encrypt certificate on your website.


Is there any way I can use this procedure for the wildcard domain?
Hi, I’m still getting a B rating. Was the addition of : ssl_protocols TLSv1 and ssl cipher are needed? Currently I’m only having the 2 ssl perm key written in the nginc.
As how do you manager to created the cipher number : ssl_ciphers ‘EECDH+AESGCM:EDH+AESGCM:AES256+EECDH:AES256+EDH’ Or it’s just generic and i add it directly to nginx file ?
thanks in advance
@Jeff,
Please add the following SSL configuration to your nginx.conf to get A rating.
Fantastic tutorial, easy to follow and very well explained.
I had 2 issue:
1. I am on a windows machine and I made the cert-renew script in notepad++, but it didn’t work. Then I changed the EOL conversion setting to Unix (LF) and it worked. It’s under Edit – EOL Conversions.
2. Using vim for the crontab editing, but I followed a guide here to figure it out: https://www.tecmint.com/vi-editor-usage/
I am getting this error after step 8.
FailedChallenges: Failed authorization procedure.
www.ashokk.com(http-01): urn:ietf:params:acme:error:dns :: DNS problem: NXDOMAIN looking up A forwww.ashokk.com.@Ashok,
Please add IPv4 A record for you domain, before running the Let’s encrypt script.
Thank you very much! Only got one problem to solve, “requested domain is not a FQDN because it contains an empty label.”
Check the DNS records for special allowed characters, especially the A or PTR records, if any!
Thanks, I solved it by using
--domains $domaininstead of “${domain_list}“. My only problem now is that I get folders like domain.com-0001. I just want to replace the existing one. Is there a solutions for this behavior?Thanks, This was VERY helpful.
two of your quotes are fancy quotes instead of plain quotes:
> Add following lines to cert-renew file.
>> webpath=’ /usr/share/nginx/html/’
@Timeless,
Thanks for pointing out those quotes, corrected in the writeup as suggested.
This is one of THE most complete and super simple tutorial I’ve seen.
Thanks a ton!!
Thanks for the detailed instructions. It helped, but I got stuck in a couple of steps. Hence, I wrote another article which shares an alternate way of using LetsEncrypt with Nginx on AWS.
The best article for installing the SSL certificate. The best part is that it also takes the whole articles in easy steps with pictures and later on further guides on how to secure and install the cron for it. Excellent work.!
Wow! – Nice article and detailed information.
Thanks for this how-to. I want to add it is possible to use systems timer feature to trigger the renewal.