In a relatively short period of time since it was developed and made available (a little over 10 years), Nginx has experienced a sustained and steady growth among web servers because of its high performance and low memory usage.

Since Nginx is Free and Open Source Software, it has been adopted by thousands of web server administrators around the globe, not only in Linux and *nix servers, but also in Microsoft Windows.
Don’t Miss: Apache Name-based and IP-based Virtual Hosting
For those of us most used to Apache, Nginx may have a somewhat steep learning curve (at least that was my case) but it certainly pays off once you set up a couple of sites and start seeing the traffic and resource usage statistics.
In this article we will explain how to use Nginx to set up name-based and ip-based virtual hosting in CentOS/RHEL 7 servers and Debian 8 and derivatives, starting with Ubuntu 15.04 and its spin-offs.
Our testing scenario for this article is as follows:
- Operating System: Debian 8 Jessie server [IP 192.168.0.25]
- Gateway: Router [IP 192.168.0.1]
- Web Server: Nginx 1.6.2-5
- Dummy Domains: www.tecmintlovesnginx.com and www.nginxmeanspower.com.
Installing Nginx Web Server
If you haven’t done so already, please install Nginx before proceeding further. If you need help to get started, a quick search for nginx in this site will return several articles on this topic. Click on the magnifying glass icon at the top of this page and search for keyword nginx. If you don’t know how to search for articles in this site, don’t worry here we’ve added links to the nginx articles, just go through and install it as per your respective Linux distributions.
- Install and Compile Nginx from Sources in RHEL/CentOS 7
- Install Nginx Web Server on Debian 8
- Install Nginx with MariaDB and PHP/PHP-FPM on Fedora 23
- Install Nginx Web Server on Ubuntu 15.10 Server/Desktop
- Password Protect Nginx Website Directories
Then get ready to continue with the rest of this tutorial.
Creating Name-based Virtual Hosts in Nginx
As I’m sure you already know, a virtual host is a website that is served by Nginx in a single cloud VPS or physical server. However, in the Nginx docs you will find the term "server blocks" instead, but they are basically the same thing called by different names.
The first step to set up virtual hosts is to create one or more server blocks (in our case we will create two, one for each dummy domain) in the main configuration file (/etc/nginx/nginx.conf) or inside /etc/nginx/sites-available.
Although the name of the configuration files in this directory (sites-available) can be set to whatever you want, it’s a good idea to use the name of the domains, and in addition we chose to add the .conf extension to indicate that these are configuration files.
These server blocks can be relatively complex, but in their basic form they consist of the following content:
In /etc/nginx/sites-available/tecmintlovesnginx.com.conf:
server {
    listen       80;
    server_name  tecmintlovesnginx.com www.tecmintlovesnginx.com;
    access_log  /var/www/logs/tecmintlovesnginx.access.log;
    error_log  /var/www/logs/tecmintlovesnginx.error.log error;
        root   /var/www/tecmintlovesnginx.com/public_html;
        index  index.html index.htm;
}
In /etc/nginx/sites-available/nginxmeanspower.com.conf:
server {
    listen       80;
    server_name  nginxmeanspower.com www.nginxmeanspower.com;
    access_log  /var/www/logs/nginxmeanspower.access.log;
    error_log  /var/www/logs/nginxmeanspower.error.log error;
    root   /var/www/nginxmeanspower.com/public_html;
    index  index.html index.htm;
}
You can use the above blocks to start setting up your virtual hosts, or you can create the files with the basic skeleton from /etc/nginx/sites-available/default (Debian) or /etc/nginx/nginx.conf.default (CentOS).
Once copied, change their permissions and ownership:
# chmod 660  /etc/nginx/sites-available/tecmintlovesnginx.com.conf
# chmod 660  /etc/nginx/sites-available/nginxmeanspower.com.conf
Debian and Derivatives
# chgrp www-data  /etc/nginx/sites-available/tecmintlovesnginx.com.conf
# chgrp www-data  /etc/nginx/sites-available/nginxmeanspower.com.conf
CentOS and RHEL
# chgrp nginx  /etc/nginx/sites-available/tecmintlovesnginx.com.conf
# chgrp nginx  /etc/nginx/sites-available/nginxmeanspower.com.conf
When you’re done, you should delete the sample file or rename it to something else to avoid confusion or conflicts.
Please note that you will also need to create the directory for the logs (/var/www/logs) and give the Nginx user (nginx or www-data, depending on whether you are running CentOS or Debian) read and write permissions over it:
# mkdir /var/www/logs
# chmod -R 660 /var/www/logs
# chgrp <nginx user> /var/www/logs
The virtual hosts must now be enabled by creating a symlink to this file in the sites-enabled directory:
# ln -s /etc/nginx/sites-available/tecmintlovesnginx.com.conf /etc/nginx/sites-enabled/tecmintlovesnginx.com.conf
# ln -s /etc/nginx/sites-available/nginxmeanspower.com.conf /etc/nginx/sites-enabled/nginxmeanspower.com.conf
Next, create a sample html file named index.html inside /var/www/<domain name>/public_html for each of the virtual hosts (replace <domain name> as needed). Modify the following code as necessary:
<!DOCTYPE html>
<html>
  <head>
    <meta charset="utf-8">
    <title>Tecmint loves Nginx</title>
  </head>
  <body>
  <h1>Tecmint loves Nginx!</h1>
  </body>
</html>
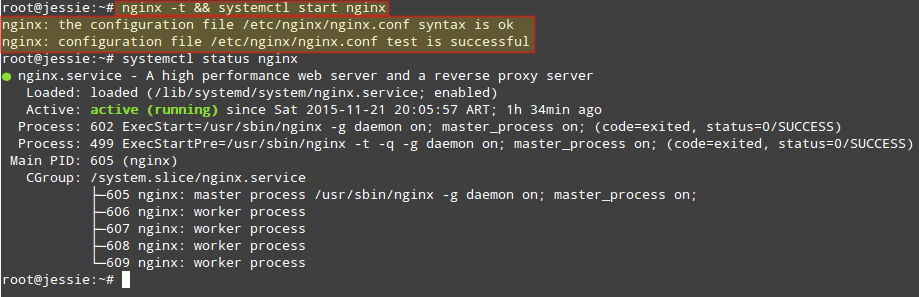
Finally, test the Nginx configuration and start the web server. If there are any errors in the configuration, you will be prompted to correct them:
# nginx -t && systemctl start nginx
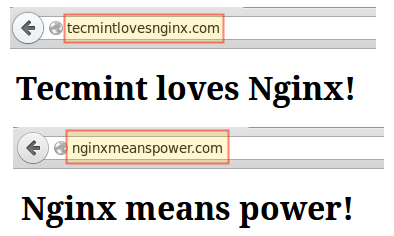
and add the following entries to your /etc/hosts file in your local machine as a basic name resolution strategy:
192.168.0.25 tecmintlovesnginx.com
192.168.0.25 nginxmeanspower.com
Then launch a web browser and go to the URLs listed above:
To add more virtual hosts in Nginx, just repeat the steps outlined above as many times as needed.
IP-based Virtual Hosts in Nginx
As opposed to name-based virtual hosts where all hosts are accessible through the same IP address, IP-based virtual hosts require a different IP:port combination each.
This allows the web server to return different sites depending on the IP address and port where the request is received on. Since named-based virtual hosts give us the advantage of sharing an IP address and port, they are the standard for general-purpose web servers and should be the setup of choice unless your installed version of Nginx does not support Server Name Indication (SNI), either because it is a REALLY outdated version, or because it was compiled without the –with-http_ssl_module compile option.
If,
# nginx -V
does not return the highlighted options below:

you will need to update your version of Nginx or recompile it, depending on your original installation method. For compiling Nginx, follow below article:
Assuming we’re good to go, we need to note that another prerequisite for IP-based virtual hosts is the availability of separate IPs – either by assigning them to distinct network interfaces, or through the use of virtual IPs (also known as IP aliasing).
To perform IP aliasing in Debian (assuming you’re using eth0), edit /etc/network/interfaces as follows:
Debian and Derivatives
auto eth0:1
iface eth0:1 inet static
        address 192.168.0.25
        netmask 255.255.255.0
        network 192.168.0.0
        broadcast 192.168.0.255
        gateway 192.168.0.1
auto eth0:2
iface eth0:2 inet static
        address 192.168.0.26
        netmask 255.255.255.0
        network 192.168.0.0
        broadcast 192.168.0.255
        gateway 192.168.0.1
In the example above we create two virtual NICs out of eth0: eth0:1 (192.168.0.25) and eth0:2 (192.168.0.26).
CentOS and RHEL
In CentOS, rename /etc/sysconfig/network-scripts/ifcfg-enp0s3 as ifcfg-enp0s3:1 and make a copy as ifcfg-enp0s3:2, and then just change the following lines, respectively:
DEVICE="enp0s3:1"
IPADDR=192.168.0.25
and
DEVICE="enp0s3:2"
IPADDR=192.168.0.26
Once done, restart the network service:
# systemctl restart networking
Next, make the following changes to the server blocks previously defined in this article:
In /etc/nginx/sites-available/tecmintlovesnginx.com.conf:
listen 192.168.0.25:80
In /etc/nginx/sites-available/nginxmeanspower.com.conf:
listen 192.168.0.26:80
Finally, restart Nginx for the changes to take effect.
# systemctl restart nginx
and don’t forget to update your local /etc/hosts accordingly:
192.168.0.25 tecmintlovesnginx.com
192.168.0.26 nginxmeanspower.com
Thus, each request made to 192.168.0.25 and 192.168.0.26 on port 80 will return tecmintlovesnginx.com and nginxmeanspower.com, respectively:
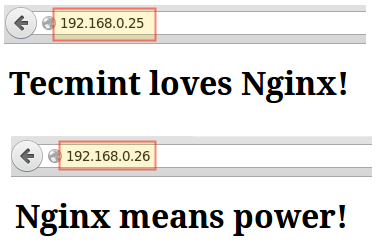
As you can see in the images above, you now have two IP-based virtual hosts using the only NIC in your server with two different IP aliases.
Summary
In this tutorial we have explained how to set up both name-based and IP-based virtual hosts in Nginx. Although you will probably want to use the first option, it’s important to know that the other option is still there if you need it – just make sure you take this decision after considering the facts outlined in this guide.
Additionally, you may want to bookmark the Nginx docs as it is worthy and well to refer to them often while creating server blocks (there you have it – we are talking in the Nginx language now) and configuring them. You won’t believe all of the options that are available to configure and tune this outstanding web server.
As always, don’t hesitate to drop us a line using the form below if you have any questions or comments about this article. We look forward to hearing from you, and your feedback about this guide is most welcome.


Great article. It would be nice to have some real world examples of when you should use IP-based vhosts. What’s the particular service or business case? Since this is a key architectural decision, what are the factors to consider?
For example: geo location