In the second Kali Linux article, the network tool known as ‘nmap‘ will be discussed. While nmap isn’t a Kali-only tool, it is one of the most useful networks mapping tools in Kali.
Nmap, short for Network Mapper, is maintained by Gordon Lyon (more about Mr. Lyon here: http://insecure.org/fyodor/) and is used by many security professionals all over the world.
The utility works in both Linux and Windows and is a command line (CLI) driven. However, for those a little timider of the command line, there is a wonderful graphical frontend for nmap called zenmap.
It is strongly recommended that individuals learn the CLI version of nmap as it provides much more flexibility when compared to the zenmap graphical edition.
What purpose does nmap serve? Great question. Nmap allows for an administrator to quickly and thoroughly learn about the systems on a network, hence the name, Network MAPper or nmap.
Nmap has the ability to quickly locate live hosts as well as services associated with that host. Nmap’s functionality can be extended even further with the Nmap Scripting Engine, often abbreviated as NSE.
This scripting engine allows administrators to quickly create a script that can be used to determine if a newly discovered vulnerability exists on their network. Many scripts have been developed and included with most nmap installs.
A word of caution – nmap is commonly used by people with both good and bad intentions. Extreme caution should be taken to ensure that you aren’t using nmap against systems that permission has not be explicitly provided in a written/legal agreement. Please use caution when using the nmap tool.
System Requirements
- Kali Linux (nmap is available in other operating systems and functions similar to this guide).
- Another computer and permission to scan that computer with nmap – This is often easily done with software such as VirtualBox and the creation of a virtual machine.
- For a good machine to practice with, please read about Metasploitable 2
- Download for MS2 Metasploitable2
- A valid working connection to a network or if using virtual machines, a valid internal network connection for the two machines.
Kali Linux – Working with Nmap
The first step to working with nmap is to log into the Kali Linux machine and if desired, start a graphical session (This first article in this series installed Kali Linux with the XFCE Desktop Environment).
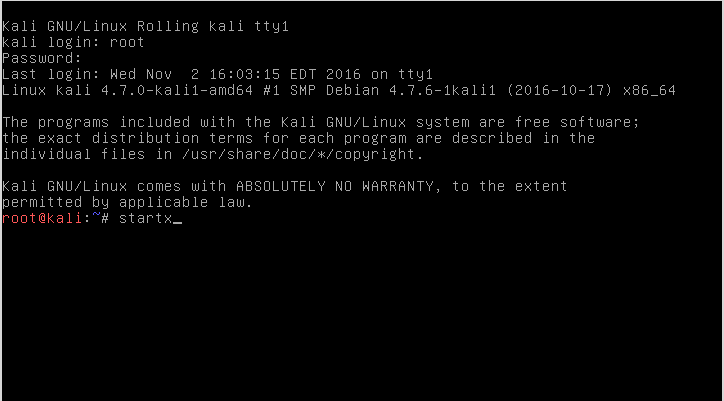
During the installation, the installer would have prompted the user for a ‘root‘ user password which will be needed to log in. Once logged in to the Kali Linux machine, using the command ‘startx‘ the XFCE Desktop Environment can be started – it is worth noting that nmap doesn’t require a desktop environment to run.
# startx
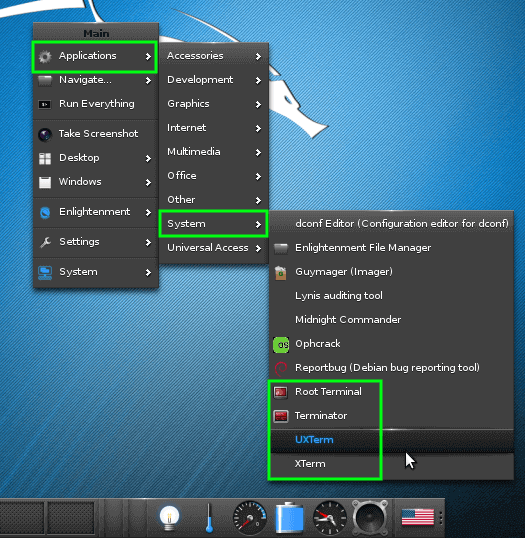
Once logged into XFCE, a terminal window will need to be opened. By clicking on the desktop background, a menu will appear. Navigating to a terminal can be done as follows: Applications -> System -> ‘Xterm‘ or ‘UXterm‘ or ‘Root Terminal‘.
The author is a fan of the shell program called ‘Terminator‘ but this may not show up in a default install of Kali Linux. All shell programs listed will work for the purposes of nmap.
Once a terminal has been launched, the nmap fun can begin. For this particular tutorial, a private network with a Kali machine and a Metasploitable machine was created.
This made things easier and safer since the private network range would ensure that scans remained on safe machines and prevents the vulnerable Metasploitable machine from being compromised by someone else.
How to Find Live Hosts on My Network?
In this example, both of the machines are on a private 192.168.56.0 /24 network. The Kali machine has an IP address of 192.168.56.101 and the Metasploitable machine to be scanned has an IP address of 192.168.56.102.
Let’s say though that the IP address information was unavailable. A quick nmap scan can help to determine what is live on a particular network. This scan is known as a ‘Simple List’ scan hence the -sL arguments passed to the nmap command.
# nmap -sL 192.168.56.0/24

Sadly, this initial scan didn’t return any live hosts. Sometimes this is a factor in the way certain Operating Systems handle port scan network traffic.
Find and Ping All Live Hosts on My Network
Not to worry though, there are some tricks that nmap has available to try to find these machines. This next trick will tell nmap to simply try to ping all the addresses in the 192.168.56.0/24 network.
# nmap -sn 192.168.56.0/24
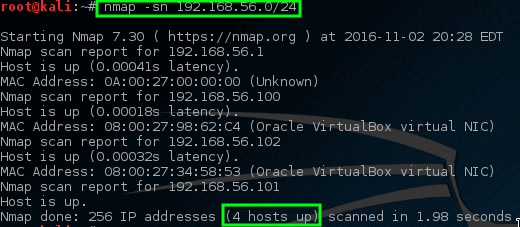
This time nmap returns some prospective hosts for scanning! In this command, the -sn disables nmap’s default behavior of attempting to port scan a host and simply has nmap try to ping the host.
Find Open Ports on Hosts
Let’s try letting nmap port scan these specific hosts and see what turns up.
# nmap 192.168.56.1,100-102
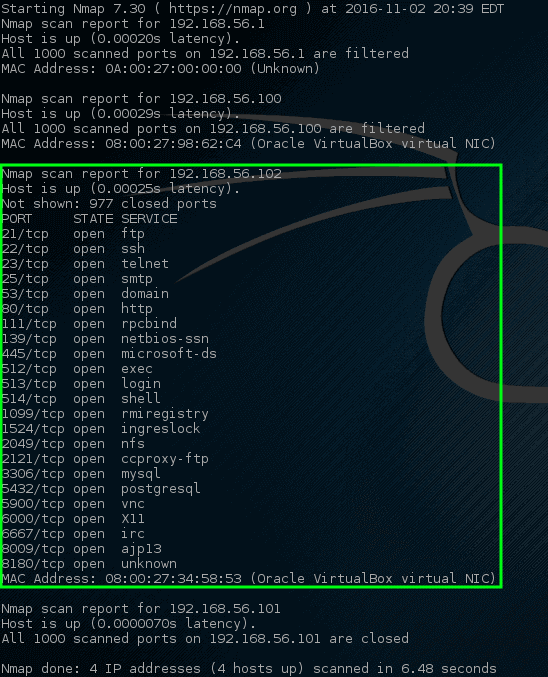
Wow! This time nmap hit a gold mine. This particular host has quite a bit of open network ports.
These ports all indicate some sort of listening service on this particular machine. Recalling from earlier, the 192.168.56.102 IP address is assigned to the metasploitable vulnerable machine hence why there are so many open ports on this host.
Having this many ports open on most machines is highly abnormal so it may be a wise idea to investigate this machine a little closer. Administrators could track down the physical machine on the network and look at the machine locally but that wouldn’t be much fun especially when nmap could do it for us much quicker!
Find Services Listening on Ports on Hosts
This next scan is a service scan and is often used to try to determine what service may be listening on a particular port on a machine.
Nmap will probe all of the open ports and attempt to banner grab information from the services running on each port.
# nmap -sV 192.168.56.102
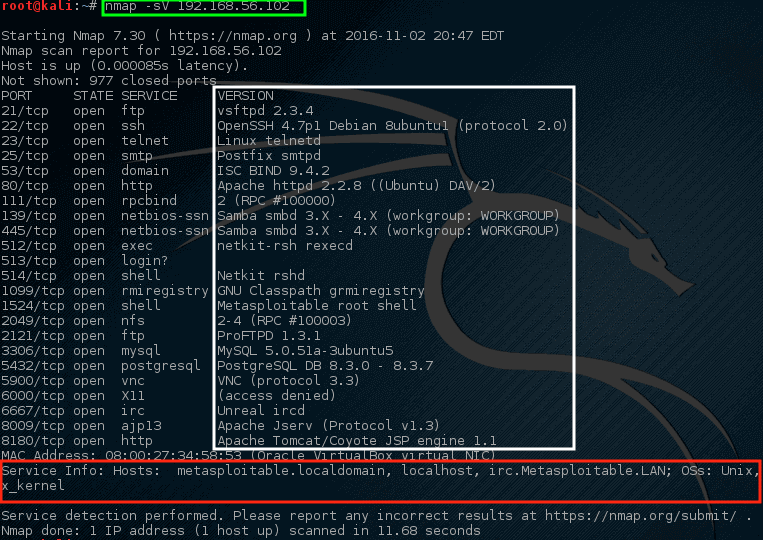
Notice this time nmap provided some suggestions on what nmap thought might be running on this particular port (highlighted in the white box). Also, nmap also tried to determine information about the operating system running on this machine as well as its hostname (with great success too!).
Looking through this output should raise quite a few concerns for a network administrator. The very first line claims that VSftpd version 2.3.4 is running on this machine! That’s a REALLY old version of VSftpd.
Searching through ExploitDB, a serious vulnerability was found back in 2011 for this particular version (ExploitDB ID – 17491).
Find Anonymous FTP Logins on Hosts
Let’s have nmap take a closer look at this particular port and see what can be determined.
# nmap -sC 192.168.56.102 -p 21
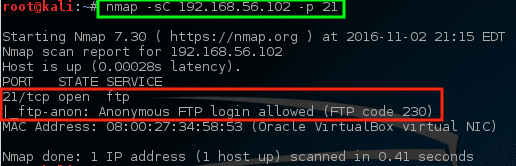
With this command, nmap was instructed to run its default script (-sC) on the FTP port (-p 21) on the host. While it may or may not be an issue, nmap did find out that anonymous FTP login is allowed on this particular server.
Check for Vulnerabilities on Hosts
This paired with the earlier knowledge about VSftd having an old vulnerability should raise some concern though. Let’s see if nmap has any scripts that attempt to check for the VSftpd vulnerability.
# locate .nse | grep ftp
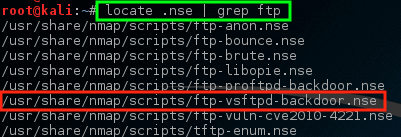
Notice that nmap has an NSE script already built for the VSftpd backdoor problem! Let’s try running this script against this host and see what happens but first it may be important to know how to use the script.
# nmap --script-help=ftp-vsftd-backdoor.nse

Reading through this description, it is clear that this script can be used to attempt to see if this particular machine is vulnerable to the ExploitDB issue identified earlier.
Let’s run the script and see what happens.
# nmap --script=ftp-vsftpd-backdoor.nse 192.168.56.102 -p 21
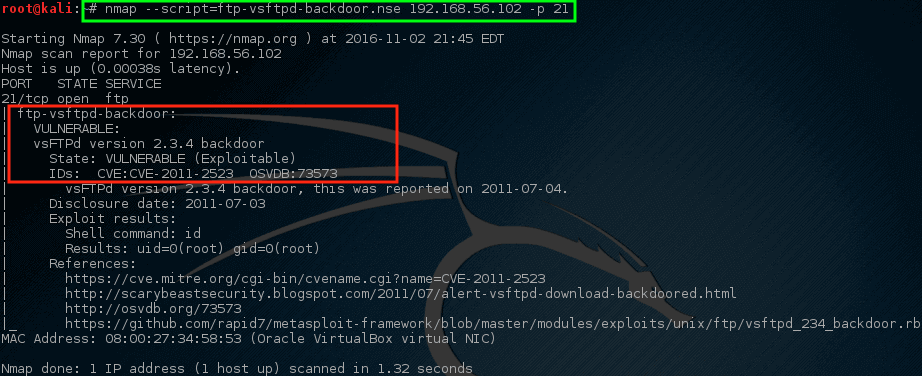
Yikes! Nmap’s script returned some dangerous news. This machine is likely a good candidate for a serious investigation. This doesn’t mean that the machine is compromised and being used for horrible/terrible things but it should bring some concerns to the network/security teams.
Nmap has the ability to be extremely selective and extremely quiet. Most of what has been done so far has attempted to keep nmap’s network traffic moderately quiet however scanning a personally owned network in this fashion can be extremely time-consuming.
Nmap has the ability to do a much more aggressive scan that will often yield much of the same information but in one command instead of several. Let’s take a look at the output of an aggressive scan (Do note – an aggressive scan can set off intrusion detection/prevention systems!).
# nmap -A 192.168.56.102
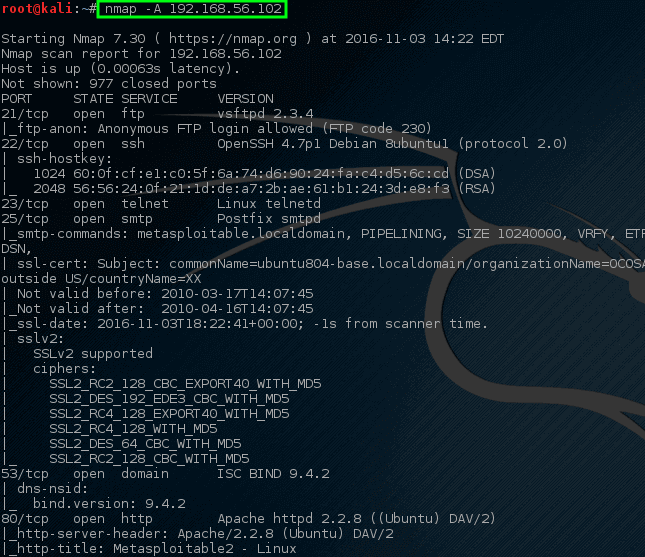
Notice this time, with one command, nmap has returned a lot of the information it returned earlier about the open ports, services, and configurations running on this particular machine. Much of this information can be used to help determine how to protect this machine as well as to evaluate what software may be on a network.
This was just a short, shortlist of the many useful things that nmap can be used to find on a host or network segment. It is strongly urged that individuals continue to experiment with nmap in a controlled manner on a network that is owned by the individual (Do not practice by scanning other entities!).
There is an official guide on Nmap Network Scanning by author Gordon Lyon, available from Amazon.


Why run ‘startx‘ to start Enlightenment only to go back and use the terminal?
@Dragonmouth,
The article is a little old, needs an update, give me some time to update it…