

Creating an ISO file from a directory in Linux is a useful task for various purposes, such as distributing software, creating bootable media, or backing up data.
ISO files are a standard format for storing and distributing data, and they can be easily created using the command line in Linux.
In this article, we will guide you through the process of creating an ISO file from a directory using the genisoimage command.
Step 1: Installing genisoimage Tool in Linux
The genisoimage package is used for creating ISO-9660 CD-ROM filesystem images in Linux. It is a pre-mastering program that can be used to create bootable CDs and CDs with support for the Macintosh HFS filesystem.
The package is part of the cdrkit suite and includes tools like mkzftree, dirsplit, and geteltorito for working with ISO images.
To install genisoimage on Linux, use the following appropriate command for your specific Linux distribution.
sudo apt install genisoimage         [On Debian, Ubuntu and Mint]
sudo yum install genisoimage         [On RHEL/CentOS/Fedora and Rocky/AlmaLinux]
sudo emerge -a sys-apps/genisoimage  [On Gentoo Linux]
sudo apk add genisoimage             [On Alpine Linux]
sudo pacman -S cdrtools              [On Arch Linux]
sudo zypper install genisoimage      [On OpenSUSE]
sudo pkg install genisoimage         [On FreeBSD]
Step 2: Creating an ISO File from a Directory
Navigate to the parent directory of the directory you want to create the ISO file from using the cd command.
For example, let’s assume your directory is called my_folder and is located in your home directory, you can use the following command:
cd /home/ravi/
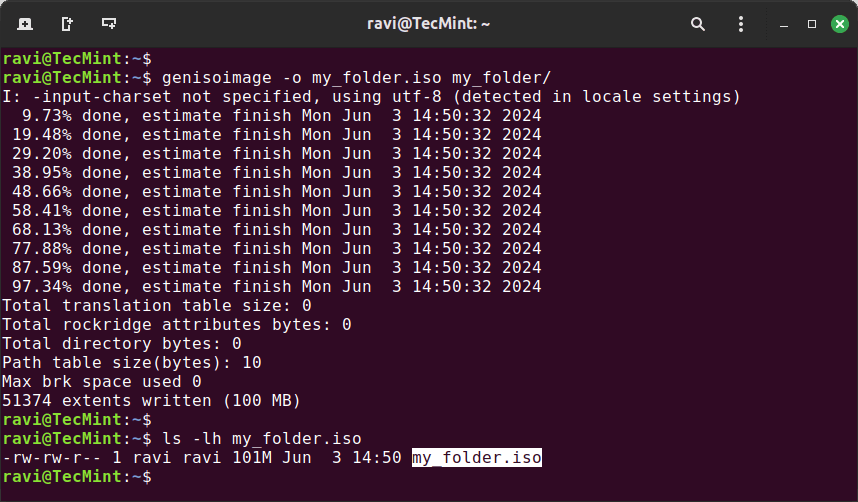
Now, run the genisoimage command to create the ISO file.
genisoimage -o my_folder.iso my_folder/
Here’s what each part of the command means:
- genisoimage -: This is the command used to create the ISO file.
- -o output.iso – This specifies the output file name for the ISO file. In this case, it will be named
"my_folder.iso". - my_folder – This is the name of the directory you want to create the ISO file from.
Once the command completes, you should have an ISO file named my_folder.iso in your current directory. To verify that the ISO file was created correctly, you can use the ls command:
ls -lh my_folder.iso
Step 3: Mount the ISO File (Optional)
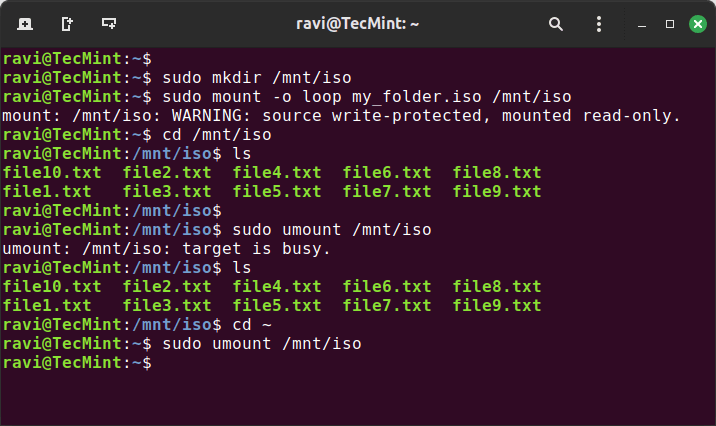
To ensure that the ISO file contains the correct data, you can mount it and check its contents. Create a mount point (a directory where you will mount the ISO) and mount the ISO file using the following commands:
sudo mkdir /mnt/iso
sudo mount -o loop my_folder.iso /mnt/iso
Now, you can navigate to /mnt/iso and check the files:
cd /mnt/iso
ls
This will show you the contents of the ISO file. When you’re done, unmount the ISO file:
cd ~
sudo umount /mnt/iso
Conclusion
Creating an ISO file from a directory in Linux is a simple process involving a few commands. By following this guide, you can easily create an ISO file for backups, distribution, or other purposes.

The package name for Arch Linux is no longer
genisoimage; the command is now part of thecdrtoolspackage, by the way.