Any type of business is bound to have innumerable amounts of items that need to be inventoried, tracked, and managed. Doing so by means of pen and paper not only takes excessive amounts of time but is often prone to multiple user errors. Moving to a digital system such as Excel/Libre Calc worksheets is a little bit more productive and easier to back up but does present some other interesting issues such as access to the spreadsheet, inability to easily query data, or the simple fact that multiple spreadsheets easily becomes a logistical nightmare!
GLPI is a fantastic piece of information-resource management software that can be installed to track company resources. GLPI is comparable in functionality to several commercial pieces of software such as LanSweeper, EasyVista,and ManageEngine. GLPI boasts several very useful features:
- Hardware/Software inventory
- Network and printing hardware inventory
- Support for Fusion Inventory and OCS Inventory
- Computer peripherals inventory such as monitors, scanners, telephones, etc
- Help-desk Ticketing System
- SLA Management
- Change Management
- Project Management
- Reporting to PDF, CSV, PNG, SVG, etc
When GLPI is paired with Fusion Inventory:
- Software deployment abilities
- Automated inventory through client agents
- Ability to do handle Android, Windows, Linux, BSD, HP-UX, and many other operating systems
All in all with GLPI and Fusion Inventory installed, the combination can be used to create an all encompassing help-desk/document management/inventory system for businesses of all sizes.
This tutorial will walk through the steps necessary to quickly setup, configure, and begin importing inventory into GLPI with the help of Fusion Inventory on Debian 8 Jessie, but the same instructions also works on Debian based systems like Ubuntu and Mint.
Necessary Components
- Debian 8 Jessie already installed ( TecMint has an article on installing Debian 8 here:
- Working network connection (necessary for the automatic inventory).
- A secondary machine to install the inventory agent (also with a network connection to the Debian server)
- Root/Administrator access to both machines
Installation of GLPI/Fusion Inventory Server
Step 1: Dependency Installation
1. The first step in the process is to boot up and prepare the Debian server. GLPI will require Apache2, MySQL, and some PHP additions in order to function properly. The easiest way to get these packages is with the Apt meta-packager.
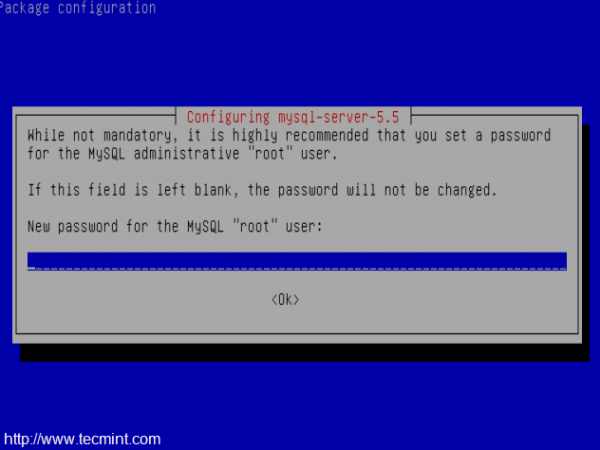
# apt-get install apache2 mysql-server-5.5 php5 php5-mysql php5-gd
This command will download and install the necessary packages and start the basic server services. While MySQL is installing, it will likely ask to have the MySQL root password set. Set this password but DO NOT forget it as it will be needed soon.
2. After all of the packages finish installing, it is always a good idea to make sure that the server services are running. This is easily accomplished by evaluating the system to see what services are listening on what ports with the ‘lsof‘ utility.
# lsof -i :80 				[will confirm apache2 is listening to port 80]
# lsof -i :3306				[will confirm MySQL is listening to port 3306]
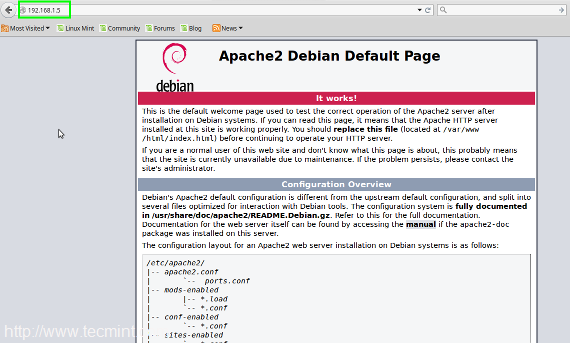
Another way to confirm apache2 is working and delivering a web-page is to open a web browser and type the Debian server’s IP address in the URL bar. If Apache2 is working, the web browser should return the “default” Apache2 page.
http://Your-IP-Addresss
Now that Apache2 is at least serving up a web-page, lets first prepare the MySQL database and then configure Apache2 to server GLPI.
Step 2: MySQL Configuration
3. From the Debian server, log into the MySQL command line interface using the ‘mysql‘ command.
# mysql -u root -p
This command will attempt to log into MySQL as the MySQL root user (NOT the system root user). The ‘-p‘ argument will prompt the user for the MySQL root user password that was configured when MySQL was installed in the prior paragraph. At this point, a new database ‘glpi‘ needs to be created for GLPI. The SQL command to do accomplish this task:
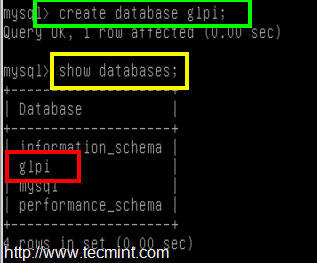
mysql> create database glpi;
To confirm that this new database was indeed created, the ‘show databases;‘ command can be issued. The result should look similar to the below screen-shot.
mysql> show databases;
4. From here, a new user with privileges to this database should be created. It is never a good idea to use the root user! To create a new MySQL user and assign them permissions to the ‘glpi‘ database:
- create user ‘glpi’@’localhost’; → creates a MySQL user called ‘glpi‘.
- grant all privileges on glpi.* to ‘glpi’@’localhost’ identified by ‘some_password’; → this grants all database privileges on the database called ‘glpi‘ to the newly created user ‘glpi‘ and then assigns a password required for that user to access the SQL database.
- flush privileges; → run this for the new privileges to be read by the MySQL server.
mysql> create user 'glpi'@'localhost';
mysql> grant all privileges on glpi.* to 'glpi'@'localhost' identified by 'some_password';
mysql> flush privileges;
At this point, MySQL is ready and it is time to obtain the GLPI software.
Step 3: Obtain and Prepare GLPI for Installation
5. Obtaining GLPI is very simple and can be accomplished one of two ways. The first method is to visit the project’s home page and Download GLPI Software or via the command line utility known as ‘wget‘.
This will download and install version 9.4.2 which is the current version as of this article.
# wget -c https://github.com/glpi-project/glpi/releases/download/9.4.2/glpi-9.4.2.tgz
6. Once the software is downloaded, the contents of the tarball need to be extracted. Using the tar utility, the contents can be decompressed, extracted, and placed in the proper location on the Debian server for the GLPI webpage to be accessible.
This will extract the tarball contents to a folder called ‘glpi‘ in the /var/www directory. By default, this is the directory that Apache2 serves files on Debian.
# tar xzf glpi-9.4.2.tgz -C /var/www
7. The above tar command will extract all the contents into the ‘/var/www/glpi‘ directory but it will all be owned by the root user. This will need to be changed for Apache2 and other security reasons using the chown command.
This will change the owner and primary group ownership for all of the files in /var/www/glpi to www-data which is the user and group that Apache2 will be using.
# chown -R www-data:www-data /var/www/glpi
At this point, Apache2 will need to be reconfigured in order to serve the newly extracted GLPI contents and the following section will detail the steps.


fusion inventory and assets in glpi cant synchronize. I am using fusion inventory agent but they can’t send inventory to assets module.
hi Rob,
1) actually I want to use it as secure site (https)
2) I need only hardware inventory, not software inventory
3) And I want I know server utilization will happen when agent communicate with server (In both end server utility as well as client also)
Can you please help me out in this.
Parthiban,
Thanks for the comment. GLPI does support HTTPS but you’ll have to either use a self-signed certificate or purchase one from a Certificate Authority like Verisign. As for hardware only, I’ve not looked into this yet. I will do some research and see if there is a way to disable software inventory. As for server resources, obviously when hosts start communicating back with the GLPI system resources are going to be used. Watching the unit we have setup, 30 or so clients connecting only uses about 80Mb of RAM during the connection and then frees up when they are done.
Rob
Fantastic and simple article, it worked out perfect for me! Thanks a bunch! As I wanted to eliminate OCS server.
Rob,
You’re quite welcome. Do realize that GLPI does have a newer version out now as well. The new version looks a lot nicer than the version in this article.
Please ignore my comment, I was using a corrupted version of the glpi, it works now. Thanks!
Chaitra,
Glad to hear you got things working! GLPI is a wonderful tool.
Thanks for the insightful article Rob.
I followed the steps you mentioned above, when i enter the IP address of the Apache2 server, I get a 500 error. Any ideas?
Danielle,
Could you provide some more information about which version of GLPI you are using as well as which plugin? There is a much newer version of GLPI out there now and you may be trying to use a plugin or version of GLPI that aren’t compatible with one another.
good day rob!
i now installed fusioninventory and configured the ‘agent.cfg’ file, but how and where do i activate the “fusioninventory-agent” command?
hope for your speedy reply
Danielle,
Once you’ve configured the agent.cfg file, all you need to do is run the “fusioninventory-agent” from the command line interface of the machine you wish to inventory.
Hi Rob Thank You for this wonderful post.
I have successfully install GLPI on Centos 6.7 and add windows and linux system with fusion-inventory.
But How to deploy fusion-inventory remotely from GLPI server because it is not possible to install fusion-inventory one by one in client system.
Regards,
Raghu
Greetings,
I have managed to install GLPI v0.9 on Ubuntu 14.04 LTS with plugin for FusionInventory. The FusionInventory agent on my Ubuntu 16.04 client was also registered in the GLPI database. However, the FusionInventory agent (fusioninventory-agent_windows-x64_2.3.17.exe) on my MS WIndows 7 client was not.
The agent appears to install without error. The host page also loads indicating the version running and an option to manually inventory. I have observed a reference to Strawberry Perl which I was unclear if was required.
Grateful for your support and assistance in resolving this matter.
Pierre Bowrin
I’m having problems with Fusion inventory also.
I cannot start the agent, it shows 404 error.
I think that the error is because I used a Rosehosting tutorial first and then stumbled upon yours article after which i continued from where I left off and installed Fusion inventory.
I think I have to start a new installation.
Ryan,
404 just means that it couldn’t find the resource on the web server. This is still potentially correctable! First thing I would do is make sure that you have the file “/plugins/fusioninventory/front/plugin_fusioninventory.communication.php” where web root is the location of the files for GLPI. If this file exists, check the permissions on all the folders leading up to the file. They must be readable and executable by the user running the webserver (should be apache2 from this guide).
The next thing I would check is on the GLPI client. Make sure that it can ping the webserver that is hosting the GLPI files. Then in the file “/etc/fusioninventory/agent.cfg” be sure that the “server=” line maps correctly to the file above for example: server=http://192.168.1.10//plugins/fusioninventory/front/plugin_fusioninventory.communication.php
Let me know what happens!
Hi Rob i have a problem with LinuMint, when i started the agent i see this :
testmint minttest # fusioninventory-agent start
[error][http client] communication error : 404 not found
[fault] No answer from the Server at /usr/share/fusioninventory/Lib/FusionInventory/Agent.pm line 261.
How can I fix this ? Thanks !
Sam,
This likely means that the url placed in the configuration file is not resolving. Open the agent file located at “/etc/fusioninventory/agent.cfg”. Inside this file there is a line that will start with “server = ” be sure that after the equal sign you place the url for the GLPI system. For example: “server = http://tecmint.tecmint.local/plugins/fusioninventory/front/plugin_fusioninventory.communication.php“. Be sure to change “tecmint.tecmint.local” to your systems hostname. Also make sure that the mint machine you are trying to configure can ping that hostname as well.
yes I followed your guide and I successed install agent in Ubuntu 14.04.3 LTS
My enviroment is
sever: debain jessie installed glpi-0.85.5.tar fusioninventory-for-glpi_0.85.1.3.tar
agent:Ubuntu 14.04.3 LTS
Patrick,
Glad to hear! Hope you enjoy GLPI.
Hi Rob! why is it every time i click the plugin it says “The action you have requested is not allowed.” i correctly installed everything and the plugin just wont work..hope you reply.
Very good post! I follow de instructions, but my instalation have a trouble, the last light (Web access to files directory is protected) is red with red note “Web access to the files directory, should not be allowed. Check the .htaccess file and the web server configuration.” I’m newbe on linux and I lost on this. Any hint? Regards
Douglas,
I’d be sure to check the permissions on the files in the GLPI web directory. Make sure that your apache user owns those files (typically www-data). If that’s not the issue, check in the file /etc/apache2/sites-available/glpi.conf file that there is a line that states “AllowOverride All” or “AllowOverride Limit”. Reply back with the results of these two and we’ll keep trouble shooting.
Hi, i have the same problem than Douglas.
Add Allowoverride All didnt fix it & my /var/www/glpi is owned by www-data:www-data.
I dont’ have a clue why this problem happens..
Any advices ?
Make sure “AllowOverride All” is added between the brackets { } in the htaccess file. What is the path to the htaccess file you manipulated?
I’m currently away from the GLPI system but I will take a look at the installation when I get back but will attempt to help in the meantime.
have you ever thought about adding anything in relation to SSL between agents and the webserver? I have been having much difficulty with having the agent connect through SSL. Would you be updating your instructions to include SSL config as well?
Craig,
I hadn’t thought about that but I will take a look and see if I can get it working. If so, I’ll update the instructions appropriately. Thank you for the idea!
Awesome, I’ve tried a few times but still no luck. If i do get it, i will make sure to add it to the comment section!
While we are adding a host we are facing issue it is detected in fusion inventory & shown in fusion inventory ignored import devices. so these are not added.
I have checked that these device serial no is blank so these are not being added kindly confirm how we can add devices like these in glpi.
Regards
Kapil Kumar
Kapil,
I’m not exactly sure what you are asking. Is fusion not obtaining the serial number for the devices or are the devices not being inventoried?
Hi Rob,
Sorry for the double posts. I was trying to discover computers, not printers, I guess I am unclear of how the Fusion Agent really works. I was under the impression that I could have one agent and be able to scan the network for other computers and populate their info in GLPI. Or do I need an agent installed on every computer on the network? Sorry for the newbie question.
Wayne
Wayne,
Thanks for the clarification. There are a couple of different options available. For computer inventory, generally companies want to know what software is installed, revision numbers, etc. As such, the fusion inventory agent client would need to be installed on the computer in order to report that information. However the network discovery would provide some basic functionality but it does require the use of SNMP. So if there was a computer that needed to be inventoried but you don’t want to install fusion agent on the machine, you could configure an SNMP user on that machine and then provide the Fusion Inventory server with the SNMP user credentials to access that machine. Does that help? If not let me know and I’ll come up with an illustration or better description.
Hi Rob,
Fantastic post! Thank you. Any assistance with Network Discovery or a place a you could direct me to? I cannot get Fusion Inventory to scan my network, through GLPI. After setting an IP range, changing the agent settings, adding a task including target and actor…I cannot perform a Network Discovery.
Hi Rob,
Fantastic post! I have followed your instructions but I have one question regarding network discovery. I was hoping you could help me out or point me in the right direction. I cannot seem to get network discovery to work. I have entered IP ranges, created a task through Task Management, configured the agent module for network discovery on an agent, and added targets and actors but nothing seems to happen after that. Any assistance would be appreciated. Again, great post!
Wayne
Wayne,
Do you mean network discovery as in locating devices on a network or locating network devices? If you are referring to the later, I had to configure SNMP users on the network devices themselves in order for Fusion Inventory to query/inventory those devices. If you are talking about simple network discovery of hosts, I’ll check what I did later this evening.
GLPI fusioninventory agent not working with ubuntu-14.04.2
Sarfaraz, Could you provide some more detail? I tested Fusion inventory from Mint 17.1 which is based on Ubuntu 14.04 and it has worked flawlessly.
Ryan,
Not a problem at all! Best of luck and if you run into any issues, please let us know. We’ll be glad to assist.
Tremendous Job. Excellent
Sarfaraz,
Thank you. GLPI/Fusion Inventory are wonderful pieces of software that have saved me tons of time. Hoping that others can benefit as much from these two pieces of software.
Hi Rob !
Thank you so much for this guide, it helped me a lot !! Especially the part with fusion inventory, I’ll set it up tomorrow thanks to you !
Regards
Ryan