For the readers unfamiliar with the Raspberry Pi, this article is sadly not talking about the eatable kind! Raspberry Pi’s are single board, credit card sized computer made by the Raspberry Pi Foundation in the UK. The boards have surprisingly good specifications for their size.
For example, the newest model (Raspberry Pi 3 B+) sports a 1.4 GHz ARM 64bit quad core, 1 Gbe network adapter, 4 USB ports, HDMI out, Built-in bluetooth and 802.11ac WiFi! The best part about these little power houses is that they’re only 35 dollars! The Raspberry Pi has become a starting point for people to learn programming to advanced topics in robotics.
This article is going to go over how to install the Linux distribution Devuan onto a Raspberry Pi 3. The process is very similar for other Raspberry Pi models as well. This installation will be done with another Linux distribution (although Windows installer tools do exist).
Needed Supplies
- Raspberry Pi – Guide will be assuming a Raspberry Pi 3
- Micro SD card – Suggested 8GB but technically a 2GB will work
- Micro USB power supply (the kind typically used on older cell phones)
- Another computer running a Linux distribution
- SD card reader; either internal to the computer running Linux or an USB card reader
- Raspberry Pi image from Devuan
Installing Devuan Linux onto a Raspberry Pi 3
Within the Linux distribution, open a terminal window and navigate to the Downloads folder.
$ cd ~/Downloads
Once in this folder, use either the wget or curl tools to download the proper Raspberry Pi image file from Devuan. This guide will again be assuming that a Raspberry Pi 3 is being used.
$ wget -c https://files.devuan.org/devuan_ascii/embedded/devuan_ascii_2.0.0_arm64_raspi3.img.xz
OR
$ curl https://files.devuan.org/devuan_ascii/embedded/devuan_ascii_2.0.0_arm64_raspi3.img.xz
The above command will download the current Raspberry Pi ASCII release from the Devuan files repository. Depending on Internet connection speeds this could take some time. Once the download is done, the file needs to be decompress with the ‘unxz’ tool.
$ unxz devuan_ascii_2.0.0_arm64_raspi3.img.xz
This process may also take some time to complete as well depending on the speed of the computer the decompression is taking place upon. The next step in the process is to write the extracted image file to the micro sd card.
This is easily accomplished with the ‘dd’ tool but extreme care must be taken with the next steps to ensure that the proper disks are manipulated! First, the device name of the micro SD needs to be located with lsblk command.
$ lsblk
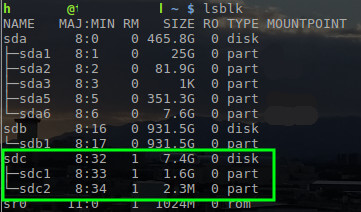
With the name of the micro SD card determined as ‘/dev/sdc’, the Devuan image can be written to the micro SD card with the ‘dd’ tool.
$ sudo dd if=~/Downloads/devuan_ascii_2.0.0_arm64_raspi3.img of=/dev/sdc status=progress
Note: The above command requires root privileges so utilize ‘sudo’ or login as the root user to run the command. Also this command will REMOVE EVERYTHING on the micro SD card. Be sure to backup needed data.
The ‘dd’ process will take some time. Simply let the process continue until dd is complete. Once the process is done, remove the micro SD card from the Linux computer and place into the Raspberry Pi.
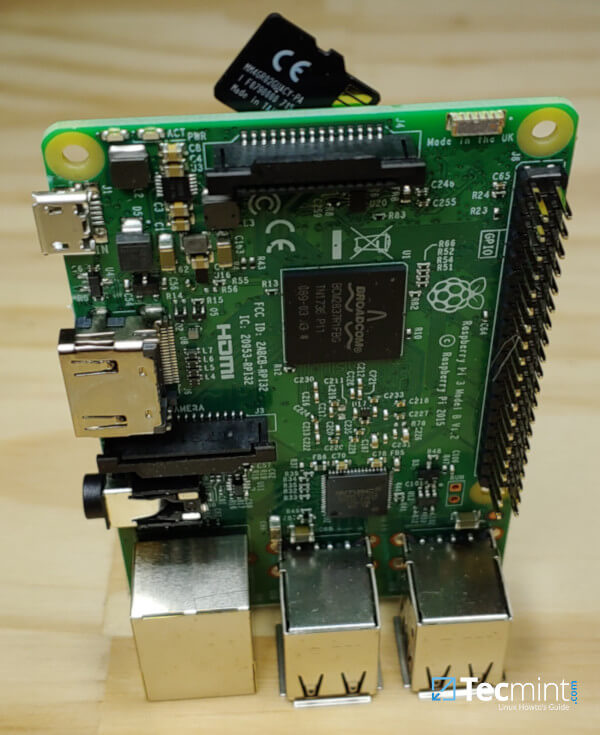
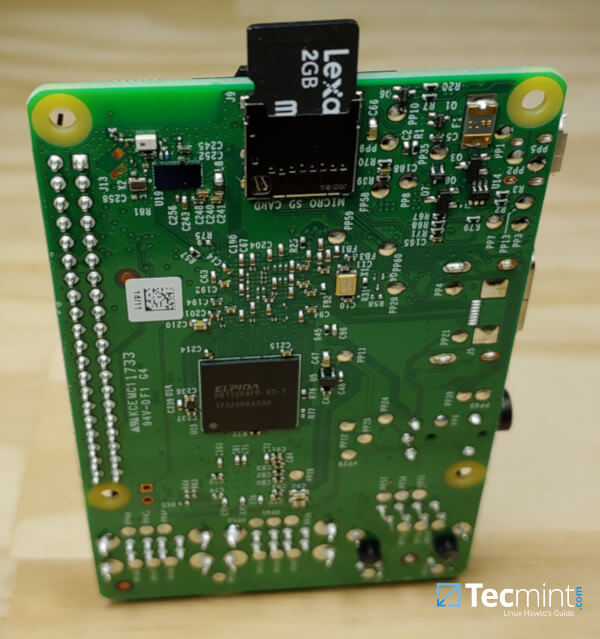
To locate the Micro SD card slot, aim the Raspberry Pi’s USB slots towards the ground. Once aimed at the ground, the edge of the Pi that is facing up will have a small slot for the Micro SD card.
Be gentle when trying to place the card into the slot as it only fits properly one way. To assist, the metal contacts on the SD card should be facing the Raspberry Pi’s ‘motherboard’ as you insert the SD card into the slot. Again do not force the card! If the card is having issues, try flipping it 180 degrees (See the images below for a better idea).
Once the Micro SD card has been seated, it’s time to turn the Raspberry Pi on! The Raspberry Pi 3 uses a typical 5 volt micro USB cell phone charger. The device will turn on as soon as power is applied and can be turned off by removing the power cord. The author typically will run the proper shutdown commands before removing the power supply just to be on the safe side.
The device can be plugged into a HDMI monitor to watch the boot sequence and to interact with the system as soon as the boot is finished. The system will also pull a DHCP address if plugged into a DHCP enabled network. This will allow users to SSH into the device if an HDMI monitor isn’t available (most TV’s support the Raspberry Pi too). The default credentials to log in are as follows:
Username: root
Password: toor
It is highly recommended that this password be changed and another user added to the system for non-admin log ins! After logging in, the Pi is ready to be used as a Devuan platform for any number of projects. The author uses the Raspberry Pi for everything from DNS, ad blocking, DHCP, NTP GPS clock, to a lite weight Linux Containers platform. The options are endless! Good luck and happy Pi hacking.
Thank you! “ascii” is quite old, could you please update this article. It is pretty high ranked.
Thanks, Shadow_I
Use the
-Ocommand to output to file..curl -O https://files.devuan.org/devuan_ascii/embedded/devuan_ascii_2.0.0_arm64_raspi3.img.xzOtherwise, the image is written to std output on the console display.
Is this a Devuan version with DE or plain terminal usage??
Thanks.
And how about installing in the internal memory (4gb) of the beaglebone black? thankful
Amon,
I sadly do not have a beaglebone to document the process. I will look into purchasing one if possible and write an article though!