OpenVPN is an Open Source and free program based on Secure Socket Layer protocol that runs over Virtual Private Networks which is designed to offer secure connections to your Central Organization Network over Internet, independent of what platform or Operating System you are using it, being as universal as possible (it runs on Linux, UNIX, Windows, Mac OS X and Android). Also it can run as a client and server the same time creating an encrypted virtual tunnel on endpoints based on cryptographic keys and certificates using TAP/TUN devices.
This tutorial guides you through installing and configuring OpenVPN Server on Zentyal 3.4 PDC so you can access your domain securely from other Internet destinations than your Local Network using OpenVPN clients on Windows based machines.
Requirements
- The former Zentyal 3.4 as a PDC Install Guide
Step 1: Install OpenVPN Server
1. Logon to Zentyal 3.4 Web Administration Tool pointing the browser to Zentyal IP address or domain name (https://domain_name ).
2. Go to Software Management -> Zentyal Components, choose VPN Service and hit on Install button.

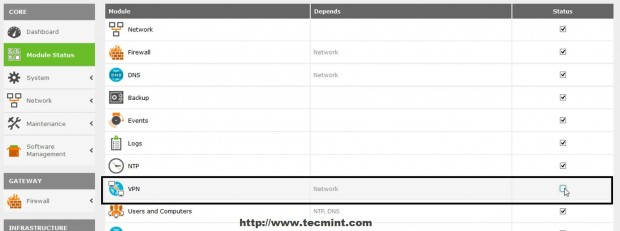
3. After the OpenVPN package successfully installs navigate to Module Status and check VPN to enable the module.
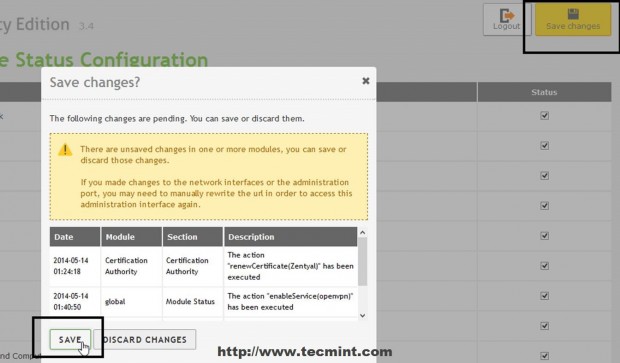
4. Accept the new pop-up which allows you to visualize system modifications then go up on page and hit Save Changes to apply new settings.
Step 2: Configure OpenVPN Server
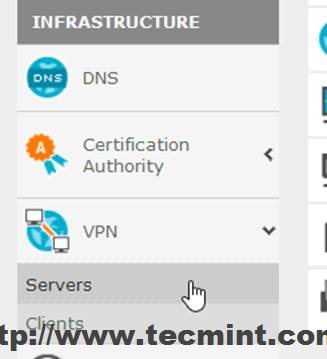
5. Now it’s time to configure Zentyal OpenVPN Server. Navigate to Infrastructure -> VPN -> Servers than click on Add New.
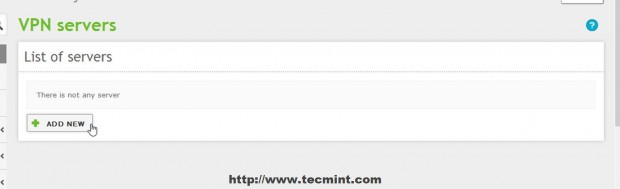
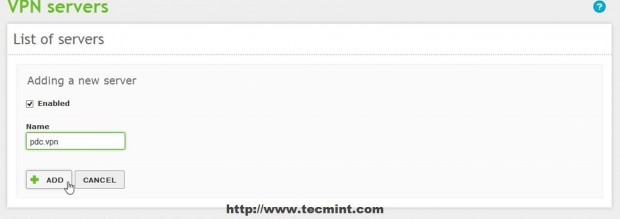
6. Choose a descriptive name for your VPN server, check Enabled and hit Add.
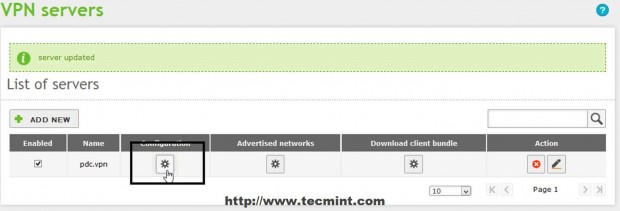
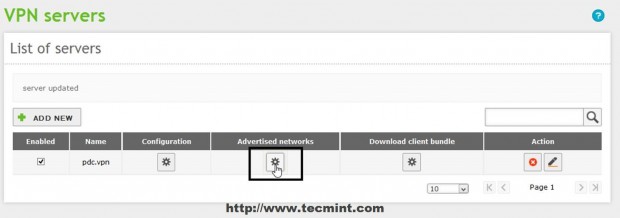
7. The newly created VPN server should appear on Server’s list so hit on Configurations button to setup this service.
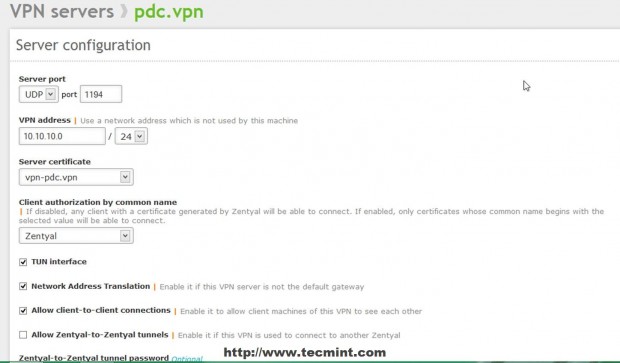
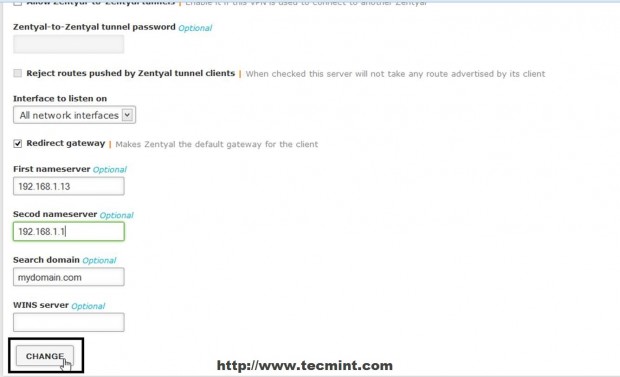
8. Edit Server configuration with the following settings and when you finish hit on Change.
- Server Port = UDP protocol, Port 1194 –default OpenVPN protocol and port (UDP works fast than TCP due to its connectionless state).
- VPN Address = 10.10.10.0/24 – here you can choose whatever private space network address you like but make sure your system does not use the same network address space.
- Server Certificate = your server name certificate – When you first add a new VPN server automatically an Certificate is issued with your VPN Server name.
- Client authorization by common name = choose Zentyal self explanatory.
- Check TUN interface – simulates a network layer device and operates at layer 3 of OSI model (if not checked TAP type interface is used, similar to a Layer 2 bridge).
- Check Network Address Translation – self explanatory.
- Check Allow client-to-client connections – From remote endpoints you can see your other machines that resides on your Local Network.
- Interface to listen on = select All network Interfaces.
- Check Redirect Gateway – self explanatory.
- First and Second Name Servers = add your Zentyal Name Servers IPs.
- Search domain = add your domain name.
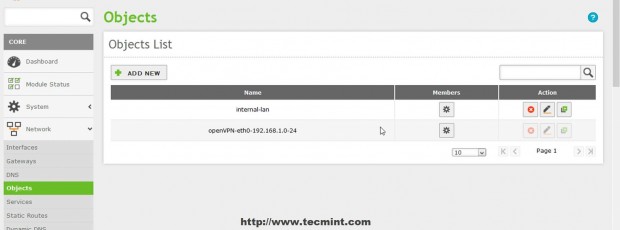
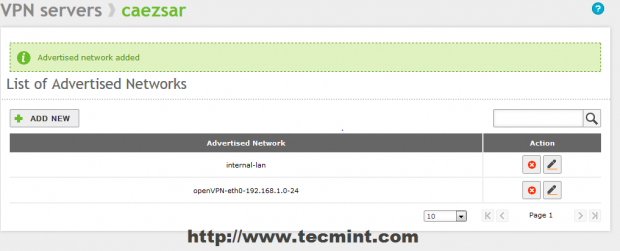
9. If you have defined other Internal Networks that Zentyal knows about in Network -> Objects click on Advertised networks filed, select and add your internal networks.
10. After all configurations are made to VPN Server hit on upper Save Changes button to apply new settings.
Step 3: Open Firewall Ports
11. Before actually opening firewall to OpenVPN traffic the service must initially be defined for Zentyal Firewall. Navigate to Network -> Services -> Add New.
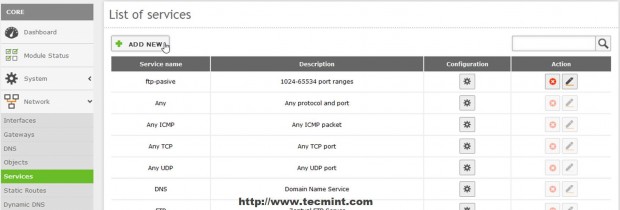
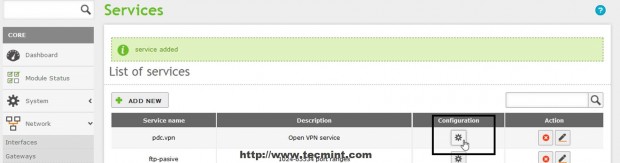
12. Enter a descriptive name for this service to remind you that is configured for OpenVPN and choose a Description then hit on Add.

13. After you newly service appears in Services List hit on Configuration button to edit settings then hit on Add New on next screen.
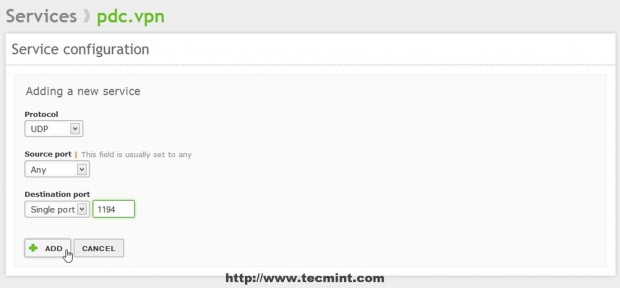
14. Use the following settings on vpn service configuration and when you’re done hit on Add.
- Protocol = UDP (if on VPN Server configuration you selected TCP protocol make sure you add a new service here with same port on TCP).
- Source Port = Any.
- Destination Port = 1194.
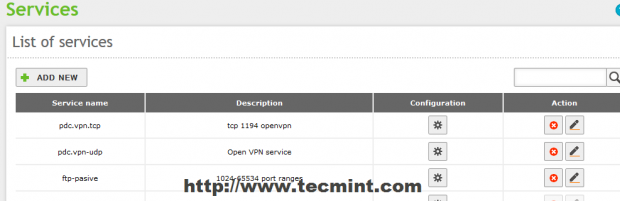
15. After you added the required services click on upper Save Changes button to apply settings.
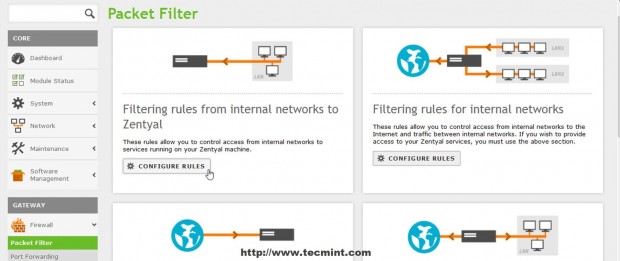
16. Now it’s time to open Zentyal Firewall for OpenVPN connections. Go to Firewall -> Packet Filter– > Filer rules from Internal Network to Zentyal – Configure Rules and hit on Add New.
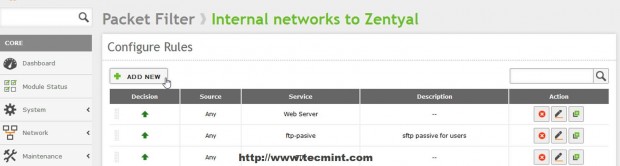
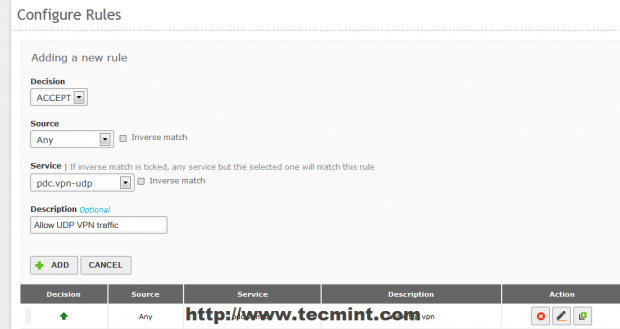
17. On the newly rule make the following settings and when you finished hit on Add.
- Decision = Accept
- Source = Any
- Service = your vpn service rule just configured
18. Repeat the steps with Filtering rules from External Networks to Zentyal then save and apply changes by hitting upper Save Changes button.
Now your OpenVPN Server is fully configured and Zentyal can receive secure connections through SSL tunnels from internal or external OpenVPN clients, the only thing remaining to do is to configure Windows OpenVPN clients.
Step 4: Configure OpenVPN clients on Windows
19. Zentyal OpenVPN offers among file configuration, server certificate and key needed for a vpn client the software necessary for Windows based machines to authenticate to VPN Server. To download the OpenVPN software and clients configurations files (keys and certificates) navigate again to Infrastructure -> VPN -> Servers and go to Download Client Bundle button of the sever you want to access.
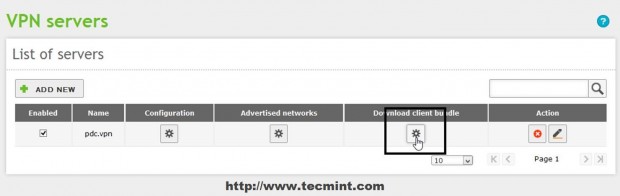
20. On the Download Client Bundle of your server use the following settings for a Windows machine then Download the client package.
- Client Type = Windows (you can also choose Linux or Mac OS X)
- Client’s Certificate = Zentyal
- Check Add OpenVPN installer to bundle (this will include OpenVPN software installer)
- Connection Strategy = Random
- Server Address = Zentyal public Internet IP Address (or valid DNS host name)
- Additional Server Address = only if you have other publicIP Address
- Second Additional Server Address = same as Additional Server Address

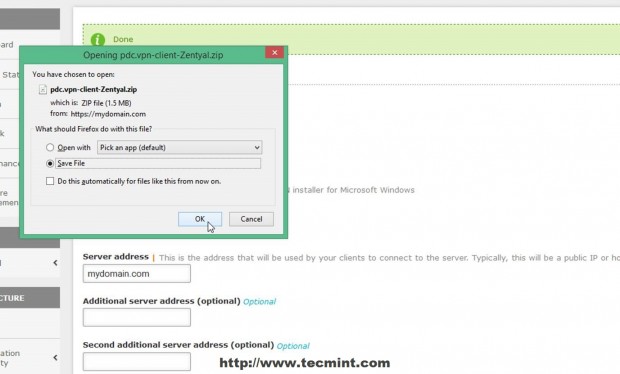
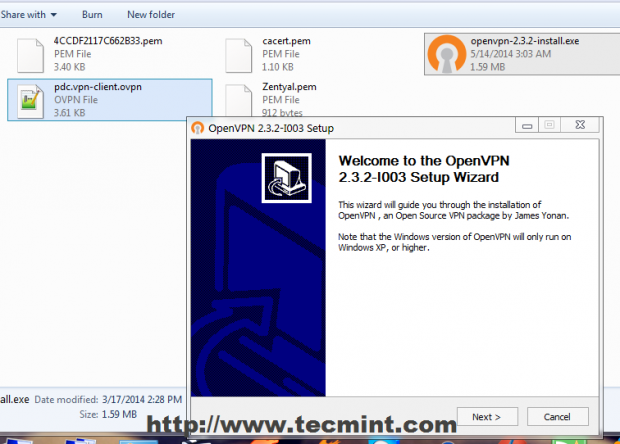
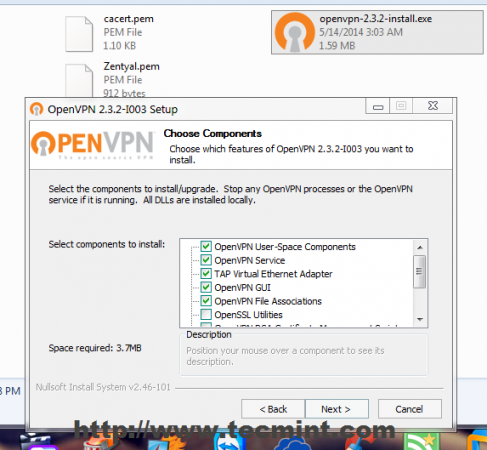
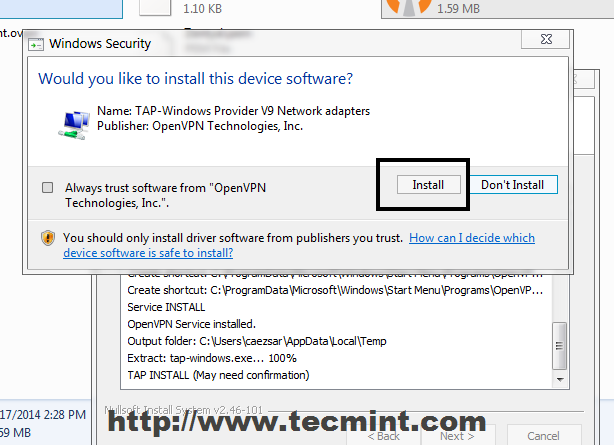
21. After the Client Bundle is downloaded or transferred using a secure procedure on your remote Windows machines, extract the zip archive and install OpenVPN software and make sure you also install Windows TAP drivers.
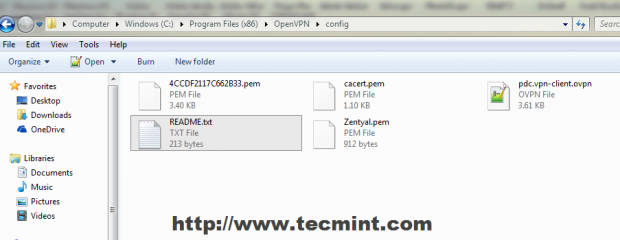
22. After the OpenVPN software successfully installs on Windows copy all Certificates, Keys and client file configuration from extracted archive to the following locations.
For 32-bit Windows
C:\Program Files\OpenVPN\config\
For 64-bit Windows
C:\Program Files (x86)\OpenVPN\config\
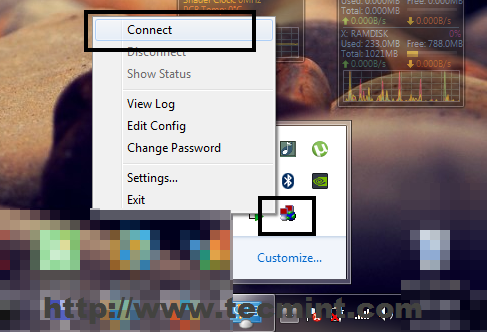
23. Click on your OpenVPN GUI Desktop icon to start the program then go to Taskbar on left OpenVPN icon and hit on Connect.
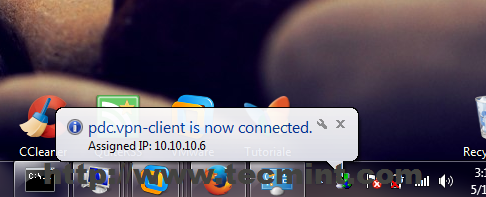
24. A pop-up window with your connection should appear on your desktop and after the connection successfully establishes on both tunnel endpoints a window bubble will inform of this fact and show your VPN IP Address.
25. Now you can test your connection by pinging Zentyal VPN Server address or open a browser and check your domain name or VPN Server address in URL.
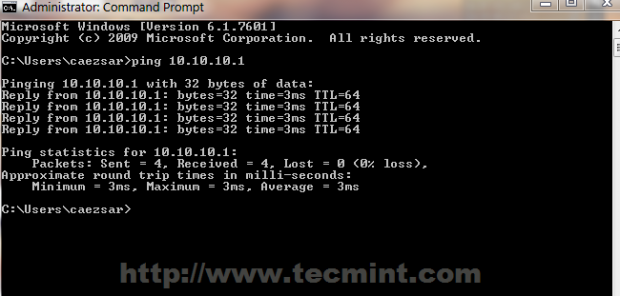

By all means your remote Windows station now access the Internet through Zentyal VPN Server (you can check your Windows public IP address and see that it has changed with Zentyal IP) and all traffic between Windows and Zentyal is encrypted on both tunnel heads, fact you can check by running a tracert command from your machine upon any IP internet address or domain.
OpenVPN offers a controlled safe solution for road warriors and remote users to access your internal company network resources, which is free of cost, easy to setup and runs on all major OS platforms.


using 1 download client bundle??
Hi Matei, good afternoon.
Very helpful tutorial, but do you know how to have this vpn for android clients?
Thanks for your help.
Hi,
I have been using Pfsense OpenVPN server, in pfsense i can create user based certificate which is required on the client machine for authentication.
Does same can be archive in Zentyal? Because in here if my certificate is been stolen anyone can login to the server, while in pfsense i can reset or revoke the user’s certificate so that he no longer can get access to the server.
I am thinking to shift to zentyal because zentyal package contains Windows AD as well as Firewall. Just needed to clear up the above mention thing so i hope you help me with this.
Thanks & Regards,
Manthan Patel.
You can revoke certificates in Zentyal also.
Hi,
When I connected to the open VPN server i am unable to browse and the connection is failed when i am browsing kindly assist me waiting for your reply.
thanks
On the server side you need to enable routing virtual a sysctl and masquarade the openvpn traffic.
Hello, mr.Cezar!
Your tutorial is one of the best tutorials about Zentyal VPN settings, in my opinion, but I have problem. After connecting to VPN (connection is success) I need to connect to my work notebook via RDP in 172.16.224.0/24 subnet.
What should I do?
I have: 2 network cards (wan,lan) lan ip 172.16.234.1 /25 mask
VPN Server is configured with ip 172.16.234.128 /25 mask
After connecting to vpn command “ipconfig” shows me 172.16.234.131,132 etc.
In VPN Server I advertised 172.16.234.0/24 subnet and 172.16.224.0/24 subnet.
Thanks, Hope you can help)
Best regards,
Stanislav
As long as Allow client-to-client connections is enabled in openvpn server you should be able to access any host from internal LAN. Check if those two LAN networks directly attached to your machine as I understand (except OpenVPN network) can see each other, meaning a router actually forwards packets from one network to another.
What I am actually saying: with no VPN whatsoever connected, from 172.16.234.1/25 network can you reach 172.16.224.0/24 network (ping a host)? If that is true on your LAN and on VPN server side, then any connected VPN client should be able to reach both networks.
i have install vpn but not clients install
Hello, excuse my English Matei
I am trying to configure vpn in zentyal 3.5 interoffice I have been guided by this guide but I can not ping from my office
network 1
eth0 public IP
eth1 192.168.0.1
VPN subnet 192.168.161.0/255.255.255.0
tap2
Address of the VPN interface 192.168.161.1/24
Red 2
network 1
eth0 DHCP (192.168.0.14)
eth1 192.168.5.1
VPN subnet 192.168.161.0/255.255.255.0
tap2
Address of the VPN interface 192.168.161.1/24
Additionally configure the rules in the firewall and networks advertised, I appreciate any help you can give me.
@Yum Kaax: I think I will …..!
Hello Mr. Cezar,
thanks so much for the great tutorials. I have learned a lot from them.
Will you be doing a tutorial about Openchange any time soon?
Thanks again and best wishes.
Yum
After reading your posts,these zentyal tutorials are really easy to perform in VM environments.
Looking forward for these posts.
1: How to integrate with LDAP ?
After integration i want to bind the LDAP with my Firewall for website restriction .
Is there any other way, to restrict the specific users for allowing only few websites/blocking websites ?
Hi, how can I have a different IP for different clients?