Ubuntu Restricted Extras is a software bundle for the Ubuntu operating system that allows users to install software that isn’t currently included for ethical or copyright reasons, such as regularly used media codecs and fonts.
The Ubuntu Restricted Extras is a metapackage that has the following dependencies:
- flashplugin-installer
- gstreamer0.10-ffmpeg
- gstreamer0.10-fluendo-mp3
- gstreamer0.10-pitfdll
- gstreamer0.10-plugins-bad
- gstreamer0.10-plugins-ugly
- gstreamer0.10-plugins-bad-multiverse
- gstreamer0.10-plugins-ugly-multiverse
- icedtea6-plugin
- libavcodec-extra-52
- libmp4v2-0
- ttf-mscorefonts-installer
- unrar
Important: Before you proceed to install Ubuntu-restricted extras on your system, take note of the following:
- All software provided by the Ubuntu restricted extras meta-package is not free, which implies that the licensing requirements of such software do not meet the Ubuntu main component license policy.
- Also, ensure that you verify your rights to use any of the non-free software and adhere to the licensing terms of the copyright holder.
- Additionally, non-free software is usually not supported and can’t be fixed or updated, therefore, use it at your own risk.
Enable Multiverse Repository in Ubuntu
To install the restricted extras on Ubuntu, you need to enable the Multiverse Repository (which provides non-open-source software to users) on your Ubuntu system.
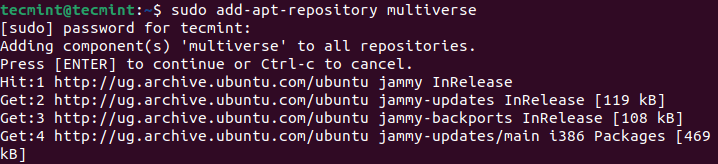
Run the following command to enable the multiverse repository: if you are prompted for a password, enter a valid one to proceed:
$ sudo add-apt-repository multiverse
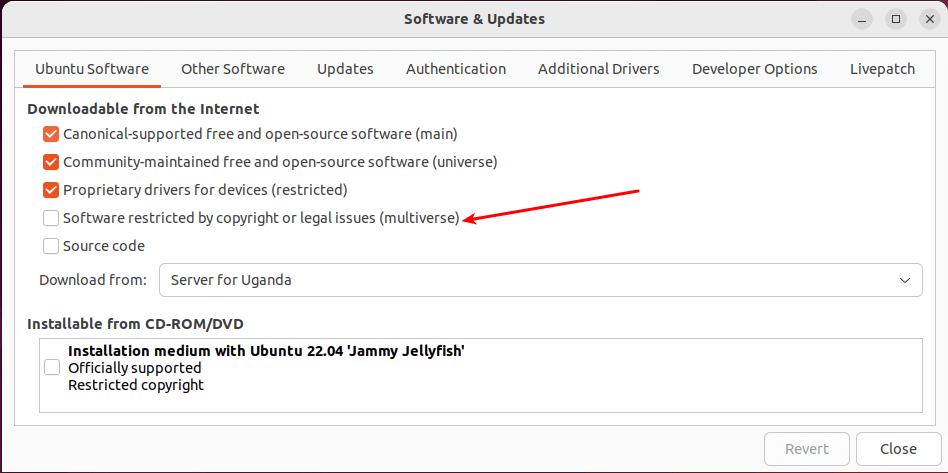
If you prefer GUI, you can enable Multiverse Repository by clicking on Activities, then search for Software & Updates and open it.
The first or default tab, “Ubuntu Software” displays a list of repositories, or “channels“. Look for the option Multiverse (software restricted by copyright or legal issues) in the list and check it as highlighted in the next screenshot.
The system will prompt you to enter your user password to continue. Enter a valid password and click “Authenticate” to proceed.
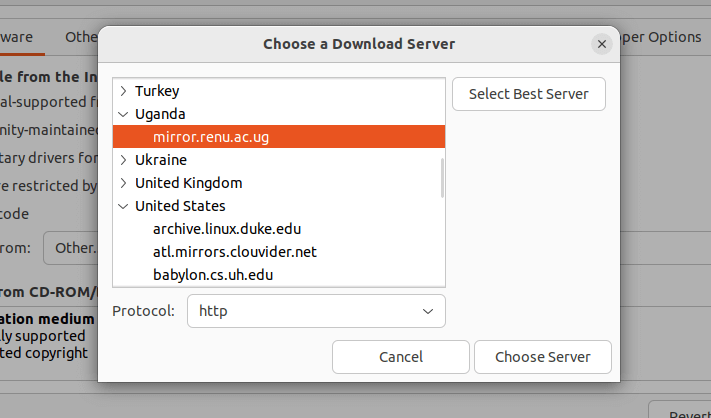
Next, the system might also prompt you to choose a download server. Select a server in your location or nearby. Alternatively, you can click “Select Best Server” so that the system performs a few tests to select the best server. Then, to proceed, click “Choose Server” and input your password.
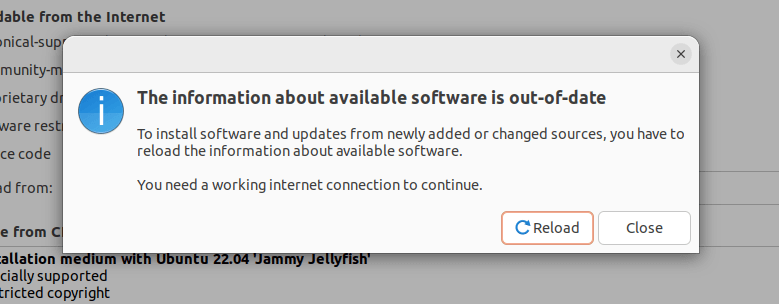
Once you try to close the Software & Updates application, the system will prompt you to refresh the package cache (similar to running the “sudo apt update” or “sudo apt-get update” command).
This step will add information about packages in the just-enabled repository to the local package index. Click Reload to proceed.
Install Ubuntu Restricted Extras Package
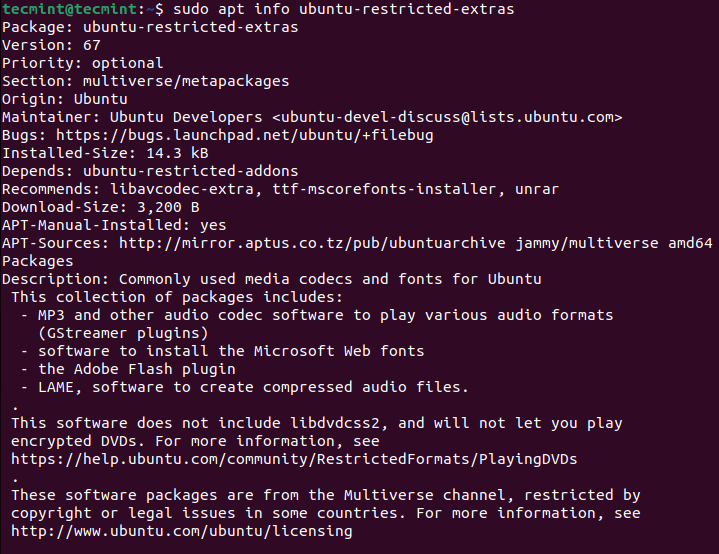
Before you proceed to install the ubuntu-restricted-extras package, you can view information about it, such as version, priority, description, and more, by running the following apt command:
$ sudo apt info ubuntu-restricted-extras
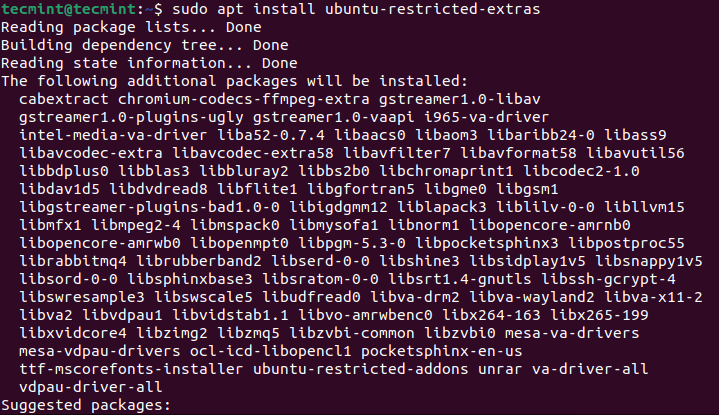
Then install ubuntu-restricted-extras package as shown:
$ sudo apt install ubuntu-restricted-extras
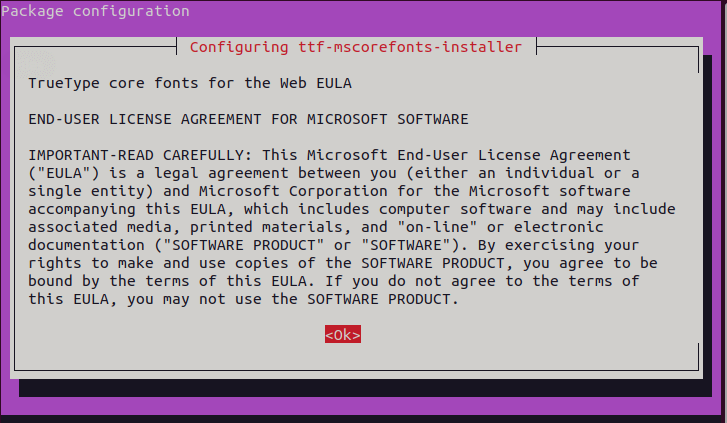
During the installation process, you will be prompted to agree to certain package licenses before they can be installed on your system. The first is the Microsoft end-user license agreement (EULA). Click OK to agree and continue.
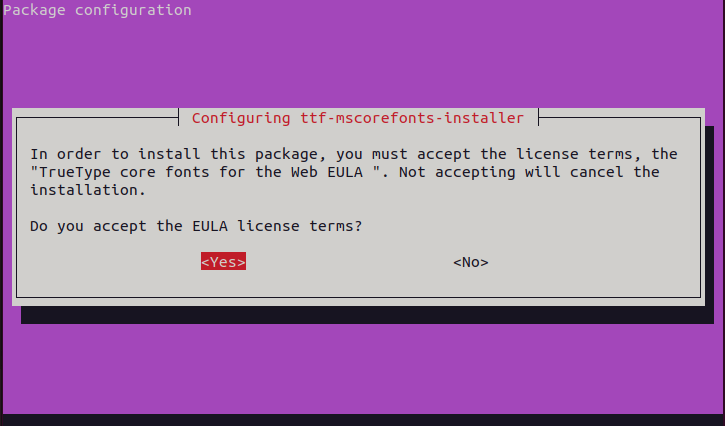
Next, you also have to accept the TrueType core fonts package’s Web EULA before the package can be installed. Select “Yes” to agree and proceed.
Verify Ubuntu Restricted Extras Installation
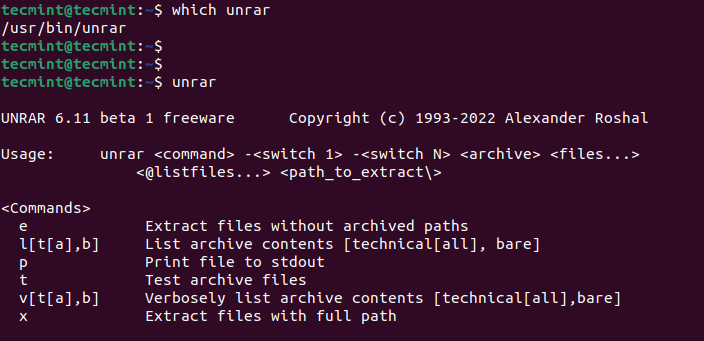
To ensure that the Ubuntu Restricted Extras have been successfully installed on your system, look for the unrar command and run it without any options or arguments, for example:
$ which unrar
$ unrar
Remove Ubuntu Restricted Extras
To remove the Ubuntu Restricted Extras meta-package, run the following command:
$ sudo apt autoremove --purge ubuntu-restricted-extras
That’s all. In this guide, we have shown how to install Ubuntu Restricted Extras. Use the comments section to ask any questions or share your thoughts about this guide.


Can you please edit the instructions – when you need to ‘click’ ‘ok’ in:
“During the installation process, you will be prompted to agree to certain package licenses before they can be installed on your system. The first is the Microsoft end-user license agreement (EULA). Click OK to agree and continue.”
Use the tab to navigate to the ‘ok’.
my friends & I needed too many minutes to figure it out :D
Thanks for this useful information Aaron.
Does one need a public authentication key to download the SSH after downloading the Ubuntu server – client package? If not, does the download for this Ubuntu OS & SSH server consist of 1 software package ?
@Nelson,
No authentication is needed to download SSH, just issue the following command to install SSH on a fresh Ubuntu install.