Managing multiple versions of Python on a Linux system is not an easy task, especially for beginners. Sometimes it even gets worse when you want to develop and run multiple projects with different Python versions on the same server. However, this shouldn’t be the case if you employ pyenv.
Read Also: How to Install Latest Python 3.6 Version in Linux
What is Pyenv?
Pyenv is a simple, powerful and cross-platform tool for managing multiple Python versions on Linux systems, that used for.
- Switching the global Python version on a per-user basis.
- setting the local Python version on per-project basis.
- Managing of virtual environments created by anaconda or virtualenv.
- Overriding the Python version with an environment variable.
- Searching commands from multiple versions of Python and more.
How Does pyenv Work?
Usually, a single default version of Python is used to run all your applications, unless you explicitly specify the version you want to use within the application. But pyenv implements a simple concept of using shims (lightweight executables) to pass your command to the correct Python version you want to use, when you have multiple versions installed.
These shims are inserted by pyenv in a directories in front of your PATH. So when you run a Python command, it is intercepted by the appropriate shim and passed to pyenv, which then establishes the Python version that has been specified by your application, and passes your commands along to the rightful Python installation. This is an overview of how pyenv operates.
In this article, we will show how to install the latest version of pyenv in Linux. We will also demonstrate the first three uses case listed above.
How to Install Pyenv in Linux
1. First install all the required packages for installing different Python versions from sources using following command on your respective Linux distribution.
------------ On Debian/Ubuntu/Linux Mint ------------
$ sudo apt install curl git-core gcc make zlib1g-dev libbz2-dev libreadline-dev libsqlite3-dev libssl-dev

------------ On CentOS/RHEL ------------
# yum -y install epel-release
# yum install git gcc zlib-devel bzip2-devel readline-devel sqlite-devel openssl-devel

------------ On Fedora 22+ ------------
# yum install git gcc zlib-devel bzip2-devel readline-devel sqlite-devel openssl-devel
2. Next, grab the the latest pyenv source tree from its Github repository and install it in $HOME/.pyenv path using following command.
$ git clone https://github.com/pyenv/pyenv.git $HOME/.pyenv
3. Now you need to set the environment variable PYENV_ROOT to point to the path where you installed pyenv and export it. Then add $PYENV_ROOT/bin to your PATH to run pyenv command-line utility like any other system commands.
You also need to enable shims as well as autocompletion by adding the pyenv init to your shell. Do all these things in your $HOME/.bashrc bash startup file, as shown.
$ vim $HOME/.bashrc
Copy and paste the following lines at the end of this file.
## pyenv configs
export PYENV_ROOT="$HOME/.pyenv"
export PATH="$PYENV_ROOT/bin:$PATH"

if command -v pyenv 1>/dev/null 2>&1; then
  eval "$(pyenv init -)"
fi
4. Once you have made the above changes, you can either source $HOME/.bashrc file or restart the shell as shown.
$ source $HOME/.bashrc
OR
$ exec "$SHELL"
How to Install Multiple Python Versions in Linux
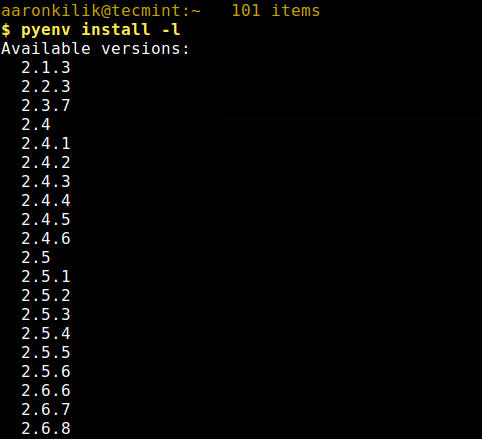
5. At this point, you should be ready to start using pyenv. Before you install any Python version, you can view all available versions with this command.
$ pyenv install -l
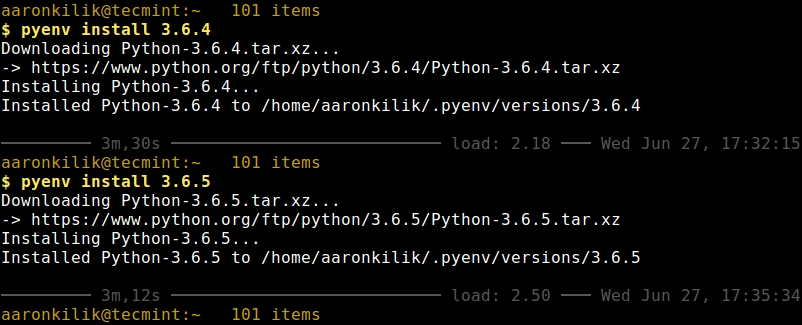
6. You can now install multiple Python version via pyenv, for example.
$ pyenv install 3.6.4
$ pyenv install 3.6.5
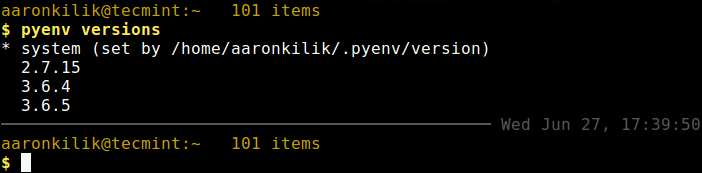
7. To list all Python versions available to pyenv, run the following command. This will only show versions installed via pyenv itself.
$ pyenv versions
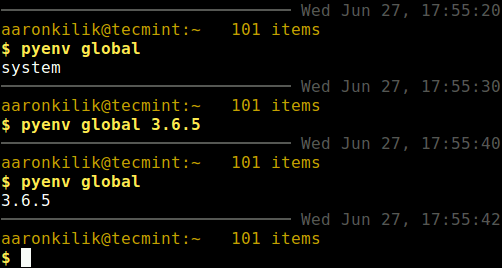
8. You can check the global Python version with the following command, by this time, the default version should be the one set by the system, not pyenv.
$ pyenv global
You can set the global python version using the pyenv command.
$ pyenv global 3.6.5
$ pyenv global
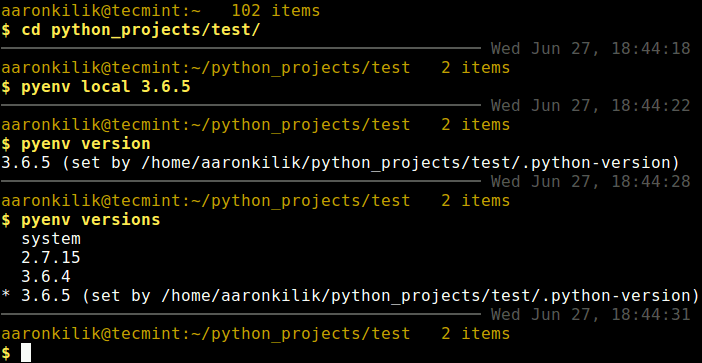
9. You can now set the local Python version on per-project basis, for instance, if you have a project located in $HOME/python_projects/test, you can set the Python version of it using following command.
$ cd python_projects/test
$ pyenv local 3.6.5
$ pyenv version		#view local python version for a specific project
OR
$ pyenv versions
10. Pyenv manages virtual environments via the pyenv-virtualenv plugin which automates management of virtualenvs and conda environments for Python on Linux and other UNIX-like systems.
You can start by installing this plugin using following commands.
$ git clone https://github.com/yyuu/pyenv-virtualenv.git   $HOME/.pyenv/plugins/pyenv-virtualenv
$ source $HOME/.bashrc
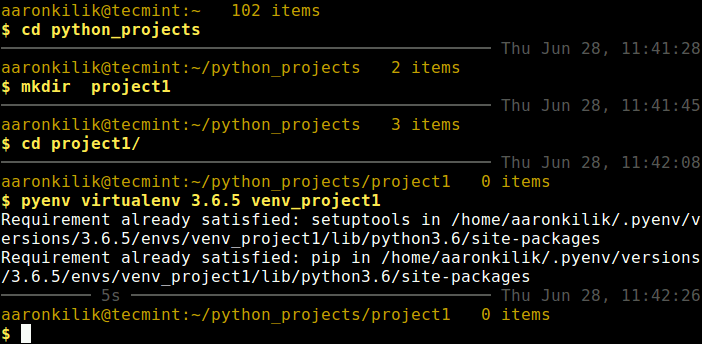
11. Now we will create a test virtual environment called venv_project1 under a project called project1 as follows.
$ cd python_projects
$ mkdir project1
$ cd project1
$ pyenv virtualenv 3.6.5 venv_project1
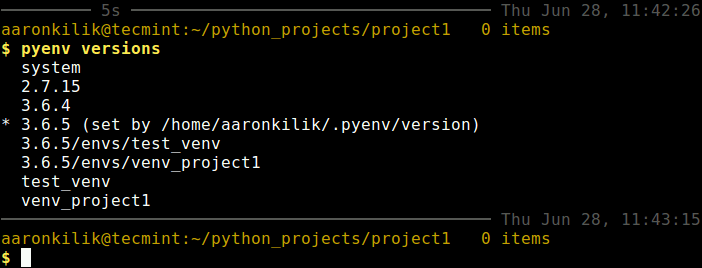
12. Now when you list all Python versions, your virtual environments as well as their local python versions should be listed also, as shown in the screenshot.
$ pyenv versions
13. To activate a virtualenv, for example venv_project1, type following command.
$ pyenv activate venv_project1
Note: You may get the message below while using the latest version of pyenv-virtualenv plugin for the first time.
pyenv-virtualenv: prompt changing will be removed from future release. configure `export PYENV_VIRTUALENV_DISABLE_PROMPT=1' to simulate the behavior.
Add the line export PYENV_VIRTUALENV_DISABLE_PROMPT=1 in your $HOME/.bashrc file, where you added other pyenv configs, and source the file to simulate the behavior being emphasized.
14. To deactivate the activated virtualenv, run this command.
$ pyenv deactivate
For more information, you can list all pyenv commands using following command.
$ pyenv commands
For more information, go to the pyenv Github repository: https://github.com/pyenv/pyenv
Read Also: How to Install Multiple PHP Versions for Multiple Websites
Using pyenv is really that simple. In this guide, we showed how to install it, as well as demonstrated some of its use cases for managing multiple python versions on a Linux system. Use the feedback form below to ask any questions or share your thoughts about this tool.


Some times _lzma might not be available in your machine, do install via below commands.
For ubuntu:
sudo apt-get install liblzma-devFor centos:
yum install -y xz-develLine eval “$(pyenv init -)” in the code snippet below should be changed to eval “$(pyenv init –path)” in order to add the .shims at the beginning in PATH variable
So
Sould be
Hello,
This link came up first in my google search for installing and using pyenv on CentOS and I hit a bug in the article.
The path should have:
Thanks for having this useful article online.
The Debian packages specified in this article was incomplete; I was getting a “module not found: ctypes” when trying to install Python 3.7.3 on MX Linux 18.2 – Continuum.
Fix:
The full syntax on pyenv website: https://github.com/pyenv/pyenv/wiki#suggested-build-environment:
$ sudo apt-get update; sudo apt-get install -y make build-essential libssl-dev zlib1g-dev libbz2-dev libreadline-dev libsqlite3-dev wget curl llvm libncurses5-dev xz-utils tk-dev libxml2-dev libxmlsec1-dev libffi-dev liblzma-dev
@Janoneros
Thanks for sharing this, we are grateful.
Installed 3.6.8, but really wanted it’s pip3.
pip --versionandpip3 --versionboth give same result:pip 18.1 from /home/searles/.pyenv/versions/3.6.8/lib/python3.6/site-packages/pip (python 3.6)
so left wondering if it’s correct.
Then finally, wanted to ‘python3.6 -m pip3 install typing‘ – but that gives “No module named pip3” !
@Dan
Run this command to check if the version you want is available:
Then install it as shown in the guide.
Awesome install guide for pyenv. In my humble opinion – just the perfect level of detail and context along with the install commands. Many thanks!
There is a typo in the command at 5th step. It should be “pyenv install -l” instead of “pynev install -l“.
@Javid,
Thanks for letting us know, corrected in the write-up..
piton, is nice if you like to do some things, but I prefer Qt and C++, that might just be the reason for my concern is on the ethics of it, after all…
by, live long and prosper…..
You might want to add libffi-dev as one of the required package for installing Python 3.7.
@Hari
Many thanks for mentioning this. We will add it.