Running large language models like DeepSeek locally on your machine is a powerful way to explore AI capabilities without relying on cloud services.
In this guide, we’ll walk you through installing DeepSeek using Ollama on Ubuntu 24.04 and setting up a Web UI for an interactive and user-friendly experience.
What is DeepSeek and Ollama?
- DeepSeek: An advanced AI model designed for natural language processing tasks like answering questions, generating text, and more. .
- Ollama: A platform that simplifies running large language models locally by providing tools to manage and interact with models like DeepSeek.
- Web UI: A graphical interface that allows you to interact with DeepSeek through your browser, making it more accessible and user-friendly.
Prerequisites
Before we begin, make sure you have the following:
- Ubuntu 24.04 installed on your machine.
- A stable internet connection.
- At least 8GB of RAM (16GB or more is recommended for smoother performance).
- Basic familiarity with the terminal.
Step 1: Install Python and Git
Before installing anything, it’s a good idea to update your system to ensure all existing packages are up to date.
sudo apt update && sudo apt upgrade -y
Ubuntu likely comes with Python pre-installed, but it’s important to ensure you have the correct version (Python 3.8 or higher).
sudo apt install python3
python3 --version
pip is the package manager for Python, and it’s required to install dependencies for DeepSeek and Ollama.
sudo apt install python3-pip
pip3 --version
Git is essential for cloning repositories from GitHub.
sudo apt install git
git --version
Step 2: Install Ollama for DeepSeek
Now that Python and Git are installed, you’re ready to install Ollama to manage DeepSeek.
curl -fsSL https://ollama.com/install.sh | sh
ollama --version
Next, start and enable Ollama to start automatically when your system boots.
sudo systemctl start ollama
sudo systemctl enable ollama
Now that Ollama is installed, we can proceed with installing DeepSeek.
Step 3: Download and Run DeepSeek Model
Now that Ollama is installed, you can download the DeepSeek model.
ollama run deepseek-r1:7b
This may take a few minutes depending on your internet speed, as the model is several gigabytes in size.
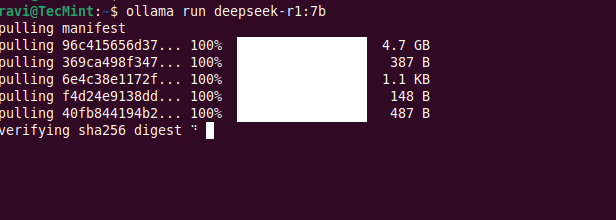
Once the download is complete, you can verify that the model is available by running:
ollama list
You should see deepseek listed as one of the available models.

Step 4: Run DeepSeek in a Web UI
While Ollama allows you to interact with DeepSeek via the command line, you might prefer a more user-friendly web interface. For this, we’ll use Ollama Web UI, a simple web-based interface for interacting with Ollama models.
First, create a virtual environment that isolates your Python dependencies from the system-wide Python installation.
sudo apt install python3-venv
python3 -m venv ~/open-webui-venv
source ~/open-webui-venv/bin/activate
Now that your virtual environment is active, you can install Open WebUI using pip.
pip install open-webui
Once installed, start the server using.
open-webui serve
Open your web browser and navigate to http://localhost:8080 – you should see the Ollama Web UI interface.
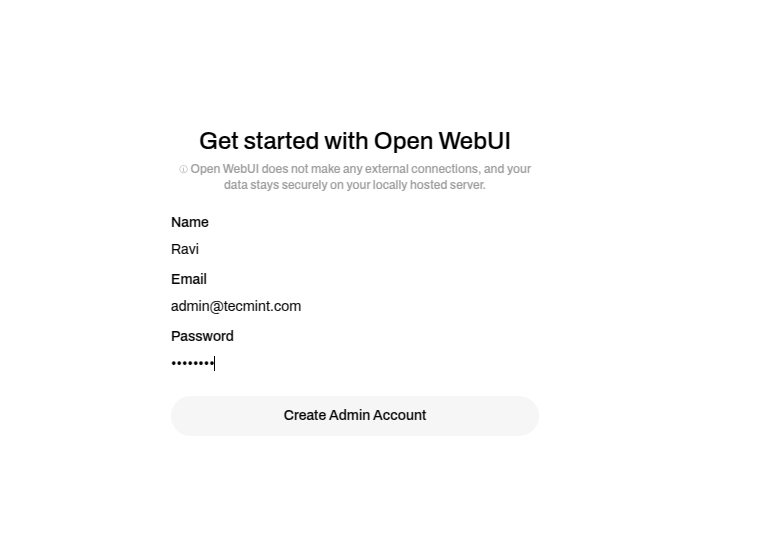
In the Web UI, select the deepseek model from the dropdown menu and start interacting with it. You can ask questions, generate text, or perform other tasks supported by DeepSeek.
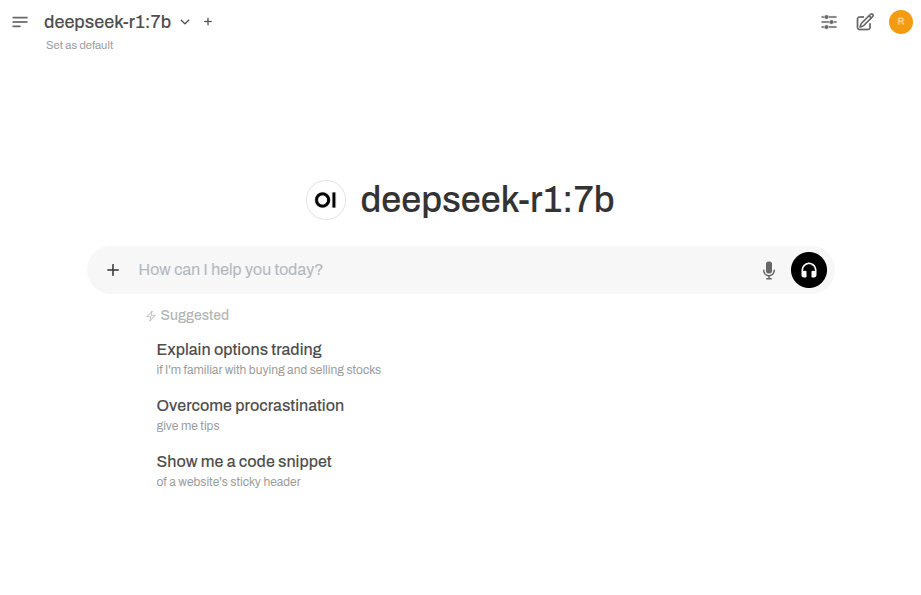
You should now see a chat interface where you can interact with DeepSeek just like ChatGPT.
Step 5: Enable Open-WebUI on System Boot
To make Open-WebUI start on boot, you can create a systemd service that automatically starts the Open-WebUI server when your system boots.
sudo nano /etc/systemd/system/open-webui.service
Add the following content to the file:
[Unit]
Description=Open WebUI Service
After=network.target

[Service]
User=your_username
WorkingDirectory=/home/your_username/open-webui-venv
ExecStart=/home/your_username/open-webui-venv/bin/open-webui serve
Restart=always
Environment="PATH=/home/your_username/open-webui-venv/bin:/usr/local/sbin:/usr/local/bin:/usr/sbin:/usr/bin:/sbin:/bin"

[Install]
WantedBy=multi-user.target
Replace your_username with your actual username.
Now reload the systemd daemon to recognize the new service:
sudo systemctl daemon-reload
Finally, enable and start the service to start on boot:
sudo systemctl enable open-webui.service
sudo systemctl start open-webui.service
Check the status of the service to ensure it’s running correctly:
sudo systemctl status open-webui.service
Running DeepSeek on Cloud Platforms
If you prefer to run DeepSeek on the cloud for better scalability, performance, or ease of use, here are some excellent cloud solutions:
- Linode – It provides affordable and high-performance cloud hosting, where you can deploy an Ubuntu instance and install DeepSeek using Ollama for a seamless experience.
- Google Cloud Platform (GCP) – It offers powerful virtual machines (VMs) with GPU support, making it ideal for running large language models like DeepSeek.
Conclusion
You’ve successfully installed Ollama and DeepSeek on Ubuntu 24.04. You can now run DeepSeek in the terminal or use a Web UI for a better experience.

Hello,
Thank you for your excellent article. I have a problem. I installed DeepSeek according to your guide. I’m using a system without a GPU. When I open the WebUI, I can successfully register and log in, but I can’t use the DeepSeek model; all I see is a white screen with the message “500: Internal Error“.
I installed the DeepSeek model on an Ubuntu Server 24.04 system without a GUI, on a virtual machine using Hyper-V. The model works fine in the terminal, but I can’t access the browser on this virtual machine to use the Open WebUI. Therefore, I open a browser on my regular desktop computer and go to the
ip_virtual_m:8080link. Again, the Open WebUI opens, and I can log in, but nothing else works.Do you know what the problem might be, or do you have any guesses? I would appreciate any help and response.
Thank you very much.
@NNatty,
Thank you for your feedback!
Since DeepSeek is working in the terminal but not through Open WebUI, it seems like the issue is related to WebUI configuration or network access.
Let’s troubleshoot step by step:
1. Run this command on your Ubuntu server to check what’s causing the “500: Internal Error“:
2. Since Open WebUI depends on Ollama, ensure Ollama is running:
3. Also, confirm that DeepSeek is installed correctly.
If you don’t see deepseek-r1:7b, reinstall it:
4. Since you’re accessing WebUI from another machine (
ip_virtual_m:8080), you need to ensure it listens on all interfaces.Modify or add these lines:
5. Save and restart WebUI:
Then, try accessing
http://your_vm_ip:8080from your desktop.Thanks so much for your help! The solution was surprisingly simple. It was silly and funny, actually! :D
I’d been noticing for a while that I couldn’t locate the Open WebUI logs. This was confirmed when I used the commands you suggested to
find /.open-webui/logs/latest.logand/.open-webui/.env– both resulted in “No such file or directory” errors.In the end, I just completely reinstalled everything remotely related to open-webui, using:
followed by manually deleting any remaining files. :D
Thank you for your time and effort! :3
@NNatty,
I’m glad you managed to resolve it by doing a clean reinstall.
I have run the command to set up for start up but I got stuck on the file how do you write it out? I closed it but then gives an error.
@Hugo,
Make sure the contents are correctly written and replace
your_usernamewith your actual username.Ravi:
These instructions (which I used on Feb 13) are perfect. I have the 14b model running on Linux Mint 22.1 Cinnamon on a basic PowerSpec PC with an AMD Ryzen 7 PRO 7745 CPU with a AMD Radeon RX 7600 XT 16 GB GPU.
The response time is great. I received notice today about a new version of Open WebUI. When I try sudo
pip install --upgrade open-webuiI get the externally-managed-environment error.What am I doing wrong? Thank you again for your excellent instruction set.
@Larry,
Regarding the externally-managed-environment error, this is a common issue when using
pipon systems that manage Python packages through their package manager (like apt on Ubuntu or Linux Mint).To avoid conflicts, recent versions of Python enforce this restriction.
Upgrade Open WebUI within the virtual environment:
Let me know if you encounter any further issues, and thanks again for your feedback!
I ran this code when I did the original install, as per the instructions:
Now I ran it again (now), and then the upgrade worked! Thanks.
Does that mean I need to re-run that code before each upgrade?
Also, FWIW, the open-webui page still shows the “new version” message in the lower right of the page. I can live with that because I do see that the 5.14 did install. Thanks again.
@Larry,
You’re welcome! Glad the upgrade worked for you.
Yes, before each upgrade, you need to activate the virtual environment using:
This ensures that the upgrade runs within the correct Python environment. However, you don’t need to recreate the virtual environment each time – just activate it before upgrading.
Dear @Ravi Saive,
Thank you.
I have a question: Is it possible to access DeepSeek (which is already installed locally on Ubuntu 24) over the local area network inside our company?
I mean, I want to allow all clients on my LAN to access DeepSeek via the WebUI.
@dn,
Yes, you can access DeepSeek installed on Ubuntu 24.04 over your local area network (LAN) and allow multiple clients to connect via the WebUI.
To do this, follow these steps:
1. If DeepSeek is running on a specific IP and port, check it using:
By default, DeepSeek’s WebUI might be accessible at
http://localhost:PORT.2. If the WebUI is only accessible on
localhost, modify the startup command to bind it to your system’s LAN IP (e.g.,192.168.1.100):This allows all devices on the same network to access it via:
3. If you have UFW (Uncomplicated Firewall) enabled, allow access to the port:
4. Now, on any device connected to the same LAN, open a browser and enter:
Replace
192.168.1.100with your Ubuntu machine’s actual LAN IP.Dear Ravi Saive,
Thank you for your kind attention.
Everything is OK. Since I do not have a GPU installed on my server, I decided to run the following command to avoid installing NVIDIA dependencies:
Result:
This indicates that Open-WebUI was installed successfully.
However, when I ran the following command to start the service, I encountered an error.
Error:
Traceback (most recent call last):
  File "/home/ubuntuusera/open-webui-venv/bin/open-webui", line 5, in
    from open_webui import app
  File "/home/ubuntuusera/open-webui-venv/lib/python3.12/site-packages/open_webui/__init__.py", line 6, in
    import typer
ModuleNotFoundError: No module named 'typer'
Could you please guide me on how to resolve this issue?
@Dn,
Thank you for reaching out. The error you’re encountering, ModuleNotFoundError: No module named ‘typer‘, indicates that the required dependency typer is missing from your environment.
Since you installed Open-WebUI with the
--no-depsoption, essential dependencies liketyperwere not installed.To resolve this issue, you can manually install the missing dependency by running:
Alternatively, if more dependencies are missing, it’s best to install all required dependencies by running:
pip install --no-deps open-webui
pip install -r <(pip show open-webui | awk '/Requires/{print $2}' | tr ',' '\n')
This command extracts and installs all dependencies required by Open-WebUI.
After installing the dependencies, try running the service again:
Let me know if you need further assistance.
Haven’t you people been following the news about DeepSeek’s data slurping and links to unsavory entities? Steer clear!
Thank you very much for the guide! How do we change the DeepSeek model from 7B to 32B/70B?
@Wonder,
You can switch to the larger DeepSeek models using the following commands:
For DeepSeek-R1-Distill-Qwen-32B:
For DeepSeek-R1-Distill-Llama-70B:
Let me know if you need further assistance!
Thanks for this, was super easy to get it running.
Curious, is there a way to have the Open-WebUI start on boot as well? Ollama is running but would be nice if it all auto-started.
@White,
Glad you found it easy to set up!
I’ve now added instructions on how to enable Open-WebUI to start on boot. Check the updated article, and let me know if you need any help!
Inspired by this article is dockerized version: https://github.com/mattyrozen/DockerDeepSeek
@Matty,
Thanks for sharing!
A Dockerized version sounds really useful.
Appreciate your contribution!
Why i need to install deepseek locally when OpenWeb UI seems to use DeepSeek via internet?
@Matias,
Installing DeepSeek locally gives you full control over the model without relying on an internet connection. While OpenWebUI allows access to DeepSeek online, a local installation ensures better privacy, faster responses, and no dependency on external servers.
It’s especially useful for offline use or handling sensitive data securely. Plus, running it locally allows for custom configurations and optimizations that aren’t possible with cloud-based solutions.
Hope this helps!
What I meant was that it didn’t work locally. If I disconnected from the internet deepseek didn’t work. I checked the whole installation.
@Matias,
Thanks for your feedback!
DeepSeek should work fully offline if all dependencies and model weights are downloaded beforehand. If it stops working after disconnecting from the internet, it’s possible that it’s trying to fetch missing resources or verify something online.
Could you check the logs to see if it’s making network requests? Also, try running it in an isolated environment to confirm if any external dependencies are causing the issue.
Let me know what you find, and I’ll update the guide with a fix!
How can I run webui in the background. When I run the command open-webui serve it runs in the console and I can’t do anything else.
@Nasir,
I’ve added instructions on how to enable OpenWebUI on boot so it can run in the background without keeping the terminal open.
I was installing on Ubuntu 24.04.
It went well to the line:
After downloading it gave the error:
@Inbert,
Thank you for sharing your experience! It sounds like you encountered an issue with the Ollama service while trying to run the DeepSeek model.
The error you’re seeing (connection reset by peer) typically indicates that the Ollama service might not be running or encountered an issue during the process.
First, check if Ollama is running, if not start it with:
Sometimes, restarting the service can resolve the issue:
After restarting Ollama, try running the model again:
Ensure no other service is using port
11434, which Ollama relies on and you can check this with:If the issue persists, it might be worth reinstalling Ollama or checking the logs for more details:
Let me know if this helps or if you need further assistance!
I have tried the steps you have told for @Inbert but it won’t work for me.
What to do??
@Kabelang,
Make sure that your firewall or security software is not blocking the connection to
127.0.0.1:11434and also if possible temporarily disable the firewall or add an exception for the port to test.Thanks for the article buddy. How much disk space would be required?
@Brvnbld,
The disk space required depends on the specific Ollama LLM model you choose to install.
Here’s a quick breakdown:
Smaller models (e.g., 7B parameters): Around 5-10 GB.
Larger models (e.g., 13B or 70B parameters): Can take 20-50 GB or more.
DeepSeek software and dependencies: About 1-2 GB.
Ubuntu 24.04 and system tools: At least 10-20 GB.
So, in total, you’d need 20-30 GB for smaller setups and 50-100 GB if you’re working with larger models. Always make sure to have some extra space for smooth operation!
DeepSeek with Ollama in Ubuntu 24 take 4.7 GB. Open WebUI 7.8 Gb (of python package), I installed Open WebUI in an env in a externald ssd drive.
@Matias,
Thanks for sharing your experience!
Yes, DeepSeek with Ollama has a relatively small footprint at 4.7 GB, but Open WebUI does take up more space due to its dependencies.
Installing it in a virtual environment on an external SSD is a smart move to save internal disk space. If you notice any performance differences running it from an external drive, feel free to share your insights!
is there some way to install open-webui pip without all the nvidia_* cuda dependencies? no cuda here :(
@Todd,
Yes, it’s possible to install Open WebUI without the NVIDIA/CUDA dependencies if you’re not using a GPU.
Here’s how you can do it:
When installing Open WebUI via pip, you can skip the GPU-specific dependencies by avoiding the nvidia-* and cuda packages.
Very well written. Easy to understand. Thank you for taking the time to share this.
Sincerely, Stable Internet
Works correctly on Debian
Installing WebUI does not work on Ubuntu 22.04.
You can continue from here: https://www.server-world.info/en/note?os=Ubuntu_22.04&p=openwebui
@Ahmed,
I haven’t tested the installation on Ubuntu 22.04, but it worked fine for me on Ubuntu 24.04.
Do NOT trust this article, DeepSeek or openweb-ui needs some sort of internet access. I had mine set up in proxmox and set up firewall rules to only allow local network access. Openweb-ui failed to properly load, either failed to interact with the DS or DS failed to load some external resource.
I disabled the firewall and immediately the page loaded. I will be filing a cybersec bug report in the relevant repositories. Use at your own personal risk!!!
@Watson,
We appreciate your feedback!
However, we clearly mentioned in the prerequisites that a stable internet connection is required. Did you get a chance to read that? If you believe there’s a security concern beyond that, filing a report is a good step.
Let us know if you need any clarification!
Dear Mr. D. Watson,
I am not part of the team that wrote the article but simply a visitor looking for a way to install DeepSeek locally in a container on Proxmox. As the author’s comment points out, it seems that you did not read the article. I believe you are only commenting to criticize it negatively.
I am extremely surprised to read that you do not trust DeepSeek or Open-GUI and that you attempted to block the requests with your firewall without understanding how a network or a system works. It’s Ollama that needs internet access to install DeepSeek.
If you had read the article and understood what you were doing, you would know that Ollama is used to install the model, while Open-GUI provides local access to it. The service running in the background is Ollama, and yes, you will need internet access to update it.
@theheister,
Thank you for your detailed comment and for clarifying the process for others. You’re absolutely correct – Ollama requires internet access to download and install the DeepSeek model, while Open WebUI provides a local interface to interact with it