Data replication is the process of copying your data across multiple servers to improve data availability and enhance the reliability and performance of an application. In MySQL replication, data is copied from a database from the master server to other nodes in real-time to ensure consistency of data and also to provide backup and redundancy.
In this guide, we demonstrate how you can set up MySQL (Master-Slave) replication in RHEL-based distributions such as CentOS, Fedora, Rocky Linux, and AlmaLinux.
MySQL Replication Setup
So, here is our MySQL replication lab setup.
MySQL Master - 10.128.0.14
MySQL Slave - 10.128.15.211
Let’s get started…
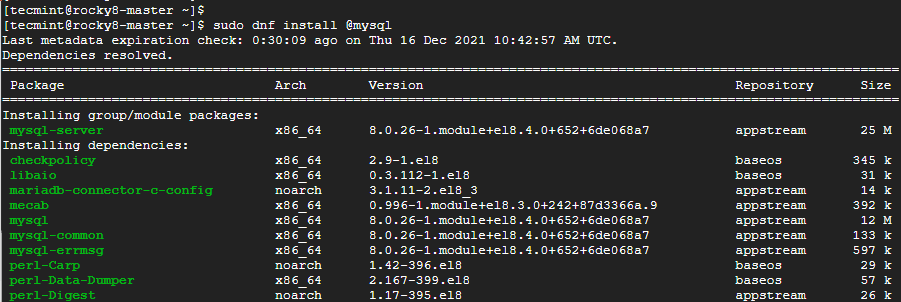
Step 1: Install MySQL on Master and Slave Server
We will start off by installing the MySQL database on both the master and slave servers.
$ sudo dnf install @mysql
Once the installation is complete, make a point to start the database server.
$ sudo systemctl start mysqld
Then enable it to start to system startup or upon reboot.
$ sudo systemctl enable mysqld
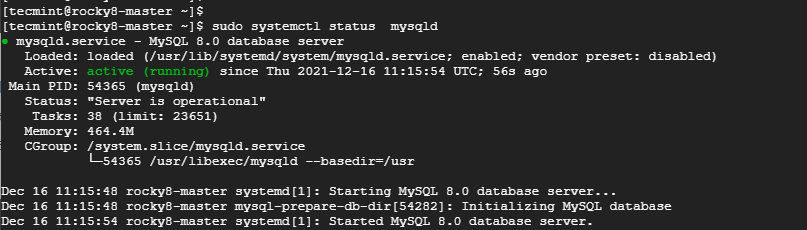
Thereafter, confirm that the MySQL database server is running as shown:
$ sudo systemctl status mysqld
Step 2: Secure MySQL on Master and Slave Server
The next step is to secure the MySQL database on both the master and slave servers. This is because the default settings are insecure and present some loopholes which can easily be exploited by hackers.
So, to harden MySQL, run the command:
$ sudo mysql_secure_installation
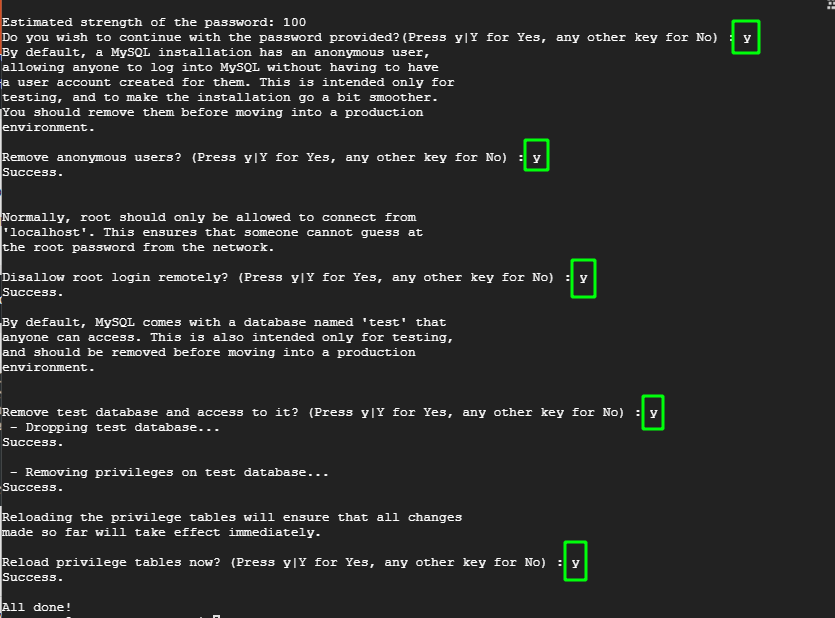
First, you will be required to set the MySQL root password. Be sure to provide a strong root password, preferably with more than 8 characters which are a mix of uppercase, lowercase, special and numeric characters.
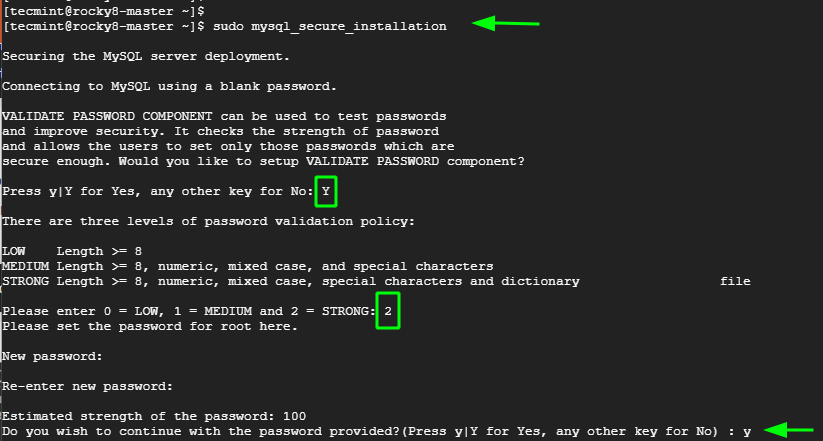
For the remaining prompts, type in 'Y' to tweak the database server to the recommended settings.
Once you have finished installing and hardening MySQL on the master and slave node, the next is to configure the master node.
Step 3: Configure the Master Node (Server)
The next step is to configure the Master node and grant the slave node access to it. First, we need to edit the mysql-server.cnf configuration file.
$ sudo vim /etc/my.cnf.d/mysql-server.cnf
Add the following lines under the [mysqld] section.
bind-address	 = 10.128.0.14
server-id 	 = 1
log_bin		 = mysql-bin
Once done, save the changes and exit. Then restart the MySQL server.
$ sudo sysemctl restart mysqld
Next, log into MySQL shell.
$ sudo mysql -u root -p
Execute the following commands to create a database user that will be used to bind the master and slave for replication.
mysql> CREATE USER 'replica'@'10.128.15.211' IDENTIFIED BY 'P@ssword321';
mysql> GRANT REPLICATION SLAVE ON *.*TO 'replica'@'10.128.15.211';
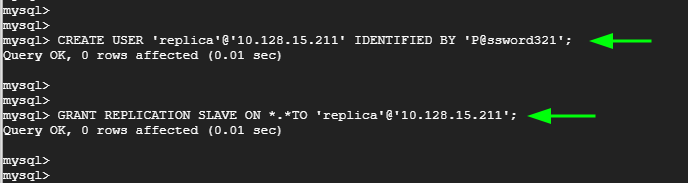
Apply the changes and exit the MySQL server.
mysql> FLUSH PRIVILEGES;
mysql> EXIT;
Verify the status of the master.
mysql> SHOW MASTER STATUS\G
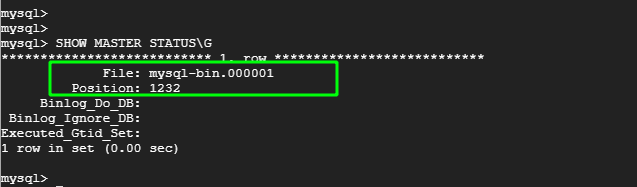
Take note of the Filename and Position. You will need this later on when setting up the slave for replication. In our case, we have the filename as mysql-bin.000001 and Position 1232.
Step 4: Configure the Slave Node (Server)
Now, head back to the Slave node. Once again, edit the mysql-server.cnf configuration file.
$ sudo vim /etc/my.cnf.d/mysql-server.cnf
As before, paste these lines under the [mysqld] section. Change the IP address to correspond to the slave’s IP. Also, assign a different server-id. Here we have assigned it the value of 2.
bind-address	 = 10.128.15.211
server-id	 = 2
log_bin 	 = mysql-bin
Save the changes and exit the file. Then restart the database server.
$ sudo systemctl restart mysqld
To configure the Slave node to replicate from the Master node, log in to the Slave’s MySQL server.
$ sudo mysql -u root -p
First and foremost, stop the replication threads:
mysql> STOP SLAVE;

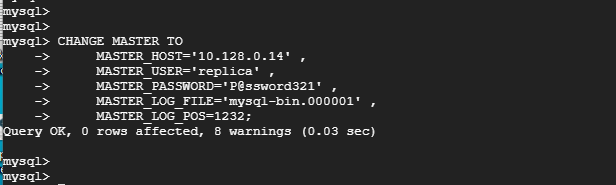
Then execute the following command to configure the slave node to replicate databases from the master.
mysql> CHANGE MASTER TO
     MASTER_HOST='10.128.0.14' ,
     MASTER_USER='replica' ,
     MASTER_PASSWORD='P@ssword321' ,
     MASTER_LOG_FILE='mysql-bin.000001' ,
     MASTER_LOG_POS=1232;
Note that the MASTER_LOG_FILE and MASTER_LOG_POS flags correspond to the file and Position values from the Master node at the end of Step 1.
The MASTER_HOST, MASTER_USER, and MASTER_PASSWORD correspond to the Master IP address, the replication user, and the replication user’s password respectively.
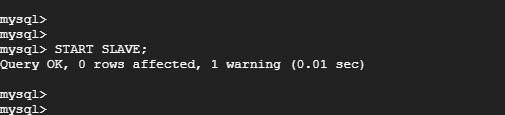
Then start the slave replication threads:
mysql> START SLAVE;
Step 4: Testing MySQL Master-Slave Replication
Now, to test if replication between the master and slave node is working, log in to the MySQL database server on the master node:
$ sudo mysql -u root -p
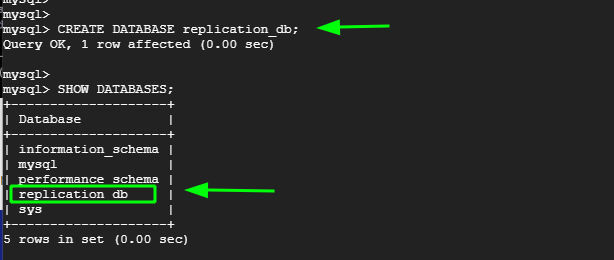
Create a test database. Here, our test database is called replication_db.
mysql> CREATE DATABASE replication_db;
Verify the existence of the database.
mysql> SHOW DATABASES;
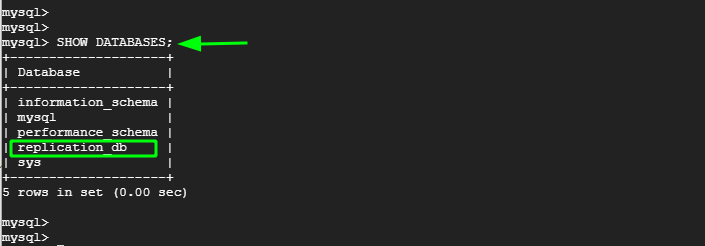
Now, head over to the slave node, log in to the MySQL server and confirm that the replication_db database is present. From the output below, we can see that the database is present. This is confirmation that replication has taken place from the Master to the slave node.
mysql> SHOW DATABASES;
And that’s it, we have successfully demonstrated how you can set up a MySQL master-slave replication model that can replicate databases from the master node to the slave node.


When I tried to add the above lines under
[mysqld]the replication is working fine but my syslog-ng.service is getting stopped.is there any solution for this?
its working fine. thanks for ur help.
Hello, Thank for this Tutorial, but it doesn’t work for me, I followed all steps, but sadly i can’t find the database that I create on Master in the other one. Please Contact me
@Memmiche,
It should work, please follow the instructions carefully..
Hi Ravi
Thanks for the knowledge on mysql-master and slave and
can I have a reference article if present based on the mysql-cluster setup.
Thanks in advance!
I get following error, how can resolve this issue?
@Umesh,
There is error in your MySQL my.conf file at line 11. Please correct and re-run the command.
After running following command, following output coming
After changing slave server changes on
my.cnfand restore the required database. Then slave server mysql service is not starting.Hi,
MySQL service failed on Slave node when trying to configure CentOS 6.3 with MYSQL Server version: 5.7.22-log MySQL Community Server (GPL).
Hi, I am getting error, status show connecting and last i/o shows error connecting to master ip address.
Please help me..
So like the simplicity of the setup. However it did not work and was frustrating as everything seemed to be set up correctly. Took some time to find the problem is due to the “binlog-do-db“.
Problem for me was there was a “test” DB and even though I was creating a “test” table in different DB it wasn’t being replicated. Read this post about why it’s dangerous: https://www.percona.com/blog/2009/05/14/why-mysqls-binlog-do-db-option-is-dangerous/ . Other than that thanks for your contributions
my master slave was running perfectly but once master got shutdown due to power failure (breakdown ) and it stop replication how to overcome this situation ? or restart replication with minimum downtime
@Prashant,
Never faced such power failure issues, but I think there nothing to worry, once you master started its automatically starts replicating to slave..
To put master host and so on slave in /etc/my.cnf is officially deprecated.
Instead run in mysql
Extract from official website
“2.2.5.2 Setting the Master Configuration on the Slave
To set up the slave to communicate with the master for replication, configure the slave with the necessary connection information. To do this, execute the following statement on the slave, replacing the option values with the actual values relevant to your system:
mysql> CHANGE MASTER TO -> MASTER_HOST='master_host_name', -> MASTER_USER='replication_user_name', -> MASTER_PASSWORD='replication_password', -> MASTER_LOG_FILE='recorded_log_file_name', -> MASTER_LOG_POS=recorded_log_position;I got the same error..
ERROR 1794 (HY000) at line 22: Slave is not configured or failed to initialize properly. You must at least set –server-id to enable either a master or a slave. Additional error messages can be found in the MySQL error log
mysql -u root -p < /root/dbdump.db
Enter password:
ERROR 1794 (HY000) at line 22: Slave is not configured or failed to initialize properly. You must at least set –server-id to enable either a master or a slave. Additional error messages can be found in the MySQL error log.
I got this when I tried to do the restore on the slave.
@James,
Have you properly configured Slave server? added correct server-id in slave my.cnf file? please check and confirm..
Hi Ravi,
I have followed your article its good, I have done the configuration in Master no issue but getting an error on slave while importing DB
ERROR 1794 (HY000) at line 22: Slave is not configured or failed to initialize properly. You must at least set –server-id to enable either a master or a slave. Additional error messages can be found in the MySQL error log.
@Gulab,
Have you added master server-id to to slave mysql configuration? Please check and confirm..
Good Job Buddy! It really helped me.
Sir what if i have to replicate more than one database from same same master server to slave.
@Anshul,
You can create x number MySQL clusters, just make sure you’ve mentioned correct MySQL id in /etc/my.conf file for each node..
Failed to import dbdump file on slave side….
Getting error while running the command….
# mysql -u root -p < /root/dbdump.db (On the slave node)
ERROR 2002 (HY000): Can't connect to local MySQL server through socket '/var/lib/mysql/mysql.sock' (2)
I have same os on both machine (i.e. Rhel7)
Plz.. give complete solution
@Gulshan,
Please make sure that MySQL started and running, if not you can start it using:
Thankyou so much pals for this superb great tutorial. It really helpful.
Hi,
Getting error while running the command….
# mysql -u root -p < dbstore.db (On the slave node)
ERROR 2002 (HY000): Can't connect to local MySQL server through socket '/var/lib/mysql/mysql.sock' (2)
@Tapas,
Make sure your MySQL is started and running, use netstat command to find out all running process.
I’ve two VM located on Digital Ocean and Microsoft Azure, I use my Digital Ocean as master and Microsoft Azure as slave. Can I implement replication in different server like Digital Ocean and Azure?
@Muhammad,
Not possible, both servers must be same Linux OS to do database Master/Slave replication…
Hi Ravi,
I mean same OS (linux) but different server. I’ve ubuntu in DO and Azure, so can I do master-slave replication?
@Muhammad,
As fas as both machine with different Linux OS will work without any issues, yes you can do a master-slave MySQL replication without any doubt…:)
thanks for reply..can u please make tutorial on or write blog for how to use replication for wamp server one slave and multiple masters.Thanks.
nice post..I am using master on windows,and my server is on cent-OS..whenever I try to run CHANGE MASTER TO…. this gives me error like slave is not configured or server_id is not set on master or slave…Thanks
I am doing this with WAMP3 Server.
@Yogesh,
If am not wrong WAMP means Windows, Apache, MySQL and PHP? if yes, then how come these commands work on Windows? better have a Linux..
@Yogesh,
I don’t think it will work that way, both machines must be Linux OS.
Slave is not configured or failed to initialize properly. You must at least set –server-id to enable either a master or a slave.
now I am getting this error..1st time its work after second time when I try to look out through START SLAVE…STOP SLAVE its produced this error..can u explain why?
+—————+——-+
| Variable_name | Value |
+—————+——-+
| server_id | 11 |
+—————+——-+
my.cnf file has
server_id = 11
replicate_do_db = dbname
pls reply I stuck on this error…
@Yogesh,
Sorry, as I said it’s difficult to answer you question, as you’re using two different OS’s for same purpose, and I don’t think it work that way, both machine must be Linux operating systems, in order to work properly…..
Great Article. Works Fine.. Thanks so much. Appreciate !
Awesome!!!! Really thanks for the post,, and its working perfectly
mysqld service is not starting
below is my my.cnf fine of slave side:
[mysqld]
datadir=/var/lib/mysql
socket=/var/lib/mysql/mysql.sock
# Disabling symbolic-links is recommended to prevent assorted security risks
symbolic-links=0
# Settings user and group are ignored when systemd is used.
# If you need to run mysqld under a different user or group,
# customize your systemd unit file for mysqld according to the
# instructions in http://fedoraproject.org/wiki/Systemd
server-id = 2
master-host=172.31.28.246
master-connect-retry=60
master-user=repl
master-password=repl
replicate-do-db=chetan
relay-log = /var/lib/mysql/mysql-relay-bin
relay-log-index = /var/lib/mysql/mysql-relay-bin.index
log-error = /var/lib/mysql/mysql.err
master-info-file = /var/lib/mysql/mysql-master.info
relay-log-info-file = /var/lib/mysql/mysql-relay-log.info
log-bin = /var/lib/mysql/mysql-bin
[mysqld_safe]
log-error=/var/log/mysqld.log
pid-file=/var/run/mysqld/mysqld.pid
~
@Chetan,
Is there any error message appears during mysql start? if yes, could you please post here..
Hi Team,
Good Day…!!!
Above Steps are not working, kindly check and do the needful.
Great tutorial…. might want to mention / mark in red on the Slave my.cnf file to change “binlog_do_db” to “replicate_do_db” took me forever to figure that out.
Hi,
Sometime ago now we managed to set-up master/slave replication and everything has been working fine with no issues. Just one question really… How do you go about safely rebooting the master or slave server ?
Hi Ravi,
Thank you very much for this post, but i am facing one issue.
when i restart the mysqld service on slave, it doesn’t start.
Would you please help me? explanation is given below.
I have a mysql master server-192.168.56.5 and a slave server-192.168.56.6.
Master COnfiguration:
[mysqld]
server-id = 1
binlog-do-db=khandu
relay-log = /var/lib/mysql/mysql-relay-bin
relay-log-index = /var/lib/mysql/mysql-relay-bin.index
log-error = /var/lib/mysql/mysql.err
master-info-file = /var/lib/mysql/mysql-master.info
relay-log-info-file = /var/lib/mysql/mysql-relay-log.info
log-bin = /var/lib/mysql/mysql-bin
datadir=/var/lib/mysql
socket=/var/lib/mysql/mysql.sock
user=mysql
# Disabling symbolic-links is recommended to prevent assorted security risks
symbolic-links=0
[mysqld_safe]
log-error=/var/log/mysqld.log
pid-file=/var/run/mysqld/mysqld.pid
Slave configuration:
[mysqld]
datadir=/var/lib/mysql
socket=/var/lib/mysql/mysql.sock
server-id=2
master-host=192.168.56.5
master-connect-retry=60
master-user=slave_user
master-password=khandu
replicate-do-db=khandu
relay-log = /var/lib/mysql/mysql-relay-bin
relay-log-index = /var/lib/mysql/mysql-relay-bin.index
log-error = /var/lib/mysql/mysql.err
master-info-file = /var/lib/mysql/mysql-master.info
relay-log-info-file = /var/lib/mysql/mysql-relay-log.info
log-bin = /var/lib/mysql/mysql-bin
# Disabling symbolic-links is recommended to prevent assorted security risks
symbolic-links=0
# Settings user and group are ignored when systemd is used (fedora >= 15).
# If you need to run mysqld under a different user or group,
# customize your systemd unit file for mysqld according to the
# instructions in http://fedoraproject.org/wiki/Systemd
user=mysql
[mysqld_safe]
log-error=/var/log/mysqld.log
pid-file=/var/run/mysqld/mysqld.pid
i have configured from shell like below .
CHANGE MASTER TO MASTER_HOST=’192.168.56.5′, MASTER_USER=’slave_user’, MASTER_PASSWORD=’khandu’, MASTER_LOG_FILE=’mysql-bin.000001′, MASTER_LOG_POS=329;
up to this step replication works perfectly, but when i restart the mysql on slave side, it generates the error
150318 12:00:06 mysqld_safe mysqld from pid file /var/run/mysqld/mysqld.pid ended
150318 12:00:56 mysqld_safe Starting mysqld daemon with databases from /var/lib/mysql
150318 12:00:56 [Note] Plugin ‘FEDERATED’ is disabled.
150318 12:00:56 InnoDB: The InnoDB memory heap is disabled
150318 12:00:56 InnoDB: Mutexes and rw_locks use GCC atomic builtins
150318 12:00:56 InnoDB: Compressed tables use zlib 1.2.3
150318 12:00:56 InnoDB: Using Linux native AIO
150318 12:00:56 InnoDB: Initializing buffer pool, size = 128.0M
150318 12:00:56 InnoDB: Completed initialization of buffer pool
150318 12:00:56 InnoDB: highest supported file format is Barracuda.
150318 12:00:56 InnoDB: Waiting for the background threads to start
150318 12:00:57 InnoDB: 5.5.36 started; log sequence number 1618405
150318 12:00:57 [ERROR] /usr/libexec/mysqld: unknown variable ‘master-host=192.168.56.5′
150318 12:00:57 [ERROR] Aborting
150318 12:00:57 InnoDB: Starting shutdown…
150318 12:00:58 InnoDB: Shutdown completed; log sequence number 1618405
150318 12:00:58 [Note] /usr/libexec/mysqld: Shutdown complete
150318 12:00:58 mysqld_safe mysqld from pid file /var/run/mysqld/mysqld.pid ended
again i need to reconfigure this via shell:- CHANGE MASTER TO MASTER_HOST=’192.168.56.5′, MASTER_USER=’slave_user’, MASTER_PASSWORD=’khandu’, MASTER_LOG_FILE=’mysql-bin.000001′, MASTER_LOG_POS=329;
please help.
Thanks!!
@Ravi,
I think you’ve syntax error in your command, use the correct single quotes as described in this following command.
I have tried the same but getting mention error. Unable to sync database
*************************** 1. row ***************************
Slave_IO_State: Waiting for master to send event
Master_Host: 192.168.1.25
Master_User: root
Master_Port: 3306
Connect_Retry: 60
Master_Log_File: mysql-bin.000003
Read_Master_Log_Pos: 106
Relay_Log_File: mysql-relay-bin.000004
Relay_Log_Pos: 251
Relay_Master_Log_File: mysql-bin.000003
Slave_IO_Running: Yes
Slave_SQL_Running: Yes
Replicate_Do_DB: testing,test
Replicate_Ignore_DB:
Replicate_Do_Table:
Replicate_Ignore_Table:
Replicate_Wild_Do_Table:
Replicate_Wild_Ignore_Table:
Last_Errno: 0
Last_Error:
Skip_Counter: 0
Exec_Master_Log_Pos: 106
Relay_Log_Space: 406
Until_Condition: None
Until_Log_File:
Until_Log_Pos: 0
Master_SSL_Allowed: No
Master_SSL_CA_File:
Master_SSL_CA_Path:
Master_SSL_Cert:
Master_SSL_Cipher:
Master_SSL_Key:
Seconds_Behind_Master: 0
Master_SSL_Verify_Server_Cert: No
Last_IO_Errno: 0
Last_IO_Error:
Last_SQL_Errno: 0
Last_SQL_Error:
1 row in set (0.00 sec)
mysql> use testing;
Database changed
mysql> SELECT * FROM employee;
ERROR 1146 (42S02): Table ‘testing.employee’ doesn’t exist
mysql>
@Suraj,
Your replication is working fine, but I think you need to first dump the mysql databases from master to slave server and then take the master binlog to slave server and restart the mysql at slave..
hi ravi boss this its very good boos i have some issue second behind master null after i log out my application
Hello Ravi,
Thanks for your suggestion.
I would also want to know how to make slave server as a master in case master gets down. Please assist we want to implement this environment in our data center.
Thanks in advance.
Regards,
Yogesh P.
@Yogesh,
you need to manually change the settings of MySQL in your application and point to Slave server. This is the only option..
Hello sir,
i want to set up multiple master server & one slave server in mariaDB 10.0.0 , how can i do this.
@Amita
Follow the same insturctions, just give the “server-id” to each server…
Hi,
Nice article.
We are trying to create new database but it wont replicate. It is showing old database which we have tested during the installation.
Actually we want to replicate multiple databases so is it necessary to mention each databaase name and database username in my.cnf file ?
If no, how can we mention the parameter in my.cnf file.
Please update.
Thanks
Yogesh P.
@Yogesh,
You must specify each database name in master my.cnf file to do replication..
Find below my.cnf for my Master server
server-id = 1
binlog-do-db=shaqib1
binlog-to-db=shaqib2
binlog-to-db=shaqib3
relay-log = /var/lib/mysql/mysql-relay-bin
relay-log-index = /var/lib/mysql/mysql-relay-bin.index
log-error = /var/lib/mysql/mysql.err
master-info-file = /var/lib/mysql/mysql-master.info
relay-log-info-file = /var/lib/mysql/mysql-relay-log.info
log-bin = /var/lib/mysql/mysql-bin
i save and then i restart mysql, i got the following errors.
141015 11:33:00 mysqld started
141015 11:33:00 [ERROR] /usr/libexec/mysqld: unknown variable ‘binlog-to-db=shaqib2’
141015 11:33:00 mysqld ended
pls urgent.
Sorry i notice my mistake.
I correct it and my mysqld service start successfully.
Now I am getting another problem, i created a table on my master, but is is not replicated on my slave. where i might be wrong?
Please check the status on the slave server and look for errors if any…
Hi ravi,
I just need to replicate some table only , is this possible , How can i do this , please advice me.
Regards,
Shufil
Sorry brother, you can’t replicate tables only databases can be replicated..
Hi,
can we able to replication server in different location..?
Yes you can as long as both server connected to each other on the network..
Ravi!
can you help me how to replicate mysql database as a backup at a different location and different network
looking forword!!!!
thanks
@Frajasa,
You can use any network, but make sure both servers communicate each other…follow the instructions as instructed in the article…there is no issue using different network, but ports should be opened for connections on both end..
I am creating a database on master server but cannot create slave server.please give me the suggatation.
Please follow the instruction carefully, it will work surely.
how to replicate multiple database in master/slave replication???
Just add the new database in Master MySQL configuration file and copy the bin log file to slave..
Just add the new database in Master MySQL configuration file and copy the bin log file to slave..??
Mr Ravi ,
binlog-do-db=tecmint
here only this tecmint database only replicated my question is suppose i have 3 database how can i replicate all three databases in slave at same time
what all the statements i add in master mysql config file and slace config file
pls reply with some example cause iam fresher in mysql
thanks….
You should follow same instruction to replicate multiple databases on slave. For example, like this way.
Hi,
My master running on AWS :3306 port and slave running in my office at port 3306 but i am using port forward on my firewall 556 kindly reply how to sync both server
Can u look into this.. I’m trying in my local network.
Server IP :192.168.1.222
Slave IP :192.168.1.19
I’m not figure out where could be the issue?
Can u help to fix this?
*************************************
server-id = 2
master-host=192.168.1.222 ( My server master IP)
master-connect-retry=60
master-user=slave_user — (MY username ex: root)
master-password=yourpassword (MY passwd ex: ramalingam)
replicate-do-db=tecmint (MY db ex: ramalingam)
relay-log = /var/lib/mysql/mysql-relay-bin
relay-log-index = /var/lib/mysql/mysql-relay-bin.index
log-error = /var/lib/mysql/mysql.err
master-info-file = /var/lib/mysql/mysql-master.info
relay-log-info-file = /var/lib/mysql/mysql-relay-log.info
log-bin = /var/lib/mysql/mysql-bin
Bro, Can I have access to your machine, to check what’s the exact problem.
Hi, at the time of configure slave server, I made changes into slave my.cnf.
After that slave mysql not working. Service fails to start.
Simple, your my.cnf was misconfigured. Check what you’ve added correctly and replace with them correct parameters.
Hello Ravi Sir,
mysql> SHOW MASTER STATUS;
Empty set (0.00 sec)
mysql>
I have used exact steps, which you provided, but when i run above mention command it’s showing empty set.
I am using Centos 6.5 64 bit.
Kindly help me.
Regards,
Manoj Gupta
No idea man, but seems your configuration was unsuccessful and might you have missed some steps, please try to follow again.
Superb tutorial. Works like a charm.
I have came problem.
Last_IO_Error: error connecting to master ‘[email protected]:3306’ – retry-time: 60 retries: 86400
It seems your slave is not connecting to your Master MySQL server, have you opened port 3306 and the slave user has proper permission to talk with master server?
Ravi,
Dose thee any value to set the replica frequency? Mean, in my case it’s not really necessary to get replica in realtime, and overload network, for example, it’s fine to try to replicate every one hour, it’s possible that??
Else, the master-connect-retry directive is unknown in mysql 5.5.38-cll-lve, I was googling, but can’t find,… this maybe fit to fix my question, right?
regards,
After setting up both master and slave configuration as mentioned here, I am getting the following error in the slave
mysql> show slave status\G
*************************** 1. row ***************************
Slave_IO_State: Connecting to master
Master_Host: 192.168.11.251
Master_User: slave_test
Master_Port: 3306
Connect_Retry: 60
Master_Log_File: mysql-bin.000007
Read_Master_Log_Pos: 331
Relay_Log_File: mysql-relay-bin.000004
Relay_Log_Pos: 4
Relay_Master_Log_File: mysql-bin.000007
Slave_IO_Running: No
Slave_SQL_Running: Yes
Replicate_Do_DB: hadoop
Replicate_Ignore_DB:
Replicate_Do_Table:
Replicate_Ignore_Table:
Replicate_Wild_Do_Table:
Replicate_Wild_Ignore_Table:
Last_Errno: 0
Last_Error:
Skip_Counter: 0
Exec_Master_Log_Pos: 331
Relay_Log_Space: 106
Until_Condition: None
Until_Log_File:
Until_Log_Pos: 0
Master_SSL_Allowed: No
Master_SSL_CA_File:
Master_SSL_CA_Path:
Master_SSL_Cert:
Master_SSL_Cipher:
Master_SSL_Key:
Seconds_Behind_Master: NULL
Master_SSL_Verify_Server_Cert: No
Last_IO_Errno: 2013
Last_IO_Error: error connecting to master ‘[email protected]:3306’ – retry-time: 60 retries: 86400
Last_SQL_Errno: 0
Last_SQL_Error:
1 row in set (0.00 sec)
Note: The Firewall is stopped and SELINUX is set to disabled in the Master server.
Please suggest me what could be the reason behind.
The error clearly saying, that slave is not reaching to master, and you also specified that Firewall and SELinux both are disabled. It seems to me something strange, have your master mysql is running? are you able to telnet to master on port 3306 from slave?
i want to config multil master – 1 slave .
can you have me
Please, dismiss my last comment, i have solve it myself, the issue was that I have import the dump file into a specific DB which I have created in the slave, and I shouldn’t dump it so, but, should just do it in the whole sql as: mysql -u root -p < dump.sql…
regards,
Awesome tutorial. Got replication setup real quick. One thing I did have to change that may help others was my firewall. Had to add and exception for port 3306 then it worked great.
HI Ravi Saive,
I just removed
relay-log = /var/lib/mysql/mysql-relay-bin
relay-log-index = /var/lib/mysql/mysql-relay-bin.index
log-error = /var/lib/mysql/mysql.err
master-info-file = /var/lib/mysql/mysql-master.info
relay-log-info-file = /var/lib/mysql/mysql-relay-log.info
log-bin = /var/lib/mysql/mysql-bin
only added server-id = 1
log-bin=mysql-bin.log
binlog-do-db=testDBname
And slave side only added server-id = 2
now its working with out any error .
can you find out what is exact problem . i added all file under mysql with correct permission like mysql-relay-bin .
I have another doubt is i create mysql user and permission is *.* username@ slave ip also sameusername@localhost . also i added master my.cnf binlog-do-db=replicationDBname , and the problem is both server running lot of site so when we changed slave server mysql from master to slave is this effect all the site ?
Regards,
Shufil
Hello sir,
I have complete two server replication through this artical. but when i have run “service mysqld restart” then replication work stop. because when server restart then file “File = mysql-bin.000010” and position = 701765 is change.
please help me for this issue.
Thanks
No, idea it shouldn’t happen, I regulary restart mysql whenever needed, but never faced such issue, I think you should check mysql logs to find out what was causing.
Hi,
I am also facing the same issue, after changing anything in the conf file, I restart mysql service, but replication stops working because log file and position gets changed. I have to run CHANGE MASTER TO MASTER_HOST command again to start replication.
Is there anyway to permanently add log file and position anywhere?
Thank you,
Umaimath
Hello Sir,
This artical is good for replication on master to slave Database. It is working fine.
But, when i have edit slave server Database master server Database is not update automatic. it is possible or not.
Thanks
I didn’t get you, can you clarify your question more clearly..
Dear Sir,
when i edit master server database then slave server database automatic update. Or If I edit slave server database then master server database is not update.
It is possible.
Thanks.
Its one way sync only from Master to Slave, not vice-versa…
dear sir,
Have you any idea about vice-versa replication between two server database.
Thanks
Mysql replication won’t work vice-versa unfortunately.
Hi Ravi,
Thanks for reply .
I checked the status both are running please see below details .
[root@localhost ~]# service mysqld status
mysqld (pid 1628) is running…
[root@localhost ~]# netstat -tln | grep 3306
tcp 0 0 192.168.2.21:3306 0.0.0.0:* LISTEN
Regards,
Shufil
Can you able to connect from localhost like, if yes, please post me the output here. or you should add –skip networking in my.cnf file.. try these both..
HI Ravi ,
Thanks for reply , I added skip networking in my.cnf, then restart mysql service , also we can login locally without any error . please see below output.
[root@localhost ~]# mysql -u root -p
Enter password:
Welcome to the MySQL monitor. Commands end with ; or \g.
Your MySQL connection id is 5
Server version: 5.1.73-log Source distribution
Copyright (c) 2000, 2013, Oracle and/or its affiliates. All rights reserved.
Oracle is a registered trademark of Oracle Corporation and/or its
affiliates. Other names may be trademarks of their respective
owners.
Type ‘help;’ or ‘\h’ for help. Type ‘\c’ to clear the current input statement.
mysql>
Regards,
Shufil
HI Ravi,
master ip 192.168.2.21 slave 192.168.2.22, same mysql user and password user master and slave .
Master and slave working fine, and getting master status correctly , but slave status seems a error , that is “Last_IO_Error: error connecting to master”.
below you can see slave status .
also we are try to connect manually from slave to master,
[root@localhost ~]# mysql -u test_user -h 192.168.2.21 -p
Enter password:
ERROR 2003 (HY000): Can’t connect to MySQL server on ‘192.168.2.21’ (113).
We are already allow port number 3306 from 192.168.2.0/24 in iptable.
___________________________________________________________________________________
mysql> show slave status\G
*************************** 1. row ***************************
Slave_IO_State: Connecting to master
Master_Host: 192.168.2.21
Master_User: test_user
Master_Port: 3306
Connect_Retry: 60
Master_Log_File: mysql-bin.000009
Read_Master_Log_Pos: 483
Relay_Log_File: mysql-relay-bin.000002
Relay_Log_Pos: 4
Relay_Master_Log_File: mysql-bin.000009
Slave_IO_Running: No
Slave_SQL_Running: Yes
Replicate_Do_DB: testDB
Replicate_Ignore_DB:
Replicate_Do_Table:
Replicate_Ignore_Table:
Replicate_Wild_Do_Table:
Replicate_Wild_Ignore_Table:
Last_Errno: 0
Last_Error:
Skip_Counter: 0
Exec_Master_Log_Pos: 483
Relay_Log_Space: 106
Until_Condition: None
Until_Log_File:
Until_Log_Pos: 0
Master_SSL_Allowed: No
Master_SSL_CA_File:
Master_SSL_CA_Path:
Master_SSL_Cert:
Master_SSL_Cipher:
Master_SSL_Key:
Seconds_Behind_Master: NULL
Master_SSL_Verify_Server_Cert: No
Last_IO_Errno: 2013
Last_IO_Error: error connecting to master ‘[email protected]:3306’ – retry-time: 60 retries: 86400
Last_SQL_Errno: 0
Last_SQL_Error:
1 row in set (0.00 sec).
Regards,
Shufil
The error itself self explanatory, that means your master MySQL service is not running or port 3306 is not opened. Please check both and come back to me with status.
HI Ravi ,
Thanks for reply , both are working .
[root@localhost ~]# service mysqld status
mysqld (pid 1628) is running…
[root@localhost ~]#
[root@localhost ~]# netstat -tln | grep 3306
tcp 0 0 192.168.2.21:3306 0.0.0.0:* LISTEN
Regards,
Shufil
If you are running this setup,
On Master, make sure you use
sync_binlog=1
And also add the db’s you don’t want to replicate;
binlog-do-db=MyForum
binlog-do-db=MyMMO
binlog-do-db=MyPlayers
# Don’t replicate Percona DB’s
binlog-ignore-db=performance_schema
binlog-ignore-db=information_schema
binlog-ignore-db=mysql
On Slave for Multiple DB’s:
replicate-do-db = MyForum
replicate-do-db = MyMMO
replicate-do-db = MyPlayers
and then make sure slave can read only, Since this is Master/Slave Setup..
# Slave only needs to read.
read_only = 0
Now I finally am able to keep my Slave database up to date through crashes, reboots or whatever.. This is what was missing but after some research, I found what was missing.
Chris
How exactly do you keep this accurate? I’m running a small mmo and I have to clean up the bin files because they eventually take so much space. I use a script that will clean the files up but after about an hour of a fresh setup, the slave is no longer up to date.. I’d have to re-do this set up each day.. Is there a better way to do master/master that is 100% up to date on both side without the bins?
Thanks,
Chris
Hello Ravi Saive ,
We have two server , both of server running with lot of sites , we need to create replication only one DB , with particulate time interval and without , can this possible .
Regards,
Shufil
Yes, it can possible, go ahead…
Hi ravi,
very nice article ……..
I have a doubt, I already have a database now.I have to set up replication.Now i am not using any password to connect mysql…..just i am typing mysql command to connect database …..in below query which user name and passed i have to use.
CHANGE MASTER TO MASTER_HOST=’192.168.1.1′, MASTER_USER=’slave_user’, MASTER_PASSWORD=’yourpassword’, MASTER_LOG_FILE=’mysql-bin.000003′, MASTER_LOG_POS=11128001;
Have you created new slave_user on your Master Server? If yes, use those details here.
Hi i made to the end but in the
Last_IO_Errno:
Last_IO_Error:
Last_SQL_Errno: 0
Last_SQL_Error:
it throws me an error that says it wasnt able to connect to ‘[email protected]’ can you help me with that?
Those errors showing nothing, have you checked these two parameters are they are in YES state?
Hi, you’re incredible! The Slave_IO_Running: parameter is showing NO. So im wondering if it has something to do with the port that im using… Cause apparently by default the port that these connection uses is :3306, should i change it to :80??
Have you added correct master file along with correct slave user details, that you’ve created on master?
Well that’s the thing, I’ve done the configuration from the start several times and i dont know what I’m doing wrong… The ip’s are ok and the master file seems to be fine, although I had some problems there cause i wasnt entering mysql as root user so i was setting up a different master file but now everything seems to be ok but i just cant get the Slave_IO_Running to get going
Here’s the whole thing:
*************************** 1. row ***************************
Slave_IO_State: Connecting to master
Master_Host: 192.168.205.3
Master_User: esclavo
Master_Port: 3306
Connect_Retry: 60
Master_Log_File: mysql-bin.000001
Read_Master_Log_Pos: 325
Relay_Log_File: mysql-relay-bin.000001
Relay_Log_Pos: 4
Relay_Master_Log_File: mysql-bin.000001
Slave_IO_Running: No
Slave_SQL_Running: Yes
Replicate_Do_DB: Tiquetes
Replicate_Ignore_DB:
Replicate_Do_Table:
Replicate_Ignore_Table:
Replicate_Wild_Do_Table:
Replicate_Wild_Ignore_Table:
Last_Errno: 0
Last_Error:
Skip_Counter: 0
Exec_Master_Log_Pos: 325
Relay_Log_Space: 106
Until_Condition: None
Until_Log_File:
Until_Log_Pos: 0
Master_SSL_Allowed: No
Master_SSL_CA_File:
Master_SSL_CA_Path:
Master_SSL_Cert:
Master_SSL_Cipher:
Master_SSL_Key:
Seconds_Behind_Master: NULL
Master_SSL_Verify_Server_Cert: No
Last_IO_Errno: 2013
Last_IO_Error: error connecting to master ‘[email protected]:3306’ – retry-time: 60 retries: 86400
Last_SQL_Errno: 0
Last_SQL_Error:
1 row in set (0.00 sec)
ERROR:
No query specified
mysql>
Thanks in advance
It’s something related to permission problem on the master or related to SELinux, please check both.
Hi! Im having a problem in the end, it says on “Last_I/O_ERROR: error connecting to master ‘[email protected]:3306 -retry time: 60 retries: 86400” what did I do wrong there? Could it be the user? if so how do I change it again?
Dear Sir,
We have face some issue when we configure the salve and write then unable to restart the mysql service please help me how can do.
Error :
[root@localhost ~]# /etc/init.d/mysqld restart
Stopping mysqld: [ OK ]
MySQL Daemon failed to start.
Starting mysqld: [FAILED]
vi /etc/my.cnf
[mysqld]
datadir=/var/lib/mysql
socket=/var/lib/mysql/mysql.sock
server-id = 2
master-host=192.168.1.113
master-connect-retry=60
master-user=root
master-password=dreamsol
replicate-do-db=dreamsol
relay-log = /var/lib/mysql/mysql-relay-bin
relay-log-index = /var/lib/mysql/mysql-relay-bin.index
log-error = /var/lib/mysql/mysql.err
master-info-file = /var/lib/mysql/mysql-master.info
relay-log-info-file = /var/lib/mysql/mysql-relay-log.info
log-bin = /var/lib/mysql/mysql-bin
# Disabling symbolic-links is recommended to prevent assorted security risks
symbolic-links=0
# Settings user and group are ignored when systemd is used (fedora >= 15).
# If you need to run mysqld under a different user or group,
# customize your systemd unit file for mysqld according to the
# instructions in http://fedoraproject.org/wiki/Systemd
user=mysql
# Semisynchronous Replication
# http://dev.mysql.com/doc/refman/5.5/en/replication-semisync.html
# uncomment next line on MASTER
;plugin-load=rpl_semi_sync_master=semisync_master.so
# uncomment next line on SLAVE
;plugin-load=rpl_semi_sync_slave=semisync_slave.so
# Others options for Semisynchronous Replication
;rpl_semi_sync_master_enabled=1
;rpl_semi_sync_master_timeout=10
;rpl_semi_sync_slave_enabled=1
“/etc/my.cnf” 45L, 1418C
It’s due to configuration error, please correct your my.cnf configuration values.
Hi Ravi,
Nice tutorial, but i want compile MySQL from source with replication (Matser Slave).
u done this before then please share..
Devendra Joshi
08796458877
Email : [email protected]
can you please answer this coment from muhammad
“would this procedure work without locking the db. I want to do this so the user keeps using the main database and the replication process works in the background, that brings another thing to point. I want to make this process automated so it triggers the replication when an update is made to the database, i know i can do crontab to schedule it but how do i do it on master and slave confused =I
any help would be appreciated.”
Thanks
hello,
how can I configure the failover after this configuration ??
Hi,
nice article..
When I execute this command on slave server :
mysql -u root -p < /root/dbdump.db
I got this error :
ERROR 1198 (HY000) at line 22: This operation cannot be performed with a running slave; run STOP SLAVE first
can you help me?
First stop slave and then restore a backup.
use “slave stop” instead of “stop slave”
Hello,
Can I implement this in two different networks. ?
Thank You
Yes you can..
Hi Ravi,
This is great but i would be much grate full if you can post something on clustering without the master – slave concept. just replicate the same data between two mysql servers. what i am trying to do is load balance mysql serer to make a mysql cluster.
Thanks in advanced.
ravi
Hello Ravi,
Thank you so much for this article.
I was facing some problems like “/usr/libexec/mysqld unknown variable ‘master-host=x.x.x.x” …
so skip adding master-host and regarding information in my.conf. and directly execute next step. So Its working for me.
@ Ravi sir !!
Very Nice Post : )
If any one want to just copy and paste :) then He/She need to edit
/ect/my.cnf file of Master Server
#bind-address=127.0.0.1
bind-address=replace with you server IP
simple and good steps.working fine.thanks.
Hi!
Thanks for the great article!
In the “Verifying MySQL Replication on Master and Slave Server” step I see that “On Master Server” you create the database:
mysql> create database tecmint;
Is it working all those steps and the replication even on existing database with a lot of data and tables on it or only on a new database?
Thanks a lot!
If you’ve properly dumped database on slave and imported bin log file properly it should work correctly..
Hi,
Thanks for the great article. How do I replicate all the databases from my master? Can I just leave out the value “tecmint” in : Replicate_Do_DB: tecmint
Is the above “row based replication” or “statement based” ?
Many thanks!
It’s a row based replication. Please follow the article we’ve already explained clearly everything.
I have a database restored by the master and slave server, after they restored, I make the master and slave configurations, the master is ok, but on the slave the mysqld service can’t be up after I edit in its my.cnf.
What is the problem?
After making changes in slave my.cnf file have you restarted mysql service?
Why does my slave db don’t sync after i add entries on my slave DB if im right i think that my slave db should return its data same with my Master DB.
Thanks
Did you followed all the steps correctly?
Yes my scenario is my two tables and updated slave is same with my master but once i delete a file at my slave the data on my master don’t overwrite my db on slave instead its adding the data the i added on my master db after the deletion of data on slave but the data that i had deleted on my slave db don’t return.
thanks
Hi , I like this tuto it is really useful but i have just one thing that i could not do it . After doing this command in master :
scp /root/db_dump.sql [email protected]:/salma/
I got this answer :
[email protected]‘s password:
scp: /salma/: Is a directory
Am i now connected to slave ??
And in slave i have this :
[root@localhost salma]# mysql -u root -p < /root/dbdump.db
bash: /root/dbdump.db: No such file or directory
How can i solve this problem ? Whould help me please i really need your help . Thank you very much .
Trying to move dump file in some other location instead of salma directory.
Hi , Thanks so much for this tuto . I have one problem when i try this command :
> GRANT REPLICATION SLAVE ON *.* TO ‘slave_user’@’%’ IDENTIFIED BY ‘your_password’;
it does not work i don’t no why ? and it displays an error . Can you help me please thank you again .
What error it displayed can you post here.
Hi,
I am trying to use following in my.cnf but its not working can u help on this.
replicate-ignore-table=abc.emp112
replicate-wild-ignore-table=abc.emp112
Also my BINLOG_DO_DB is not coming
+——————+———-+————–+——————+
| File | Position | Binlog_Do_DB | Binlog_Ignore_DB |
+——————+———-+————–+——————+
| mysql-bin.000008 | 739 | | |
+——————+———-+————–+——————+
Try this and let me know.
replicate-ignore-table=abc.emp112
replicate-wild-ignore-table=abc.emp112.%
would this procedure work without locking the db. I want to do this so the user keeps using the main database and the replication process works in the background, that brings another thing to point. I want to make this process automated so it triggers the replication when an update is made to the database, i know i can do crontab to schedule it but how do i do it on master and slave confused =I
any help would be appreciated.
Great knowledge bank
Now import the dump file that we exported in earlier command and restart the MySQL service.
# mysql -u root -p < /root/dbdump.db
^^ this is showing .. no database selected … do i create a new db on the slave? name it the same as the exported db from master?
Yes! you need to create same database on the slave and then do import.
hello
thank you Mr Saive
i need MySQL immediately but i use windows and i cant install it.i appreciate any suggestion.HELP ME PLEASE!
what is the point of the dump? its not being imported, at any point?
i cant seem to get this working either, i just get connecting to master, then it errors out after a while when checking for status. followed the guide to the tee.
Sorry, I forget to mention that we need to import the exported dump file on slave server. I have updated the article follow the guide again. and let me know if it working or not.
Dear Ravi,
have followed all your steps. but when my Replicate_Do_DB is not the same as the one i had specified in my.cnf file.
where i might have wronged?
Your both my.cnf files have same database name mentioned. Unless it won’t work for you. Please follow the guide again properly. If any help needed contact me..
thanks for that. do you know if a slave can be a master for another machine?
if i have 1 master going to a slave and that same slave being a master for another slave?
Yes, a slave can be master of another machine or x number of machines. Just you have to assign “server ids” correctly to get this work.
Dear Ravi;
i need db software and all commands….
I think you talking about MySQL software and commands. Here is the complete guide to MySQL installation to Administration.
MYSQL Database Installation Guide
MySQL Basic Database Administration Commands
20 MySQL (Mysqladmin) Commands for Database Administration
MySQL Backup and Restore Commands for Database Administration
my Replicate_Do_DB: is not same is the one i have specified in my.cnf file.
can you advise y?
Sup Thx.
it’s working cheers………..