Installing, updating, and removing (when needed) installed programs are key responsibilities in a system administrator’s daily life. When a machine is connected to the Internet, these tasks can be easily performed using a package management system such as aptitude (or apt-get), yum, or zypper, depending on your chosen distribution, as explained in Part 9 – Linux Package Management of the LFCE (Linux Foundation Certified Engineer) series. You can also download standalone .deb or .rpm files and install them with dpkg or rpm, respectively.

Introducing The Linux Foundation Certification Program
However, when a machine does not have access to the world wide web, another methods are necessary. Why would anyone want to do that? The reasons range from saving Internet bandwidth (thus avoiding several concurrent connections to the outside) to securing packages compiled from source locally, and including the possibility of providing packages that for legal reasons (for example, software that is restricted in some countries) cannot be included in official repositories.
That is precisely where network repositories come into play, which is the central topic of this article.
Our Testing Environment
Network Repository Server:	CentOS 7 [enp0s3: 192.168.0.17] - dev1
Client Machine:			CentOS 6.6 [eth0: 192.168.0.18] - dev2
Setting Up a Network Repository Server on CentOS 7
As a first step, we will handle the installation and configuration of a CentOS 7 box as a repository server [IP address 192.168.0.17] and a CentOS 6.6 machine as client. The setup for openSUSE is almost identical.
For CentOS 7, follow the below articles that explains a step-by-step instructions of CentOS 7 installation and how to setup a static IP address.
As for Ubuntu, there is a great article on this site that explains, step by step, how to set up your own, private repository.
Our first choice will be the way in which clients will access the repository server – FTP and HTTP are the most well used. We will choose the latter as the Apache installation was covered in Part 1 – Installing Apache of this LFCE series. This will also allow us to display the package listing using a web browser.
Next, we need to create directories to store the .rpm packages. We will create subdirectories within /var/www/html/repos accordingly. For our convenience, we may also want to create other subdirectories to host packages for different versions of each distribution (of course we can still add as many directories as needed later) and even different architectures.
Setting Up the Repository
An important thing to take into consideration when setting up your own repository is that you will need a considerable amount of available disk space (~20 GB). If you don’t, resize the filesystem where you’re planning on storing the repository’s contents, or even better add an extra dedicated storage device to host the repository.
That being said, we will begin by creating the directories that we will need to host the repository:
# mkdir -p /var/www/html/repos/centos/6/6
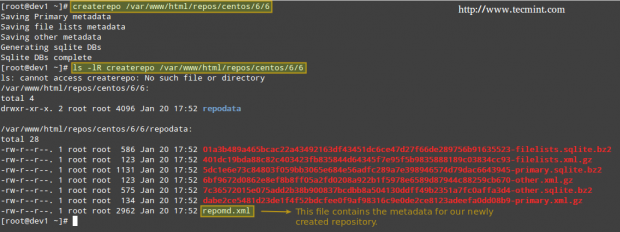
After we have created the directory structure for our repository server, we will initialize in /var/www/html/repos/centos/6/6 the database that keeps tracks of packages and their corresponding dependencies using createrepo.
Install createrepo if you haven’t already done so:
# yum update && yum install createrepo
Then initialize the database,
# createrepo /var/www/html/repos/centos/6/6
Updating the Repository
Assuming that the repository server has access to the Internet, we will pull an online repository to get the latest updates of packages. If that is not the case, you can still copy the entire contents of the Packages directory from a CentOS 6.6 installation DVD.
In this tutorial we will assume the first case. In order to optimize our download speed, we will choose a CentOS 6.6 mirror from a location near us. Go to CentOS download mirrorand pick the one that is closer to your location (Argentina in my case):
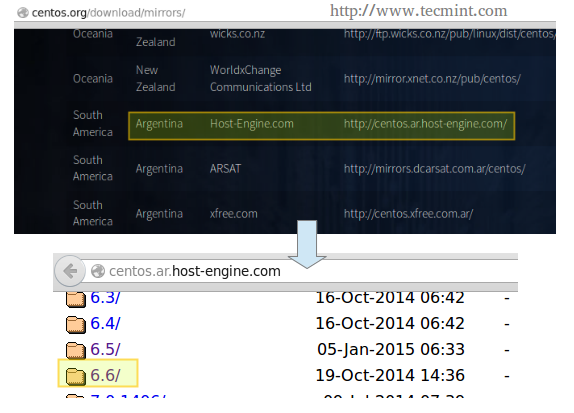
Then, navigate to the os directory inside the highlighted link and then choose the appropriate architecture. Once there, copy the link in the address bar and download the contents to the dedicated directory in the repository server:
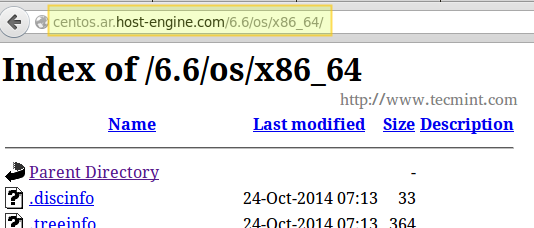
# rsync -avz rsync://centos.ar.host-engine.com/6.6/os/x86_64/ /var/www/html/repos/centos/6/6/
In case that the chosen repository turns out to be offline for some reason, go back and choose a different one. No big deal.
Now is the time when you may want to relax and maybe watch an episode of your favourite TV show, because mirroring the online repository may take quite a while.
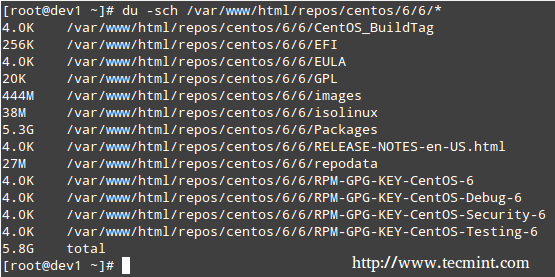
Once the download has completed, you can verify the usage of disk space with:
# du -sch /var/www/html/repos/centos/6/6/*
Finally, update the repository’s database.
# createrepo --update /var/www/html/repos/centos/6/6
You may also want to launch your web browser and navigate to the repos/centos/6/6 directory so as to verify that you can see the contents:
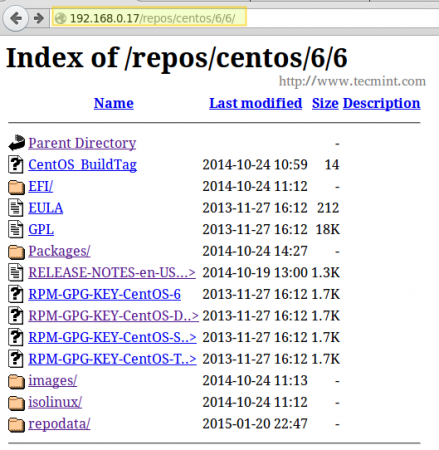
And you’re ready to go – now it’s time to configure the client.


Hi, I need to pass rsync through a proxy server to get to the mirror, what should i do?
Thanks in advance
@Ricardo,
First you need to set proxy connection settings in your exports path as shown.
Then you can tell that you want rsync to use below proxy settings for its traffic.
You can modify the above command as per your proxy connection requirements (some do not need user/password)
Finally you run your rsync job.
Hi, I’m afraid your instructions are not correct. You must not use createrepo to create the repodata, but instead you should use the repodata you get from the mirror you sync from.
If you create the repodata yourself, you will break the GPG signing of repomd.xml (see repomd.xml.asc). Please remove all references to “createrepo‘”.
For those thinking of setting up a public CentOS mirror based on this blog posting, you should sync everything with one rsync command, and not by individual version or repository. In this case the
-H(preserve hard links) rsync option would save you some bandwidth and hard disk space.Best regards, avij on behalf of the CentOS Linux Project.
Dear Tecmint Team,
Thanks for your support with reference to Hadoop and Maria DB. Good Article and very good for a beginner like me. I request to kindly help me with the article for creation Installation and usage of Active Directory Services for Centos 7 64bit Server and Centos 7 64bit Client.(i.e i should communicate with Centos 7 Server with Centos 7 Client).
Please help
Thanks and Regards
Dinakar N K
@Dinakar,
Please check this article: Integrate CentOS 7 to Active Directory.
How to block access of repository url in suse, Redhat over port 80 ?
It’s important to remember that after you setup your rsync in cron, you also need to update the repo, may be include the update command after the rsync in cron.
Nope, you get the repodata from the upstream mirror. There is no need at all to run createrepo.
How do I add an Ubuntu repository to Red Hat satellite 5.x?
Anyone wondering how to quickly undo the renaming of their .repo files (remove the .orig extension) can use this. Always backup your files first.
for i in $(ls *.orig); do mv -- "$i" "${i%.orig}"; doneBTW – These tutorials are great. Thanks!
Since you have this whole setup spread across 2 or 3 different pages, I may have missed it, but I’m pretty sure you left out the part about opening up the ports on the firewall for the web server.
Hi,
Would you say this process is an alternative to using RedHat Satellite in a RHEL environment? I’d like to save my company a tons of money getting Satellite or all our servers.
@Doyin,
Yes you absolutely correct, just setup one local network yum repository server, and tell all Linux clients to use this local yum repository to install and update packages over local network, this way you can save lots of money + network bandwidth too, and very quickly..
Thanks Ravi. In order to centrally initiate/manage the yum updates and the repository, would I still need redhat satellite?
Even though all the servers make use of the local repo, I’ll still need to centrally manage updates. What’s the best way you would advise to achieve this?
@Doyin,
Yes, you need the RH satellite to keep your packages updates on regular interval on the Server only..
@Doyin,
There are other alternatives to managing updates in this scenario. Please check https://access.redhat.com/solutions/29269 to see which solution works best for your environment and needs.
Hi Gabriel,
There is a small issue here – Once we download the entire structure under “OS” , we get the necessary updates which can be fed to all in house servers through FTP/HTTP. But this update will NOT be complete – for example, we will not get the latest kernel, firefox etc. as their updated packages are contained in “updates, centosplus, extras” etc. directories, which will not get downloaded by the described procedure.
Also, if we include these directories (updates, centosplus, extras etc.) in separate commands using rsync, we will be downloading lot of data which will be irrelevant – for example the “updates” directory contains around 18 files for firefox rpm of different versions and each of 70 MB size ( half of which are 32bit ) – whereas we just need the latest version of the rpm only. How to get “Only” the required rpms of latest versions from these directories ?
Why RSYNC, we can use reposync command to sync any yum repo..
when I run rsync (# rsync -avz rsync://mirror.ox.ac.uk/sites/mirror.centos.org/6/os/x86_64/ /var/www/html/repos/centos/) on Centos 7.1, I get always this error:
rsync: failed to connect to mirror.ox.ac.uk (163.1.221.67): Connection timed out (110)
rsync: failed to connect to mirror.ox.ac.uk (163.1.160.163): Connection timed out (110)
rsync error: error in socket IO (code 10) at clientserver.c(122) [Receiver=3.0.9]
How can I fix this?
If has something to do with ports
P.S. I’ve already tried in different repositories
Many thanks
@Alberto,
Make sure you have the package openssh-clients (that’s the exact name) installed on your CentOS 7.1 box. Also, have you checked the firewalld log, in case you have it enabled? You can do systemctl stop firewalld and then try to connect again in order to discard a firewall issue on your end. Last, but not least, please check this article on rsync that may be helpful in this case: https://www.tecmint.com/rsync-local-remote-file-synchronization-commands/. Please let us know how everything goes.
Dear Gabriel Cánepa
I am a System Administrator at a financial institution. We have around 40 servers with RHEL 6.5, 6.2, 5.5, OEL 5.5, Centos 5.7 etc. We don’t have all the servers connected to the public internet. We want to create a local yum repository that is connected with both outside and inside and get all software updates there and use this repo from all other internal servers. The problem is that could I connect all versions specially the 5x to use the central yum repo on RHEL 6.5? There are many mirrors for CentOS as described in this article. Is the same process will work in RHEL and where will I get the RHEL mirrors?
I am desperately seeking for a solution for a long time. Many of my new projects are pending for this. Please help me in this regard.
Thanks in advance.
@asbir,
The same process described in this article for CentOS should work for RHEL as well. I am afraid that the information provided in your comment is not enough for me to assess the situation. If you can be more specific, upload a document somewhere with your intended set up and I will take a look.
Hi:
On cron, after running “rsync”, it’s mandatory/recommended to run the “createrepo –update”?
Thanks!
@Carlos,
I must confess I didn’t think of it while writing this article, so thank you for bringing this to my attention. Absolutely – I would recommend using createrepo with the update flag in the scenario that you described.
Please note: Some ISPs knock-out the standard port(s) for rsync.
This will cause your initial-load and your refreshes to fail.
@Pim,
Thank you for bringing that to our attention. Luckily at least my ISP didn’t do it :). I was able to complete the tutorial without issues or unnecesary delays.
That being said, it would be a good idea to find out if other ISPs block the ports (or not) in order to know which one we can use.
Thanks for your comment, again!
Thank for your great coverage of exam objectives , i wish this all 12 parts put on pdf , mobi ,epub format or develop as book ,also the same for LFCS parts ,I really appreciate everything you’ve done.
@Izzeldin,
Yes, we do have a plan to release it in a PDF format..stay tuned for this..