A LFCE (Linux Foundation Certified Engineer) is a trained professional who has the skills to install, manage, and troubleshoot network services in Linux systems, and is in charge of the design, implementation and ongoing maintenance of the system architecture and user administration.
Introducing The Linux Foundation Certification Program.
In a previous tutorial we discussed how to install the necessary components of a mail service. If you haven’t installed Postfix and Dovecot yet, please refer to Part 1 of this series for instructions to do so before proceeding.
Requirement
In this post, I will show you how to configure your mail server and how to perform the following tasks:
- Configure email aliases
- Configure an IMAP and IMAPS service
- Configure an smtp service
- Restrict access to an smtp server
Note: That our setup will only cover a mail server for a local area network where the machines belong to the same domain. Sending email messages to other domains require a more complex setup, including domain name resolution capabilities, that is out of the scope of the LFCE certification.
But first off, let’s start with a few definitions.
Components Of a Mail Sending, Transport and Delivery Process
The following image illustrates the process of email transport starting with the sender until the message reaches the recipient’s inbox:
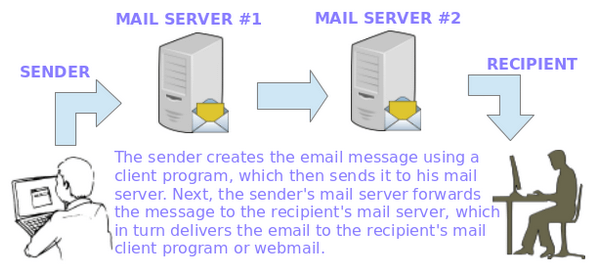
To make this possible, several things happen behind the scenes. In order for an email message to be delivered from a client application (such as Thunderbird, Outlook, or webmail services such as Gmail or Yahoo! Mail) to his / her mail server and from there to the destination server and finally to its intended recipient, a SMTP (Simple Mail Transfer Protocol) service must be in place in each server.
When talking about email services, you will find the following terms mentioned very often:
Message Transport Agent – MTA
MTA (short for Mail or Message Transport Agent), aka mail relay, is a software that is in charge of transferring email messages from a server to a client (and the other way around as well). In this series, Postfix acts as our MTA.
Mail User Agent – MUA
MUA, or Mail User Agent, is a computer program used to access and manage the user’s email inboxes. Examples of MUAs include, but are not limited to, Thunderbird, Outlook, and webmail interfaces such as Gmail, Outlook.com, to name a few. In this series, we will use Thunderbird in our examples.
Mail Delivery Agent
MDA (short for Message or Mail Delivery Agent) is the software part that actually delivers email messages to user’s inboxes. In this tutorial, we will use Dovecot as our MDA. Dovecot will also will handle user authentication.
Simple Mail Transfer Protocol – SMTP
In order for these components to be able to “talk” to each other, they must “speak” the same “language” (or protocol), namely SMTP (Simple Mail Transfer Protocol) as defined in the RFC 2821. Most likely, you will have to refer to that RFC while setting up your mail server environment.
Other protocols that we need to take into account are IMAP4 (Internet Message Access Protocol), which allows to manage email messages directly on the server without downloading them to our client’s hard drive, and POP3 (Post Office Protocol), which allows to download the messages and folders to the user’s computer.
Our Testing Environment
Our testing environment is as follows:
Mail Server Setup
Mail Server OS	: 	Debian Wheezy 7.5
IP Address	:	192.168.0.15
Local Domain	:	example.com.ar
User Aliases	:	[email protected] is aliased to [email protected] and [email protected]
Client Machine Setup
Mail Client OS	: 	Ubuntu 12.04
IP Address	:	192.168.0.103
On our client, we have set up elementary DNS resolution adding the following line to the /etc/hosts file.
192.168.0.15 example.com.ar mailserver
Adding Email Aliases
By default, a message sent to a specific user should be delivered to that user only. However, if you want to also deliver it to a group of users as well, or to a different user, you can create a mail alias or use one of the existing ones in /etc/postfix/aliases, following this syntax:
user1: user1, user2
Thus, emails sent to user1 will be also delivered to user2. Note that if you omit the word user1 after the colon, as in
user1: user2
the messages sent to user1 will only be sent to user2, and not to user1.
In the above example, user1 and user2 should already exist on the system. You may want to refer to Part 8 of the LFCS series if you need to refresh your memory before adding new users.
In our specific case, we will use the following alias as explained before (add the following line in /etc/aliases).
sysadmin: gacanepa, jdoe
And run the following command to create or refresh the aliases lookup table.
postalias /etc/postfix/aliases
So that messages sent to [email protected] will be delivered to the inbox of the users listed above.
Configuring Postfix – The SMTP Service
The main configuration file for Postfix is /etc/postfix/main.cf. You only need to set up a few parameters before being able to use the mail service. However, you should become acquainted with the full configuration parameters (which can be listed with man 5 postconf) in order to set up a secure and fully customized mail server.
Note: That this tutorial is only supposed to get you started in that process and does not represent a comprehensive guide on email services with Linux.
Open /etc/postfix/main.cf file with your choice of editor and do following changes as explained.
# vi /etc/postfix/main.cf
1. myorigin specifies the domain that appears in messages sent from the server. You may see the /etc/mailname file used with this parameter. Feel free to edit it if needed.
myorigin = /etc/mailname
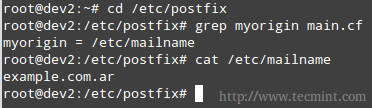
If the value above is used, mails will be sent as [email protected], where user is the user sending the message.
2. mydestination lists what domains this machine will deliver email messages locally, instead of forwarding to another machine (acting as a relay system). The default settings will suffice in our case (make sure to edit the file to suit your environment).

Where the /etc/postfix/transport file defines the relationship between domains and the next server to which mail messages should be forwarded. In our case, since we will be delivering messages to our local area network only (thus bypassing any external DNS resolution), the following configuration will suffice.
example.com.ar    local:
.example.com.ar    local:
Next, we need to convert this plain text file to the .db format, which creates the lookup table that Postfix will actually use to know what to do with incoming and outgoing mail.
# postmap /etc/postfix/transport
You will need to remember to recreate this table if you add more entries to the corresponding text file.
3. mynetworks defines the authorized networks Postfix will forward messages from. The default value, subnet, tells Postfix to forward mail from SMTP clients in the same IP subnetworks as the local machine only.
mynetworks = subnet

4. relay_domains specifies the destinations to which emails should be sent to. We will leave the default value untouched, which points to mydestination. Remember that we are setting up a mail server for our LAN.
relay_domains = $mydestination
Note that you can use $mydestination instead of listing the actual contents.

5. inet_interfaces defines which network interfaces the mail service should listen on. The default, all, tells Postfix to use all network interfaces.
inet_interfaces = all

6. Finally, mailbox_size_limit and message_size_limit will be used to set the size of each user’s mailbox and the maximum allowed size of individual messages, respectively, in bytes.
mailbox_size_limit = 51200000
message_size_limit = 5120000
Restricting Access to the SMTP Server
The Postfix SMTP server can apply certain restrictions to each client connection request. Not all clients should be allowed to identify themselves to the mail server using the smtp HELO command, and certainly not all of them should be granted access to send or receive messages.
To implement these restrictions, we will use the following directives in the main.cf file. Though they are self-explanatory, comments have been added for clarification purposes.
# Require that a remote SMTP client introduces itself with the HELO or EHLO command before sending the MAIL command or other commands that require EHLO negotiation.
smtpd_helo_required = yes

# Permit the request when the client IP address matches any network or network address listed in $mynetworks
# Reject the request when the client HELO and EHLO command has a bad hostname syntax
smtpd_helo_restrictions = permit_mynetworks, reject_invalid_helo_hostname

# Reject the request when Postfix does not represent the final destination for the sender address
smtpd_sender_restrictions = permit_mynetworks, reject_unknown_sender_domain

# Reject the request unless 1) Postfix is acting as mail forwarder or 2) is the final destination
smtpd_recipient_restrictions = permit_mynetworks, reject_unauth_destination
The Postfix configuration parameters postconf page may come in handy in order to further explore the available options.
Configuring Dovecot
Right after installing dovecot, it supports out-of-the-box for the POP3 and IMAP protocols, along with their secure versions, POP3S and IMAPS, respectively.
Add the following lines in /etc/dovecot/conf.d/10-mail.conf file.
# %u represents the user account that logs in
# Mailboxes are in mbox format
mail_location = mbox:~/mail:INBOX=/var/mail/%u
# Directory owned by the mail group and the directory set to group-writable (mode=0770, group=mail)
# You may need to change this setting if postfix is running a different user / group on your system
mail_privileged_group = mail
If you check your home directory, you will notice there is a mail subdirectory with the following contents.
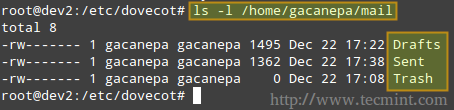
Also, please note that the /var/mail/%u file is where the user’s mails are store on most systems.
Add the following directive to /etc/dovecot/dovecot.conf (note that imap and pop3 imply imaps and pop3s as well).
protocols = imap pop3
And make sure /etc/conf.d/10-ssl.conf includes the following lines (otherwise, add them).
ssl_cert = </etc/dovecot/dovecot.pem
ssl_key = </etc/dovecot/private/dovecot.pem
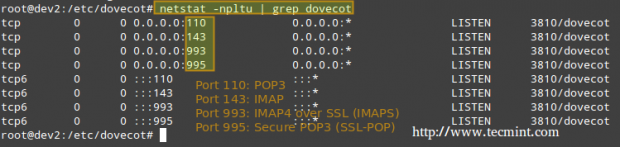
Now let’s restart Dovecot and verify that it listens on the ports related to imap, imaps, pop3, and pop3s.
# netstat -npltu | grep dovecot
Setting Up a Mail Client and Sending/Receving Mails
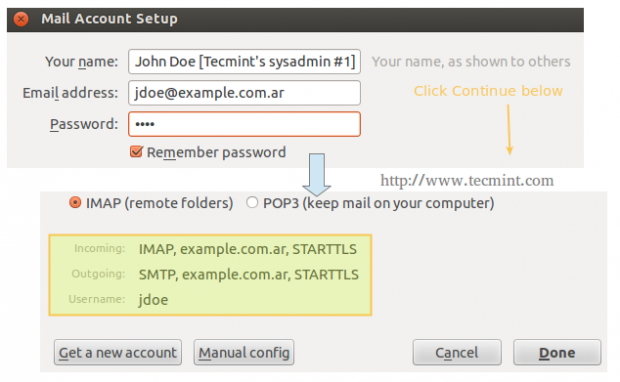
On our client computer, we will open Thunderbird and click on File → New → Existing mail account. We will be prompted to enter the name of the account and the associated email address, along with its password. When we click Continue, Thunderbird will then try to connect to the mail server in order to verify settings.
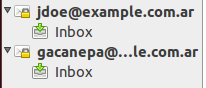
Repeat the process above for the next account ([email protected]) and the following two inboxes should appear in Thunderbird’s left pane.
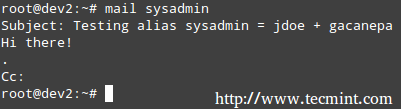
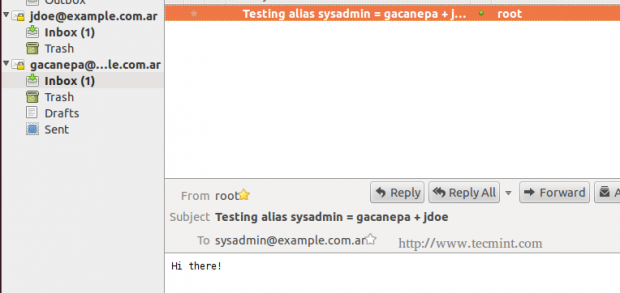
On our server, we will write an email message to sysadmin, which is aliased to jdoe and gacanepa.
The mail log (/var/log/mail.log) seems to indicate that the email that was sent to sysadmin was relayed to [email protected] and [email protected], as can be seen in the following image.

We can verify if the mail was actually delivered to our client, where the IMAP accounts were configured in Thunderbird.
Finally, let’s try to send a message from [email protected] to [email protected].
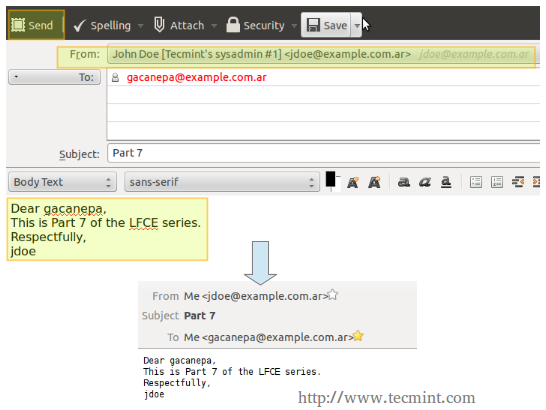
In the exam you will be asked to work exclusively with command-line utilities. This means you will not be able to install a desktop client application such as Thunderbird, but will be required to use mail instead. We have used Thunderbird in this chapter for illustrative purposes only.
Conclusion
In this post we have explained how to set up an IMAP mail server for your local area network and how to restrict access to the SMTP server. If you happen to run into an issue while implementing a similar setup in your testing environment, you will want to check the online documentation of Postfix and Dovecot (specially the pages about the main configuration files, /etc/postfix/main.cf and /etc/dovecot/dovecot.conf, respectively), but in any case do not hesitate to contact me using the comment form below. I will be more than glad to help you.


Hi Gabriel, Are required nameserver records not already pre-configured like in Red Hat exams?
Hello, I followed your guide but there is no mail folder at /home/username
The operating system is CentOS 7
The mail folder for each user is locate at /var/spool/mail/
How can i make my smpt server to only handle email sent to the” schools.dr.server” domain?
@rcty,
Look up the mydestination parameter in http://www.postfix.org/postconf.5.html#mydestination. Best of luck!
This guide is not complete, the whole SSL (encyption) setup is missing.
@drpaneas,
As per the documentation,
protocols = imap pop3in /etc/dovecot/dovecot.conf implies imaps and pop3s as well. Also, adding the certificate and key is explained in this guide.
Could you give me information about the smtp authentication? Thanks
@Johnni21,
Please refer to the Postfix docs as mentioned in this guide. If you have a specific question, please let us know.
You have shown thunderbird configuration which requires authentication of IMAP and SMTP. Please explain how you have achieved this e.g. Have you used SASL and if so can you add configuration steps to this guide?
Another very easy way to restrict access to SMTP is via /etc/postfix/access
Also during the configuration section “And make sure /etc/conf.d/10-ssl.conf” should be “And make sure /etc/dovecot/conf.d/10-ssl.conf
Thanks
@Chris,
Thank you for bringing this to our attention. We have corrected this in the write-up. Please note we used Thunderbird for illustrative purposes only. In the exam you will not be required to install a desktop client application. You can restrict the access to the server as explained in this article.
I was looking your guide to the email server configuration, but I have a doubt. In postfix you are no using any authentication mechanism.
To enable authentication in postfix I use:
smtpd_sasl_auth_enable = yes
smtpd_sasl_security_options = noanonymous
broken_sasl_auth_clients = yes
smtpd_recipient_restrictions =
permit_sasl_authenticated,
permit_mynetworks,
reject_unauth_destination
smtpd_sasl_type = dovecot
smtpd_sasl_path = private/auth
If I want to use TLS I add:
smtpd_tls_cert_file = /etc/pki/tls/certs/mail.pem
smtpd_tls_session_cache_database = btree:/var/spool/postfix/smtpd_tls_cache
smtpd_tls_security_level = may
I don’t really know if this is what the examen ask.
Please update “/etc/conf.d/10-ssl.conf” under “Configuring Dovecot” section. It should be “/etc/dovecot/conf.d/10-ssl.conf”.
Great tutorials! :)
Hi,
“grep mydestination main.cf” or similar is fine, but why not to use “postconf -n| grep mydestination”?
@Aleksei,
Feel free to use either command. Thank you for sharing another option!
Hi Gabriel, it’s grate article. I take LFCE Exam in next Friday. Could You post some tips about Routing IP Traffic Statically and Dynamically on Iptables Firewall? For dynamic routing I’m using only quagga.
@Marcin,
If everything goes as planned, I will be sending Part 10 of this series (which covers the topics you mention) next Wednesday at around 9 pm UTC -03:00. Hope that will give you enough time to review it in preparation for your exam. Please stay tuned, and kindly take a couple of minutes after your exam with your feedback as to whether these tutorials were relevant in your preparation. That will be most appreciated.
Hmm, I think I just leave You information, how was on my exam :) It started on 01/02/2015 at 10 am :)
(for those who are confused): I don’t think the term “Dynamically” refers to dynamic routing such as OSPF etc (that falls under pure “networking” exams), I had a doubt in the begginging so I confirmed this with Linux Foundation and I got an email that the exam does not include dynamic routing protocol, but hey, feel free to send them an email to clear your confusion.
So then what does ‘dynamic routing’ in the LFCE context actually mean, if it does not mean protocols like RIP, OSPF, BGP ?
Frank ,I agree the term dynamic (in the required competencies) is very confusing and it usually (elsewhere and in books) points to the dynamic protocols but that can itself be a huge thing to cover (which is why I clarified this with LF before taking the exam). I believe it requires that you are able to create static routes (e.g. ip route add) and make sure (extremely important!) that those routes persist across reboots. But I would suggest anyone having doubts to send LF an email as they will be happy to clarify it. Hope this helps
@birdman,
I can confirm that your understanding about dynamic and static routing in the context of the LFCE exam is correct.