In this tutorial we’ll learn how to install and configure Cacti network monitoring tool in the latest version of Debian and Ubuntu 16.04 LTS. Cacti will be build and installed from source files during this guide.
Cacti is an open source monitoring tool created for monitoring networks, especially network devices, such as switches, routers, servers via SNMP protocol. Cacti interacts with end-users and can be administered via a web tool interface.
Requirements
Step 1: Install and Configure Prerequisites for Cacti
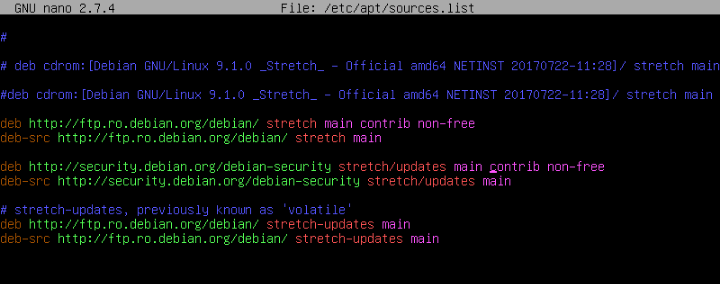
1. In Debian 9, open sources list file for editing and add the contrib and non-free repositories to the file by changing the following lines:
# nano /etc/apt/sources.list
Add following lines to sources.list file.
deb http://ftp.ro.debian.org/debian/ stretch main contrib non-free
deb-src http://ftp.ro.debian.org/debian/ stretch main

deb http://security.debian.org/debian-security stretch/updates main contrib non-free
deb-src http://security.debian.org/debian-security stretch/updates main
2. Afterwards, make sure to update the system by issuing the below command.
# apt update
# apt upgrade
3. In your LAMP stack make sure the following PHP extensions are present in the system.
# apt install php7.0-snmp php7.0-xml php7.0-mbstring php7.0-json php7.0-gd php7.0-gmp php7.0-zip php7.0-ldap php7.0-mcrypt
4. Next, edit PHP configuration file and change the time zone setting to match your server’s physical location, by issuing the below command.
# echo "date.timezone = Europe/Bucharest" >> /etc/php/7.0/apache2/php.ini
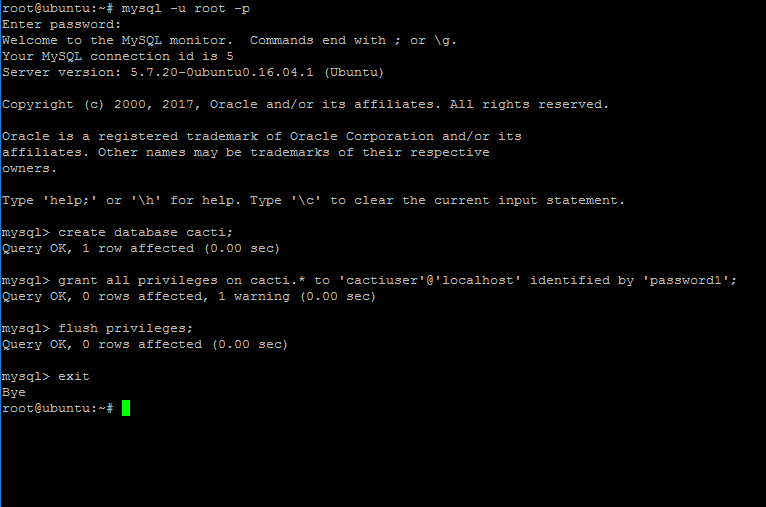
5. Next, log in to MariaDB or MySQL database from your LAMP stack installation and create a database for installing Cacti by issuing the following commands.
Replace cacti database name, user and password to match your own configurations and choose a strong password for cacti database.
# mysql -u root -p
mysql> create database cacti;
mysql> grant all on cacti.* to 'cactiuser'@'localhost' identified by 'password1';
mysql> flush privileges;
mysql> exit
6. Also, issue the below commands to allow cacti user select permissions to MySQL data.timezone setting by issuing the below commands.
# mysql -u root -p mysql < /usr/share/mysql/mysql_test_data_timezone.sql
# mysql -u root -p -e 'grant select on mysql.time_zone_name to cactiuser@localhost'
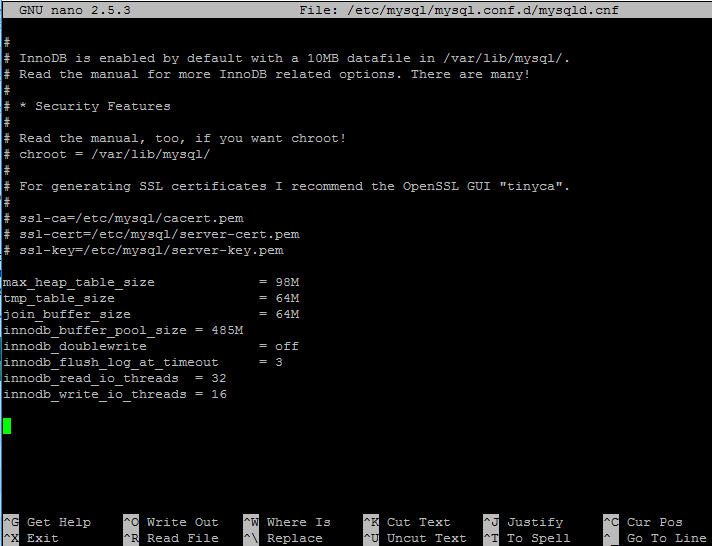
7. Next, open MySQL server configuration file and add the following lines at the end of the file.
# nano /etc/mysql/mariadb.conf.d/50-server.cnf [For MariaDB]
# nano /etc/mysql/mysql.conf.d/mysqld.cnf      [For MySQL]
Add the following lines to the end of the 50-server.cnf or mysqld.cnf file.
max_heap_table_size		= 98M
tmp_table_size			= 64M
join_buffer_size		= 64M
innodb_buffer_pool_size	= 485M
innodb_doublewrite		= off
innodb_flush_log_at_timeout	= 3
innodb_read_io_threads	= 32
innodb_write_io_threads	= 16
For MariaDB database also add the following line to the end of the 50-server.cnf file:
innodb_additional_mem_pool_size = 80M
8. Finally, restart MySQL and Apache services to apply all settings and verify both services status by issuing the following commands.
# systemctl restart mysql apache2
# systemctl status mysql apache2
Step 2: Download and Prepare Cacti Installation
9. Start install Cacti from sources by downloading and extracting the latest version of Cacti archive and copy all the extract files to Apache web document root, by issuing the following commands.
# wget https://www.cacti.net/downloads/cacti-latest.tar.gz
# tar xfz cacti-latest.tar.gz
# cp -rf cacti-1.1.27/* /var/www/html/
10. Remove index.html file from /var/www/html directory, create the Cacti log file and grant Apache with write permissions to web root path.
# rm /var/www/html/index.html
# touch /var/www/html/log/cacti.log
# chown -R www-data:www-data /var/www/html/
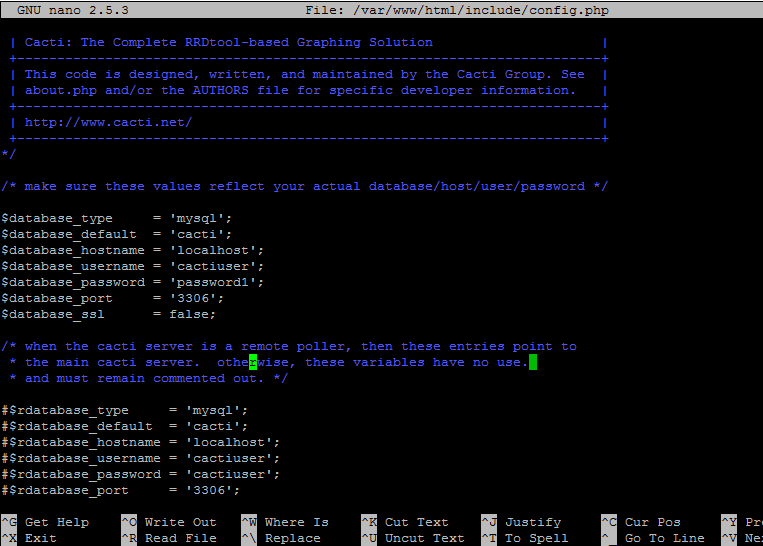
11. Next, edit cacti configuration file and modify the following lines as shown in the below example.
# nano /var/www/html/include/config.php
Cacti config.php file sample. Replace cacti database name, user and password accordingly.
$database_type     = 'mysql';
$database_default  = 'cacti';
$database_hostname = 'localhost';
$database_username = 'cactiuser';
$database_password = 'password1;
$database_port     = '3306';
$database_ssl      = false;
$url_path = '/';
12. Next, populate cacti database with the cacti.sql script from /var/www/html/ directory by issuing the below command.
# mysql -u cactiuser cacti -p < /var/www/html/cacti.sql
13. Now install some additional resources, as Cacti engine collects devices data via the SNMP protocol and displays graphics by using RRDtool. Install all of them by issuing following command.
# apt install snmp snmpd snmp-mibs-downloader rrdtool
14. Verify if SNMP service is up and running by restarting snmpd daemon by issuing the below command. Also check the snmpd daemon status and its open ports.
# systemctl restart snmpd.service
# systemctl status snmpd.service
# ss -tulpn| grep snmp
Step 3: Download and Install Cacti-Spine
15. Cacti-Spine is a C written replacement for the default cmd.php poller. Cacti-Spine provides a faster execution time. To compile Cacti-Spine pooler from sources install the below required dependencies in your system.
---------------- On Debian 9 ----------------
# apt install build-essential dos2unix dh-autoreconf help2man libssl-dev libmysql++-dev librrds-perl libsnmp-dev libmariadb-dev libmariadbclient-dev

---------------- On Ubuntu ----------------
# apt install build-essential dos2unix dh-autoreconf help2man libssl-dev libmysql++-dev  librrds-perl libsnmp-dev libmysqlclient-dev libmysqld-dev
16. After you’ve installed the above dependencies, download the latest version of Cacti-Spine archive, extract the tarball and compile cacti-spine by issuing the following series of commands.
# wget https://www.cacti.net/downloads/spine/cacti-spine-latest.tar.gz
# tar xfz cacti-spine-latest.tar.gz
# cd cacti-spine-1.1.27/
17. Compile and install Cacti-Spine from sources by issuing the following commands.
# ./bootstrap
# ./configure
# make
# make install
18. Next, make sure spine binary is owned by root account and set the suid bit for the spine utility by running the following commands.
# chown root:root /usr/local/spine/bin/spine
# chmod +s /usr/local/spine/bin/spine
19. Now, edit Cacti Spine configuration file and add the cacti database name, user and password to the Spine conf file as illustrated in the below example.
# nano /usr/local/spine/etc/spine.conf
Add following configuration to spine.conf file.
DB_Host localhost
DB_Database cacti
DB_User cactiuser
DB_Pass password1
DB_Port 3306
DB_PreG 0
Step 4: Cacti Installation Wizard Setup
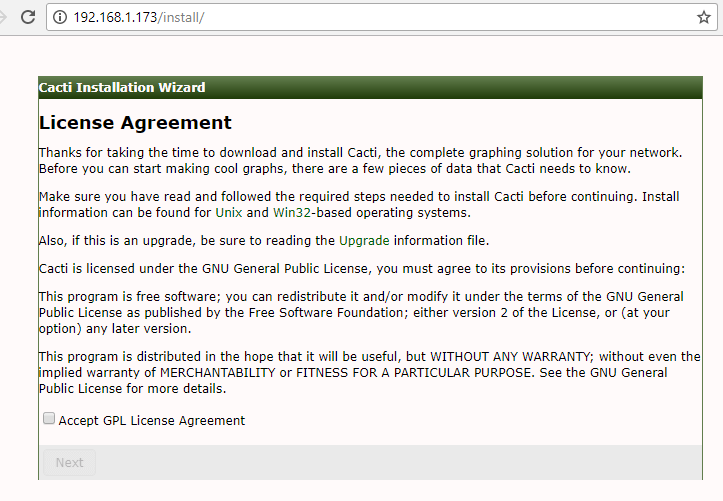
20. To install Cacti, open a browser and navigate to your system IP address or domain name at the following URL.
http://your_IP/install
First, check Acept License Agreement and hit on the Next button to continue.
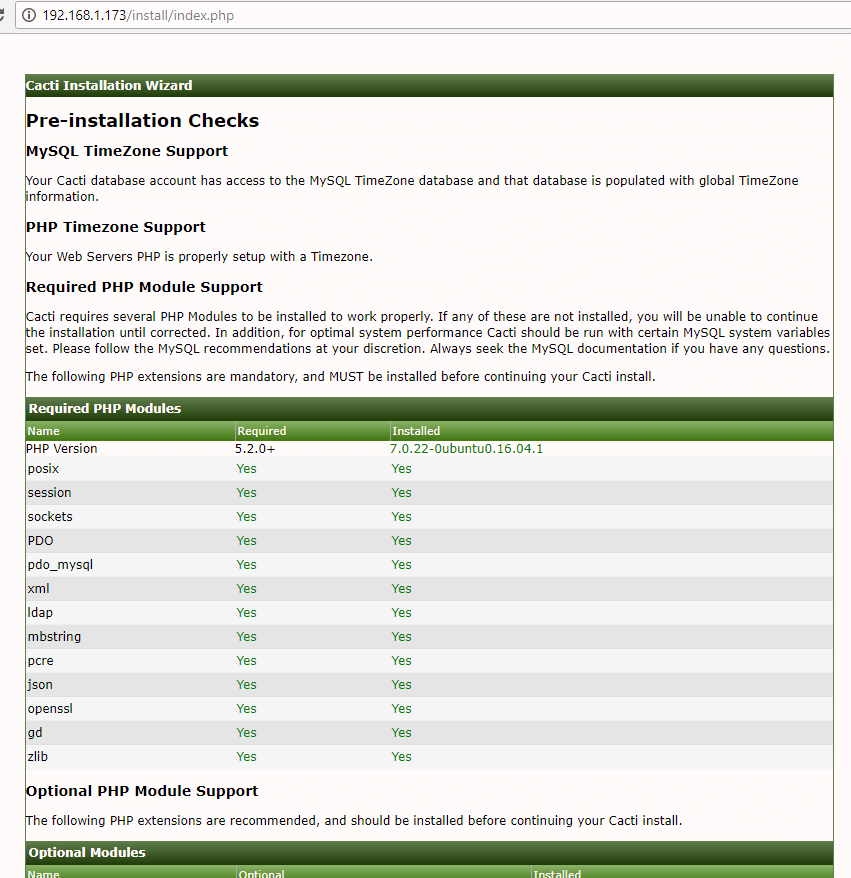
21. Next, check if system requirements and hit Next button to continue.
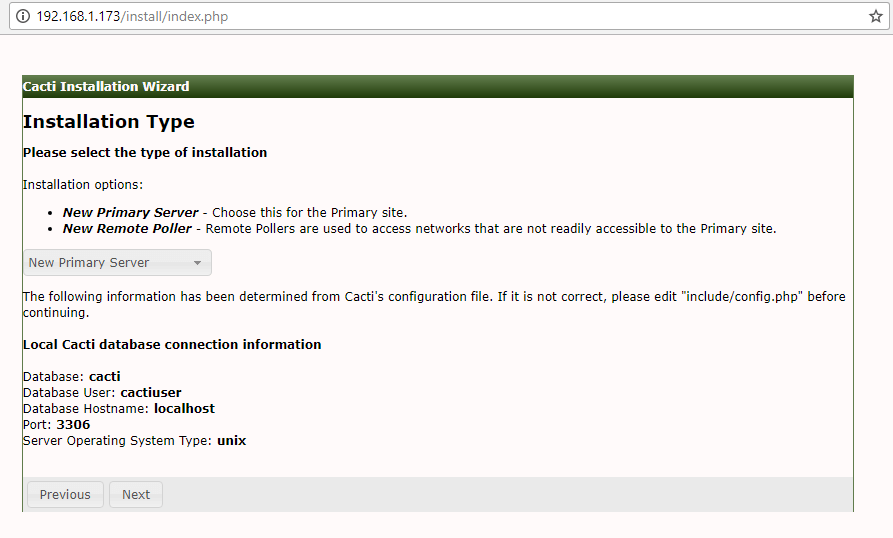
22. In the next window, select New Primary Server and hit on Next button to continue.
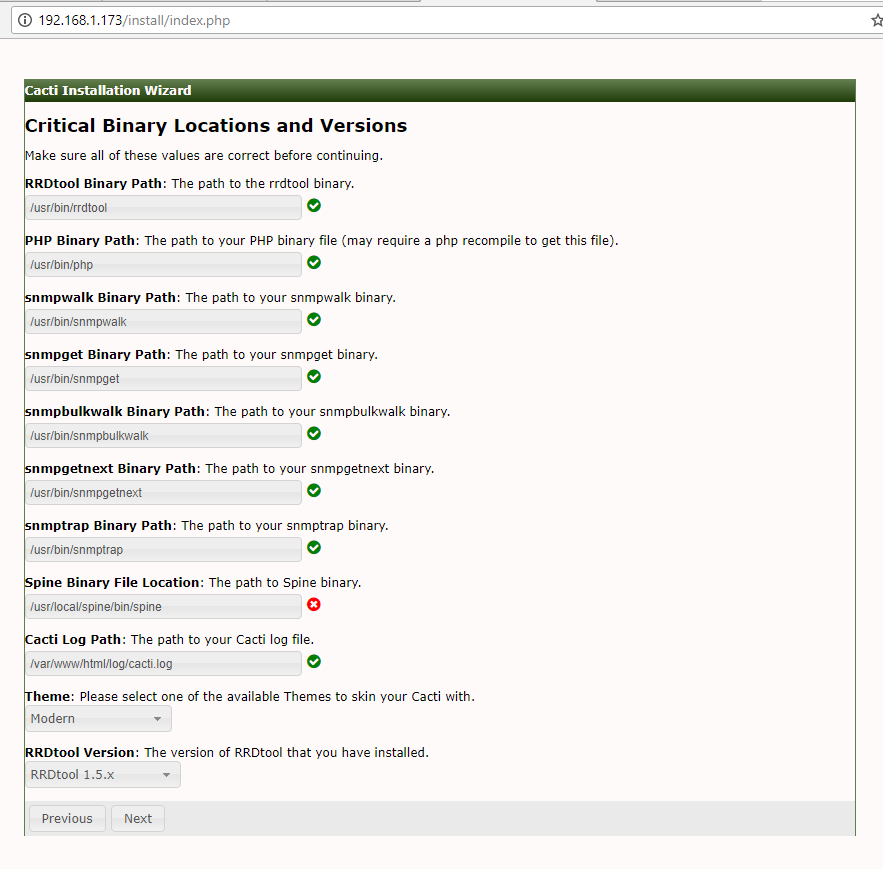
23. Next, verify critical binary locations and versions and change Spine binary path to /usr/local/spine/bin/spine. When you finish, hit Next button to continue.
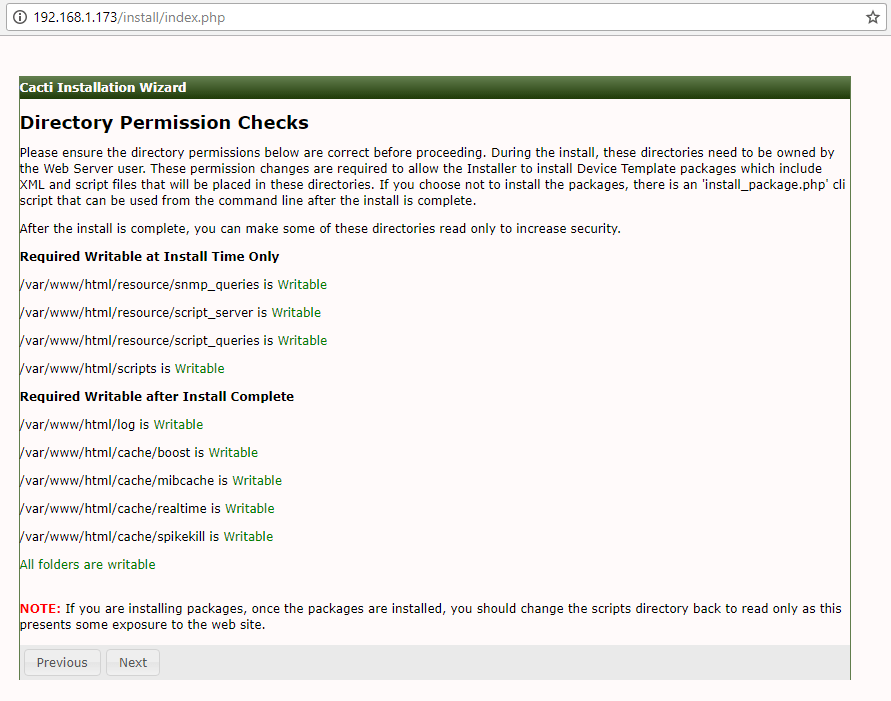
24. Next, check if all web server directory permissions are in place (write permissions are set) and hit on Next button to continue.
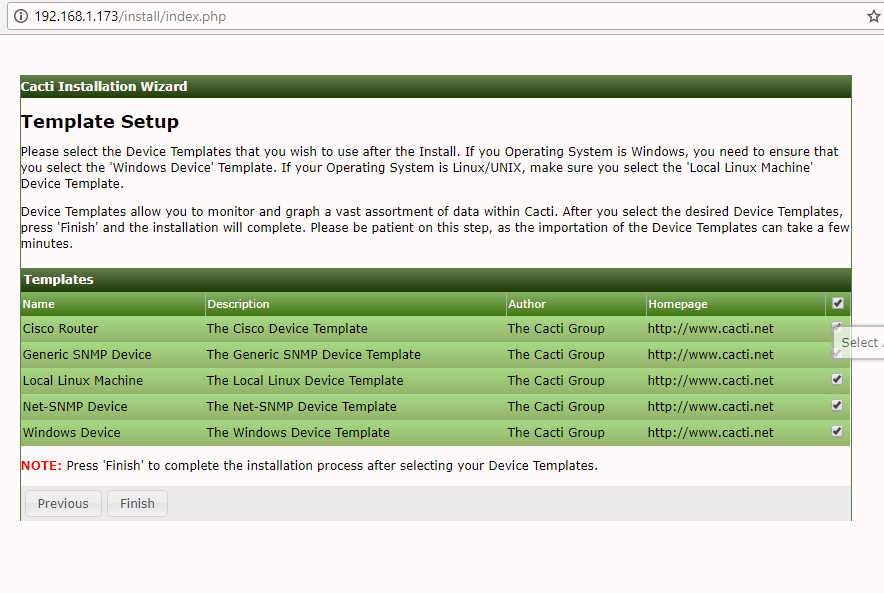
25. On the next step check all the templates and hit on Finish button in order to finish the installation process.
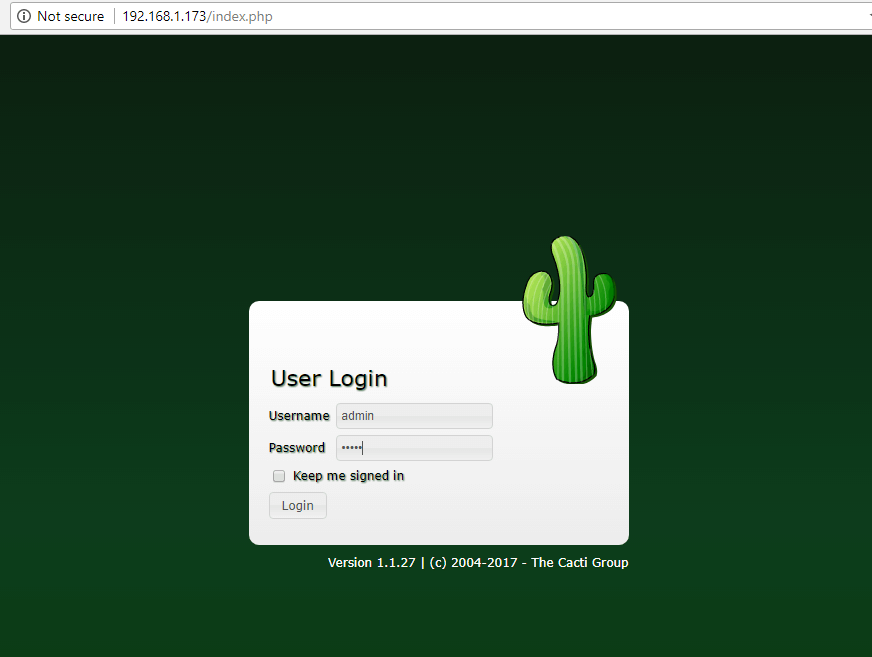
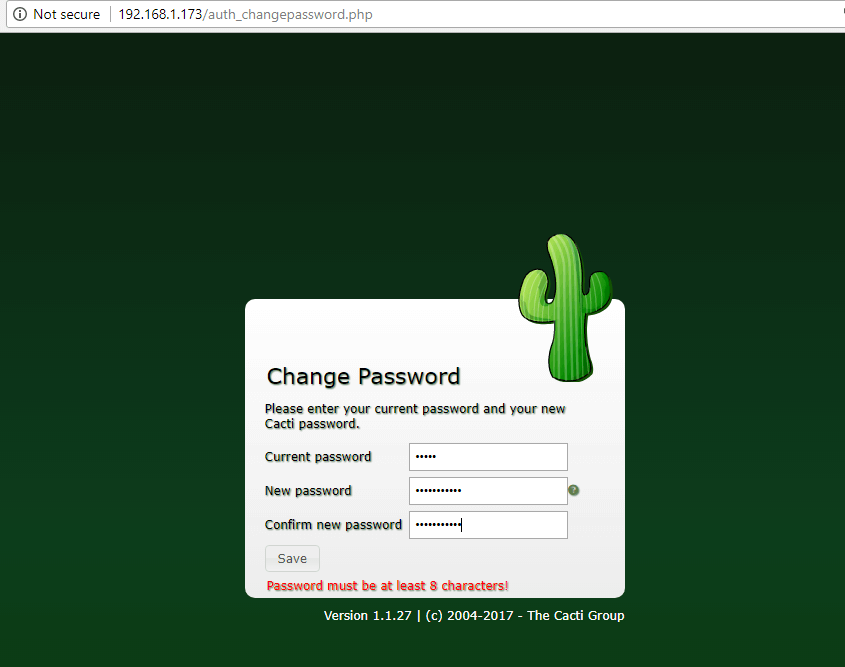
26. Log in to Cacti web interface with the default credentials shown below and change the admin password, as illustrated in the following screenshots.
Username: admin
Password: admin
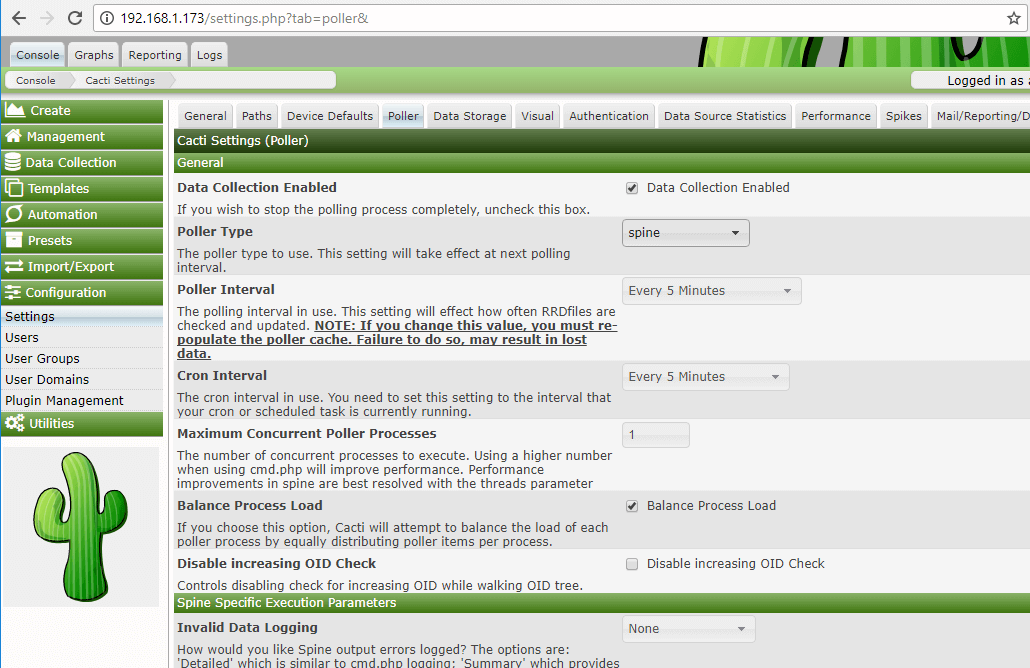
27. Next, go to Console -> Configuration -> Settings -> Poller and change the Poller Type from cmd.php to Spine binary and scroll down to Save button to save the configuration.
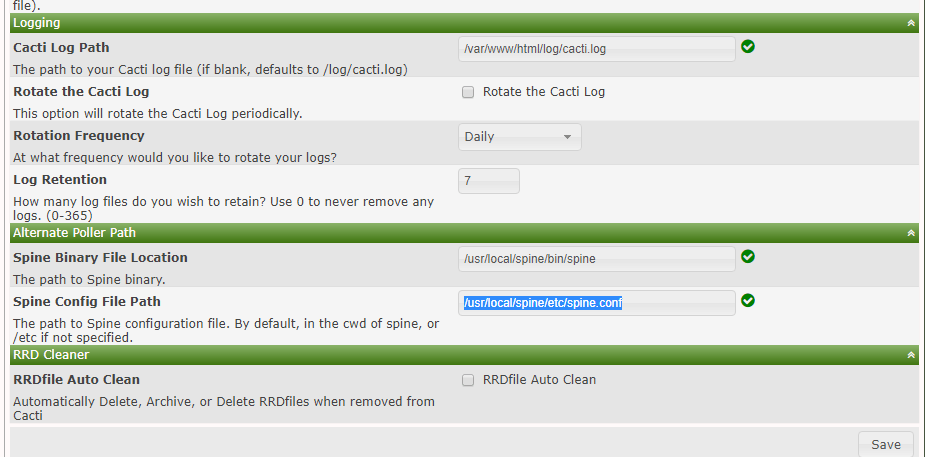
28. Then, go to Console -> Configuration -> Settings -> Paths and add the following path to Cacti-Spine configuration file:
/usr/local/spine/etc/spine.conf
Hit on Save button to apply configuration.
29. The final setup which enables Cacti poller to start collecting data from monitored devices is to add a new crontab task in order to query each device via SNMP every 5 minutes.
The crontab job must be owned by www-data account.
# crontab -u www-data -e
Add Cron file entry:
*/5 * * * * /usr/bin/php /var/www/html/poller.php
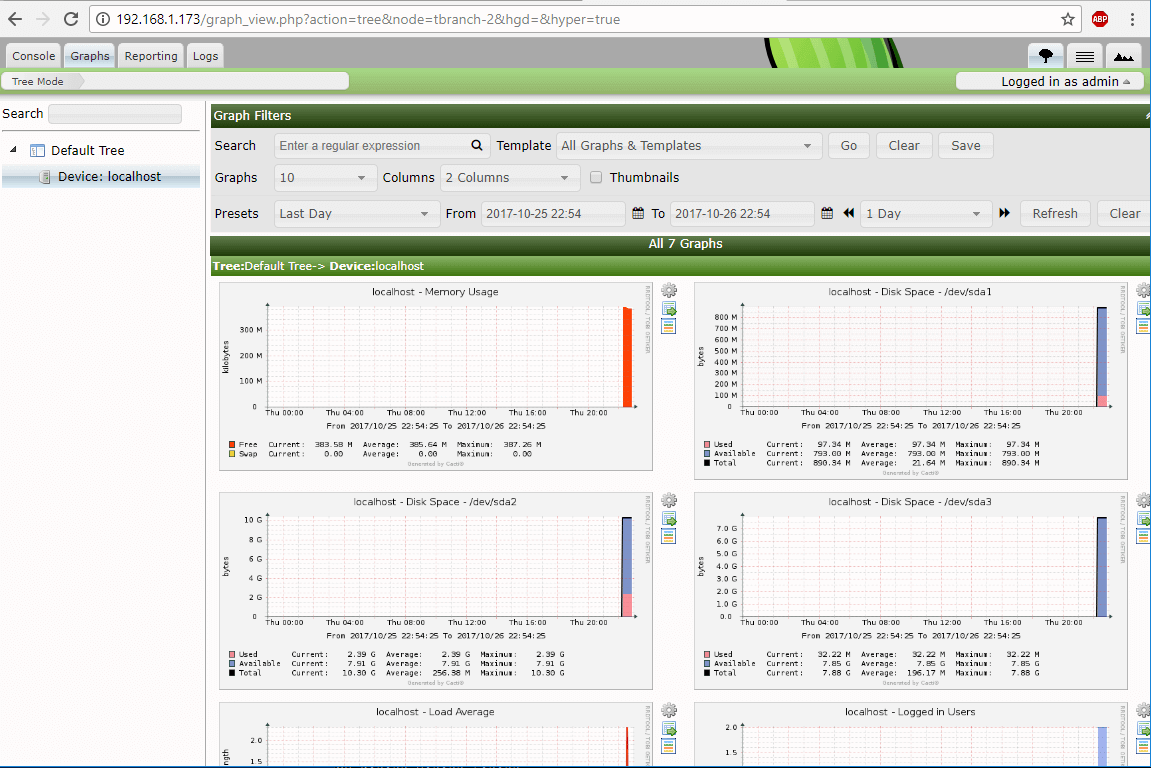
30. Wait a few minutes for Cacti to collect data and go to the Graphs -> Default Tree and you should see the graphs collected for your monitored devices.
That’s all! You have successfully installed and configured Cacti with Cacti-Spine pooler, from sources, in the latest release of Debian 9 and Ubuntu 16.04 LTS server.


It is not working for ubuntu 18, you have to update this tutorial its make peoples confused.
@Modahda,
We will update the article with the latest instructions, till then stay tuned for updates…
Matel,
Awesome instructions. Thank you.
We wanted to upgrade our older Cacti to a newer version. I am no expert on Cacti or Linux (Debian 9 or 10), but I am learning fast. I performed a MySQL export of all databases from the old Cacti server. I built the new Cacti onto a Debian 9U3 server per the above instructions.
I imported the Cacti database. When caused an upgrade when logging in, expected. The upgrade completed with no errors. We have all of our graph templates, but none of them are showing anything graph wise in the templates.
Can you by any chance take an educated guess at what I may have missed?
Hi, thanks for your helpful article.
When installing cacti, I go the following errors. Please advise what to do? help me ?
Loaded plugins: fastestmirror
Loading mirror speeds from cached hostfile
* base: mirror.idealhosting.net.tr
* epel: mirror.ps.kz
* extras: mirror.idealhosting.net.tr
* remi-safe: remi.mirrors.arminco.com
* updates: mirror.ni.net.tr
* webtatic: uk.repo.webtatic.com
Resolving Dependencies
–> Running transaction check
—> Package cacti.noarch 0:1.1.38-2.el7 will be installed
–> Processing Dependency: php(language) >= 5.4 for package: cacti-1.1.38-2.el7.noarch
–> Processing Dependency: php-zlib for package: cacti-1.1.38-2.el7.noarch
–> Processing Dependency: php-xml for package: cacti-1.1.38-2.el7.noarch
–> Processing Dependency: php-spl for package: cacti-1.1.38-2.el7.noarch
–> Processing Dependency: php-sockets for package: cacti-1.1.38-2.el7.noarch
–> Processing Dependency: php-snmp for package: cacti-1.1.38-2.el7.noarch
–> Processing Dependency: php-simplexml for package: cacti-1.1.38-2.el7.noarch
–> Processing Dependency: php-session for package: cacti-1.1.38-2.el7.noarch
–> Processing Dependency: php-reflection for package: cacti-1.1.38-2.el7.noarch
–> Processing Dependency: php-posix for package: cacti-1.1.38-2.el7.noarch
–> Processing Dependency: php-pdo_mysql for package: cacti-1.1.38-2.el7.noarch
–> Processing Dependency: php-pdo for package: cacti-1.1.38-2.el7.noarch
–> Processing Dependency: php-pcntl for package: cacti-1.1.38-2.el7.noarch
–> Processing Dependency: php-openssl for package: cacti-1.1.38-2.el7.noarch
–> Processing Dependency: php-mbstring for package: cacti-1.1.38-2.el7.noarch
–> Processing Dependency: php-ldap for package: cacti-1.1.38-2.el7.noarch
–> Processing Dependency: php-json for package: cacti-1.1.38-2.el7.noarch
–> Processing Dependency: php-intl for package: cacti-1.1.38-2.el7.noarch
–> Processing Dependency: php-imap for package: cacti-1.1.38-2.el7.noarch
–> Processing Dependency: php-iconv for package: cacti-1.1.38-2.el7.noarch
–> Processing Dependency: php-gd for package: cacti-1.1.38-2.el7.noarch
–> Processing Dependency: php-filter for package: cacti-1.1.38-2.el7.noarch
–> Processing Dependency: php-dom for package: cacti-1.1.38-2.el7.noarch
–> Processing Dependency: php-date for package: cacti-1.1.38-2.el7.noarch
–> Processing Dependency: php-ctype for package: cacti-1.1.38-2.el7.noarch
–> Processing Dependency: httpd for package: cacti-1.1.38-2.el7.noarch
–> Processing Dependency: /usr/bin/php for package: cacti-1.1.38-2.el7.noarch
–> Processing Dependency: /usr/bin/php for package: cacti-1.1.38-2.el7.noarch
–> Finished Dependency Resolution
Error: Package: cacti-1.1.38-2.el7.noarch (epel)
Requires: php-iconv
Error: Package: cacti-1.1.38-2.el7.noarch (epel)
Requires: php-spl
Error: Package: cacti-1.1.38-2.el7.noarch (epel)
Requires: php-pdo_mysql
Error: Package: cacti-1.1.38-2.el7.noarch (epel)
Requires: php-json
Error: Package: cacti-1.1.38-2.el7.noarch (epel)
Requires: php-intl
Error: Package: cacti-1.1.38-2.el7.noarch (epel)
Requires: php-posix
Error: Package: cacti-1.1.38-2.el7.noarch (epel)
Requires: php-snmp
Error: Package: cacti-1.1.38-2.el7.noarch (epel)
Requires: php-filter
Error: Package: cacti-1.1.38-2.el7.noarch (epel)
Requires: php-openssl
Error: Package: cacti-1.1.38-2.el7.noarch (epel)
Requires: php-xml
Error: Package: cacti-1.1.38-2.el7.noarch (epel)
Requires: php-sockets
Error: Package: cacti-1.1.38-2.el7.noarch (epel)
Requires: php-session
Error: Package: cacti-1.1.38-2.el7.noarch (epel)
Requires: php-mbstring
Error: Package: cacti-1.1.38-2.el7.noarch (epel)
Requires: php-simplexml
Error: Package: cacti-1.1.38-2.el7.noarch (epel)
Requires: php-imap
Error: Package: cacti-1.1.38-2.el7.noarch (epel)
Requires: php-reflection
Error: Package: cacti-1.1.38-2.el7.noarch (epel)
Requires: php-ctype
Error: Package: cacti-1.1.38-2.el7.noarch (epel)
Requires: php-pdo
Error: Package: cacti-1.1.38-2.el7.noarch (epel)
Requires: php(language) >= 5.4
Error: Package: cacti-1.1.38-2.el7.noarch (epel)
Requires: /usr/bin/php
Error: Package: cacti-1.1.38-2.el7.noarch (epel)
Requires: php-ldap
Error: Package: cacti-1.1.38-2.el7.noarch (epel)
Requires: php-gd
Error: Package: cacti-1.1.38-2.el7.noarch (epel)
Requires: php-pcntl
Error: Package: cacti-1.1.38-2.el7.noarch (epel)
Requires: httpd
Error: Package: cacti-1.1.38-2.el7.noarch (epel)
Requires: php-zlib
Error: Package: cacti-1.1.38-2.el7.noarch (epel)
Requires: php-date
Error: Package: cacti-1.1.38-2.el7.noarch (epel)
Requires: php-dom
You could try using –skip-broken to work around the problem
You could try running: rpm -Va –nofiles –nodigest
@benyamin,
Please remove all third-party Yum repositories and install Cacti from default repositories..
How to remove all, please give the command?
@Benyamin,
Use following command to remove Webtatic, EPEL and Remi repository.
Hello I have an error during installation: Please update config.php with the correct relative URI location of Cacti (url_path). How to fix
debian_version 9.4
Cacti version cacti-1.1.38
Thank you very much, Matei.
Not wanting to abuse, do you have some tutorial to install the Cacti Monitor and Wethermap plugins?
You should check Apache error log file to debug the problem.
Hi Matei,
Many thanks for this article, very helpful. Please help me step 21 (Preinstalltion checks) on my installation comes back with a blank page and nothing happens, no error message that I could see. What could I have done wrong? Did I miss some stage or step? Would be grateful for your help.