iperf3 is a free open-source, cross-platform command-line-based program for performing real-time network throughput measurements. It is one of the most powerful tools for testing the maximum achievable bandwidth in IP networks (supports IPv4 and IPv6).
With iperf, you can tune several parameters associated with timing, buffers, and protocols such as TCP, UDP, and SCTP. It comes in handy for network performance tuning operations.
In order to acquire maximum or rather improved network performance, you need to increase the throughput as well as the latency of your network’s receiving and sending capabilities.
However, before you can go into actual tuning, you need to perform some tests to gather overall network performance statistics that will guide your tuning process.
Its results include time interval in seconds, data transferred, bandwidth (transfer rate), loss, and other useful network performance parameters. It is primarily intended to assist in tuning TCP connections over a particular path and this is what we will focus on in this guide.
Requirements:
- Two networked computers which both have iperf3 installed.
How to Install iPerf3 in Linux Systems
Before you start using iperf3, you need to install it on the two machines you will use for benchmarking. Since iperf3 is available in the official software repositories of most common Linux distributions, installing it should be easy, using a package manager as shown.
$ sudo apt install iperf3         [On Debian, Ubuntu and Mint]
$ sudo yum install iperf3         [On RHEL/CentOS/Fedora and Rocky/AlmaLinux]
$ sudo emerge -a net-misc/iperf   [On Gentoo Linux]
$ sudo apk add iperf3             [On Alpine Linux]
$ sudo pacman -S iperf3           [On Arch Linux]
$ sudo zypper install iperf3      [On OpenSUSE]
Once you have iperf3 installed on both machines, you can start testing network throughput.
How to Test Network Speed Between Two Linux Servers
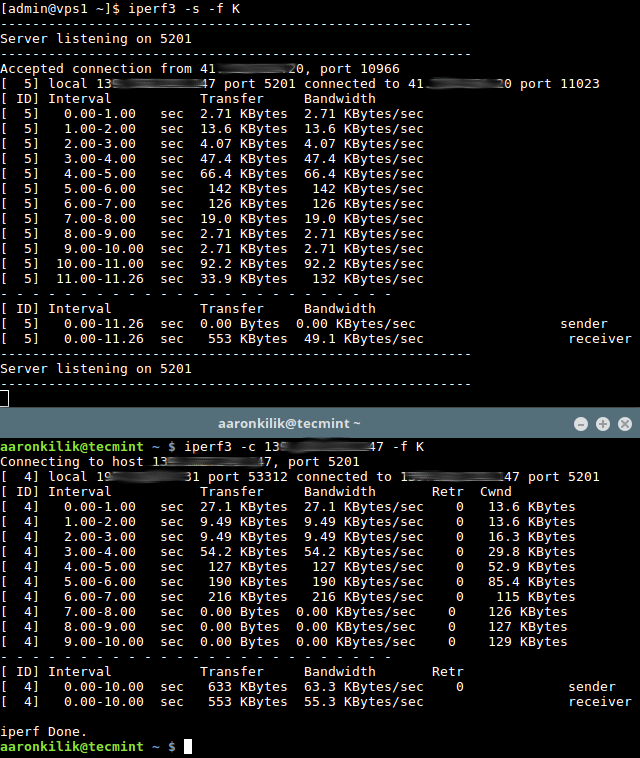
First, connect to the remote machine which you will use as the server, and fire up iperf3 in server mode using -s flag, it will listen to port 5201 by default.
You can specify the format (k, m, g for Kbits, Mbits, Gbits or K, M, G for KBytes, Mbytes, Gbytes) to report in, using the -f switch as shown.
$ iperf3 -s -f K
If port 5201 is being used by another program on your server, you can specify a different port (e.g 3000) using the -p switch as shown.
$ iperf3 -s -p 3000
Optionally, you can run the server as a daemon, using the -D flag and write server messages to a log file, as follows.
$ iperf3 -s -D > iperf3log
Then on your local machine which we will treat as the client (where the actual benchmarking takes place), run iperf3 in client mode using -c flag and specify the host on which the server is running (either using its IP address or domain or hostname).
$ iperf3 -c 192.168.10.1 -f K
After about 18 to 20 seconds, the client should terminate and produce results indicating the average throughput for the benchmark, as shown in the following screenshot.
How to Perform Advanced Network Test Throughput in Linux
There are a number of client-specific options for performing an advanced test, as explained below.
One of the important factors that determine the amount of data in the network at a given time is the TCP window size – it is important in tuning TCP connections. You can set the window size/socket buffer size using the -w flag as shown.
$ iperf3 -c 192.168.10.1 -f K -w 500K
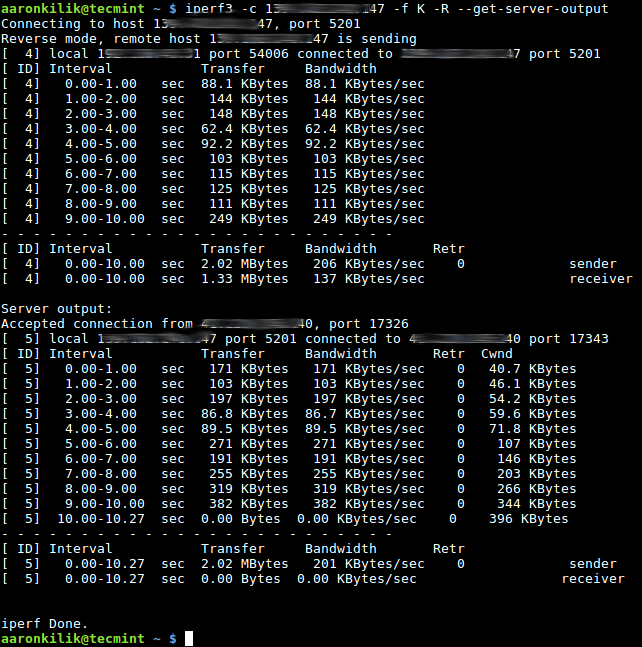
To run it in reverse mode where the server sends and the client receives, add the -R switch.
$ iperf3 -c 192.168.10.1 -f K -w 500K -R
To run a bi-directional test, meaning you measure bandwidth in both directions simultaneously, use the -d option.
$ iperf3 -c 192.168.10.1 -f K -w 500K -d
If you want to get server results in the client output, use the --get-server-output option.
$ iperf3 -c 192.168.10.1 -f K -w 500K -R --get-server-output
It is also possible to set the number of parallel client streams (two in this example), which run at the same time, using the -P options.
$ iperf3 -c 192.168.10.1 -f K -w 500K -P 2
For more information, see the iperf3 man page.
$ man iperf3
That’s all! Remember to always perform network performance tests before going for actual network performance tuning. iperf3 is a powerful tool, that comes in handy for running network throughput tests.
Do you have any thoughts to share or questions to ask, use the comment form below.


I love the way you guys explain the concepts, tools, and the sequence. This is the one and only place I come to for any Linux issues or to understand concepts.
Command line error: for a bi-directional test, `iperf3` uses `–bidir` while `iperf` uses `-d`.
Your 1 link per Performance Tuning: jumps to other networking tools. “Not” the actual TCP/UDP tuning.
What is in need is actual and proper TCP/UDP tuning tips on correctly setting one Linux Interface to maximize the actual Throughput performance pt-pt regarding 100meg 1gig 2.5gig and 10g networking achievement. With many of the /etc/sysctl.conf set empty with respect to the vehicle for setting outside Kernel /proc/TCP feature.
It is a hard search to find the correct documentation for one to set Test and find the actual settings one can load into /etc/sysctl.conf to get the maximum transfer speeds per file transfer.
Be helpful to some simple examples using some of the tools “IPerf3” and such to help those help themselves obtain these results on their own home and necessary networks. Something of such Document would be GOLD for all Seekers to such accurate information, and not the jump here and there to nothing.
We’re advanced enough with all this tech. Out of box experience provides “Nothing” Nor does any Distro provide information to Tweek Tune their own OS for these Parameter features to enrich that out-of-box experience.
“Just a penny toss” Food for thought…
I had never encountered iperf3 before today. But we have to log a cluster soak test, and iperf works as either a server or a client against a server. So I set up a server on one of the four clients and then run iperf clients out of cronjobs on all four clients. Only the cronjobs fire at random or silently fail. I don’t work out why until I’ve been fiddling for 3 hours. Hours I should have been doing something else.
tldr; iperf is serial only not parallel, if you stagger the cronjobs, they all work, if they fire at the same time, only one of them will, at random. Caveat Emptor.
How to verify using the client on the same Platform?
“You should write. For example test servers at
https://iperf.cc”6 Servers tested, all busy, giving up. Don’t update the article with this junk ;-)
typo errors — iperf 3. Should remove that space. Also, when using different port besides the default, you need to specify the port on the client-side also.
Example:
Server side
iperf3 -s -p 8021Client side
iperf3 -c 10.10.1.11 -p 8021 -f KProblem with iperf3 is if I’m testing a connection with a temporary IP number (needed for the testing purpose) iperf would delete the temporary IP number as soon as I started it. So the test can never run.
Thanks for the article..
I have one question the output of IPerf3 shows the amount of bandwidth. so how can we determine the throughput? since these two terms (bandwidth and throughput) are different.
Regards
You should write “iperf3” instead of “iperf 3” (this first one is right, but not the other six)
@Cyril
Okay, this is correct, thanks.
Still, you did not correct the article? Why?
@Daniele,
Corrected the commands in the article. Sorry for delay…
You should write also that possible to use any test iperf server to measure speed. For example test servers at https://iperf.cc
@John
Many thanks for sharing this, we will update the article with this information.