Firewalld provides a way to configure dynamic firewall rules in Linux that can be applied instantly, without the need of firewall restart and also it support D-BUS and zone concepts which makes configuration easy.
Firewalld replaced old Fedora’s firewall (Fedora 18 onwards) mechanism, RHEL/CentOS 7 and other latest distributions rely on this new mechanism. One of the biggest motive of introducing new firewall system is that the old firewall needs a restart after making each change, thus breaking all active connections. As said above, that the latest firewalld supports dynamic zones which is useful in configuring different set of zones and rules for your office or home network via a command line or using a GUI method.
Initially, firewalld concept looks very difficult to configure, but services and zones makes it easier by keeping both together as covered in this article.
In our earlier article, where we have seen how to play with firewalld and its zones, now here, in this article, we will see some useful firewalld rules to configure your current Linux systems using command line way.
All the examples covered in this article are practically tested on CentOS 7 distribution, and also works on RHEL and Fedora distributions.
Before implementing firewalld rules, make sure to first check whether firewalld service enabled and running.
# systemctl status firewalld

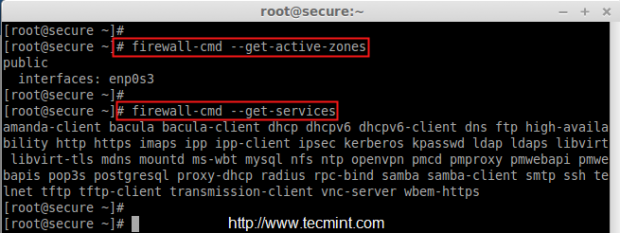
The above picture shows that firewalld is active and running. Now it’s time to check all the active zones and active services.
# firewall-cmd --get-active-zones
# firewall-cmd --get-services
If incase, you’re not familiar with command line, you can also manage firewalld from the GUI, for this you need to have GUI package installed on the system, if not install it using the following command.
# yum install firewalld firewall-config
As said above, this article is specially written for command line lovers and all the examples, which we’re going to cover are based on command line only, no GUI way..sorry…..
Before moving further, first make sure to confirm on which public zone you’re going to configure Linux firewall and list all active services, ports, rich rules for public zone using following command.
# firewall-cmd --zone=public --list-all
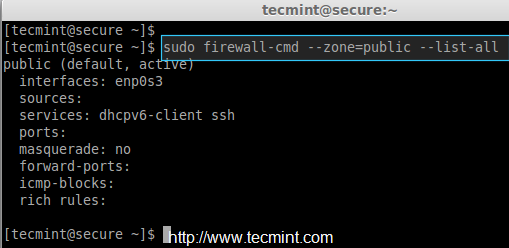
In the above picture, there isn’t any active rules are added yet, let’s see how to add, remove and modify rules in the remaining part of this article….
1. Adding and Removing Ports in Firewalld
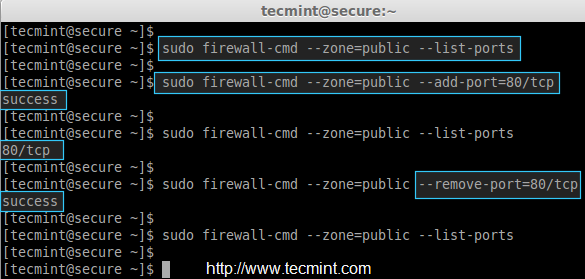
To open any port for public zone, use the following command. For example, the following command will open port 80 for public zone.
# firewall-cmd --permanent --zone=public --add-port=80/tcp
Similarly, to remove added port, just use the ‘–remove‘ option with firewalld command as shown below.
# firewall-cmd --zone=public --remove-port=80/tcp
After adding or removing specific ports, make sure to confirm whether the port is added or removed by using ‘–list-ports‘ option.
# firewall-cmd --zone=public --list-ports
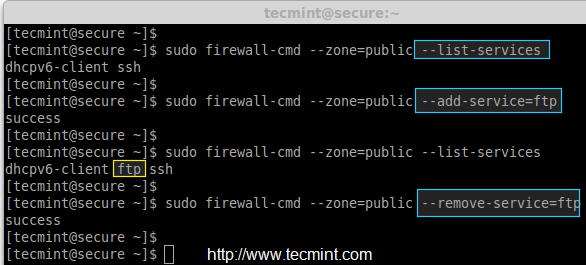
2. Adding and Removing Services in Firewalld
By default firewalld comes with pre-defined services, if you want to add a list of specific services, you need to create a new xml file with all services included in the file or else you can also define or remove each service manually by running following commands.
For example, the following commands will help you to add or remove specific services, like we did for FTP here in this example.
# firewall-cmd --zone=public --add-service=ftp
# firewall-cmd --zone=public --remove-service=ftp
# firewall-cmd --zone=public --list-services
3. Block Incoming and Outgoing Packets (Panic Mode)
If you wish to block any incoming or outgoing connections, you need to use a ‘panic-on‘ mode to block such requests. For example, the following rule will drop any existing established connection on the system.
# firewall-cmd --panic-on
After enabling panic mode, try to ping any domain (say google.com) and check whether the panic mode is ON using ‘–query-panic‘ option as listed below.
# ping google.com -c 1
# firewall-cmd --query-panic
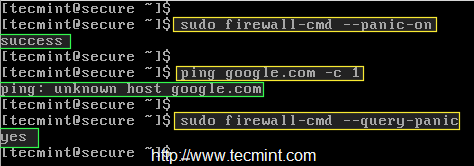
Do you see in the above picture, the panic query says “Unknown host google.com“. Now try to disable the panic mode and then once again ping and check.
# firewall-cmd --query-panic
# firewall-cmd --panic-off
# ping google.com -c 1
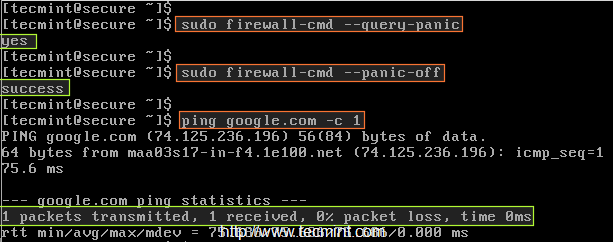
Now this time, there will be a ping request from google.com..


Hi, I want to know if I could add certain I.P.s (approx 5 I.P.s) to access my Linux Server using SSH so that no one except those I.P.s would be able to access the server. I don’t want to use rich-rule. How can I do that?
My server is RHEL 7.4.
Hi Naushad,
Yes, you can add alias IP for a single NIC, or you can add those individual IP for separate NIC’s to access the server. Kindly follow below article for the same requirement.
https://www.tecmint.com/create-multiple-ip-addresses-to-one-single-network-interface/
Thanks & Regards,
Babin Lonston
Thanks Babin ..
Babin,
I followed the url you have provided in your above comment. Looking at that I think I was not able to brief my problem.
Actually I have a Linux server on a network. I have 100s of other computers (running windows) on the same network. All of them can access my server but I want to allow only 5 I.P.s (i.e. 5 other computers) which are on the same network to access my Linux server using ssh. So I want to set up a firewall-cmd rule so that apart from those 5 I.P.s no one on the network would be able to access my Linux server. How can I do that?
Once again thanks for your earlier response.
@Naushad,
We assume your 5 IP’s are in 192.168.1.x range.
Thanks & Regards,
Babin Lonston
Thanks Babin for your kind response. Now I have got it. Doing this will automatically block all the other users except those which are added by add- source option, right?
But I didn’t get why I need to remove my interface.
Sure, I understand your requirement now.
To achieve this, you can use the firewall-cmd command to configure the firewall rules on your Linux server.
Here’s how you can set it up to allow only specific IP addresses to access your server via SSH:
Replace ‘IP_ADDRESS_1’, ‘IP_ADDRESS_2’, etc., with the actual IP addresses you want to allow SSH access from. Also, replace ‘NOT_IP_ADDRESS_1’, ‘NOT_IP_ADDRESS_2’, etc., with the IP addresses you want to block.
After executing these commands, only the specified IP addresses will be able to access your Linux server via SSH, while all other connections will be rejected by the firewall. Make sure to adjust the rules according to your specific requirements.
Is it possible to add networks like 172.5.0.0/24?
@Oppa,
yes you can add for network range. 172.5.0.x is a network.
Yes, you can certainly add networks in CIDR notation like ‘172.5.0.0/24’ to the firewall rules.
Here’s how you would modify the commands to allow SSH access from a specific network range:
Just replace ‘IP_ADDRESS_1’, ‘IP_ADDRESS_2’, etc., with the specific IP addresses you want to allow SSH access from, or replace ‘172.5.0.0/24’ with the desired network range.
All other connections will be rejected by the firewall.
Note that fail2ban does not monitor any services by default, so simply installing it will achieve nothing without configuring it.
Observo que se hace referencia al bloqueo de un IP pero lo único que se bloquea es el acceso a servidor sin embargo pueden navegar al internet usando como puerta de enlace el servidor.
¿ Cuál sería la forma de bloquear un IP para que no navegue a través del servidor?.
============
I note that referred to the blockade of IP, but the only thing that is blocking access to server but can browse the internet using Gateway as the server.
What would be the way to block an IP to not navigate through the server ?.
@Christian
I don’t understand what your requirement can you please make it little more clear.
Thanks a million for your really great tutorials.
Although I am having a problem blocking ICMP . I get ‘yes’‘, that means there is a icmp block applied, and it’s enabled. However, when I –zone e=external –list-all there are no entries for icmp-blocks: (empty).
Using Fedora 21 Workstation. Thanks again for your invaluable articles.