Net-filter as we all know it’s a firewall in Linux. Firewalld is a dynamic daemon to manage firewalls with support for network zones. In the earlier version, RHEL & CentOS we have been using iptables as a daemon for packet filtering framework.
In newer versions of RHEL-based distributions such as Fedora, Rocky Linux, CentOS Stream, AlmaLinux, and openSUSE – the iptables interface is being replaced by firewalld.
It’s recommended to start using Firewalld instead of iptables as this may discontinue in the future. However, iptables are still supported and can be installed with the yum command. We can’t keep Firewalld and iptables both in the same system which may lead to conflict.
In iptables, we used to configure as INPUT, OUTPUT & FORWARD CHAINS but here in Firewalld, the concept uses Zones. By default, there are different zones available in firewalld, which will be discussed in this article.
The basic zones are public zone and private zone. To make things work around with these zones, we need to add the interface with the specified zone support and then we can add the services to firewalld.
By default, there are many services available, one of the best features of firewalld is, it comes with pre-defined services and we can take these services as an example to add our services by simply copying them.
Firewalld works great with IPv4, IPv6, and Ethernet bridges too. We can have a separate run-time and permanent configuration in firewalld.
Let’s get started on how to work with zones and create our own services and much more exciting usage of firewalld in Linux.
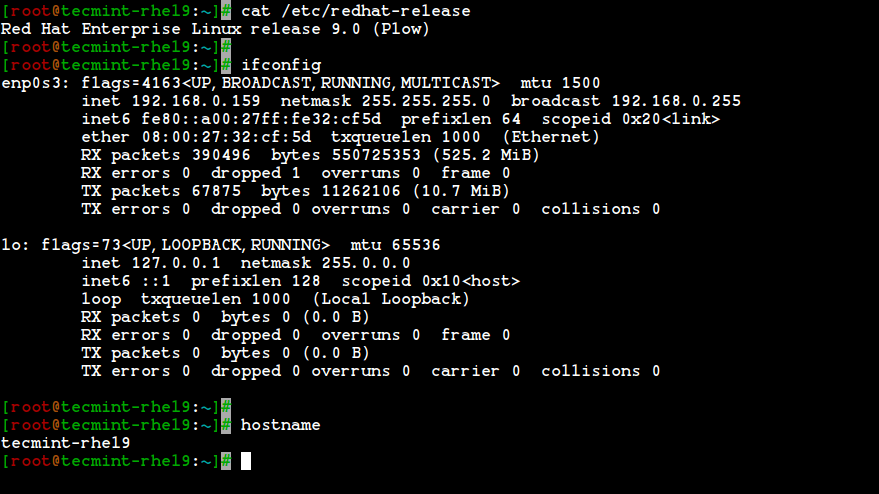
Our Testing Environment
Operating System :	Red Hat Enterprise Linux release 9.0 (Plow)
IP Address       :	192.168.0.159
Host-name	:	tecmint-rhel9
Step 1: Installing Firewalld in RHEL-based Systems
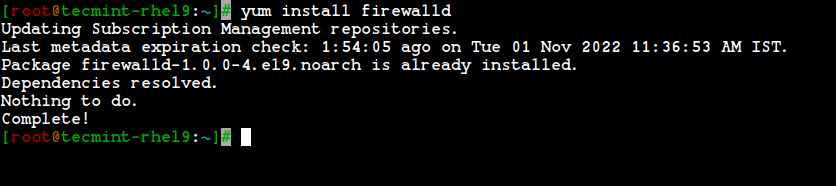
1. Firewalld package is installed by default in RHEL, Fedora, Rocky Linux, CentOS Stream, AlmaLinux, and openSUSE. If not, you can install it using the following yum command.
# yum install firewalld -y
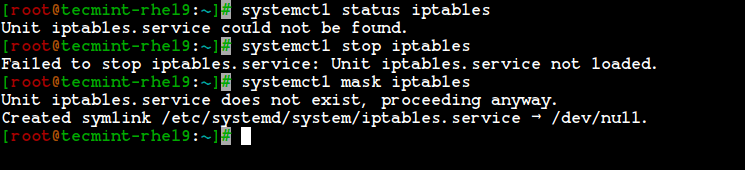
2. After the firewalld package has been installed, it’s time to verify whether the iptables service is running or not, if running, you need to stop and mask (not use anymore) the iptables service with the below commands.
# systemctl status iptables
# systemctl stop iptables
# systemctl mask iptables
Step 2: Understanding Firewalld Components (Zones and Rules)
3. Before heading up for firewalld configuration, I would like to discuss each zones. By default, there are some zones available. We need to assign the interface to the zone. A zone defines the zone that was trusted or denied level to the interface to get a connection. A zone can contain services & ports.
Here, we’re going to describe each zones available in Firewalld.
- Drop Zone: Any incoming packets are dropped if we use a drop zone. This is the same as we use to add iptables -j drop. If we use the drop rule, means there is no reply, only outgoing network connections will be available.
- Block Zone: Block zone will deny the incoming network connections are rejected with an icmp-host-prohibited. Only established connections within the server will be allowed.
- Public Zone: To accept the selected connections we can define rules in the public zone. This will only allow the specific port to open in our server other connections will be dropped.
- External Zone: This zone will act as router options with masquerading is enabled other connections will be dropped and will not accept, and only specified connections will be allowed.
- DMZ Zone: If we need to allow access to some of the services to the public, you can define it in the DMZ zone. This too has the feature of only selected incoming connections being accepted.
- Work Zone: In this zone, we can define only internal networks i.e. private network traffic is allowed.
- Home Zone: This zone is specially used in home areas, we can use this zone to trust the other computers on networks to not harm your computer as in every zone. This too allows only the selected incoming connections.
- Internal Zone: This one is similar to the work zone with selected allowed connections.
- Trusted Zone: If we set the trusted zone all the traffic is accepted.
Now you have got a better idea about zones, now let’s find out available zones, and default zones, and list all zones using the following commands.
List Firewalld Zones
# firewall-cmd --get-zones

List Firewalld Default Zone
# firewall-cmd --get-default-zone

List All Firewalld Zones
# firewall-cmd --list-all-zones
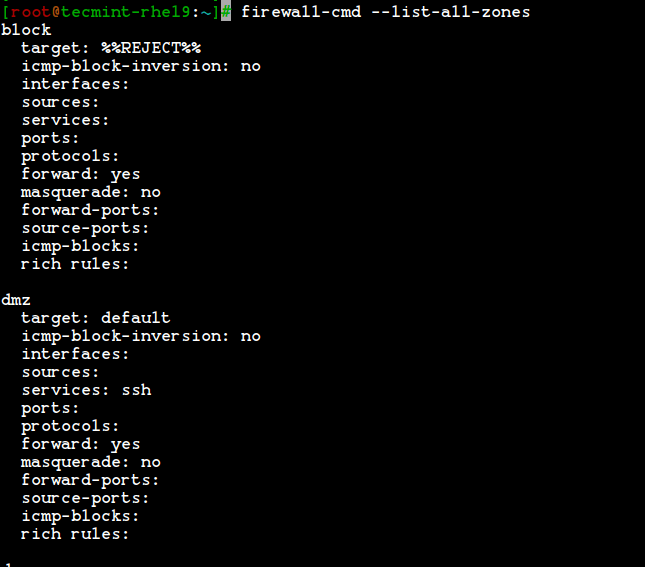
Note: The output of the above command won’t fit into a single page as this will list every zones like block, dmz, drop, external, home, internal, public, trusted, and work. If the zones have any rich rules, enabled services or ports will be also listed with those respective zone information.
Step 3: Setting Default Firewalld Zone
4. If you would like to set the default zone as internal, external, drop, work, or any other zone, you can use the below command to set the default zone. Here we use the “internal” zone as default.
# firewall-cmd --set-default-zone=internal
5. After setting the zone, verify the default zone using the below command.
# firewall-cmd --get-default-zone

6. Here, our Interface is enp0s3, If we need to check the zone in which the interface is bounded we can use the below command.
# firewall-cmd --get-zone-of-interface=enp0s3

7. Another interesting feature of firewalld is that ‘icmptype‘ is one of the icmp types supported by firewalld. To get the listing of supported icmp types we can use the below command.
# firewall-cmd --get-icmptypes

Step 4: Creating Own Services in Firewalld
8. Services are a set of rules with ports and options which is used by Firewalld. Services that are enabled, will be automatically loaded when the Firewalld service is up and running.
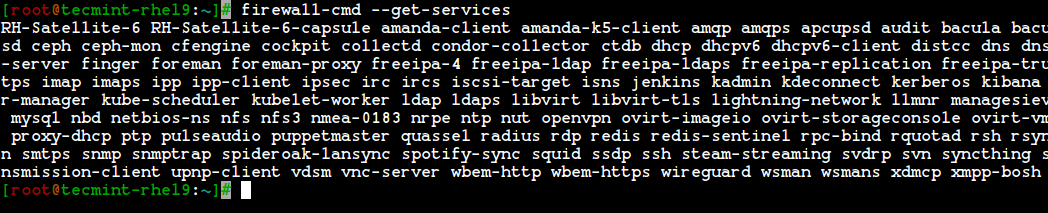
By default, many services are available, to get the list of all available services, use the following command.
# firewall-cmd --get-services
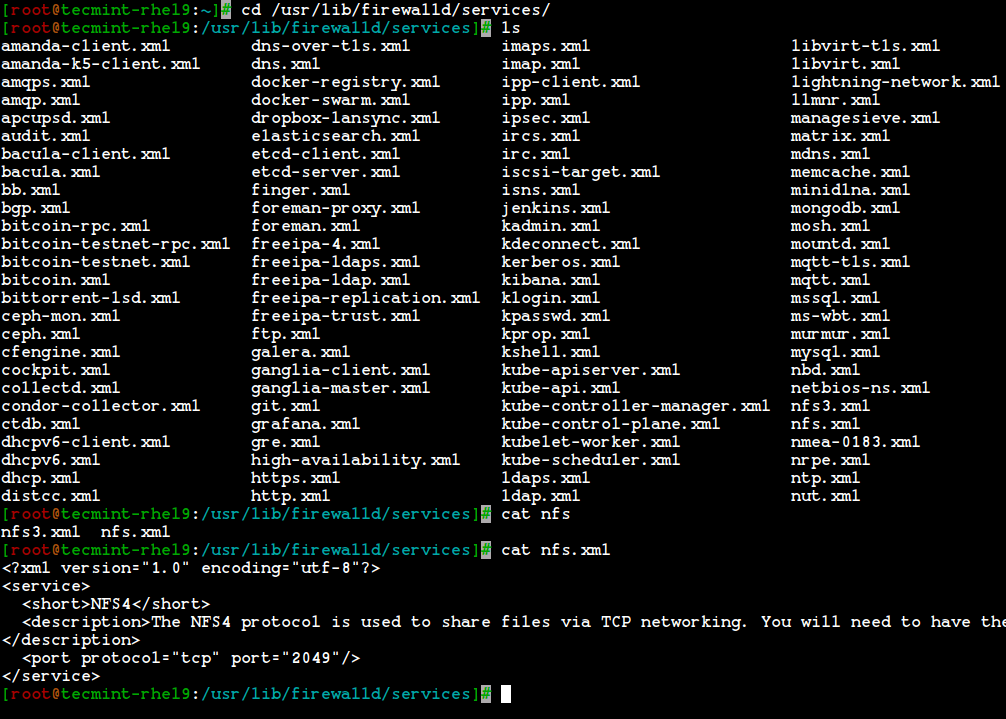
9. To get the list of all the default available services, go to the following directory, here you will get the list of services.
# cd /usr/lib/firewalld/services/
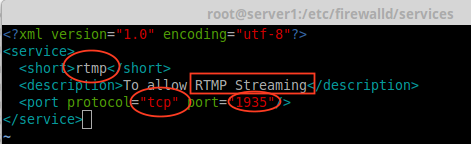
10. To create your own service, you need to define it at the following location. For example, here I want to add a service for RTMP port 1935, first make a copy of any one of the services.
# cd /etc/firewalld/services/
# cp /usr/lib/firewalld/services/ssh.xml /etc/firewalld/services/
And then, navigate to the location where our service file was copied, next rename the file ‘ssh.xml‘ to ‘rtmp.xml‘ as shown in the below picture.
# cd /etc/firewalld/services/
# mv ssh.xml rtmp.xml
# ls -l rtmp.xml

11. Next open and edit the file as Heading, Description, Protocol, and Port number, which we need to use for the RTMP service as shown in the below picture.
12. To make these changes activate, restart the firewalld service, or reload the settings.
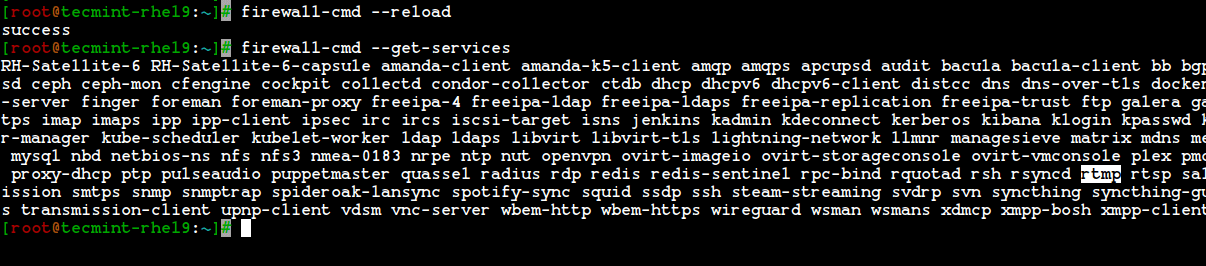
# firewall-cmd --reload
13. To confirm, whether a service is added or not, run the below command to get a list of services available.
# firewall-cmd --get-services
Step 5: Assigning Services to Firewalld Zones
14. Here we are going to see how to manage the firewall using the firewall-cmd command. To know the current state of the firewall and all active zones, type the following command.
# firewall-cmd --state
# firewall-cmd --get-active-zones
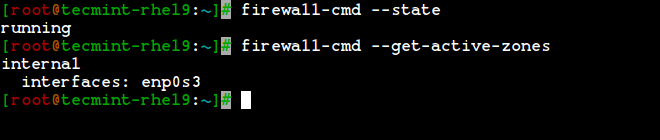
15. To get the public zone for interface enp0s3, this is the default interface, which is defined in /etc/firewalld/firewalld.conf file as DefaultZone=public.
To list all available services in this default interface zone.
# firewall-cmd --get-service
Step 6: Adding Services to Firewalld Zones
16. In the above examples, we have seen how to create our own services by creating the rtmp service, here we will see how to add the rtmp service to the zone as well.
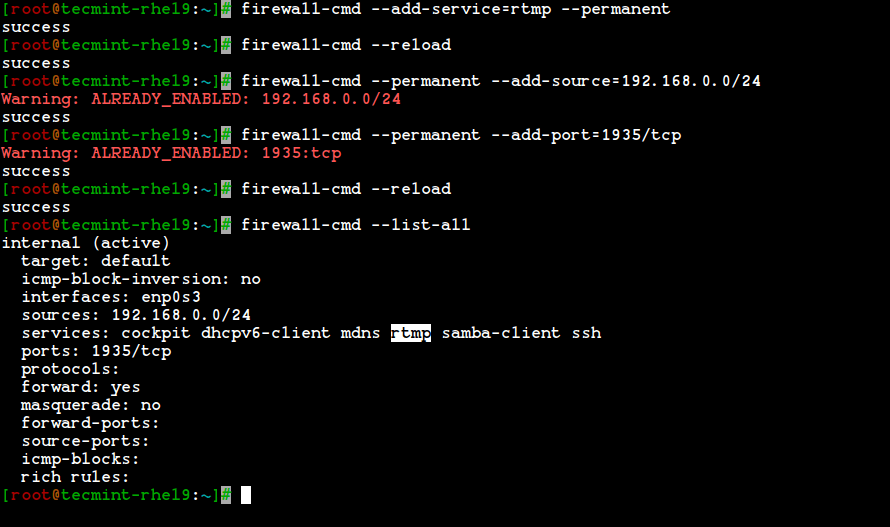
# firewall-cmd --add-service=rtmp
17. To remove added zone, type.
# firewall-cmd --zone=public --remove-service=rtmp
The above step was a temporary period only. To make it permanent we need to run the below command with option –permanent.
# firewall-cmd --add-service=rtmp --permanent
# firewall-cmd --reload
18. Define rules for network source range and open any one of the ports. For example, if you would like to open a network range say ‘192.168.0.0/24‘ and port ‘1935‘ use the following commands.
# firewall-cmd --permanent --add-source=192.168.0.0/24
# firewall-cmd --permanent --add-port=1935/tcp
Make sure to reload the firewalld service after adding or removing any services or ports.
# firewall-cmd --reload
# firewall-cmd --list-all
Step 7: Adding Firewalld Rich Rules for Network Range
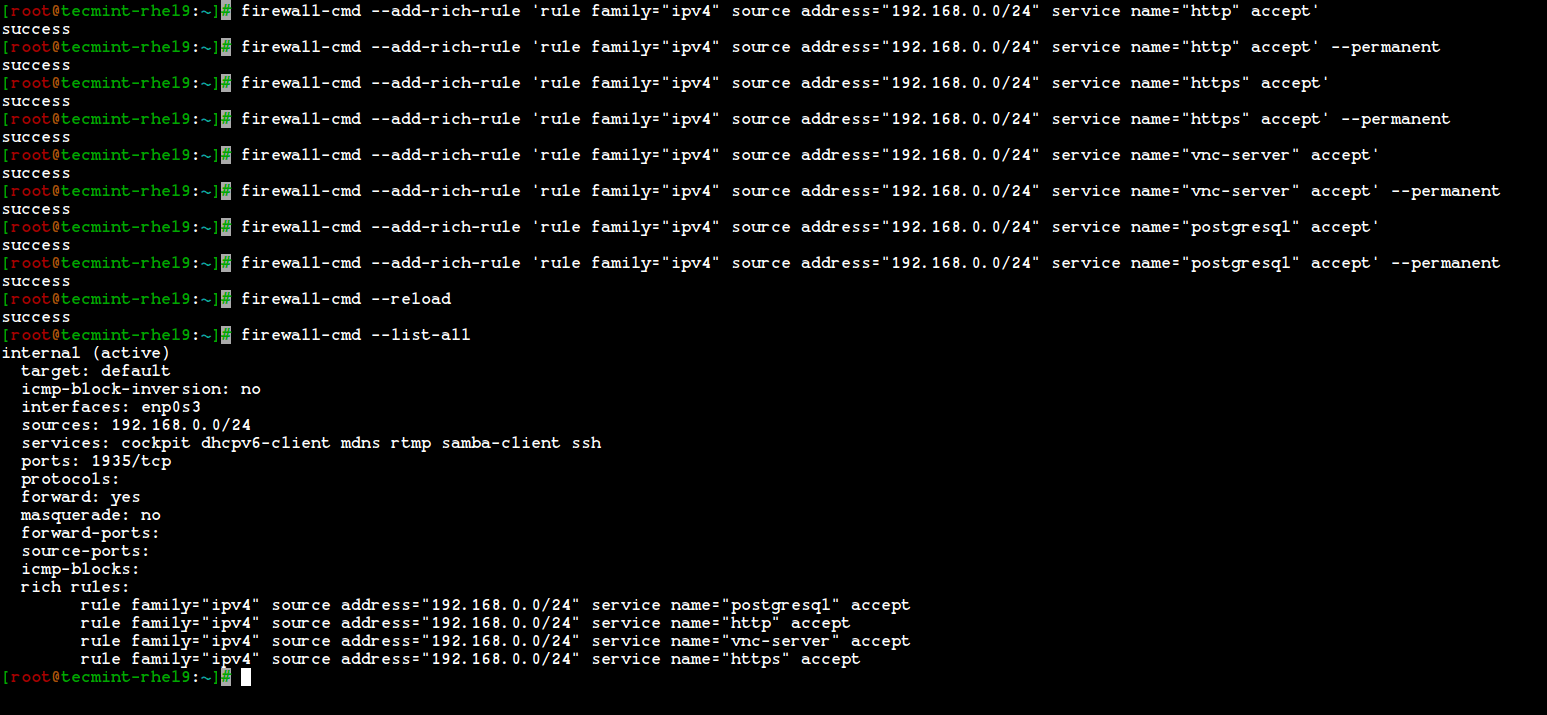
19. If I want to allow services such as http, https, vnc-server, and PostgreSQL, I use the following rules. First, add the rule and make it permanent, reload the rules, and check the status.
# firewall-cmd --add-rich-rule 'rule family="ipv4" source address="192.168.0.0/24" service name="http" accept'
# firewall-cmd --add-rich-rule 'rule family="ipv4" source address="192.168.0.0/24" service name="http" accept' --permanent

# firewall-cmd --add-rich-rule 'rule family="ipv4" source address="192.168.0.0/24" service name="https" accept'
# firewall-cmd --add-rich-rule 'rule family="ipv4" source address="192.168.0.0/24" service name="https" accept' --permanent

# firewall-cmd --add-rich-rule 'rule family="ipv4" source address="192.168.0.0/24" service name="vnc-server" accept'
# firewall-cmd --add-rich-rule 'rule family="ipv4" source address="192.168.0.0/24" service name="vnc-server" accept' --permanent

# firewall-cmd --add-rich-rule 'rule family="ipv4" source address="192.168.0.0/24" service name="postgresql" accept'
# firewall-cmd --add-rich-rule 'rule family="ipv4" source address="192.168.0.0/24" service name="postgresql" accept' --permanent
Now, the Network range 192.168.0.0/24 can use the above service from my server. The option –permanent can be used in every rule, but we have to define the rule and check with the client access after that we have to make it permanent.
20. After adding the above rules, don’t forget to reload the firewall rules and list the rules using:
# firewall-cmd --reload
# firewall-cmd --list-all
To know more about Firewalld.
# man firewalld
That’s it, we have seen how to set up a net-filter using Firewalld in RHEL-based distributions such as Fedora, Rocky Linux, CentOS Stream, AlmaLinux, and openSUSE.
Conclusion
Net-filter is the framework for a firewall for each and every Linux distribution. Back in every RHEL and CentOS edition, we used iptables but in newer versions, they have introduced Firewalld. It’s easier to understand and use firewalld. Hope you have enjoyed the write-up.


This article is not accurate for AlmaLinux 9.2. NetworkManager is enabled by default and cannot be disabled. Changing interfaces on zones with firewalld does nothing because NetworkManager resets them upon reloading.
Your article does not cover the additional nmcli commands needed to move interfaces to the correct zones. You must use both firewalld commands and nmcli con commands to do this correctly.
Additionally, you do not explain that firewalld.conf has nftables turned on by default in AlmaLinux 9.2. This can cause issues if you are not aware of this default setting.
Although nftables is enabled by default, I switched it to iptables as that is how I configured my previous firewalld setup, even though iptables is deprecated.
@Mike,
Thank you for your feedback. We appreciate your insights on AlmaLinux 9.2 and the role of NetworkManager.
We’ll update the article to include the necessary `nmcli` commands for moving interfaces to the correct zones and highlight the default settings of `firewalld.conf` with `nftables`.
Your suggestion about iptables is also noted.
My comment post was submitted twice in error, so I am assuming that is the reason it was not published,
firewalld is the default firewall utility in openSUSE as well as in Redhat/CentOS/Fedora, so I do not understand the reason for not adding SUSE to distributions supported.
Please verify if Tecmint has a strong preference for these now IBM-owned/controlled distributions, over other major distributions like SUSE/OpenSUSE, so that readers are fully aware.
Thank You
@Wendell,
I have included OpenSUSE in the article as suggested by you…
Hi,
Thanks for the great topic…
Hello again,
This is the type of errors present on DNS co-related with my previous message
co-related with
Marian
Question 11 is what, my friend does not understand, can you explain it to me?
Hello,
I have a question since I cannot find this information in any way…
Let’s assume the network setup is in place and I just want to change the firewall zone ordering [this because with standard zone ordering all the DNS requests are failing because ‘block‘ zone is the first one in list ]. More precisely:
Is it possible to reorder from this default ordering towards new zone ordering based only on firewall-cmd commands ? Is there any other way to implement it if not possible with firewall-cmd commands ?
I really appreciate an answer.
Thank you very much!
Marian
We are running the old NIS with ypserv & ypbind. We have these rules but it appears we are missing something else as this fails with: ypinit -s IP
Can’t enumerate maps from IP. Please check that it is running. Any other suggestions?
Dear Sir,
I have below doubts in firewalld (RHEL7/CentOS7).
1). How to flush all firewall rules in firewalld using single command?
2). How to block all outgoing connections from Server using Firewalld?
@Arun,
FirewallD is based on zones, so it’s not possible to flush everything in one go. You should remove one by one as explained here – https://fedoraproject.org/wiki/Firewalld
Thanks Sir…
2). How to block all outgoing connections from Server using Firewalld?
@Arun,
By default everything is blocked on firewalld, you need to open each port or service to allow access on server, for example to enable only outgoing open port 80 use:
It will only enable port 80, rest everything blocks.
Sir, Thanks for the information.
Actually I want to block all outgoing ports connections. ie inside to outside connections.
By default(Active State of Firewalld) there is no blocking in firewall from inside to outside, I checked it my RHEL 7 Server and confirmed. So I want to Blocking outgoing ports with firewalld. Please Explain Sir…
@Arun,
firewall-cmd –direct –add-rule ipv4 filter OUTPUT 2 -j DROP
Thanks & Regards,
Bobin Lonston
Another alternative to iptables is to use a service like HeatShield, which will let you set up a strong and powerful firewall to prevent unauthorized access to services running on your servers, such as SSH and MySQL. HeatShield also includes brute force blocking to prevent malicious SSH login attempts into your server.
@Ben,
Thanks for your additional valuable points. Same we can use fail2ban to blacklisting IP’s and more services.
Hi Babin,
I would like to transfer this below iptables rule to allow incoming nfs connection (example to allow only from 172.16.10.0/24 network) into the firewalld rule, how to get correct or equivalent in the firewalld?
-A INPUT -s 172.16.10.0/24 -m state –state NEW -p udp –dport 111 -j ACCEPT
-A INPUT -s 172.16.10.0/24 -m state –state NEW -p tcp –dport 111 -j ACCEPT
-A INPUT -s 172.16.10.0/24 -m state –state NEW -p tcp –dport 2049 -j ACCEPT
-A INPUT -s 172.16.10.0/24 -m state –state NEW -p tcp –dport 32803 -j ACCEPT
-A INPUT -s 172.16.10.0/24 -m state –state NEW -p udp –dport 32769 -j ACCEPT
-A INPUT -s 172.16.10.0/24 -m state –state NEW -p tcp –dport 892 -j ACCEPT
-A INPUT -s 172.16.10.0/24 -m state –state NEW -p udp –dport 892 -j ACCEPT
-A INPUT -s 172.16.10.0/24 -m state –state NEW -p tcp –dport 875 -j ACCEPT
-A INPUT -s 172.16.10.0/24 -m state –state NEW -p udp –dport 875 -j ACCEPT
-A INPUT -s 172.16.10.0/24 -m state –state NEW -p tcp –dport 662 -j ACCEPT
-A INPUT -s 172.16.10.0/24 -m state –state NEW -p udp –dport 662 -j ACCEPT
by reading your tutorial, i am assume to put the port in nfs.xml file, and add rich text rule in public zone? but not sure
Could you please share to do it correctly.
Thank you,
Bun
Very good article, thanks.
Hi,
Thanks for this! Would it be possible to add a “bittorrent/p2p” service to firewalld and try blocking it?
@Zoran,
Yes, you can add “bittorrent/p2p” ports to firewalld to block them..
I have not tried yet, but torrent use random ports so its not possible i think.
thanks a lot for your kind of help
It’s easier to understand and use firewalld
Hello!
When using firewalld, you should also disable and mask the “ip6tables” and “ibtables” services.