Firewalld (firewall daemon) is an alternative to the iptables service, for dynamically managing a system’s firewall with support for network (or firewall) zones and provides a D-Bus interface for managing configurations. It’s easy to use and configure, and it’s now the default firewall management tool on RHEL/CentOS, Fedora and several other Linux distributions.
In this article, we will discuss how to configure system firewall with firewalld and implement basic packet filtering in CentOS/RHEL 7 and Ubuntu.
The Basics About Firewalld
Firewalld comprises of three layers, which are, the:
- core layer: responsible for handling the configuration and the back ends (listed below).
- D-Bus interface: the primary means of changing and creating the firewall configuration.
- backends: for interacting with netfilter (the native kernel module used for firewalling). They include iptables, ip6tables, ebtables, ipset, nft, linnftables; networkmanager; and modules.
It manages firewall rules by implementing network/firewall zones that define the trust level of network connections or interfaces. Other supported firewall features include services, direct configuration (used to directly pass raw iptables syntax), IPSets as well as ICMP types.
Two kinds of configuration environments are supported by firewalld:
- runtime configuration which is only effective until the machine has been rebooted or the firewalld service has been restarted
- permanent configuration which is saved and works persistently.
The firewall-cmd command line tool is used to manage runtime and permanent configuration. Alternatively, you may use the firewall-config graphical user interface (GUI) configuration tool to interact with the daemon.
In addition, firewalld offers a well defined interface for other local services or applications to request changes to the firewall rules directly, if they are running with root privileges.
The global configuration file for firewalld is located at /etc/firewalld/firewalld.conf and firewall features are configured in XML format.
Understanding Important Firewalld Features
The central feature of firewalld is network/firewall zones. Every other feature is bounded to a zone. A firewall zone describes the trust level for a connection, interface or source address binding.
The default configuration comes with a number of predefined zones sorted according to the default trust level of the zones from untrusted to trusted: drop, block, public, external, dmz, work, home, internal and trusted. They are defined in files stored under the /usr/lib/firewalld/zones directory.
You can configure or add your custom zones using the CLI client or simply create or copy a zone file in /etc/firewalld/zones from existing files and edit it.
Another important concept under firewalld is services. A service is defined using ports and protocols; these definitions represent a given network service such as a web server or remote access service. Services are defined in files stored under the /usr/lib/firewalld/services/ or /etc/firewalld/services/ directory.
If you know basic iptables/ip6tables/ebtables concepts, you can also use the direct interface (or configuration) to gain direct access to the firewall. But, for those without any iptables knowledge, you can employ the rich language for creating more complex firewall rules for IPv4 and IPv6.
How to Install Firewalld Package in Linux
On CentOS 7, the firewalld package comes pre-installed and you can verify using following command.
$ rpm -qa firewalld
On Ubuntu 16.04 and 18.04, you can install it using the default package manager as shown.
$ sudo apt install firewalld
How to Manage Firewalld Service in Linux
Firewalld is a regular systemd service that can be managed via the systemctl command.
$ sudo systemctl start firewalld	#start the service for the mean time
$ sudo systemctl enable firewalld	#enable the service to auto-start at boot time
$ sudo systemctl status firewalld	#view service status
After starting firewalld service, you can also check whether the daemon is running or not, using the firewall-cmd tool (in case it’s not active, this command will output “not running”).
$ sudo firewall-cmd --state

If you happen to save any changes permanently, you can reload firewalld. This will reload firewall rules and keep state information. The current permanent configuration will become new runtime configuration.
$ sudo firewall-cmd --reload
How to Work with Firewall Zones in Firewalld
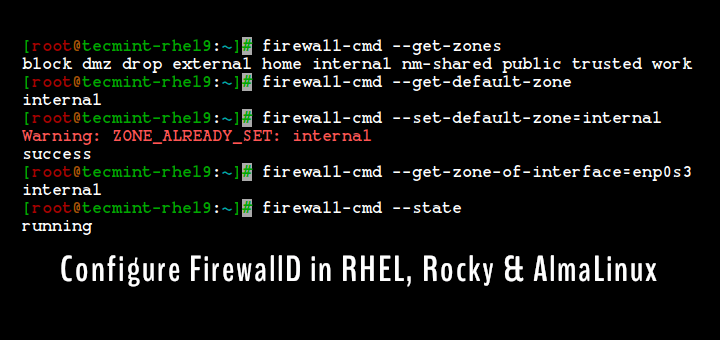
To get a list of all available firewall zones and services, run these commands.
$ sudo firewall-cmd --get-zones
$ sudo firewall-cmd --get-services
The default zone is the zone that is used for every firewall feature that is not explicitly bounded to another zone. You can get the default zone set for network connections and interfaces by running.
$ sudo firewall-cmd --get-default-zone

To set the default zone, for example to external, use the following command. Note that adding the option --permanent sets the configuration permanently (or enables querying of information from the permanent configuration environment).
$ sudo firewall-cmd --set-default-zone=external
OR
$ sudo firewall-cmd --set-default-zone=external --permanent
$ sudo firewall-cmd --reload
Next, let’s look at how to add an interface to a zone. This example shows how to add your wireless network adapter (wlp1s0) to zone home, which is used in home areas.
$ sudo firewall-cmd --zone=home --add-interface=wlp1s0

An interface can only be added to a single zone. To move it to another zone, use the --change-interface switch as shown, or remove it from the previous zone using the –remove-interface switch, then add it to the new zone.
Assuming you want to connect to a public WI-FI network, you should move your wireless interface back to the public zone, like this:
$ sudo firewall-cmd --zone=public --add-interface=wlp1s0
$ sudo firewall-cmd --zone=public --change-interface=wlp1s0

You can use many zones at the same time. To get a list of all active zones with the enabled features such as interfaces, services, ports, protocols, run:
$ sudo firewall-cmd --get-active-zones

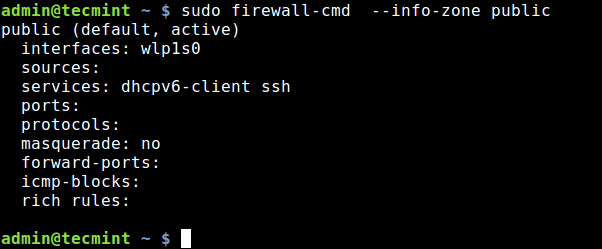
In relation to the previous point, If you want to find more information about a particular zone, i.e everything added or enabled in it, use one of these commands:
$ sudo firewall-cmd --zone=home --list-all
OR
$ sudo firewall-cmd --info-zone public
Another useful option is --get-target, which shows you the target of a permanent zone. A target is one of: default, ACCEPT, DROP, REJECT. You can check the target of various zones:
$ sudo firewall-cmd --permanent --zone=public --get-target
$ sudo firewall-cmd --permanent --zone=block --get-target
$ sudo firewall-cmd --permanent --zone=dmz --get-target
$ sudo firewall-cmd --permanent --zone=external --get-target
$ sudo firewall-cmd --permanent --zone=drop --get-target
How to Open and Block Ports in Firewalld
To open a port (or port/protocol combination) in the firewall, simply add it in a zone with the --add-port option. If you don’t explicitly specify the zone, it will be enabled in the default zone.
The following example shows how to add port 80 and 443 to allow in-bound web traffic via the HTTP and HTTPS protocols, respectively:
$ sudo firewall-cmd --zone=public --permanent --add-port=80/tcp --add-port=443/tcp
Next, reload firewalld and check the enabled features in the public zone once more, you should be able see the just added ports.
$ sudo firewall-cmd --reload
$ sudo firewall-cmd --info-zone public
Blocking or closing a port in the firewall is equally easy, simply remove it from a zone with the --remove-port option. For example, to close ports 80 and 443 in the public zone.
$ sudo firewall-cmd --zone=public --permanent --remove-port=80/tcp --remove-port=443/tcp
Instead of using port or port/protocol combination, you can use the service name to which a port is assigned as explained in the next section.
How to Open and Block Services in Firewalld
To open a service in the firewall, enable it using the --add-service option. If zone is omitted, default zone will be used.
The following command will permanently enable the http service in the public zone.
$ sudo firewall-cmd --zone=public --permanent --add-service=http
$ sudo firewall-cmd --reload
The --remove-service option can be used to disable a service.
$ sudo firewall-cmd --zone=public --permanent --remove-service=http
$ sudo firewall-cmd --reload
How to Enable and Disable IP Masquerading Using Firewalld
IP Masquerading (also known as IPMASQ or MASQ) is a NAT (Network Address Translation) mechanism in Linux networking which allows your hosts in a network, with private IP addresses to communicate with the Internet using your Linux server’s (IPMASQ gateway) assigned public IP address.
It is a one-to-many mapping. Traffic from the your invisible hosts will appear to other computers on the internet as if it were coming from your Linux server.
You can enable IP masquerading in a desired zone, for instance the public zone. But before doing that, first check if masquerading is active or not (a “no” means its disabled and a “yes” means otherwise).
$ sudo firewall-cmd --zone=public --query-masquerade
$ sudo firewall-cmd --zone=public --add-masquerade
A typical use case for masquerading is to perform port forwarding. Assuming you want to SSH from a remote machine to a host in your internal network with the IP 10.20.1.3, on which the sshd daemon is listening on port 5000.
You can forward all connections to port 22 on your Linux server to the intended port on your target host by issuing:
$ sudo firewall-cmd --zone=public --add-forward-port=port=22=proto=tcp:toport=5000:toaddr=10.20.1.3
To disable masquerading in a zone, use the --remove-masquerade switch.
$ sudo firewall-cmd --zone=public --remove-masquerade
How to Enable and Disable IMCP Message in Firewalld
ICMP (Internet Control Message Protocol) messages are either information requests or replies to information requests or in error conditions.
You can enable or disable ICMP messages in the firewall, but before that first list all supported icmp types.
$ sudo firewall-cmd --get-icmptypes

To add or remove a block type you want.
$ sudo firewall-cmd --zone=home --add-icmp-block=echo-reply
OR
$ sudo firewall-cmd --zone=home --remove-icmp-block=echo-reply
You can view all icmp types added in a zone using the --list-icmp-blocks switch.
$ sudo firewall-cmd --zone=home --list-icmp-blocks
How to Use Direct Interface to Pass Raw iptables Commands
The firewall-cmd also provides direct options (--direct) for you to get more direct access to the firewall. This is useful for those with basic knowledge of iptables.
Important: You should only use the direct options as a last resort when it’s not possible to use the regular firewall-cmd options explained above.
Here is an example of how to pass raw iptables rule, using the --add-rules switch. You can easily remove these rules by replacing --add-rule with --remove-rule:
$ sudo firewall-cmd --direct --add-rule ipv4 filter IN_public_allow 0 -m tcp -p tcp --dport 80 -j ACCEPT
For more information about iptables, see this guide: How To Setup an Iptables Firewall to Enable Remote Access to Services in Linux.
If you aren’t familiar with iptables syntax, you can opt for firewalld’s “rich language” for creating more complex firewall rules in an easy to understand manner as explained next.
How to Use Rich Language in Firewalld
The rich language (also known as rich rules) is used to add more complex firewall rules for IPv4 and IPv6 without the knowledge of iptables syntax.
It extends the zone features (service, port, icmp-block, masquerade and forward-port) that we have covered. It supports source and destination addresses, logging, actions and limits for logs and actions.
The --add-rich-rule is used to add rich rules. This example shows how to allow new IPv4 and IPv6 connections for service http and log 1 per minute using audit:
$ sudo firewall-cmd --add-rich-rule='rule service name="http" audit limit value="1/m" accept'
To remove the added rule, replace the --add-rich-rule option with --remove-rich-rule.
$ sudo firewall-cmd --remove-rich-rule='rule service name="http" audit limit value="1/m" accept'
This feature also allows for blocking or allowing traffic from a specific IP address. The following example shows how to reject connections from the IP 10.20.1.20.
$ sudo firewall-cmd --zone=public --add-rich-rule='rule family="ipv4" source address="192.168.0.254" reject'
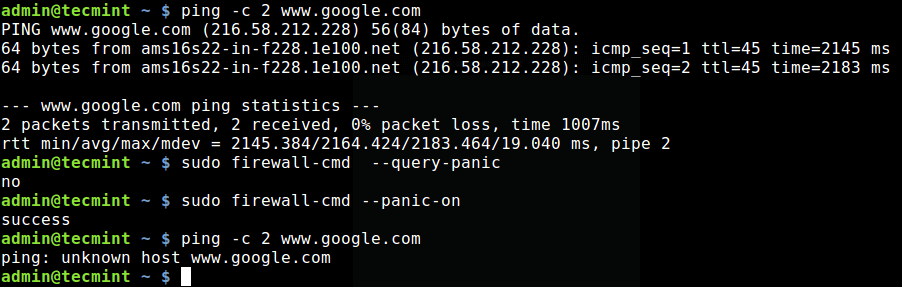
How to Enable and Disable Panic Mode in Firewalld
Panic mode is a special mode under firewalld where all in-bound and out-bound packets are dropped, and active connections will expire once activated.
You can enable this mode in emergency situations where a threat to your network environment exits.
To query panic mode, use the --query-panic option.
$ sudo firewall-cmd --query-panic
To enable panic mode, use the --panic-on option. You can test if it is working using the ping command as shown. Because the packet is dropped, the name www.google.com can not be resolved, hence the error displayed.
$ sudo firewall-cmd --panic-on
$ ping -c 2 www.google.com
To disable panic mode, use the --panic-off option.
$ sudo firewall-cmd --panic-off
How to Lockdown Firewalld
Remember, we mentioned under the basics about firewalld that local applications or services are able to alter the firewall configuration if they are running with root privileges. You can control which applications are able to request firewall changes, by specifying then in a lockdown whitelist.
This feature is turned off by default, you can enable or disable it with the --lockdown-on or --lockdown switch receptively.
$ sudo firewall-cmd --lockdown-on
OR
$ sudo firewall-cmd --lockdown-off
Note that it is recommended to enable or disable this feature by editing the main config file, because the firewall-cmd may not exist on lockdown whitelist when you enable lockdown.
$ sudo vim /etc/firewalld/firewalld.conf
Find the parameter Lockdown and change its value from no (means off) to yes (means on).
Lockdown=yes
To make this setting permanent reload firewalld.
$ sudo firewall-cmd --reload
Summary
Firewalld is an easy to use replacement for the iptables service, which uses iptables as a backend. In this article, we have shown how to install firewalld package, explained firewalld’s important features and discussed how to configure them in the runtime and permanent configuration environments.
If you have any questions or comments, feel free to reach us via the comment form below. You may refer to the firewalld manual page (man firewalld) or the firewalld documentation in the project website, for more information.


I think it is a mismatch for the IP address
The following example shows how to reject connections from the IP 10.20.1.20.
$ sudo firewall-cmd --zone=public --add-rich-rule='rule family="ipv4" source address="192.168.0.254" reject'Don’t know why learn additional language and command option set (like those of firewalld/ufw/shorewall) when iptables syntax is very structured, flexible and not that hard by itself.
My needs are satisfied completely by ‘iptables-persistent‘ Ubuntu package and by iptables service in RHEL/CentOS.
@Wladimir
Okay, many thanks for sharing your thoughts with us.
I have flash chat installed on Ubuntu VPS and some users spamming in our chat platform by using a program ( wpepro.exe ) , How to block wpepro.exe using iptables or firewalld ?
Thanks