In Parts 1 through 3 of this Postfix series we explained, step by step, how to set up and configure an email server with virtual users. We also showed you how to access one of those accounts using Thunderbird as email client.
- Setting Up Postfix Mail Server and Dovecot with MariaDB – Part 1
- Configure Postfix and Dovecot Virtual Domain Users – Part 2
- Install and Integrate ClamAV and SpamAssassin to Postfix Mail Server – Part 3
In this era of connectivity when you are likely to need access to your inbox from anywhere (and not just from your home computer), server-side software known as webmail clients make it possible for you to read and send emails through a web interface.

Roundcube is one of such programs, and given its many features (which you can read more about in the project’s website) it is the one we have chosen to use in this tutorial.
Install Roundcube Webmail for Postfix
In CentOS 7 and based distributions such as RHEL and Fedora, installing Roundcube is as easy as doing:
# yum update && yum install roundcubemail
Note: Please keep in mind that Roundcube is included in the EPEL repository, which we must have already enabled as outlined in Part 1.
In Debian 8 and its derivatives such as Ubuntu and Mint, you will need to enable the Jessie backports (web) first:
# echo "deb http://http.debian.net/debian jessie-backports main" >> /etc/apt/sources.list
Then install Roundcube as follows:
# aptitude update && aptitude install roundcube
Regardless of the distribution we’re using, we now need to create a database to store Roundcube’s internal structure.
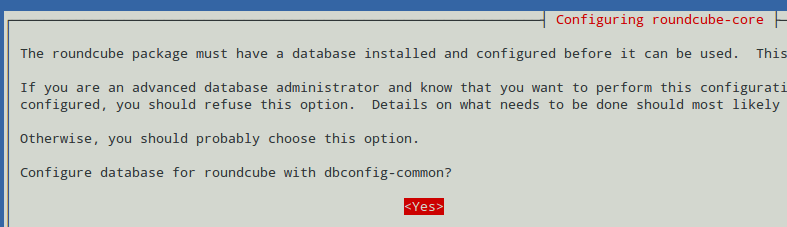
In Debian 8, the installation process will take care of this:
Choose Yes when prompted whether you want to configure the Roundcube database using dbconfig-common:
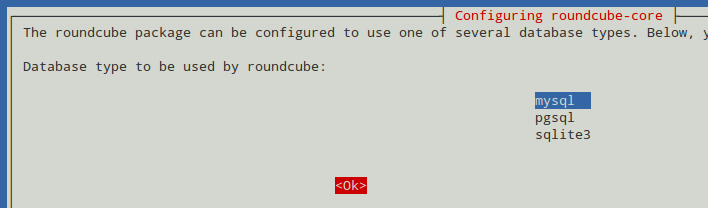
Choose mysql as database type:
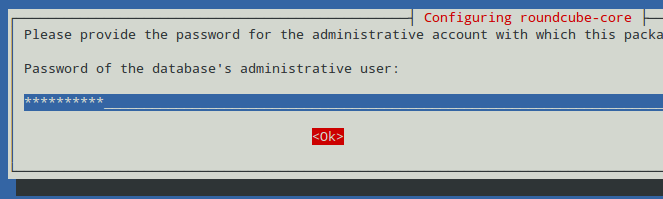
Provide the password for the MariaDB root user:
And choose a password for roundcube to register with the database server, then click Ok:
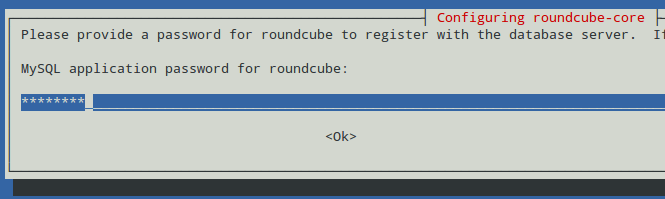
Confirm the password you entered during the previous step:

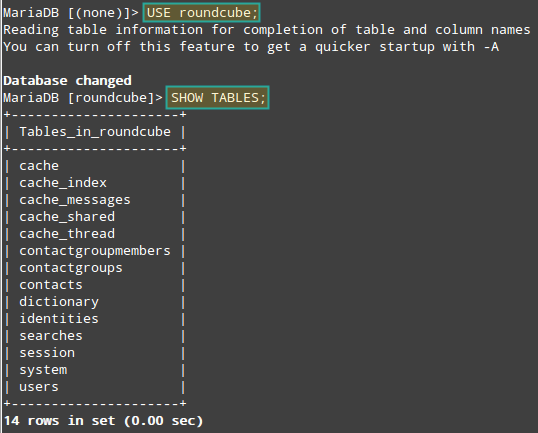
And before long, you will have a database named roundcube and its corresponding tables created automatically for you:
MariaDB [(none)]> USE roundcube;
MariaDB [(none)]> SHOW TABLES;
In CentOS 7, you will need to create the database manually by either logging on to phpMyAdmin or via the command line. For brevity, we will use the second proposed method here:
# mysql -u root -p
MariaDB [(none)]> CREATE DATABASE RoundCube_db;
Then exit the MariaDB prompt and run the following SQL script:
# mysql -u root -p RoundCube_db < /usr/share/roundcubemail/SQL/mysql.initial.sql
Please note that in Debian you can also perform these steps manually. Thus, you get to rename your database if you want to instead of having it named automatically “roundcube” as seen before.
Configure Roundcube for Postfix
To begin, you should note that from RoundCube v1.0 and onwards, the configuration settings are included in one file only, as opposed to previous versions where they were split between two files.
First, locate the following file and make a copy named config.inc.php in the same directory. Use the -p option to preserve mode, ownership, and original timestamp:
# cp -p /etc/roundcubemail/defaults.inc.php /etc/roundcubemail/config.inc.php
Next, make sure Roundcube can access the database we created previously. In db_dsnw, replace user and password with an username and password with permissions to access the RoundCube_db.
For example, you could use the same administrative account you utilized to log on to phpMyAdmin in Part 1, or you can just use root if you want.
$config['db_dsnw'] = 'mysql://user:password@localhost/RoundCube_db';
The following settings refer to the hostname, ports, authentication type, and so on (they are self-explanatory, but you can find more details by reading the comments in the configuration file):
$config['default_host'] = 'ssl://mail.linuxnewz.com';
$config['default_port'] = 143;
$config['smtp_server'] = 'tls://mail.linuxnewz.com';
$config['smtp_port'] = 587;
$config['smtp_user'] = '%u';
$config['smtp_pass'] = '%p';
$config['smtp_auth_type'] = 'LOGIN';
These last two settings (product_name and useragent) refer to the header in the web interface and to the email headers sent with the messages.
$config['product_name'] = 'Linuxnewz Webmail - Powered by Roundcube';
$config['useragent'] = 'Linuxnewz Webmail';
In order for Roundcube to use virtual user’s authentication for outgoing mail, we need to activate the virtuser_query plugin (which can be found in /usr/share/roundcubemail/plugins):
$config['plugins'] = array('virtuser_query');
$config['virtuser_query'] = "SELECT Email FROM EmailServer_db.Users_tbl WHERE Email = '%u'";
Note how the SQL query above points to the EmailServer_db database we set up initially in Part 1, which is where the information about the virtual users is stored.
Finally, similarly to what we did in Part 1 to be able to access phpMyAdmin’s web interface using a web browser, let’s dive into the Roundcube / Apache configuration file at:
# vi /etc/httpd/conf.d/roundcubemail.conf # CentOS 7
# nano /etc/roundcube/apache.conf # Debian 8
And place the following lines inside the indicated tags:
Debian 8:
<IfVersion >= 2.3>
    Require ip AAA.BBB.CCC.DDD
    Require all granted
</IfVersion>
CentOS 7:
<IfModule mod_authz_core.c>
    # Apache 2.4
    Require ip AAA.BBB.CCC.DDD
    Require all granted
</IfModule>
Though not strictly required, it’s a good idea to change the alias of the Roundcube directory in order to protect yourself from bots that target /roundcube as a well-known door to break into your system. Feel free to choose an alias that suits your needs (we will go with webmail here):
Alias /webmail /usr/share/roundcubemail # CentOS 7
Alias /webmail /var/lib/roundcube # Debian 8
Save changes, exit the configuration file and restart Apache:
# systemctl restart httpd # CentOS 7
# systemctl restart apache2 # Debian 8
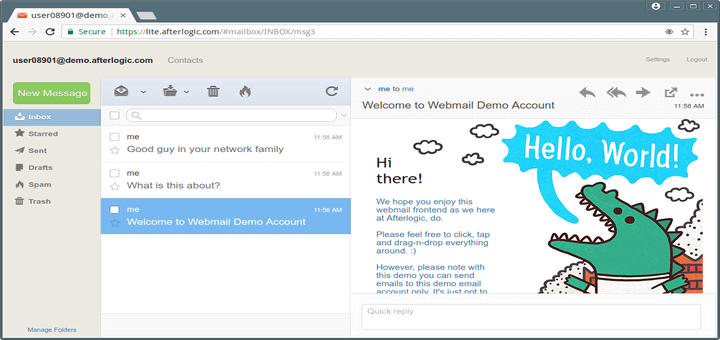
Now you can open a web browser and point it to https://mail.yourdomain.com/webmail and you should see something similar to:

You can now log on with one of the accounts we configured in the previous articles and start sending and receiving emails using Roundcube from anywhere!
Customizing Roundcube Webmail
Fortunately, Roundcube’s interface is fairly intuitive and easy to configure. At this point, you could spend some 15-30 minutes configuring the environment and becoming familiar with it. Go to Settings for more details:
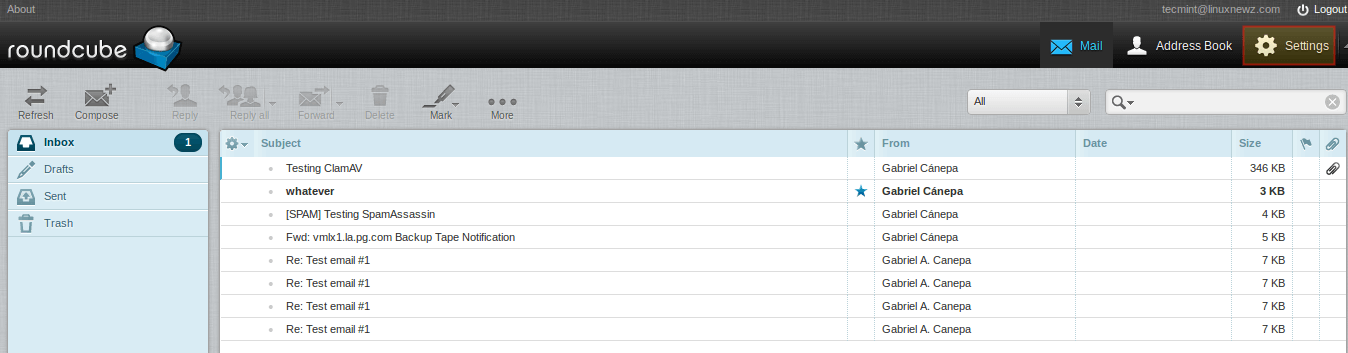
Please note that the above image shows the emails that we have received in this account ([email protected]).
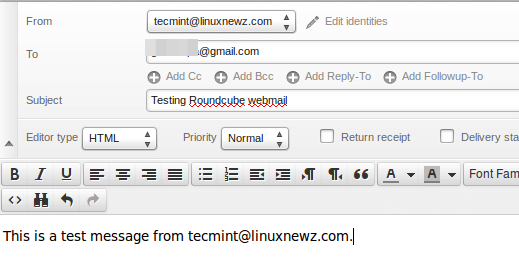
You can click Compose and start writing an email to an external email address:
Then hit Send and check the destination to see if it arrived correctly:
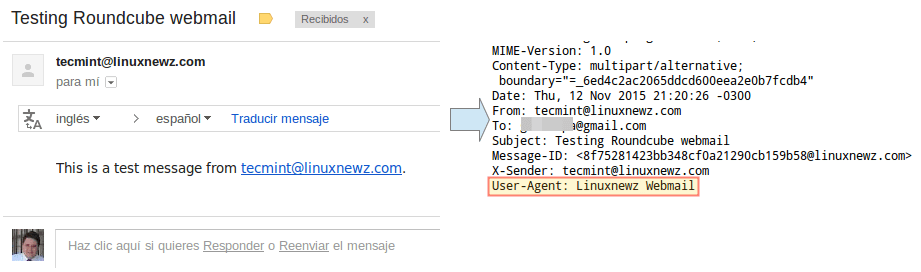
Congratulations! You have successfully setup Roundcube to send and receive emails!
Summary
In this article we have explained how to setup and configure Roundcube as web client. As you explore Roundcube’s interface you will see how easy it is to use, as described in the Webmail help.
However, don’t hesitate to let us know if you have any questions or concerns – just drop us a note using the comment form below. We look forward to hearing from you!


Hi, I can not connect to roundcube in the log I have this message:
Cound not connect to ssl://mail.server.com:993: Connexion refused in /usr/share/roundcubemail/program/lib/Roundcube/rcube_imap.php on line 197 (POST /webmail/?_task=login?_task=login&_action=login)
See my post https://www.tecmint.com/install-and-configure-roundcube-webmail-for-postfix-mail-server/comment-page-1/#comment-916126
In config.inc.php;
instead of using ssl, use tls, eg;
Thank you for your reply but I have this error now :
SMTP Error : Connection failed : Failed to connect socket: connection refused …
I believe you’re trying to connect roundcube through imaps instead of imap. The port should be 143. Make sure you have tls enabled and check the Dovecot config the ensure you have imap only enabled to run netstat -ntlp |grep imap to see if 143 is opened and make sure it is open in the firewall.
Hi, I can not connect to RoundCube in the log I have this message:
Could not connect to ssl://mail.server.com:143: Connexion refused in /usr/share/roundcubemail/program/lib/Roundcube/rcube_imap.php on line 197 (POST /webmail/?_task=login?_task=login&_action=login)
We need more information. Is your mail server working connecting with an email client? What error do you get when you try to login using a round cube?
We can try to help but it connects with an array in the PHP file based on your setup.
Hi,
Ther is posible to update roundcubemail to version 1.3.7 on CentOS ? How ?
@FlorinC,
Please follow our latest article on Roundcube Mail – How to Install Latest Roundcube Webmail in CentOS 7
Hi Sir, I purchase a host they give me already installed roundcube mail when I send mails that mail ging to spam folder of users how can I solve this sir thanks you..
You should contact your hosting provider. Most likely this is being caused by someone misusing the email server installed on your shared host.
I set up everything as written and can’t log to server with existing user. After looking at roundcube error.log I’ve noticed this:
IMAP Error: Login failed for [email protected] from 78.28.131.219. Could not connect to ssl://mail.domain.net:993: Permission denied in /usr/share/roundcubemail/program/lib/Roundcube/rcube_imap.php on line 197 (POST /twebmail/?_task=login?_task=login&_action=login)
I’ve changed real user and domain name.
Anyway roundcube is trying to connect to port 993 although I put $config[‘default_port’] = 143; in config.inc.php.
Any suggestions?
please edit IP address as well.
I’ve got the same error
IMAP Error in /usr/share/roundcubemail/program/lib/Roundcube/rcube_imap.php (197): Login failed for ***@***.com from 140.0.249.109. Could not connect to ssl://***.***.com:993: Permission denied
please advice
oh wel, no one can’t help? :(
Instructions for config.inc.php are wrong, using ssl:// for $config[‘default_host’] = ‘ssl://mail.linuxnewz.com’; is telling Roundcube to use port 993. Use tls:// instead – $config[‘default_host’] = ‘tls://mail.linuxnewz.com’;
See ttps://serverfault.com/a/692397 for details
I would like to customize my Roundcube login page to reflect my company. I’ve looked at tutorials but none seem to work. I’d like my logo and banner in place of the roundcube logo and banner.
Any help would be appreciated.
I’m missing something here. I went through this a dozen times and can’t get anything but 403. (CentOS7)
When I follow this guide exactly (Except replace db info with my current info and AAA.BBB.CCC.DDD with the server’s IP.) I get 403. Everything works fine (get default page) if I browse the server root but I get 403 when attempting to navigate to server.com/webmail.
After removing roundcubemail, checking for clean up, and stepping through this guide Part meticulously a couple times and getting 403 every time I gave up and decided to start from square one and check every step. I removed roundcubemail, checked to make sure all the config files were gone, restarted httpd.
I start from the point of everything apparently fine with Apache (http & https) and firewall. I get the default config page on 80 and 443. Cert looks good on 443. I create an arbitrary file: /var/www/html/index.html This page displays instead of the default config page on both 80 and 443. It appears all is well to this point.
I install RC (yum install roundcubemail) and do no configuration on it, leaving all the RC defaults in place. The install placed the files at /usr/share/roundcubemail and placed roundcubemail.conf in /etc/httpd/conf.d/ that created the alias /roundcubemail pointing to /usr/share/roundcubemail. So far so good. I restart httpd.
I attempt to browse to server.com/roundcubemail and get a 403. “You don’t have permission to access /roundcubemail on this server.” I check the directory /usr/share/roundcubemail and find 777 permissions. As a troubleshooting measure I edit /etc/httpd/conf.d/roundcubemail.conf to replace all permissions in the modules for /usr/share/roundcubemail/ with “Require all granted”. Restart httpd. Get 403 again.
Whether following this guide or simple going with defaults I get the same result, so apparently I’m not making it past the first step; but I don’t understand where things are off. If the roundcubemail.conf file grants to all and file permissions are 777 then what is being forbidden?
Same problem with me. I had RC on debian wheezy before into my domain root (not as a binary package). Upgraded to Jessie recently. Decided to do backport and install as binary package.
I followed this guide and checked all similar ones for Debian 8 to get it work. Can’t get it working. Had 500 error and reinstalled now “The requested page could not be found” error. Went through all config files /etc/roundcube and /etc/apache2/conf-available etc and /var/lib/roundcube etc..
All good. Can’t get it to login page. I don’t know htaccess of my domain and this roundcube interfering?? But i tried disabling it . Still not working… https://mirrorlessforums.com/webmail/
Bit of success update.. Now after I tried installing Roundcube to separate location (not as binary). Now added the roundcube as subdomain. And I can get to login and /installer directory etc. So you can guess I had to add the apache virtual part for roundcube inside the domain virtual file in ‘sites-available’.
So no ‘config-available/roundcube.conf. But still the domain.com/webmail or domain.com/roundcube. I assume thats do with the .htaccess entries which I’m not going to touch as my original wish was to add roundcube as webmail.domain.com.
So if anyone facing this issue and wants to get it working as domain.com//webmail , would have to uncomment/comment each line of .htaccess inside roundcube install directory. Cheers
Great tutorial series. The only thing I added to it was the addition of postfixadmin and figuring out how to integrate it.
@Martin,
Thank you for pointing this out. I had not heard about postfixadmin up until now. For the reference of the community, here’s the link to the project’s website: http://postfixadmin.sourceforge.net.
Hello,
I’ve got a problem with login :(.
I enabled “imap_debug” and after click button “Login”, show messages:
“IMAP Error in /usr/share/roundcubemail/program/lib/Roundcube/rcube_imap.php (197): Login failed for [email protected] from XXX LOGIN: Authentication failed.”
Can you help me?
Problem SOLVED. I don’t know why, but SHA512-CRYPT wrong generate password hash. I must generate hash with “doveadm pw” and update user password in MariaDB.
@Dawid,
What distribution and version are you using? With CentOS 7, which we used in this tutorial, this workaround was not needed. However, if you used a different distro and / or version, please let us know so users following this tutorial will benefit from it.
@Gabriel Cánepa,
Thanks for reply. I use CentOS 7. I don’t know how, but now everything be ok.
Hi, nice work, quick question. I’m using ubuntu server, I’ve installed roundcube with apt but the virtuser_query plugin is not in the installation, Also I look in to the official plugins page of roundcube with no look, any approach here?
@Daniel,
What version of Ubuntu server are you using? The plugin should be available in Precise: http://packages.ubuntu.com/precise/all/roundcube-plugins/filelist
Excellent article, I have carried out fully and it works perfectly. I had to make some minor adjustments but integrally is a complete manual.
I thank you for the time you’ve invested in this work.
regards
@Marcos,
Thank YOU for taking the time to get back to us and for your kind words about our work. Help us spread the word by sharing our content through your social network profiles :).
Nice tutorial
But how can you reset user password in case they forget ” through roundcube