We read of virus infections (new ones come out all the time) and are somehow affected by spam mail on a daily basis. While there are plenty of free and commercial solutions (available as client applications) for both nuisances, system administrators need to have a strategy for dealing with these threats well before they reach the users’ mailboxes.
One of such strategies is as setting up an antivirus / antispam gateway. You can think of this tool as an intermediate layer (or filter) between the outside world and your inside network as far as email content is concerned.
In addition, if you think of it, it is much easier to install and maintain a single piece of software in a single machine (the mail server) than it is to do the same on several machines individually.
In this article we will introduce you to Sagator, an antivirus/anti-spam gateway for Linux mail servers written in Python. Among other things, Sagator provides database logging, use statistics, and daily reports for users. That said, let’s get started.
Installing Sagator and Postfix Mail Server
To install Sagator in CentOS/RHEL 7, download and install the following RPM packages. The latest beta release (7) includes support and fixes for systemd – that is why we prefer to install it using this method instead of downloading the package from the repositories.
# rpm -Uvh https://www.salstar.sk/pub/sagator/epel/testing/7/i386/sagator-core-1.3.2-0.beta7.el7.noarch.rpm
# rpm -Uvh https://www.salstar.sk/pub/sagator/epel/testing/7/i386/sagator-1.3.2-0.beta7.el7.noarch.rpm
If you are performing this installation on a fresh server, please note that several other packages need to be installed as dependencies, among which we can mention Postfix, ClamAV, and SpamAssassin.
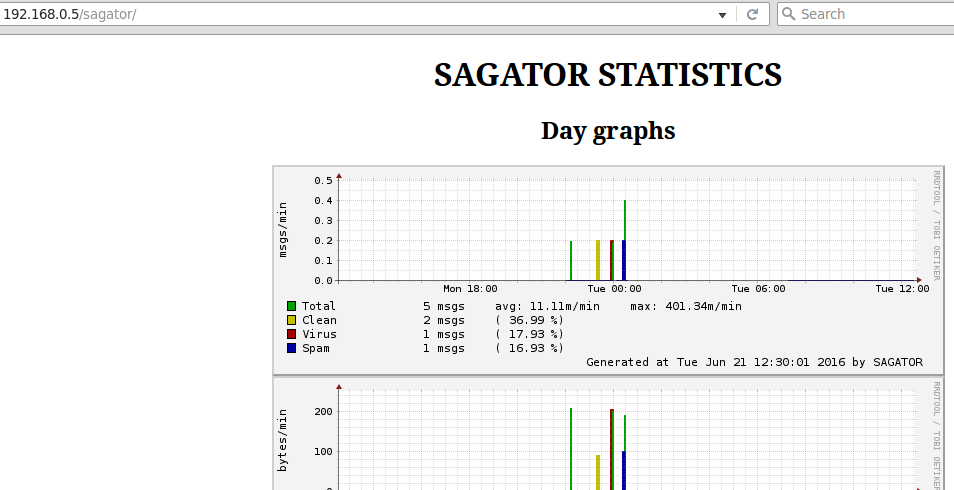
Additionally, you may want to also install Rrdtool, an utility to create and display day / week / month / year graphics of total / clean / virus / spam number of emails.
These graphics will be available in /var/www/html/sagator once the service and its dependencies are fully functional.
# yum install epel-release
# yum install postfix spamassassin clamav clamav-scanner clamav-scanner-systemd clamav-data clamav-update rrdtool
This is not a surprise as we will need a mail server, and antivirus / antispam software Sagator can hook up to. In addition, we may need to install the mailx package, which provides MUA (Mail User Agent, also known as Email Agent) functionalities.
In Debian and Ubuntu, you will need to install Sagator from a precompiled .deb package, which you can download from here and install as follows:
Debian Jessie:
# wget https://www.salstar.sk/pub/sagator/debian/pool/jessie/testing/sagator-base_1.3.2-0.beta7_all.deb
# wget https://www.salstar.sk/pub/sagator/debian/pool/jessie/testing/sagator_1.3.2-0.beta7_all.deb
# dpkg -i sagator-base_1.3.2-0.beta7_all.deb
# dpkg -i sagator_1.3.2-0.beta7_all.deb
Ubuntu Trusty:
# wget https://www.salstar.sk/pub/sagator/ubuntu/pool/trusty/testing/sagator-base_1.3.2-0.beta7_all.deb
# wget https://www.salstar.sk/pub/sagator/ubuntu/pool/trusty/testing/sagator_1.3.2-0.beta7_all.deb
# sudo dpkg -i sagator-base_1.3.2-0.beta7_all.deb
# sudo dpkg -i sagator_1.3.2-0.beta7_all.deb
As it was the case with CentOS, you will need to install and configure the mail server, SpamAssassin, and ClamAV packages:
# aptitude install postfix spamassassin clamav clamav-daemon -y
Don’t forget to use sudo in Ubuntu.
Next, regardless of the distribution, you will need to update the virus definition before starting ClamAV. Before doing it, edit /etc/clamd.d/scan.conf and /etc/freshclam.conf and delete the following line:
Example
Also, in /etc/clamd.d/scan.conf, make sure the following line is uncommented:
LocalSocket /var/run/clamd.scan/clamd.sock
Finally, do
# freshclam
And start / enable ClamAV, SpamAssassin, and Sagator:
# systemctl start clamd@scan
# systemctl start spamassassin
# systemctl start sagator
# systemctl enable clamd@scan
# systemctl enable spamassassin
# systemctl enable sagator
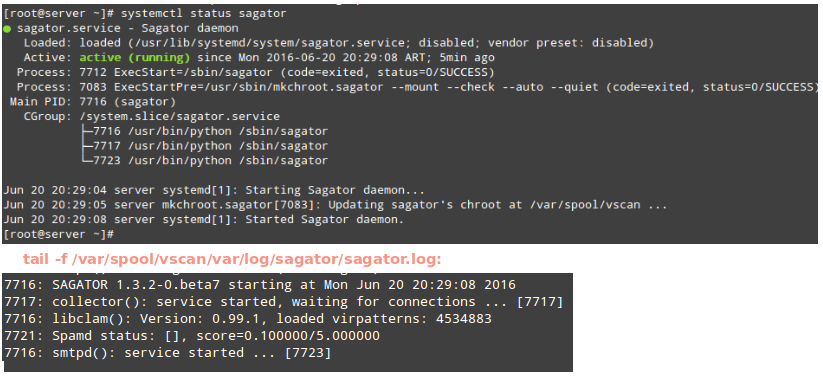
You may want to check the Sagator log to make sure the service started correctly:
# systemctl status -l sagator
or for more details,
# tail -f /var/spool/vscan/var/log/sagator/sagator.log
The above commands are illustrated in the following image:
Configuring Sagator in Linux
The main configuration file is located at /etc/sagator.conf. Let’s have a look at the minimum set of directives we need to set in order for Sagator to operate properly:
Step 1 – We will be using Sagator inside a chroot, so make sure the following line is uncommented:
CHROOT = '/var/spool/vscan'
Step 2 – Make sure the LOGFILE directive matches the following value:
LOGFILE = CHROOT + '/var/log/sagator/sagator.log'
Step 3 – Choose an antivirus that will be integrated with Sagator. To do so, make sure the lines highlighted in the image below are uncommented:
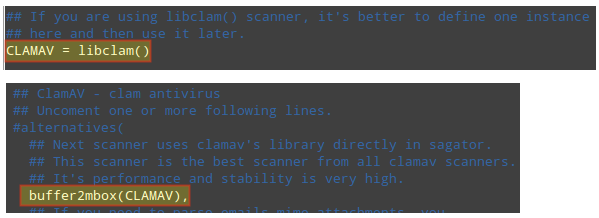
While you are free to choose from a wide variety of antivirus solutions, ClamAV provides higher performance and stability. Although we will use ClamAV in this guide, please keep in mind that the configuration file includes the instructions to hook Sagator to other antivirus / antispam solutions.
When you’re done, run
# sagator --test
To check the configuration file. No output is a good thing! Otherwise, address whatever errors are found before proceeding.
Integrating Sagator with Postfix
In order to integrate Sagator with Postfix, make sure the following lines are present in /etc/postfix/main.cf and /etc/postfix/master.cf:
mynetworks = 127.0.0.0/8
content_filter = smtp:[127.0.0.1]:27
#smtp inet n - n -- smtpd
127.0.0.1:26 inet n - n - 30 smtpd
-o content_filter=
-o myhostname=localhost
-o local_recipient_maps=  -o relay_recipient_maps=
-o mynetworks=127.0.0.0/8  -o mynetworks_style=host
-o smtpd_restriction_classes=  -o smtpd_client_restrictions=
-o smtpd_helo_restrictions=  -o smtpd_sender_restrictions=
-o smtpd_data_restrictions=
-o smtpd_recipient_restrictions=permit_mynetworks,reject
-o receive_override_options=no_unknown_recipient_checks,no_header_body_checks
-o smtpd_use_tls=no
Then restart postfix and make sure it’s enabled to start automatically on boot:
# systemctl restart postfix
# systemctl enable postfix
We can now proceed with testing.
Testing Sagator
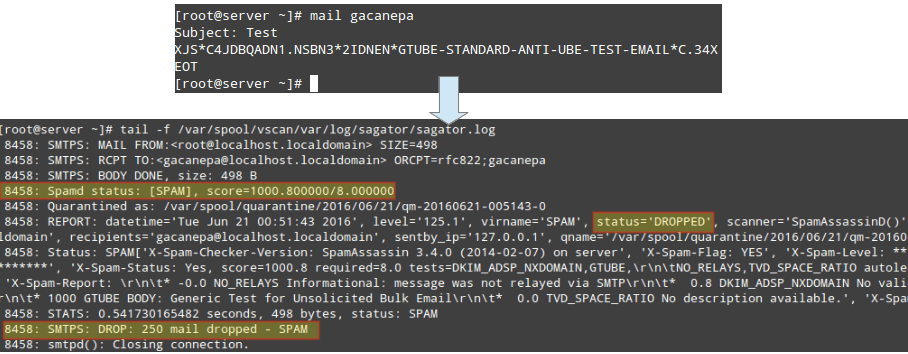
To test Sagator, send an email from user root to user gacanepa with the following body. This is nothing more and nothing less than the standard GTUBE (Generic Test for Unsolicited Bulk Email) provided by SpamAssassin, as shown in the image below:
XJS*C4JDBQADN1.NSBN3*2IDNEN*GTUBE-STANDARD-ANTI-UBE-TEST-EMAIL*C.34X
Now let’s see what happens when a virus is sent as an attachment. In the following example we will use the EICAR test (refer to this Wikipedia entry for more details):
# wget http://www.eicar.org/download/eicar.com
# mail -a eicar.com gacanepa
Then check the log:
# tail -f /var/spool/vscan/var/log/sagator/sagator.log
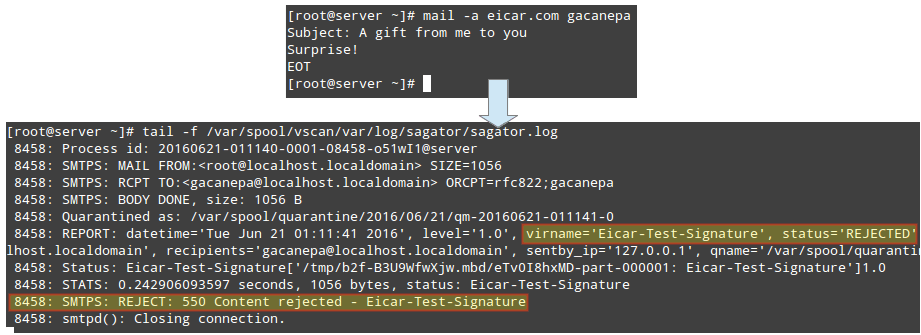
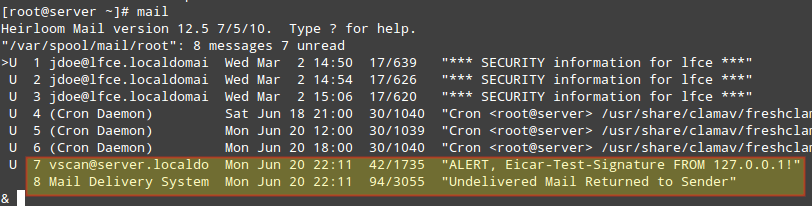
Rejected emails are then delivered back to the sender with the corresponding notice:
What’s so good about this? As you can see, spam and viruses never actually make it to the destination mail server and the users’ mailboxes, but they are dropped or rejected at the gateway level.
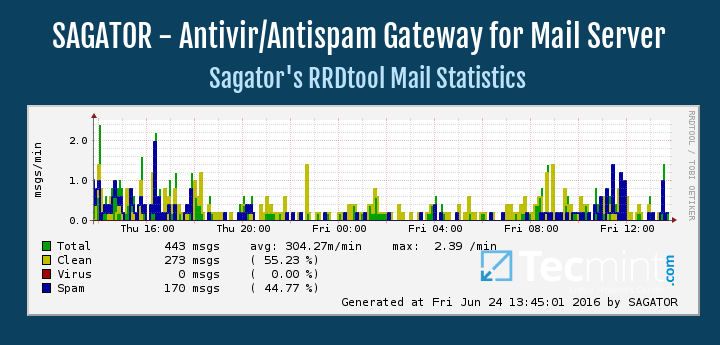
As we mentioned before, the graphs are available at http://<server ip or hostname>/sagator:
Summary
In this article we have explained how to install and configure Sagator, an antivirus / antispam gateway which integrates seamlessly with and protects your mail server.
For more information and further functionality (there is much more to this incredible software than we can adequately cover in a single article!), you may want to refer to the project’s website at http://www.salstar.sk/sagator.
As always, don’t hesitate to drop us a line using the comment form below if you have any questions or comments.
Special thanks to Jan ONDREJ (SAL), the developer of Sagator, for his outstanding support while I was writing this article.


Hi,
What is the recommended memory for this setup?
What is the point of installing Sagator when you can simply use Spamassassing (and also ClamAV) by themselves?
What’s the advantage of adding yet another component into the mix?
Thanks!
My end solution was to use ScrolloutF1. It’s a Debian flavor and has a downloadable iso that you load as a second machine, either vm or physical. My incoming mail goes through Scrollout then to my mail server. I didn’t feel the need to use it for out going. It seems to be working very well.
You can run outgoing mail through it also but at this point I didn’t feel the need to.
Just an alternative solution I thought I would share.
I tried it in a production server running Slackware. Recompiled from source. Under SCANNERS = [ ….. ] array, it looks that alternatives() is called on with its input parameters, but it is commented out.
It throws me error when I started sagator. So what I did, I comment out #alternatives( and its matching ), below. In your screenshot, you only show ‘buffer2mbox(CLAMAV)’ commented out.
In the master.cf you commented out:
This will stop postfix from listening on port 25. Resulting in the machine no longer accepting email coming in on the standard email port and it will no longer receive email from external.
The master.cf should look more like this:
Hello
Not ready….
The first line
-ocontent_filter=error when I restart the service
any idea?
When I make the changes to the main.cf it shuts email down. As soon as I undo those changes, email works perfectly.
It seems there is something needed or missing from the config. This is a “real world” email server and I can’t have it down.
I need some direction to get sagator integrated with postfix and the email flowing properly.
Any suggestions would be greatly appreciated.
Eric,
Unfortunately, we are unable to properly provide the kind of support you need using this channel. You’re welcome to take a look at our Services page (https://www.tecmint.com/services/) and contact us for a quote.
This may be a dumb question nut here goes; Should I be able to use Sagator and spamassasin together or chose on or the other?
I have spamassasin working, but when I try to config Sagator, it stops everything.
Just need some clarification.
Thanks.
You could use Sagator and SpamAssassin together because Sagator is gateway… But i have same problem that you… Something in the config is missing… So i have uninstall Sagator ^^
Yes, you can use both as Florian pointed out.
Hello,
Sorry to my english, i’m french.
Sagator can not send me the emails received. No error message, it is as if I did not receive it when I send it. Gmail / Live tells me this error message: The recipient server did not accept our requests to connect. Learn more at https://support.google.com/mail/answer/7720 [mail.domain.eu. XXX.XXX.XX.XXX: generic :: failed_precondition: connect error (0): error]
An idea ? If I remove the changes in postfix, all messages reach me.