Installing Linux from a USB mass storage device or logging into Live Linux Environment is a cool Idea. Booting from a USB mass storage device is sometimes necessary, especially when the ROM media device is not working.
Booting Windows from a USB mass storage device is not difficult, and with the availability of various software, it has been just a few clicks away. Booting into a windows machine requires only three files, namely boot.ini, ntldr, and ntdetect.com.
But booting into a Linux machine is a complex process which requires a whole lot of files and process in a well-defined execution manner. The booting process is complex but creating a boot-able USB media is very interactive and fun.
We will be creating USB boot-able image in two different way
- Unetbootin – is an open-source tool for creating bootable Live USB drives for Ubuntu, Fedora, and other Linux distributions.
- dd – is a command-line tool for converting and copying files.
For creating a USB bootable image, certain basic requirements are:
- Usb Mass Storage Device (Pen Drive).
- Linux Image in CD/DVD/ISO or Internet connection (Not recommended for large images).
- Windows/Linux Platform.
Creating Bootable USB Device Using Unetbootin Tool
To install UNetbootin on Ubuntu and Ubuntu-based Linux distributions, use the following apt command to add PPA and install it.
$ sudo add-apt-repository ppa:gezakovacs/ppa
$ sudo apt-get update
$ sudo apt-get install unetbootin
Alternatively, you can download UNetbootin binaries and run them without installing on the Linux systems (supports all Linux distributions).
-------------- 64-bit System --------------
$ wget https://github.com/unetbootin/unetbootin/releases/download/681/unetbootin-linux64-681.bin
$ chmod +x ./unetbootin-linux64-681.bin
$ sudo ./unetbootin-linux64-681.bin

-------------- 32-bit System --------------
$ wget https://github.com/unetbootin/unetbootin/releases/download/681/unetbootin-linux-681.bin
$ chmod +x ./unetbootin-linux-681.bin
$ sudo ./unetbootin-linux-681.bin
Insert Your USB pen-drive into the Windows/Linux machine and Launch Unetbootin, you will be greeted with a window similar to.
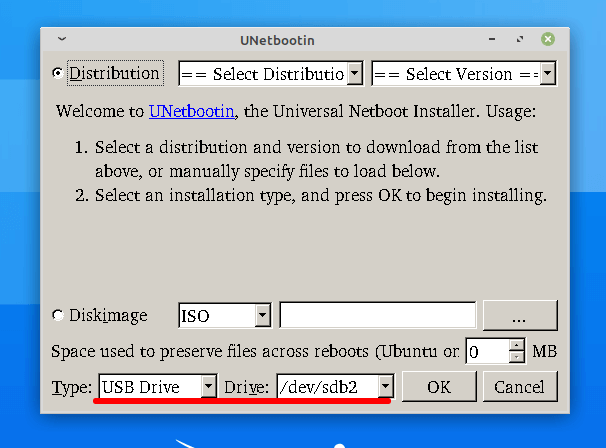
Check the content above the red line. The type should be Usb Device, strictly and if more than one usb device is plugged in you need to know the name of the exact Usb device you need to work upon. A wrong selection will lead to wiping your hard disk, so be aware. You can browse to the stored disk image on your hard drive, from the Unetbootin window.

Or alternatively download from the internet, in real-time. Although it is a time taking process and may result in an error when a larger image is downloaded.
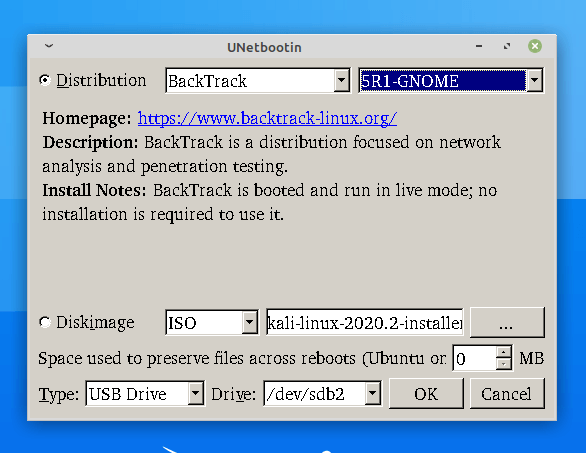
Click OK, and the process of downloading and/or extracting the image will start. It will take time depending upon the size of the download and/or the file size of the ISO image. Once completed, click ‘exit‘.
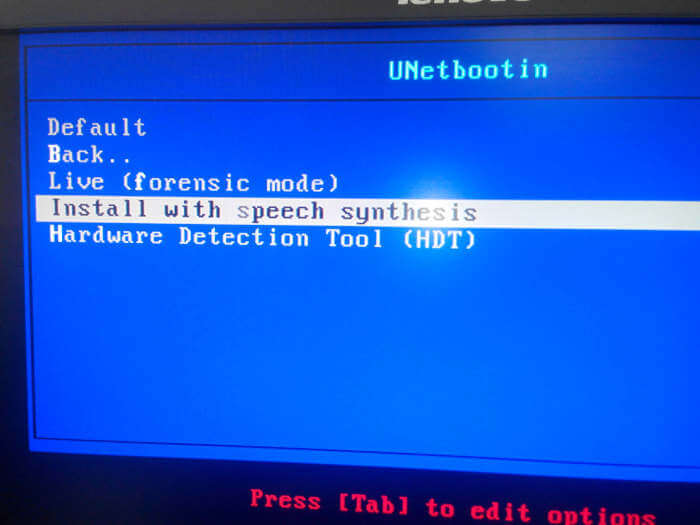
Plug out the usb storage device safely and plug it into the machine you want to boot. Restart it and set that usb storage device to boot first from the BIOS menu which maybe F12, F8, F2, or Del depending upon your machine and build.
You will be greeted with a window as below, from where you can boot into Live Linux Mode and/or Install on Hard Disk from there, directly.
Pros of using Unetbootin
- Most of the processing is automated.
- Easy to use.
- Make it possible to create a boot-able stick from windows/Linux.
Cons of using Unetbootin
- One wrong selection of disk and all your Data and Installation on primary HDD is wiped.
Creating a Bootable USB Device using dd Command
dd command originally was a part of UNIX, which is implemented in Linux. The dd command is capable of striping headers, extracting parts of binary files. It is used by the Linux kernel Makefiles to make boot images.
The basic syntax of dd command is
dd if=<source> of=<target> bs=<byte size>; sync
The bite Size is generally “some power of 2, and usually, not less than 512 bytes i.e., 512, 1024, 2048, 4096, 8192, 16384, but can be any reasonable whole integer value.
sync option allows you to copy everything using synchronized I/O.
Run the below command with modification depending upon your source and destination.
# dd if=/home/server/Downloads/kali-linux-2020.2-installer-amd64.iso of=/dev/sdb1 bs=512M; sync
It will take time to create the boot-able disk depending upon the size of the ISO image and your RAM capacity.
Don’t interrupt the boot stick creation, once the process is completed, you will get something like this in your terminal.
4+1 records in
4+1 records out
2547646464 bytes (2.5 GB) copied, 252.723 s, 10.1 MB/s
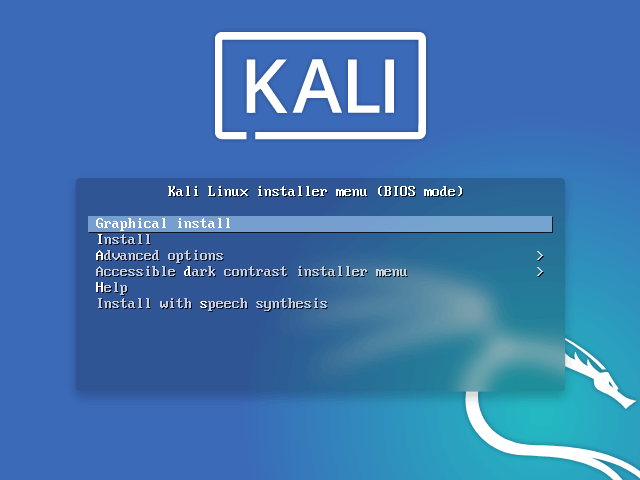
Now safely eject the disk, plug it into the machine you want to boot with Linux, and Yup doesn’t forget to change the booting option in your BIOS, setting your flash stick to boot primarily.
When USB is booted, You will be greeted with a window similar to.
Pros of the above method:
- Least possible error in making a copy.
- No extra/ third party tool required.
Cons of the Above method:
- No room for error, an error, and everything is wiped.
- Non-interactive way.
- You should know, what you are doing, as you won’t get any manual/prompt/help at run time, you must be good in terminals.
Remember, All the distro don’t allow Live Environment, but most of today’s distro does. You will be able to log into a live Linux Environment only if supported.
The above article does not aim at comparing the two methods. Before writing anything we give hours in testing and executing the process to ensure you get a 100% working solution.
If you get stuck at somewhere, feel free to contact us in the comment section. For any damage to data/disk, as a result of the above method, neither the Author nor Tecmint is responsible.
That’s all for now. I will soon be here again, with another interesting article, you people will love to read. Till then stay healthy, safe, tuned, and connected to Tecmint.


Rule #1 of working with storage devices is that before doing anything else, BACK UP your device, whether it is a USB, an HDD, or an SSD. Better yet, back up ALL your devices. You will be able to restore the data on your device in case you make an incorrect device assignment or issue an incorrect command.
Thanks for another great article! As you say, there’s no room for error: If you input the wrong device name for your USB, you will accidentally wipe your HDD. So, before I plug in the USB, I run the command `
sudo dmesg -wH`, and I watch the kernel messages scroll by because that tells me the correct device name, e.g., `/dev/sdc`.Afterward, I always double-check by running `lsblk` or `df -hT` to make certain that I’m targeting the correct USB drive. Then I `umount` the device. I use `dd` with some additional options.
Here’s an example:
where `status=progress` shows periodic transfer statistics and `oflag=direct` uses direct I/O for data. Lastly I run `sync`.
That was very helpful. Thanks for the info.
how can we do when our laptop screen unreadable and need an external monitor to see what I am doing.
Hello
Thanks for useful information.
How can multiple ISOs be put into a single flash drive so they are available during boot time?
for e.g. latest Debian Linux (codenamed”Jessie”) comes in 13 DVD iso files (of which first three are of importance to me). If we install from DVD there is a prompt to replace DVD completed when done. How to modify your command
so that, 3 DVDs roughly of size 4GB each can be accommodated sequentially (or packages in appropriate folder /whatever works) in One flash drive of appropriate size ~ 16 GB.
Thanks
Have you tried to put each ISO into a different USB (that is: 3 USB drives)?
Does not work when trying to install Suse Ent Server 12. Shows a screen with the word “default” only
@Lambert,
Try to use Rufus tool to create a bootable USB media..
Thanks Ravi. I did find that tool and it worked perfectly. My goal was to create a dual boot system with Windows Server 2012 and Suse Server….not there yet, but a step in the right direction Server 2012 is installed, doesnt recognize the Linux OS as a boot option.
Unetbootin doesn’t work for Centos 7 !
@Lyashenkogs,
I think it should work, have you tried it on CentOS?
Hi I have a problem with Cinnamon 17.3 I have upgraded some files as stated in Synaptic and the result is the whole system is failed. It does not recognize my password. I want to go back to before I upgraded version. How can I do that I don’t know. Need help. Thanks.
@Chandrakant,
I am afraid, that you already screwed up and you already have newer versions of most of the packages, so even if you try to remove them it will still hold to keep the new versions, so better option is to backup and reinstall.
I’m having trouble installing kali 2.0 when trying to install it from usb drive. It’s saying it cant find the installation cd, which, of course, coz I’m running from usb drive. Any help!!!!
@AR,
Have you selected Boot option to set USB as priority in Boot Menu from the BIOS?
can you assist with links to a linux distro that has live ,install and other options
@Afolabi,
Not all Linux distributions provides USB Live installs, but some do, you can find them in their official download page..
Hello Avishek brother,
Can you please explain me about 6 options of boot menu such as live, install, graphical, etc.
Install with none at all. Neither USB nor CD: https://linuxwithoutcd.wordpress.com/
I have problem of imputing the source the directory. As newbie can you direct me of how to get the copy and paste as it is in my download file
your source then should be
/home/Rosli/Downloads/name_of_iso.iso
Don’t forget to replace Rosli in the above example with your User_name and name_of_iso.iso with original iso name
I got a funny dd write just now. On an old USB stick i wrote 621 Mb in 1,27 seconds or 486 Mb/s if I am to trust the dd report. However the terminal has not finished the job, so I wonder why the report was made before the write was complete.
Now its finished after about three minutes of writing.
No Droggi,
It says it will be writing xy blocks. It don’t returns the prompt which means the command has not completed yet, and it simply means dd is still in action. It is not funny at all.
Hi Avishek Kumar
can i use dd command in windows OS?
No @ Rafiq,
there is no dd command in windows (as far as i remember).
Trying to install linux in a laptop with WIN8 pre-installed. Used Unetbootin, enabling CSM, disabling secure boot and fast start-up, chose C:/ within Unetbootin as the program would not detect my external usb HDD. Upon reboot, it loads Windows bootloader and allows either Windows or Unetbootin, when I try Unetbootin I get a 0xc0000007b error, thus not allowing me to install linux. Please help!
any chance you are running 32 bit windows? and the binary is 64 bit version?
0xc000007b= “STATUS_INVALID_IMAGE_FORMAT”
wrong binaries(32 bit vs 64 bit) or corrupt file I would think.
Hello,
My PC seems to get stuck in a “rebooting” loop when I try to boot Ubuntu from my flash drive. It opens the main menu (as shown in your last screenshot above), but once I select any option it just reboots again. The BIOS is set for USB Device first. Any suggestions?
Thanks you
Try making your flash drive boot-able again.
checksum you image file to confirm your iso is intact.
Use iso as per you architecture.
The ISO image should be in DD or in USB,and thank you
The Iso Image should be on computer HDD from where it will be written to USB stick using dd command.
Avishek: Thanks for the very clear instructions. I have an old Compaq desktop with Debian 6 running. I downloaded a Debian 7 live image and installed it to a USB thumb drive using dd just as you described it here.
If I change the boot order in BIOS to place the USB drive first in line, and restart, the machine does boot into the USB drive’s OS. BUT! something very weird happens: the power supply fan slows way down, and after about fifteen or twenty seconds, the mouse no longer gets responses when I click on menu items, and the mouse pointer freezes.
At that point I have to turn the power off and on manually to restart.
Any ideas?
Regards
Rob
Check two things.
1. md5 hash of the ISO image you are using with that of official release.
2. (if the first step is ok) try making the USB bootable again!
Let us know where you are?