A backup is the last defense against data loss, offering a means to restore original data. You can use either a removable media such as an external hard drive or USB flash disk or a shared network folder, or a remote host to back up your data. It’s very easy (and equally essential) to automatically backup your important files without you having to remember to do so.
Read Also: 24 Outstanding Backup Tools for Linux Systems in 2018
In this article, we will learn how to auto backup data to a removable media after connecting it to your Linux machine. We will test with an external disk. This is a basic guide to get you started with using udev for real-life solutions.
For the purpose of this article, we need a modern Linux system with:
- systemd systems and services manager
- udev device manager
- rsync backup tool
How to Configuring Udev Rules for Removable Media
Udev is a device manager that enables you to define rules that can among others, trigger execution of a program or script when a device is added to or removed from a running system, as part of the device event handling. We can use this feature to execute a backup script after adding a removable media to the running system.
Before we configure the actual rule for device event handling, we need to provide udev some attributes of the removable media that will be used for the backup. Connect the external disk to the running system and run the following lsusb command to identify its vendor and product ID.
For the testing purpose, we will be using 1TB external hard disk as shown.
$ lsusb
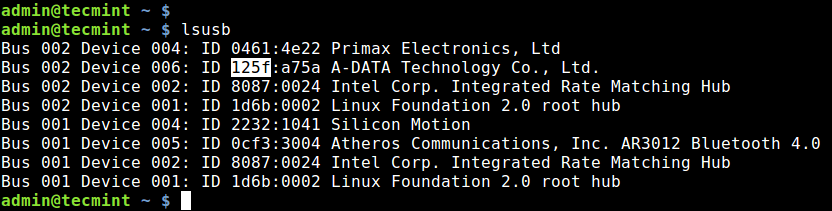
From the output of the above command, our device vendor ID is 125f, which we will specify in the udev rules as explained below.
First, remove the connected media from the system and create a new udev rules file called 10.autobackup.rules under the directory /etc/udev/rules.d/.
The 10 in the filename specifies the order of rules execution. The order in which rules are parsed is important; you should always create custom rules to be parsed before the defaults.
$ sudo vim /etc/udev/rules.d/10.autobackup.rules
Then add the following rule in it:
SUBSYSTEM=="block", ACTION=="add", ATTRS{idVendor}=="125f" SYMLINK+="external%n", RUN+="/bin/autobackup.sh"
Let’s briefly explain the above rule:
"==": is an operator to compare for equality."+=": is an operator to add the value to a key that holds a list of entries.- SUBSYSTEM: matches the subsystem of the event device.
- ACTION: matches the name of the event action.
- ATTRS{idVendor}: matches sysfs attribute values of the event device, which is the device vendor ID.
- RUN: specifies a program or script to execute as part of the event handling.
Save the file and close it.
Create an Auto Backup Script
Now create an auto backup script that will auto backup files to removable USB when connected to the system.
$ sudo vim /bin/autobackup.sh
Now copy and paste the following script, make sure to replace values of BACKUP_SOURCE, BACKUP_DEVICE, and MOUNT_POINT in the script.
#!/usr/bin/bash
BACKUP_SOURCE="/home/admin/important"
BACKUP_DEVICE="/dev/external1"
MOUNT_POINT="/mnt/external"


#check if mount point directory exists, if not create it
if [ ! -d “MOUNT_POINT” ] ; then
	/bin/mkdir  “$MOUNT_POINT”;
fi

/bin/mount  -t  auto  “$BACKUP_DEVICE”  “$MOUNT_POINT”

#run a differential backup of files
/usr/bin/rsync -auz "$MOUNT_POINT" "$BACKUP_SOURCE" && /bin/umount "$BACKUP_DEVICE"
exit
Then make the script executable with the following command.
$ sudo chmod +x /bin/autobackup.sh
Next, reload udev rules using the following command.
$ udevadm control --reload
The next time you connect your external hard disk or whatever device you configured to the system, all your documents from the specified location should be auto backed up to it.
Note: How effectively this works may be influenced by the filesystem on your removable media and the udev rules you write, especially capturing the device attributes.
For more information, see the udev, mount and rsync man pages.
$ man udev
$ man mount
$ man rsync
You might also like to read these following Linux backup related articles.
- rdiff-backup – A Remote Incremental Backup Tool for Linux
- Tomb – A File Encryption and Personal Backup Tool for Linux
- System Tar and Restore – A Versatile Backup Script for Linux
- How to Create Bandwidth-efficient Backups Using Duplicity in Linux
- Rsnapshot – A Local/Remote Backup Tool for Linux
- How to Sync Two Apache Web Servers/Websites Using Rsync
That’s all for now! In this article, we have explained how to auto backup data to a removable media after connecting it to your Linux machine. We would like to hear from you via the feedback form below.

Hi,
This is flawed on very many levels. Besides what was already mentioned:
I’d suggest taking that offline until it is re-worked. Good luck!
Kind regards,
Frank.
@Frank
We will review the guide but you can always add your code to the script to make it better. Thanks for sharing your thoughts with us.
The author promised to update each of these mistakes several times, yet, here I am in 2019-10-26 going through the guide running into the same issues. Most obviously the discrepancies in the naming like backup.sh vs autobackup.sh or $MOUNT_LOC.
I am an absolute beginner but won’t even go into detail and try to fix this based on the comments.
I firmly believe the post should be updated or deleted.
@ABSOLUTE_BEGINNER
The corrections you were concerned about have now been made, thanks for the feedback.
I used to think these sorts of mistakes were purposeful to make you think about stuff and learn, I see them all the time like the op doesn’t test the code because they know what they are doing and simply wrote an article… Good thing you are onto it ;)
rsync SOURCE DESTINATION while you are trying to do rsync DESTINATION SOURCE which might completely mess up the user directories if they follow your guide.
Your bash script simply won’t work on default setup without direct fstab modifications for specific usb devices.
Device vendor ID is not permanent across udev sessions and it will be changed!
@tastym
We will review this guide, especially the script and udev rules to check some of the issue you have raised. Thanks for the feedback.
Still not fixed. Remove this shit before somebody loses their data.
I just use fwbackups. I define backup jobs for each of my four data partitions and /home, set the times to backup in the fwbackups GUI, mount the drives and go to bed. Runs nicely every night.
Who needs the command line and scripts? Fwbackups does incremental backups nicely and the only time it fails is if the target disk is out of space for some reason (or a file to be backed up has the wrong permissions.)
@Richard
Many thanks for mentioning this, we’ll check it out and possibly review it soon.
If I got this right, then all your disks with vendor ID 125f will be overwritten with a backup, as soon as you plug them in. To avoid accidentally losing data, wouldn’t it be reasonable to check for a file system UID or some other unique string, besides the common vendor ID?
@Herald
This is a great and practical concern, thanks for pointing this, we will update the article to explain using of other unique device attributes.
Nice post, but I think I spotted a few errors. In the rule the line
RUN+="/bin/backup.sh"refers to a script named backup.sh while in the rest of the post the script is called autobackup.sh.In the script itself, the rsync command refers to
$MOUNT_LOCwhile it’s actually $MOUNT_POINT that is declared. Finally it would be nice to have some explanation about SYMLINK in the rule (especially the%npart which isn’t obvious). Besides these details, excellent use case. Thanks.@p6ril
We will do the necessary corrections and additions in the article, many thanks for the feedback.