Sometimes it can be painful to navigate the Linux file system with commands, especially for the newbies. Normally, we primarily use the cd (Change Directory) command for moving around the Linux file system.
In a previous article, we reviewed a simple yet helpful CLI utility for Linux called bd – for quickly moving back into a parent directory without typing cd ../../.. repeatedly.
This tutorial will explain a related set of commands: “pushd” and “popd” which are used for efficient navigation of the Linux directory structure. They exist in most shells such as bash, tcsh etc.
Suggested Read: Autojump – An Advanced ‘cd’ Command to Quickly Navigate Linux Filesystem
How pushd and popd Commands Work in Linux
pushd and popd work according to the “LIFO” (last in, first out) principle. In this principle, only two operations are allowed: push an item into the stack, and pop an item out of the stack.
pushd adds a directory to the top of the stack and popd removes a directory from the top of the stack.
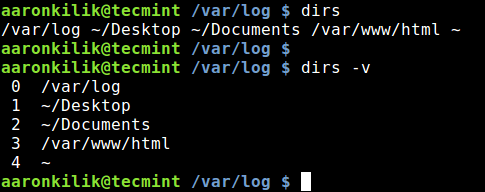
To display directories in the directory stack (or history), we can use the dirs command as shown.
$ dirs
OR
$ dirs -v
pushd command – puts/adds directory paths onto a directory stack (history) and later allowing you to navigate back to any directory in history. While you add directories to the stack, it also echoes what’s existing in history (or “stack”).
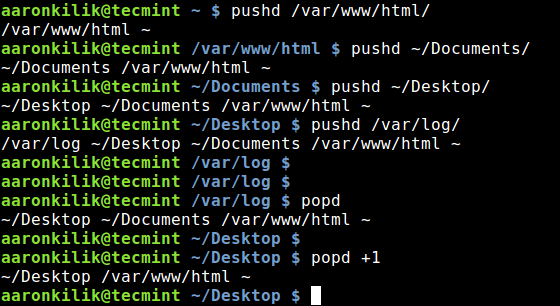
The commands show how pushd works:
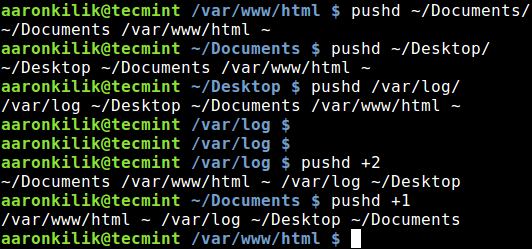
$ pushd  /var/www/html/
$ pushd ~/Documents/
$ pushd ~/Desktop/
$ pushd /var/log/
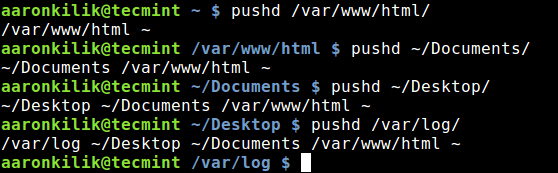
From directory stack in the output above (directory index is in reverse order):
- /var/log is the fifth [index 0] in the directory stack.
- ~/Desktop/ is fourth [index 1].
- ~/Documents/ is third [index 2].
- /var/www/html/ is second [index 3] and
- ~ is first [index 4].
Optionally, we can use the directory index in the form pushd +# or pushd -# to add directories to the stack. To move into ~/Documents, we would type:
$ pushd +2
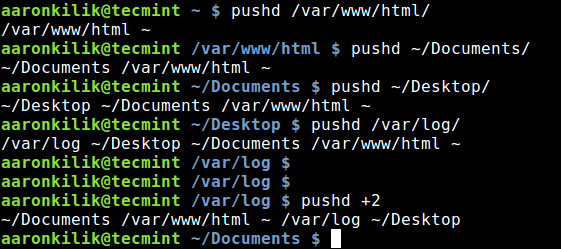
Note after this, the stack content will change. So from the previous example, to move into /var/www/html, we would use:
$ pushd +1
popd command – removes a directory from the top of the stack or history. To list the directory stack, type:
$ popd
To remove a directory from the directory stack inded use popd +# or popd -#, in this case, we would type the command below to remove ~/Documents:
$ popd +1
Also check out: Fasd – A Commandline Tool That Offers Quick Access to Files and Directories
In this tutorial we explained “pushd” and “popd” commands which are used for efficient navigation of the directory structure. Share your thoughts concerning this article via the feedback form below.


Guys, you are too good. After reading this article My all confusions about pushd and popd get cleared.
Thank you so much.
I saw this same tip on Enki today, and then I saw it here. Coincidence? I think not :-) Seriously though, I’ve used Linux since the early 00s, and somehow I only learned about popd and pushd today!
@Sophie,
Maybe coincidence, but trust me, even I don’t know about these two tiny commands pushd and popd till now, last day came to know when one of my author Aaron written an article on the same…
@Sophie
I did not know about these commands as well, but in a recent article we published: bd – Quickly Go Back to a Parent Directory Instead of Typing “cd ../../..” Redundantly, a reader suggested to us pushd and popd commands for efficient file system navigation in one of the comments.
Then i had to write this article about them.