How to Check All Connected Webcams on Ubuntu

Take Your Linux Skills to the Next Level All courses, certifications, ad-free articles & community — from $8/mo
Join Root →
Ad-free access to all premium articles
Access to all courses: Learn Linux, AI for Linux, Bash Scripting, Ubuntu Handbook, Golang and more.
Access to Linux certifications (RHCSA, RHCE, LFCS and LFCA)
Access new courses on release
Get access to weekly newsletter
Priority help in comments
Private Telegram community
Connect with the Linux community
From $8/mo · or $59/yr billed annually · Cancel anytime

If you’re using Ubuntu or Ubuntu-based distribution and want to find or list out which webcams are connected to your system, you can do this easily using a few simple commands. Whether you’re troubleshooting a webcam issue or just curious about what’s available, here’s how to check all connected webcams in Ubuntu.

This article will guide you through the process of identifying all available webcams on your Ubuntu system using command-line tools and graphical interfaces.

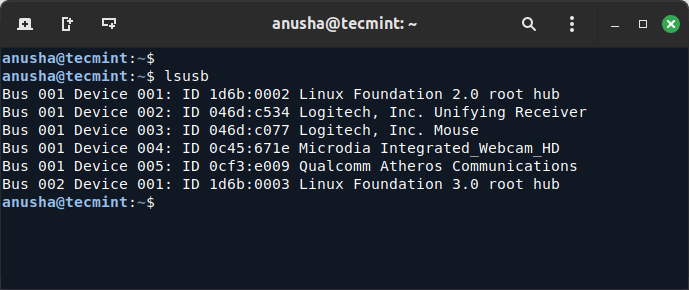
1. Using the lsusb Command

The lsusb command lists all USB devices connected to your system, including webcams.

lsusb

The above command will list all connected USB devices to your system, look for entries that mention “USB Video Device” or similar, which are typically your webcams.

The output will look something like this:

Bus 001 Device 004: ID 0c45:671e Microdia Integrated_Webcam_HD

In this example, the “Microdia Integrated_Webcam_HD” is detected. The numbers before and after the colon represent the USB vendor and product IDs, which can be useful for identifying specific devices.

lsusb - List Connected Devices
lsusb – List Connected Devices

2. Using the v4l2-ctl Command

The v4l2-ctl command is part of the v4l-utils package, which provides detailed information about video devices and webcams.

sudo apt install v4l-utils
v4l2-ctl --list-devices
Show Connected Devices

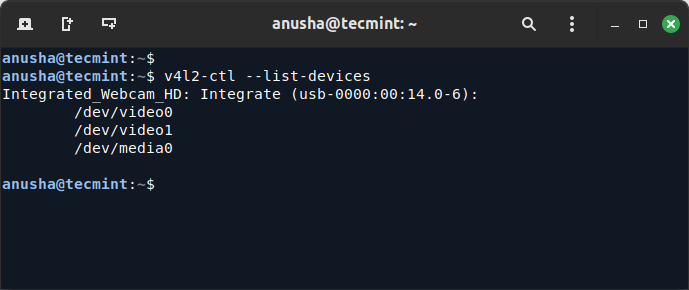
Here, /dev/video0 is the device file associated with the Integrated_Webcam_HD. You can use these device files to interact with your webcams.

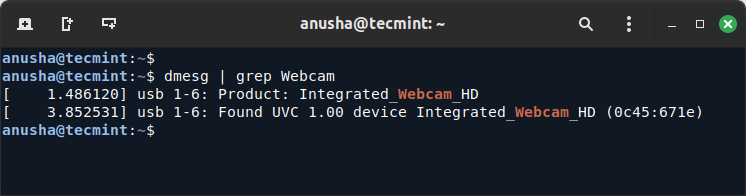
3. Using the dmesg Command

The dmesg command shows system messages, including those related to hardware detection. It can be useful for finding out if your webcam was detected by the kernel:

dmesg | grep video

This will display messages related to video devices, which may include information about your webcam.

List Connected Devices

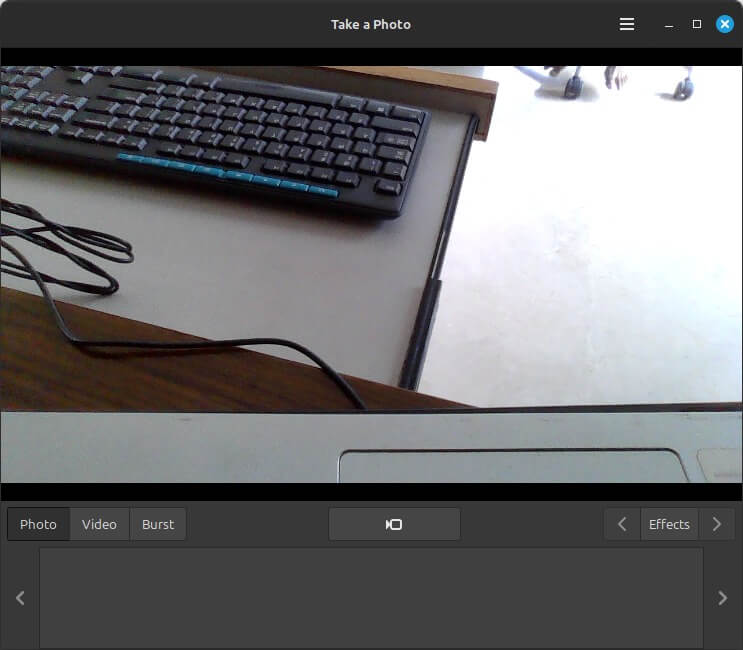
4. Using the Cheese Graphical Tool

Cheese is a simple webcam application that allows you to view video from your webcam and take photos.

sudo apt install cheese

Open Cheese from the applications menu. If your webcam is working, you should see its output in the Cheese window.

View Webcam in Ubuntu

5. Using GNOME Settings

If you are using GNOME, you can check your webcam settings through the GNOME Control Center. Open Settings from the applications menu.

Go to the “Devices” section and select “Camera” if available, this will show your connected webcams.

Conclusion

Checking all available webcams in Ubuntu is straightforward with the use of command-line tools like lsusb, v4l2-ctl, and dmesg, or through graphical applications such as Cheese and GNOME Settings.

Each method provides different levels of detail, so you can use the one that best suits your needs.

Root Plan
Premium Linux Education for Serious Learners

Take Your Linux Skills to the Next Level

Root members get full access to every course, certification prep track, and a growing library of hands-on Linux content — with new courses added every month.

What You Get
Ad-free access to all premium articles
Access to all courses: Learn Linux, AI for Linux, Bash Scripting, Ubuntu Handbook, Golang and more.
Access to Linux certifications (RHCSA, RHCE, LFCS and LFCA)
Access new courses on release
Get access to weekly newsletter
Priority help in comments
Private Telegram community
Connect with the Linux community
Ravi Saive
I'm Ravi Saive, an award-winning entrepreneur and founder of several successful 5-figure online businesses, including TecMint.com, GeeksMint.com, UbuntuMint.com, and the premium learning hub Pro.Tecmint.com.

Each tutorial at TecMint is created by a team of experienced Linux system administrators so that it meets our high-quality standards.

Join the TecMint Weekly Newsletter (More Than 156,129 Linux Enthusiasts Have Subscribed)
Was this article helpful? Please add a comment or buy me a coffee to show your appreciation.

Got Something to Say? Join the Discussion...

Thank you for taking the time to share your thoughts with us. We appreciate your decision to leave a comment and value your contribution to the discussion. It's important to note that we moderate all comments in accordance with our comment policy to ensure a respectful and constructive conversation.

Rest assured that your email address will remain private and will not be published or shared with anyone. We prioritize the privacy and security of our users.

Root Plan Premium Linux Education for Serious Learners

Before You Go - Upgrade Your Linux Skills

Root members get everything in one place, with new courses added every month.

What You Get
Ad-free access to all premium articles
Access to all courses: Learn Linux, AI for Linux, Bash Scripting, Ubuntu Handbook, Golang and more.
Linux certifications: RHCSA, RHCE, LFCS and LFCA
Access new courses on release
Weekly newsletter, priority support & Telegram community
Join Root Today and Start Learning Linux the Right Way
Structured courses, certification prep, and a community of Linux professionals - all in one membership.
Join Root Plan →
$8/mo · or $59/yr billed annually