Netplan is the default network management tool in many modern Linux distributions, like Ubuntu. However, some users might prefer using the traditional /etc/network/interfaces method for managing network configurations.
This guide will walk you through the steps to switch back to using /etc/network/interfaces instead of Netplan.
Step 1: Understand Netplan Configuration
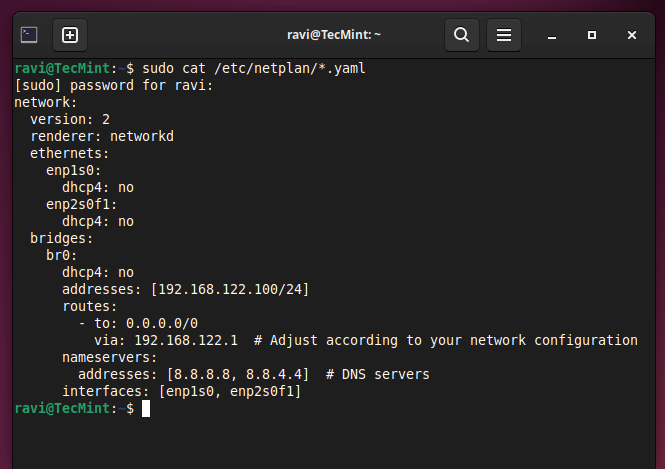
Before switching back to the old method, it’s important to understand the existing network configuration managed by Netplan configuration files, which are stored in the /etc/netplan/ directory, typically ending with .yaml extensions.
To view the current Netplan configuration, use the following cat command:
sudo cat /etc/netplan/*.yaml
This will display your current network settings, which you will need to manually transfer to the /etc/network/interfaces file.
Step 2: Disable Netplan in Ubuntu
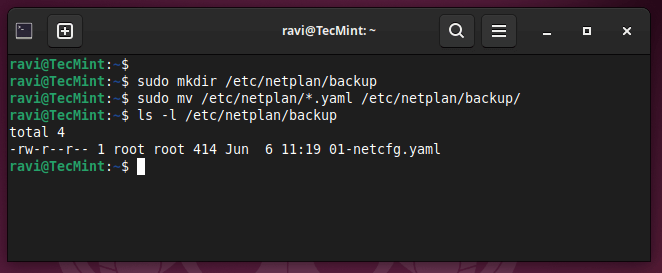
Netplan can be disabled by either removing or renaming the configuration files within the /etc/netplan/ directory.
sudo mkdir /etc/netplan/backup
sudo mv /etc/netplan/*.yaml /etc/netplan/backup/
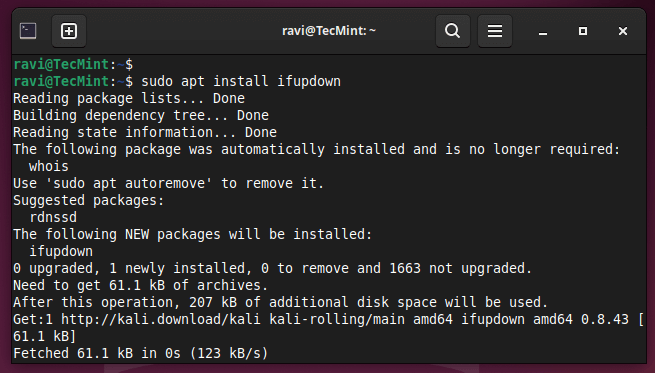
Step 3: Install ifupdown in Ubuntu
The ifupdown package is responsible for managing network interfaces using the /etc/network/interfaces file.
If it’s not installed on your system, you can install it with apt command:
sudo apt update
sudo apt install ifupdown
Step 4: Enable /etc/network/interfaces Configuration
Next, you need to manually configure your network settings in the /etc/network/interfaces file.
Open the file with a nano text editor:
sudo nano /etc/network/interfaces
Here’s a basic template you can use:
# Loopback network interface
auto lo
iface lo inet loopback

# Primary network interface (replace 'eth0' with your actual interface name)
auto eth0
iface eth0 inet dhcp
If you’re using a static IP address, the configuration might look like this:
# Loopback network interface
auto lo
iface lo inet loopback

# Primary network interface (replace 'eth0' with your actual interface name)
auto eth0
iface eth0 inet static
    address 192.168.1.100
    netmask 255.255.255.0
    gateway 192.168.1.1
    dns-nameservers 8.8.8.8 8.8.4.4
Make sure to replace eth0 with your actual network interface name, which you can find using the ip a or ifconfig command.
ip addr
or
ifconfig
Once you’ve configured the /etc/network/interfaces file, restart the networking service to apply the changes:
sudo systemctl restart networking
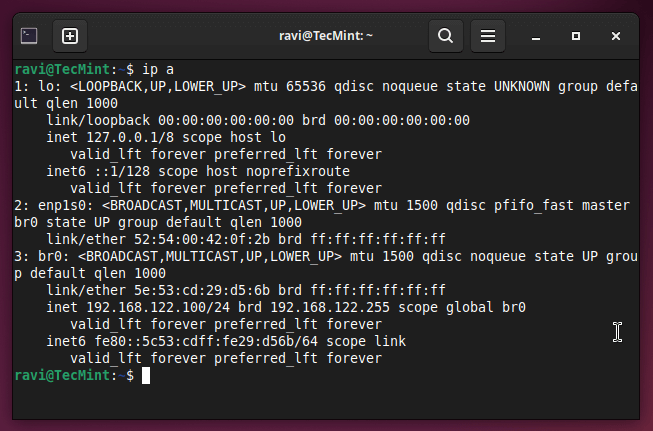
To ensure that your changes have been applied correctly, check the network interfaces using the following command:
ip a
Step 5: (Optional) Remove Netplan
If you’re confident that you no longer need Netplan, you can remove it from your system:
sudo apt remove netplan.io
However, this step is optional, as keeping Netplan installed doesn’t affect your new configuration.
Revert to Netplan from Network Interfaces
If you decide to revert back to using Netplan after switching to /etc/network/interfaces, here’s how you can do it.
If you moved your Netplan configuration files to a backup directory (as shown in the previous guide), you can restore them with the following command:
sudo mv /etc/netplan/backup/*.yaml /etc/netplan/
If you deleted them, you’ll need to recreate the Netplan configuration files.
sudo nano /etc/netplan/01-netcfg.yaml
Here’s an example of a basic Netplan configuration file:
network:
  version: 2
  renderer: networkd
  ethernets:
    eth0:
      dhcp4: yes
To revert to using Netplan, you’ll need to disable the ifupdown package.
sudo apt remove ifupdown
After restoring or recreating the Netplan configuration file, apply the configuration using the following command:
sudo netplan apply
Check if the network interfaces are configured correctly by running:
ip a
If you want to clean up and ensure there’s no conflict, you can remove or comment out the entries in the /etc/network/interfaces file:
sudo nano /etc/network/interfaces
Conclusion
Switching back to /etc/network/interfaces from Netplan is a straightforward process that involves disabling Netplan, configuring the network settings manually, and restarting the networking service.


After spending hours troubleshooting Netplan and encountering various errors, we finally decided to disable it and go old school. We reverted to using traditional interfaces configuration, set up and configured 9 Ubuntu servers – all up and running in less than 30 minutes.
Why was Netplan even introduced in the first place?
Thanks for the article!
@Geoffrey,
Sure! Here’s a simple and friendly reply:
—
Glad to hear you got all 9 servers up and running so quickly!
Netplan was introduced to make network configuration more consistent across Ubuntu systems and to work better with tools like cloud-init. But yes, it can be frustrating sometimes, especially if you’re used to the old `interfaces` way.
Thanks for sharing your experience!
Please move ‘install ifupdown‘ above ‘remove netplan‘. If you remove netplan before installing ifupdown, you will not have a network to install ifupdown.
Otherwise, great info.
Thanks!
@mic,
Good catch! I’ll update it.
Thanks!