In the previous article of this series we explained how to set up and manage the mail server database securely using phpMyAdmin.
Requirement:
Now it’s time to configure the internal programs that will make sending and receiving emails a reality: Postfix and Dovecot (to handle outgoing and incoming emails, respectively).
Configuring Postfix Mail Server
Before you begin configuring Postfix, it would be worth and well to take a look at its man pages here, putting special emphasis on the section titled “Information for new Postfix users“. If you do, you will find it easier to follow along with this tutorial.
In few words, you should know that there are two configuration files for Postfix:
- /etc/postfix/main.cf (Postfix configuration parameters, refer to man 5 postconf for more details).
- /etc/postfix/master.cf (Postfix master daemon configuraton, see man 5 master for further details).
In /etc/postfix/main.cf, locate (or add, if necessary) the following lines and make sure they match the values indicated below:
append_dot_mydomain = no
biff = no
config_directory = /etc/postfix
dovecot_destination_recipient_limit = 1
message_size_limit = 4194304
readme_directory = no
smtp_tls_session_cache_database = btree:${data_directory}/smtp_scache
smtpd_banner = $myhostname ESMTP $mail_name (CentOS)
smtpd_tls_cert_file = /etc/pki/dovecot/certs/dovecot.pem
smtpd_tls_key_file = /etc/pki/dovecot/private/dovecot.pem
smtpd_tls_session_cache_database = btree:${data_directory}/smtpd_scache
smtpd_use_tls = yes
virtual_transport = dovecot
smtpd_sasl_type = dovecot
smtpd_sasl_path = private/auth
The next three settings are of special importance. In the files indicated in yellow we will configure Postfix’s access to the Domains_tbl, Users_tbl, and Alias_tbl tables:
virtual_mailbox_domains = mysql:/etc/postfix/mariadb-vdomains.cf
virtual_mailbox_maps = mysql:/etc/postfix/mariadb-vusers.cf
virtual_alias_maps = mysql:/etc/postfix/mariadb-valias.cf
Note that you can choose different file names above, as long as you make sure to create them and insert the following contents in them. In each case, replace YourPassword with the password you chose for the dba user in Part 1, or you can also use the MariaDB root credentials for user and password below.
Also, make sure you use the exact same names of the email server database and tables created in Part 1.
In /etc/postfix/mariadb-vdomains.cf:
user = dba
password = YourPassword
hosts = 127.0.0.1
dbname = EmailServer_db
query = SELECT 1 FROM Domains_tbl WHERE DomainName='%s'
In /etc/postfix/mariadb-vusers.cf:
user = dba
password = YourPassword
hosts = 127.0.0.1
dbname = EmailServer_db
query = SELECT 1 FROM Users_tbl WHERE Email='%s'
In /etc/postfix/mariadb-valias.cf:
user = dba
password = YourPassword
hosts = 127.0.0.1
dbname = EmailServer_db
query = SELECT Destination FROM Alias_tbl WHERE Source='%s'
Finally, don’t forget to change the permissions to these files to 640:
# chmod 640 /etc/postfix/mariadb-vdomains.cf
# chmod 640 /etc/postfix/mariadb-vusers.cf
# chmod 640 /etc/postfix/mariadb-valias.cf
And the ownership to user root and group postfix:
# chown root:postfix /etc/postfix/mariadb-vdomains.cf
# chown root:postfix /etc/postfix/mariadb-vusers.cf
# chown root:postfix /etc/postfix/mariadb-valias.cf
Next, to enable secure connections we need to make sure the following settings are uncommented (or added, if necessary) in /etc/postfix/master.cf:
submission inet n       -       n       -       -       smtpd
  -o syslog_name=postfix/submission
  -o smtpd_tls_security_level=encrypt
  -o smtpd_sasl_auth_enable=yes
  -o smtpd_reject_unlisted_recipient=no
  -o smtpd_recipient_restrictions=permit_sasl_authenticated,reject
  -o milter_macro_daemon_name=ORIGINATING
pickup    unix  n       -       n       60      1       pickup
cleanup   unix  n       -       n       -       0       cleanup
qmgr      unix  n       -       n       300     1       qmgr
tlsmgr    unix  -       -       n       1000?   1       tlsmgr
rewrite   unix  -       -       n       -       -       trivial-rewrite
bounce    unix  -       -       n       -       0       bounce
defer     unix  -       -       n       -       0       bounce
trace     unix  -       -       n       -       0       bounce
verify    unix  -       -       n       -       1       verify
flush     unix  n       -       n       1000?   0       flush
proxymap  unix  -       -       n       -       -       proxymap
proxywrite unix -       -       n       -       1       proxymap
smtp      unix  -       -       n       -       -       smtp
relay     unix  -       -       n       -       -       smtp

showq     unix  n       -       n       -       -       showq
error     unix  -       -       n       -       -       error
retry     unix  -       -       n       -       -       error
discard   unix  -       -       n       -       -       discard
local     unix  -       n       n       -       -       local
#virtual   unix  -       n       n       -       -       virtual
lmtp      unix  -       -       n       -       -       lmtp
anvil     unix  -       -       n       -       1       anvil
scache    unix  -       -       n       -       1       scache
Note: The indentation in the lines beginning with the -o option is critical; otherwise postfix check will return an error:

Before you save changes, add the following lines at the bottom of the file:
dovecot   unix  -       n       n       -       -       pipe
    flags=DRhu user=vmail:vmail argv=/usr/libexec/dovecot/deliver -f ${sender} -d ${recipient}
At this point it is essential to check whether Postfix has access to the database tables and the domains, accounts, and alias that we created in Part 1.
To do so, we will use the postmap command, an utility to test communication with the tables Postfix will look up during operation, but first and foremost we’ll need to restart postfix:
# systemctl postfix restart
# postmap -q linuxnewz.com mysql:/etc/postfix/mariadb-vdomains.cf
# postmap -q someotherdomain.com mysql:/etc/postfix/mariadb-vdomains.cf
# postmap -q [email protected] mysql:/etc/postfix/mariadb-vusers.cf
# postmap -q [email protected] mysql:/etc/postfix/mariadb-vusers.cf
# postmap -q [email protected] mysql:/etc/postfix/mariadb-vusers.cf
# postmap -q [email protected] mysql:/etc/postfix/mariadb-valias.cf
In the image below we can see that for existing records in the database, a 1 is returned. Otherwise, nothing is displayed back to the screen. In the case of the alias check, note that the actual email account the alias is mapped to is returned:
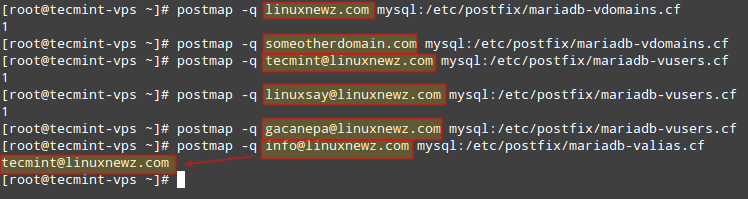
Note that we are NOT authenticating against the credentials set for each email account, we are only testing the ability of Postfix to detect those records in the database.
Thus, if you get a different output than above, make sure you are using a valid user / password pair in mariadb-vdomains.cf, mariadb-vusers.cf, and mariadb-valias.cf (or whatever you chose to call those files).
Configuring Dovecot
As an IMAP / POP3 server, Dovecot provides a way for users through a Mail User Agent (MUA, or also known as client), such as Thunderbird or Outlook, to name a few examples to access their mail.
To begin, let’s create a user and a group to handle emails (we will need this as our email accounts are not associated with a system user). You can use another UID and GID (other than 5000 as we do below) as long as it’s not in use and is a high number:
# groupadd -g 5000 vmail
# useradd -g vmail -u 5000 vmail -d /home/vmail -m
The settings for Dovecot are split across several configuration files (make sure the following lines are uncommented and / or edit them to match the settings indicated below).
In /etc/dovecot/dovecot.conf:
!include_try /usr/share/dovecot/protocols.d/*.protocol
protocols = imap pop3 lmtp
!include conf.d/*.conf
!include_try local.conf
In /etc/dovecot/conf.d/10-auth.conf (only enable authentication through SQL and leave other authentication methods commented out):
disable_plaintext_auth = yes
auth_mechanisms = plain login
!include auth-sql.conf.ext
In /etc/dovecot/conf.d/auth-sql.conf.ext (note that we will store emails within a directory named yourdomain.com inside /home/vmail, which you need to create if it doesn’t exist. In our case we did mkdir /home/vmail/linuxnewz.com to manage emails for that domain):
passdb {
  driver = sql
  args = /etc/dovecot/dovecot-sql.conf.ext
}
userdb {
  driver = static
  args = uid=vmail gid=vmail home=/home/vmail/%d/%n/Maildir
}
Individual inboxes for user accounts will be created when emails for such accounts are first received.
In /etc/dovecot/conf.d/10-mail.conf:
mail_location = maildir:/home/vmail/%d/%n/Maildir
namespace inbox {
  inbox = yes
}
mail_privileged_group = mail
mbox_write_locks = fcntl
In /etc/dovecot/conf.d/10-master.conf:
service imap-login {
  inet_listener imap {
    port = 143
  }
  inet_listener imaps {
  }
}
service pop3-login {
  inet_listener pop3 {
    port = 110
  }
  inet_listener pop3s {
  }
}
service lmtp {
  unix_listener /var/spool/postfix/private/dovecot-lmtp {
   mode = 0600
   user = postfix
   group = postfix
  }
}
service auth {
  unix_listener /var/spool/postfix/private/auth {
    mode = 0666
    user = postfix
    group = postfix
  }
  unix_listener auth-userdb {
   mode = 0600
   user = vmail
  }
  user = dovecot
}
service auth-worker {
  user = vmail
}
service dict {
  unix_listener dict {
  }
}
In /etc/dovecot/conf.d/10-ssl.conf (replace the certificate and key paths if you are planning on using a certificate signed by a CA):
ssl = required
ssl_cert = </etc/pki/dovecot/certs/dovecot.pem
ssl_key = </etc/pki/dovecot/private/dovecot.pem
In /etc/dovecot/dovecot-sql.conf.ext enter your database information and the credentials of the administrative user created in Part 1.
Important: if your password contains an asterisk (#), you will need to enclose the connect string as indicated in the example below:
driver = mysql
connect = "host=127.0.0.1 dbname=EmailServer_db user=dba password=PassWith#Here"
default_pass_scheme = SHA512-CRYPT
password_query = SELECT Email as User, password FROM Users_tbl WHERE Email='%u';
Additionally, you can configure logging for Dovecot to be separate from Postfix in /etc/dovecot/conf.d/10-logging.conf:
log_path = /var/log/dovecot.log
Finally, make sure the Dovecot log is accessible for user dovecot:
# chown vmail:dovecot /var/log/dovecot.log
# chmod 660 /var/log/dovecot.log
Verify and Fix Postifix Configuration and Enable SMTP, POP3, and IMAP in Firewall
If you happen to run into any issues while configuring Postfix and / or Dovecot, instead of submitting all of the configuration files to ask for help, you can get a configuration summary (uncommented lines only) with:
# postconf –n # Summary for /etc/postfix/main.cf
# postconf –M # Summary for /etc/postfix/master.cf
# doveconf –n # Summary of all configuration files for Dovecot
In addition, make sure that the email inboxes are readable by vmail only:
# chown –R vmail:vmail /home/vmail
Configuration files should also be readable by vmail and dovecot users:
# chown -R vmail:dovecot /etc/dovecot
# chmod -R o-rwx /etc/dovecot
Finally, make sure you enable SMTP, POP3, and IMAP through the firewall:
# firewall-cmd --add-port=143/tcp
# firewall-cmd --add-port=143/tcp --permanent
# firewall-cmd --add-port=110/tcp
# firewall-cmd --add-port=110/tcp --permanent
# firewall-cmd --add-port=587/tcp
# firewall-cmd --add-port=587/tcp --permanent
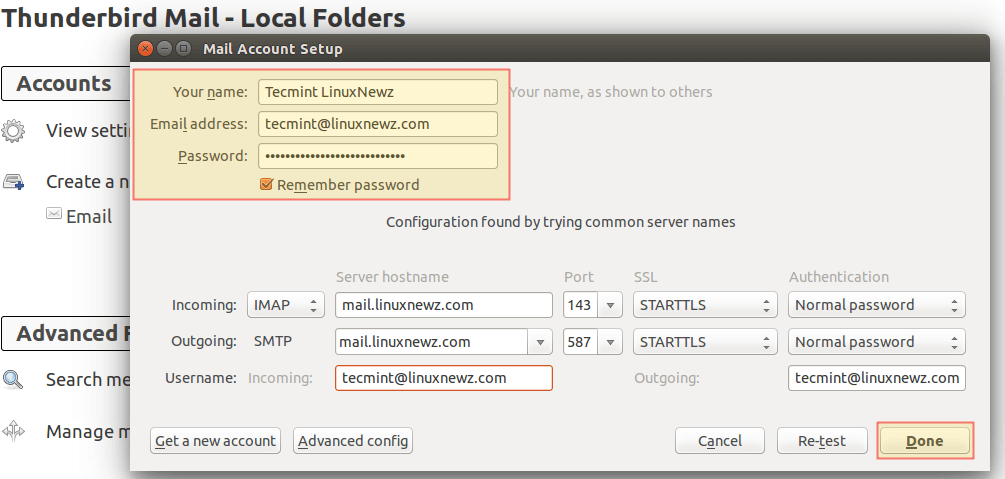
Configure Thunderbird as an Email Client for Postfix
Having secured access through the firewall for the ports used in email communications, it’s time to configure an email client. Using [email protected] and its corresponding password, along with mail.linuxnewz.com as IMAP (or POP3) and SMTP server we are ready to start sending and receiving emails to and from such account:
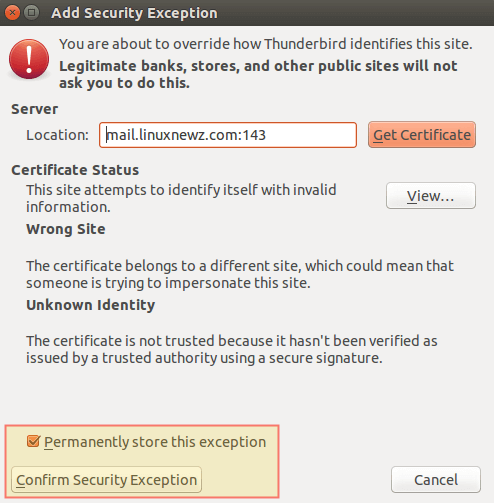
You can safely disregard the warning message that is shown because you are using a certificate that is not signed by a trusted 3rd-party CA:
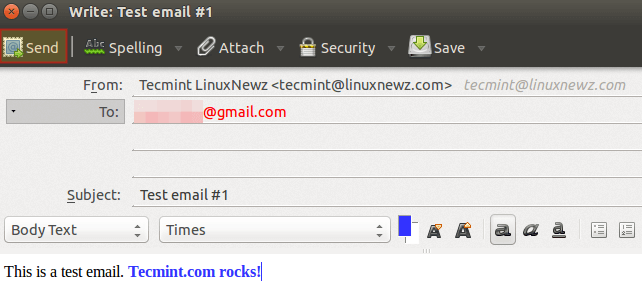
Let’s compose a brief test email and click Send:
When prompted to accept the self-signed certificate for the outgoing server, confirm it previously as before:

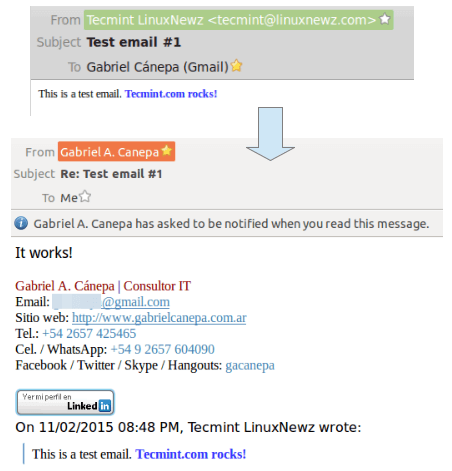
Finally, go to the destination email to see if you received the email that was just sent. If so, reply to it and see if it is delivered back to the source email inbox (otherwise, refer to the Postfix log at /var/log/maillog or the Dovecot log at /var/log/dovecot.log for troubleshooting information):
You now have a working Postfix and Dovecot email server and can start sending and receiving emails.
Summary
In this article we have explained how to configure Postfix and Dovecot to handle email traffic in your Linux server. If something does not work as indicated in this article, make sure you take time to check the Postfix and Dovecot documentation.
Please note that although setting up a Postfix mail server is not an easy task, it is a rewarding experience for every system administrator.
If after going through the docs you find yourself still struggling with Postfix and / or Dovecot, feel free to drop us a note using the comment form below and we will be glad to help you (don’t forget to upload to an online storage service the Postfix and Dovecot configuration as retrieved using postconf and doveconf as outlined in this article).


Hi,
I just update my Centos 9, I follow the steps
But in the /var/log/maillog, I got an error.
I do see /var/log/dovecot.log with no issue.
I still can send & receive emails though.
What is the cause on this?
Many thanks and great instructions!
Hi,
Thank you for your great tutorial! There is one issue though.
I can now send email using thunderbird to my Gmail account and Gmail actually receives it. However, I look at the raw header from Gmail. It shows
Received: from T320.localdomain ([my-ip-address]).
Where T320 is my Linux hostname. How can I make it show the actual domain, such as mydomain.com, as below:
Received: from mydomain.com ([my-ip-address]).
My machine has two domains pointing to it with same ip address….
Not getting any answer?
Here is the raw header from Gmail
Received: by T320.localdomain (Postfix, from userid 1000) id 90B1920813085; Wed,
I wish it is
Received: by mydomain.com (Postfix, from userid 1000) id 90B1920813085; Wed,
@Frank,
You must set your domain under “myhostname” in /etc/postfix/main.cf file.
Password mismatch? Check my comment in the first part of this article.
I will quote it here:
After hours and hours just found the issue…
`password` VARCHAR(100) NOT NULL,But the result of
ENCRYPT(‘PasswordForFirstEmailAccount’, CONCAT(‘$6$’, SUBSTRING(SHA(RAND()), -16)))will always exceed 100 characters
From Dovecot’s documentation: “Home directory shouldn’t be the same as mail directory with mbox or Maildir formats (but with dbox/obox it’s fine). It’s possible to do that, but you might run into trouble with it sooner or later.” And you use the same path in this tutor. Link: https://wiki.dovecot.org/VirtualUsers/Home
Hi there I keep getting password mismatch error when trying to login, and I am sure I’ve entered the correct password. Any idea why this happened ?
auth-worker(403): Debug: sql([email protected],127.0.0.1): query: SELECT Email as user, password FROM Users_tbl WHERE Email='[email protected]';Jul 29 14:04:33 auth-worker(403): Info: sql([email protected],127.0.0.1): Password mismatchplease help me it’s been 1 week and i have no idea how to fix this
I have successfully installed virtual domain postfix with dovecot. my server supports regexp, but i am unable to write rule for following
it didn’t work with my regex, Please guide.
Can you please reply solution for my question.
Thanks
Is it possible to write header check like
\n if (wild_card) sender_domain != receipient_domain REJECT email /^From:[[:space:]]+(.*)/ REPLACE From: ">${1}<" /^ToHi,
For me Ubuntu-18.04 dovecot lib path is /usr/lib/dovecot not /usr/libexec.
Re
dovecot unix – n n – – pipe
flags=DRhu user=vmail:vmail argv=/usr/lib/dovecot/deliver -f ${sender} -d ${user}@${nexthop}
Hi, knowledgeable once. Can you please answer one of my question
I want mailbox structure like this where fzela.com and fzmail.com are domain which contain permission of root directory and inside domain for example fzela.com , I want user permission like this
where fzinnus123 and fzsaran123 are users for fzela.com domain.
I tried a lots but unable to get in mycase my using virtual users
I’m not sure about why you would want root permissions, but I will say that I followed this article and it worked/is still working very well.
https://www.linode.com/docs/email/postfix/email-with-postfix-dovecot-and-mysql-on-centos-6/#install-required-packages
I love these kinds of articles, do any of them work?
For all us newer users, this article would be fantastic if….Just post the complete config file for postfix/dovecot….Do the mods, file creation, databases, etc and done.
Hi,
I have configured a local email server according to your article. I am having a problem when connecting through thunderbird. It keeps saying the password is incorrect. But the password is correct. The dovecot.log gives the authentication failed error. Could you please help me on this?
Hello Gabriel Cánepa, well done on the tutorial, I managed to follow it through and though I had to tweak a bit to get things going I finally did it and it’s working fine, I can receive messages!
But I am afraid I cannot send such, sending to other addresses which doesn’t belong to the local host such @gmail.com, @yahoo.com, etc. fails, as if the server is trying to connect them using SMTP.
Here are few errors which might help you straight what I mean out:
Sep 28 12:51:40 us00 postfix/smtp[2491]: connect to mx10.mailspamprotection.com[184.154.177.50]:25: Connection timed out
Sep 28 12:51:40 us00 postfix/smtp[2491]: A25613F0E5: to=, relay=none, delay=227, delays=72/0.03/155/0, dsn=4.4.1, status=deferred (connect to mx10.mailspamprotection.com[184.154.177.50]:25: Connection timed out)
Sep 28 12:51:35 us00 postfix/smtp[2490]: A42F93F0AC: to=, relay=none, delay=2358, delays=2208/0.02/150/0, dsn=4.4.1, status=deferred (connect to alt4.gmail-smtp-in.l.google.com[74.125.193.27]:25: Connection timed out)
Sep 28 12:51:35 us00 postfix/smtp[2493]: 1692A3F0D8: to=, relay=none, delay=2278, delays=2128/0.04/150/0, dsn=4.4.1, status=deferred (connect to alt4.gmail-smtp-in.l.google.com[74.125.193.27]:25: Connection timed out)
Please bare in mind that these two are email addresses hosted externally.
I have followed all settings in the tutorial, my MX record is pointing to:mx.domain.tld, PTR to mx.domain.tld and mx.domain.tld A Record.
I am honestly not sure what shall I tweak or do to make sure emails are going back and forth.
Hopefully you can help!
Centos 7.5, pointing dovecot log file to /var/log/dovecot.log with suggested permissions results with the following error.
Jul 02 21:03:48 domain.com dovecot[5708]: Can’t open log file /var/log/dovecot.log: Permission denied
Event chmod 777 /var/log/dovecot.log didn’t help
@Derek,
Have you tried:
The problem with de line argv=/usr/libexec/dovecot/deliver is the indentation. I have the error message “bad field count” until i put 2 spaces before the
argv=.help me! when i go to step
Before you save changes, add the following lines at the bottom of the file:
master.cf
[root@sv conf.d]# postfix check
/usr/sbin/postconf: fatal: file /etc/postfix/master.cf: line 129: bad field count
@Le,
Go the line 129 in master.cf file and check for any extra spaces or use correct spacing..
dovecot unix - n n - - pipe flags=DRhu user=vmail:vmail argv=/usr/libexec/dovecot/deliver -f ${sender} -d ${recipient}There needs to be space before “flags” (or after pipe). If you are copying and pasting, you need to add it manually.
dovecot unix – n n – – pipe
flags=DRhu user=vmail:vmail argv=/usr/libexec/dovecot/deliver -f ${sender} -d ${recipient}
Hello Gabriel A. Cánepa,
Me too have the same issue, Please comment on this. I have doubt the path “argv=/usr/libexec/dovecot/deliver” in line 134. Is it matching with your tutorial ? Actually that line needs a bit explanation, please consider. thanking you in advance….
/usr/sbin/postconf: fatal: file /etc/postfix/master.cf: line 134: bad field count
postfix/postlog: warning: inet_protocols: disabling IPv6 name/address support: Address family not supported by protocol
postfix/postfix-script: fatal: cannot execute /usr/sbin/postconf!
Good evening Gabriel Cánepa,
Thank you very much for your presentation.
What should I change if I want the Samba4 LDAP instead of MariaDB? Thank you.
I can’t login into the mail server
May 19 17:29:28 imap-login: Info: Aborted login (auth failed, 5 attempts in 10 secs): user=, method=PLAIN, rip=140.0.249.109, lip=10.10.10.16, TLS: Disconnected, session=
I have a small issue and I can’t seem to find a reason for it. about 5 times a day, I get email addressed to other users on my server. I have enabled verbose logging on postfix and dovecot but I can find no correlation between the logs and the email being sent to the wrong inbox. I am perplexed. Any ideas?
Hi Eric,
This is very strange. If you can post the logs somewhere and indicate what are the right and wrong email addresses, I would be glad to take a look.
On a side note, when an email is sent to the wrong inbox, does the “right” recipient also get a copy or not? Additionally, how did you become aware of this issue and how were you able to determine where the email had gone?
I’ll have to work on getting the logs. I will have to search logs by message ID and figure out which ones are being delivered incorrectly.
The reason I know this is happening is I get other users email, email not addressed to me, but others in the database.
I’ll work on the logs and get back to you.
I believe whats happening is my email gateway, ScrolloutF1, is marking these messages and sending them to a collector email that aliases to my email. I traced one email in particular and it is forwarded to the collector email address and then it gets delivered to me.
That may be the issue.I’ll keep you posted.
Thank you for the prompt reply.
Hi, great article,
After setting everything up I successfully telnet to the server over port 993 (143 does not pass the SSL routine), but I am unable to login.
any ideas?
I’m using ScrolloutF1 for email security and it seems to work great, but I want to send spam reports to the Admin user for each domain. In other words, I would like to forward my spam filter collector address to a distribution group.
Can you explain how to “Alias” a distribution group so an email can be sent to many recipients at once?
Besides creating the group, I would need to add members.
Any help would be greatly appreciated.
Tomthevth,
You need a leading space in front of the line and the error will be resolved. With no space, it does give a config error.
I hope this helps.
I’m getting postfix error when editing the /etc/postfix/master.cf
/usr/sbin/postconf: fatal: file /etc/postfix/master.cf: line 131:
Line 131 is the added flag line:
flags=DRhu user=vmail:vmail argv=/usr/libexec/dovecot/deliver -f ${sender} -d ${recipient}
Someone any idea?
Thanks
I had a same issue because of white spaces copy any similar line
from the file (master.cf) and change it as given instruction should work
S Shah, If you created the user table with password VARCHAR(100) thats the issue. Recreate it with VARCHAR(250) and it will work. The SHA512 encryption makes the password longer than the 100 characters defined.
Hope this helps.
Very nice article but I am stuck unable to login using thunderbird or any other email client
I have the same problem here. Roundcube works fine, also telnet and openssl. But I cannot login via client.
Any ideas?
I got it fixed. Thank you for a great article.
Now I’m back to this:
mail postfix/qmgr[11148]: warning: connect to transport private/dovecot: Connection refused
I am going to uninstall and reinstall postfix and dovecot unless I hear back from you soon. I have to get this going.
Jan 13 04:48:00 mail postfix/master[3845]: warning: process /usr/libexec/postfix/pipe pid 5338 exit status 1
Jan 13 04:48:00 mail postfix/qmgr[3861]: warning: private/dovecot socket: malformed response
Jan 13 04:48:00 mail postfix/qmgr[3861]: warning: transport dovecot failure — see a previous warning/fatal/panic logfile record for the problem description
postconf -n:
append_dot_mydomain = no
biff = no
command_directory = /usr/sbin
config_directory = /etc/postfix
daemon_directory = /usr/libexec/postfix
data_directory = /var/lib/postfix
debug_peer_level = 2
debugger_command = PATH=/bin:/usr/bin:/usr/local/bin:/usr/X11R6/bin ddd $daemon_directory/$process_name $process_id & sleep 5
html_directory = no
inet_interfaces = all
inet_protocols = all
mail_owner = postfix
mailq_path = /usr/bin/mailq.postfix
manpage_directory = /usr/share/man
message_size_limit = 4194304
queue_directory = /var/spool/postfix
readme_directory = no
sample_directory = /usr/share/doc/postfix-2.10.1/samples
sendmail_path = /usr/sbin/sendmail.postfix
setgid_group = postdrop
smtp_tls_session_cache_database = btree:${data_directory}/smtp_scache
smtpd_banner = $myhostname ESMTP $mail_name (CentOS)
smtpd_sasl_path = private/auth
smtpd_sasl_type = dovecot
smtpd_tls_cert_file = /etc/pki/dovecot/certs/dovecot.pem
smtpd_tls_key_file = /etc/pki/dovecot/private/dovecot.pem
smtpd_tls_session_cache_database = btree:${data_directory}/smtpd_scache
smtpd_use_tls = yes
unknown_local_recipient_reject_code = 550
virtual_alias_maps = mysql:/etc/postfix/mariadb-valias.cf
virtual_mailbox_domains = mysql:/etc/postfix/mariadb-vdomains.cf
virtual_mailbox_maps = mysql:/etc/postfix/mariadb-vusers.cf
virtual_transport = dovecot
postconf -n:
# 2.2.10: /etc/dovecot/dovecot.conf
# OS: Linux 3.10.0-514.2.2.el7.x86_64 x86_64 CentOS Linux release 7.3.1611 (Core) xfs
auth_mechanisms = plain login
first_valid_uid = 1000
log_path = /var/log/dovecot.log
mail_location = maildir:/home/vmail/%d/%n/Maildir
mail_privileged_group = mail
mbox_write_locks = fcntl
namespace inbox {
inbox = yes
location =
mailbox Drafts {
special_use = \Drafts
}
mailbox Junk {
special_use = \Junk
}
mailbox Sent {
special_use = \Sent
}
mailbox “Sent Messages” {
special_use = \Sent
}
mailbox Trash {
special_use = \Trash
}
prefix =
}
passdb {
args = /etc/dovecot/dovecot-sql.conf.ext
driver = sql
}
service auth-worker {
user = vmail
}
service auth {
unix_listener /var/spool/postfix/private/auth {
group = postfix
mode = 0666
user = postfix
}
unix_listener auth-userdb {
mode = 0600
user = vmail
}
user = dovecot
}
service imap-login {
inet_listener imap {
port = 143
}
}
service lmtp {
unix_listener /var/spool/postfix/private/dovecot-lmtp {
group = postfix
mode = 0600
user = postfix
}
}
service pop3-login {
inet_listener pop3 {
port = 110
}
}
ssl = required
ssl_cert = </etc/pki/dovecot/certs/dovecot.pem
ssl_key = </etc/pki/dovecot/private/dovecot.pem
userdb {
args = uid=vmail gid=vmail home=/home/vmail/%d/%n/Maildir
driver = static
}
I don't think authentication is the issue at all. I believe that the pid file is corrupt or the process is. I am connected with an email client, can send email anywhere, and email hits the server. Once it's on the server, delivery fails I think due to the process failing and exiting in the error I mentioned earlier.
I failed to thank you for the article. Its a great article and will make managing multiple domains and users easier.
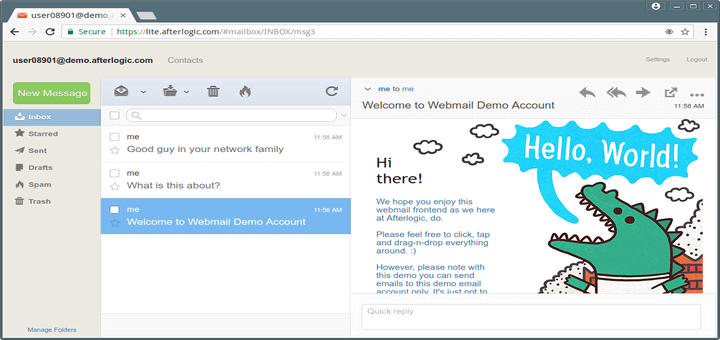
One question: What do you recommend for this setup for webmail? I would like to incorporate that into the setup for user convenience.
Thank you again for the article.
Hello Gabriel,
thank you for this great Guide.
Sending a mail works like it should, but receiving not.
If I try to send a Mail via telnet it looks like this:
at this point i don’t receive a ack code like (250 2.1.5 Ok) this should be an sign for an error, but the log does not say anything
(The “…” shows parts of the ssl communication)
In the postfix logfile is nothing.
Ok i find out, that on the next Page (“How to Add Antivirus and Spam Protection”) in the configuration file /etc/postfix/master.cf the smtp service is configured as inet type. In this section it should be configured as unix type. So which should i use?
Set to “inet” -> restart -> maillog after sending an email:
warning: do not list domain xxx.xx in BOTH mydestination and virtual_mailbox_domains
NOQUEUE: reject: RCPT from mail-vk0-f47.google.com[209.85.213.47]: 550 5.1.1 : Recipient address rejected: User unknown in local recipient table; from= to= proto=ESMTP helo=
When sending a test email to postfix/error[19255]: 020D02159E3: to=, relay=none, delay=0.1, delays=0.04/0.02/0/0.04, dsn=4.3.0, status=deferred (mail transport unavailable)
myself I get: postfix/qmgr[19096]: warning: connect to transport private/dovecot: Connection refused
I can send outside, but not to myself.
This is a local email account only, no public MX record but I have mx record on my dns server and use it to get logs for devices emailed to me.
Please help.
I got everything worked out except; I can send email any where in the world, but it’s not relaying inside the mail server. In other words, if I have a user called [email protected], it will send the email but it states the there is no relay for that user. It finds it in the database and authenticates, etc, but when queued, it never gets delivered. I’ve been over this 100 times and not sure why its not relaying local.
Any suggestions?
I can post error message if you need me to.
Thanks.
I figured out that the query returns an empty result, hence, user not authenticated. I can run the query on the db and specify an ID, but with the query in vusers.cf and vdomains.cf, it is not returning a value. How do I correct this?
Eric – can you send me (or post online) your configuration files and database diagram? I’ll compare with the ones used in our setup and get back to you. Please obfuscate any personal information.
I have resolved the flags error. I needed to put a space in front of the line and the problem went away.
However, after much trouble shooting I am stumped as to why my login is being rejected. I removed and recreated the account in mariadb making sure my password is correct, queried the db to ensure my account exists and my domain exists. I went through every file line by line, but it’s rejecting my login. I am at a loss.
Please help.
Thanks.
When I add the line at the end of master.cf.
flags=DRhu user=vmail:vmail argv=/usr/libexec/dovecot/deliver -f ${sender} -d ${recipient}I get
Commenting the line removes the error.
Suggestions?
Eric – make sure you’re using the right spacing in master.cf: http://superuser.com/questions/809479/fatal-error-bad-field-count-while-configuring-postfix.
Hello @Gabriel,
First of all, thank you for the great article.
I have some issues though: after following this tutorial, and checking all steps few times, I have problems with receiving e-mails. I’m able to send e-mail to everyone, but e-mails from outside domains (e.g. gmail) are not excepted by my mail server. We are using public IP address for mail server. And also, gmail gives me notification that my mail server did not encrypt the message. I’m using let’s encrypt as CA, and their cert and key (fullchain.pem and privkey.pem respectively).
From postfix.com:
“By default, TLS is disabled in the Postfix SMTP server, so no difference to plain Postfix is visible. Explicitly switch it on with “smtpd_tls_security_level = may”. ”
smtpd_use_tls = yes is termed legacy. Could this be the cause of the problem?
“By default, TLS is disabled in the Postfix SMTP server, so no difference to plain Postfix is visible. Explicitly switch it on with “smtpd_tls_security_level = may”.”
Ivan – can you send me (or post online) your configuration files and database diagram? I’ll compare with the ones used in our setup and get back to you.
postmap -q [email protected] mysql:/etc/postfix/mariadb-vusers.cf
postmap: warning: mysql query failed: You have an error in your SQL syntax; check the manual that corresponds to your MariaDB server version for the right syntax to use near ”[email protected]’ at line 1
Sorry i know
i miss ‘ at mariadb-vusers.cf
So my problem is .. i am on the of the part 2 so i am trying setup Thunderbird but i have a problem. I can connect to my mail server and get the folders (inbox, draft, trash) and i think download mails via imap (this i can’t test because i don’t have any emails).
But smtp still not work..Thunderbird shows me error that connection to my mail server failed and nothing shows in logs.. Telnet works i cant normally send email… Another thing when i send email from gmail to my server then gmail send me back error message.
this is my log when i connect to sync my emails.. there are some unknown user auth-worker messages and some pam auth messages
Hi can i still ask some questions ?
@Richard,
Yes, you can feel free to ask any questions related this topic..
I am on the end of this part of tutorial… but my smtp connection via mail client doesn’t work… i can normally send email via telnet but not via client … it shows me error with smtp failed connection and no logs anywhere.
Imap works i think because i connect and got folders so i think it can sync mail via server and client. Another thing is that when i want send email from gmail to my server it return error message to gmail that wasn’t successful.
Is there any options how can i turn on logs for smtp ? because i trying connect but there is nothing in logs no messages for smtp.
I’ve installed all as is decribed in part 1 and 2, but the postfix don’t communicate with me.
If I try to connect at port 25 with telnet, there isn’t answer.
Could You describe how we can test the installation and how to set postfix to log in maillog file?
Thanks for articles/help.
Mareg
Hello, Should we create users in Postfix and Dovecote to use mail server?
Best regards
there’s an error in /etc/postfix/mariadb* files. line startin with “host” should be “hosts”
@Marek,
Good catch!
@Ravi,
Please correct the typo as Marek has pointed out.
Hello, notice the last line in the master.cfg
” flags=DRhu user=vmail:vmail argv=/usr/libexec/dovecot/deliver -f ${sender} -d ${recipient}”
must start with [space]
Mareg
@Mareg,
Thanks for your comment, but I never noticed this. I am confused as to why you had to do that.
I tried this again but its true. So if You look at examples in file, every second line with “flags” parameter had two spaces in the start of.
I’ve done everything step by step, but I can not send or receive any email, I opened port 25 and nothing … please some help … thank you
Ok I have an issue with /var/log/dovecot.log, apparently it was not created during the postfix configuration.. What can I do? can I just create that file under /var/log/?
@Johnny,
The log file should have been created if you followed the steps outlined in this series. What distribution are you using? If you’re using a distro other than CentOS, the file may be located somewhere else. Before creating it manually, I would do a search: find / -name “dovecot.log”.
I’ve been using this guide as a step-by-step literal how-to. At the point with header “Configuring Dovecot” I attempted to send mail to my server using a telnet session, both from localhost and from external. Connection was refused in all cases despite firewall being open on 25. The solution was to modify master.cf to add the line:
smtp inet n – n – 1 smtpd
I’ve got other issues at this point, but at least the server is accepting connection and responding to ehlo now. On CentOS7.2 x64.
@Harmon20,
Please refer to Part 3 (https://www.tecmint.com/integrate-clamav-and-spamassassin-to-protect-postfix-mails-from-viruses/) and check Figure 1. This same instruction was provided there.
What? RTFM before posting? Why would I do that?
BTW, the “other issues” I’ve got … spelling alias in my mariadb lookup cf as “alais”.
I’m a doof. I’m going to keep plugging away at it anyways. Maybe I’ll have a functional server by the time I get to the end of this series.
I advised you to check Part 3 of this series to point out that this had been properly addressed there. This setup was tested so I don’t see why you wouldn’t have a functional server once you complete this series.
Oh, I don’t doubt the series. With stupid problems like spelling mistakes and freaking out about broken stuff before bothering to reading the entire process I’m questioning my ability to execute properly. But I’m learning plenty along the way, so I’m going to keep at it. I’ve tried a dozen different tutorials and I keep coming back to this one. It seems to make more sense and be laid out a bit more logically and informatively than most. If I can’t make it work, its on me.
@Harmon20,
If for some reason you can’t make it work, don’t hesitate to let us know. I’m willing to share all the configuration files so you can compare them to your setup. We really want you to have the awesome feeling of having set up this complete mail server and make it work :).
I was having the same issue receiving emails from outside, i solved it with
firewall-cmd –add-port=25/tcp
firewall-cmd –add-port=25/tcp –permanent
@JOSE,
Good catch. Yes, you need to allow the appropriate traffic through the built-in firewall service.
Hi, i’ve follow the how to , and it works perfectly but just one important thing doesn’t work! I don’t receive the mail but i can send, why ?? I’ve rechecked the configuration file and it’s seem all ok!
@Mario,
First, check the logs. Can you see anything useful there?
Next, check the my_networks directive in the Postfix configuration file. What does it say?
I using a ec2 instance on amazon web service. Port 143 and 587 are reachable from outside.
mynetworks = 172.31.16.0/24 127.0.0.0/8
Into log message:
dovecote.log:
After I try to download mail from thunderbird
Feb 25 17:33:48 auth: Info: mysql: Connected to 127.0.0.1 (EmailServer_db)
Feb 25 17:34:02 imap-login: Info: Disconnected (auth failed, 3 attempts): user=, method=PLAIN, rip=82.48.31.30, lip=172.31.16.209, TLS
Feb 25 17:34:07 imap-login: Info: Login: user=, method=PLAIN, rip=82.48.31.30, lip=172.31.16.209, mpid=31542, TLS
Feb 25 17:34:07 imap(XXXXX): Info: Disconnected: Logged out bytes=8/328
Feb 25 17:34:13 imap-login: Info: Login: user=, method=PLAIN, rip=82.48.31.30, lip=172.31.16.209, mpid=31544, TLS
I substute in this paste [email protected] for privacy reason.
Into maillog I don’t see anything when I try to download the mail from thunderbird. I see only log messages relative sent mail.
@Mario,
I would look into the Dovecot side of things. We don’t have this server anymore, but I kept a backup of the configuration files. Do you want me to send them to you? Other than that, I would go through the comments in these articles. What other users did may be helpful for you as well.
# 2.0.9: /etc/dovecot/dovecot.conf
# OS: Linux 4.1.17-22.30.amzn1.x86_64 x86_64 ext4
auth_mechanisms = plain login
listen = *
log_path = /var/log/dovecot.log
mail_location = maildir:/home/vmail/%d/%n/Maildir
mail_privileged_group = mail
mbox_write_locks = fcntl
namespace inbox {
inbox = yes
location =
prefix =
}
passdb {
args = /etc/dovecot/dovecot-sql.conf.ext
driver = sql
}
service auth-worker {
user = vmail
}
service auth {
unix_listener /var/spool/postfix/private/auth {
group = postfix
mode = 0666
user = postfix
}
unix_listener auth-userdb {
mode = 0600
user = vmail
}
user = dovecot
}
service imap-login {
inet_listener imap {
port = 143
}
}
service lmtp {
unix_listener /var/spool/postfix/private/dovecot-lmtp {
group = postfix
mode = 0600
user = postfix
}
}
service pop3-login {
inet_listener pop3 {
port = 110
}
}
ssl = required
ssl_cert = </etc/pki/dovecot/certs/dovecot.pem
ssl_key = </etc/pki/dovecot/private/dovecot.pem
userdb {
args = uid=vmail gid=vmail home=/home/vmail/%d/%n/Maildir
driver = static
}
This is my dovecot configuration file obtained by doveconf -n. I has read the comment but i don't find a solution for my problem. I follow the suggestion of an user in the previously article (change VARCHAR(100) in VARCHAR(106) ) so, I think the problem wansn't authentication. Thanks for your support :)
Grabiel don’t leave me alone please lol ;)
@Mario,
He will surely help you out, may be he kinda busy, just have patience, you will soon hear from him with solution..
@Mario,
Another reader has commented that he had the same issue and he solved it by opening the right port in the firewall:
firewall-cmd –add-port=25/tcp
firewall-cmd –add-port=25/tcp –permanent
Can you please give it a try and let us know if it worked?
Yes, 25 port is open (i open it into amazon web service interface) but if I launch a nmap on localhost I get this:
PORT STATE SERVICE
21/tcp open ftp
22/tcp open ssh
80/tcp open http
110/tcp open pop3
111/tcp open rpcbind
143/tcp open imap
443/tcp open https
587/tcp open submission
993/tcp open imaps
995/tcp open pop3s
3306/tcp open mysql
And, this is the nmap from remote:
21/tcp open ftp
22/tcp open ssh
25/tcp closed smtp
80/tcp open http
110/tcp open pop3
143/tcp open imap
587/tcp open submission
993/tcp open imaps
995/tcp open pop3s
not functional
you waste your time guys
go find other tutorial
@Sam,
Please tell us clearly and explain why this article is waste of time? where you’re facing problems, we’re here to help you out, but just don’t post meaning less comment here..
Two brilliant articles for configuring an email server on my new CentOS 7.2 system — thanks very much!
But a typo in Part 1 of the article didn’t manifest itself until I hit the end of Part 2 — I kept getting authorization failed errors when trying to log in with my email client:
imap-login: Info: Disconnected (auth failed, 1 attempts in 4 secs)
After investigating further with some debug options turned on, it turned out to be a “Password mismatch” error — which I found was due the “password” field in the Users_tbl being defined as a 100 character field. But the encrypted password requires a minimum of 106 characters, so it was being truncated when stored in the database. Consequently, the password entered in the email client would never match the password in the database, and I would never be able to log in.
When creating the Users_tbl in Step 13 in the Part 1 article, change the:
`password` VARCHAR(100)
reference to:
`password` VARCHAR(106)
or some other value larger than 106 and everything works great.
For those who have already got this far, but cannot log in, run these SQL statements in your EmailServer_db to correct this issue:
alter table Users_tbl modify column password varchar(106);
and then update your email pasword in the database for each email account:
update Users_tbl set password=ENCRYPT(‘MyPasswordHere’, CONCAT(‘$6$’, SUBSTRING(SHA(RAND()), -16))) where Email=’MyEmailAccountHere’;
Once I did that, everything worked perfectly.
Thank you for your contribution! We’ll work on correcting the writeup!
Hi
I have the same issue as @Georg has. I set up everything according this guide, but I am not able to configure an email account in Thunderbird. It keeps saying that no settings for my mail account could be found.
Do you have any idea what could be wrong?
Regards, Phrosgone
Please share your configuration files and I can take a look. Also, please see my comment in response to Georg below.
Hi Gabriel,
I was following the instructions letter by letter and had no mistakes.
At the ‘Configure Thunderbird as an Email Client for Postfix’ step I stumbled upon an error that looks strange to me:
Server is accessible, I see a Dovecot prompt at port 143, but neither Thunderbird nor Apple Mail won’t recognize a valid IMAP login attempt.
What I see in the logs is:
Nov 27 12:12:23 urbi postfix/submission/smtpd[3237]: connect from ip.hostname.net[46.xxx.xxx.xxx]
Nov 27 12:12:26 urbi postfix/submission/smtpd[3237]: warning: ip.hostname.net[46.xxx.xxx.xxx]: SASL PLAIN authentication failed:
Nov 27 12:12:26 urbi postfix/submission/smtpd[3237]: disconnect from ip.hostname.net[46.xxx.xxx.xxx]
Nov 27 12:12:36 urbi postfix/submission/smtpd[3237]: lost connection after AUTH from ip.hostname.net[46.xxx.xxx.xxx]
Nov 27 12:12:36 urbi postfix/submission/smtpd[3237]: disconnect from de2x.mullvad.net[46.165.208.203]
Nov 27 12:14:16 urbi dovecot: auth: Warning: auth client 0 disconnected with 1 pending requests: EOF
Nov 27 12:15:51 urbi dovecot: imap-login: Disconnected (no auth attempts in 15 secs): user=, rip=46.xxx.xxx.xxx, lip=xx.xx.xx.xx, TLS handshaking: Disconnected, session=
Nov 27 12:15:54 urbi dovecot: imap-login: Aborted login (auth failed, 1 attempts in 2 secs): user=, method=PLAIN, rip=xx.xx.xx.xx, lip=xx.xx.xx.xx, TLS, session=
Thunderbird is able to autodetect ports (143/587) and STARTTLS as a Security setting, keeps telling me “Maybe the password is wrong?”
I deleted the user and created it again with a password that has no special characters – only letters/numbers – it did not help.
Any ideas what could be wrong?
Thanks,
Georg
Make sure the passwords have been encrypted as explained in this article. Other encryption methods will not work.
To whom it may concern if you have trouble sending mails or if postfix has trouble connecting to db (keep in mind i used mysql instead of mariadb).
A quick installation of postfix-mysql may solve your issue “sudo apt-get install postfix-mysql”
I have actually successfully set up a server a couple of times successfully using this guide using ubuntu 14. There were just a few tweaks I had to make. Can’t remember them with out actually going through the process, so i’ll just post as I remember.
Another required tweak I had to make for receiving mail…
One reason that you are not recieving mail may be that dovecot is not actually listening on the imap(143) or pop3(110) ports.
You can check this with the command “netstat -nl4”
If this is the case look in dovecot.conf and uncomment the line “listen = *,::”
If your server does not support ipv6 you can also remove the “,::”
For anyone who has trouble recieving mail, if your are using ubuntu the information in master.cf may be wrong. The guide says to add a line at the end of master.cf in /etc/postfix
In the snippet the guide has you add at the bottom it has argv=/usr/libexec/dovecot/deliver
Make sure that folder exists if not, it is most likely argv=/usr/lib/dovecot/deliver as it was with mine.
@Rocky,
Please refer to the last paragraph in the Summary section of this article: “…feel free to drop us a note using the comment form below and we will be glad to help you (don’t forget to upload to an online storage service the Postfix and Dovecot configuration as retrieved using postconf and doveconf as outlined in this article).”
Unfortunately, the information provided by the logs is not enough to troubleshoot this issue – that is why I asked readers to submit their configuration files in order for me to take a look. Feel free to obfuscate your IP address and passwords with letters or signs.
What I can tell you for sure is that Postfix / Dovecot are not seeing your virtual users accounts. So that makes me think they’re not having access to the database. But I’m afraid that’s all I can tell without looking at your config files. Look forward to hearing from you!
Hi Gabriel,
Thanks for your reply…
I had successfully configured mail server for single domain before, so it’s all DNS,PTR and MX records are correctly set.
EMAILS sending and receiving are working fine on that VM.
But here for virtual domain mail server’s VM ( issue ) :
– I am able to send emails but not receiving it from external servers.. for example GMAIL,HOTMAIL, etc
Here are my main.cf,master.cf and dovecot configuration ( as it was not working with given setting…I slightly modified it..)
——————————————–
MAIN.CF
————————————————————————————————————————————
alias_database = hash:/etc/aliases
alias_maps = hash:/etc/aliases
append_dot_mydomain = no
biff = no
command_directory = /usr/sbin
config_directory = /etc/postfix
daemon_directory = /usr/libexec/postfix
data_directory = /var/lib/postfix
debug_peer_level = 2
debugger_command = PATH=/bin:/usr/bin:/usr/local/bin:/usr/X11R6/bin ddd $daemon_directory/$process_name $process_id & sleep 5
dovecot_destination_recipient_limit = 1
home_mailbox = Maildir/
html_directory = no
inet_interfaces = all
inet_protocols = ipv4
mail_owner = postfix
mailq_path = /usr/bin/mailq.postfix
manpage_directory = /usr/share/man
message_size_limit = 4194304
milter_default_action = accept
milter_protocol = 2
mydestination = localhost, localhost.localdomain
mydomain = example.com
myhostname = mail.example.com
mynetworks = 127.0.0.0/8, 192.168.56.0/24, 27.5.68.0/24
myorigin = example.com
newaliases_path = /usr/bin/newaliases.postfix
non_smtpd_milters = $smtpd_milters
queue_directory = /var/spool/postfix
readme_directory = no
sample_directory = /usr/share/doc/postfix-2.10.1/samples
sendmail_path = /usr/sbin/sendmail.postfix
setgid_group = postdrop
smtp_tls_session_cache_database = btree:${data_directory}/smtp_scache
smtpd_banner = $myhostname NO UCE ESMTP
smtpd_milters = inet:127.0.0.1:8891
smtpd_sasl_path = private/auth
smtpd_sasl_type = dovecot
smtpd_tls_cert_file = /etc/pki/dovecot/certs/dovecot.pem
smtpd_tls_key_file = /etc/pki/dovecot/private/dovecot.pem
smtpd_tls_session_cache_database = btree:${data_directory}/smtpd_scache
smtpd_use_tls = yes
unknown_local_recipient_reject_code = 550
virtual_alias_domains =
virtual_alias_maps = mysql:/etc/postfix/mariadb-valias.cf
virtual_gid_maps = static:5000
virtual_mailbox_base = /home/vmail
virtual_mailbox_domains = mysql:/etc/postfix/mariadb-vdomains.cf
virtual_mailbox_maps = mysql:/etc/postfix/mariadb-vusers.cf
virtual_transport = dovecot
virtual_uid_maps = static:5000
——————————————–
MASTER.CF
————————————————————————————————————————————
smtp inet n – n – – smtpd
submission inet n – n – – smtpd
-o syslog_name=postfix/submission
-o smtpd_tls_security_level=encrypt
-o smtpd_sasl_auth_enable=yes
-o smtpd_reject_unlisted_recipient=no
-o smtpd_recipient_restrictions=permit_sasl_authenticated,reject
-o milter_macro_daemon_name=ORIGINATING
smtps inet n – n – – smtpd
-o syslog_name=postfix/smtps
-o smtpd_tls_wrappermode=yes
-o smtpd_sasl_auth_enable=yes
-o smtpd_recipient_restrictions=permit_sasl_authenticated,reject
-o milter_macro_daemon_name=ORIGINATING
pickup unix n – n 60 1 pickup
cleanup unix n – n – 0 cleanup
qmgr unix n – n 300 1 qmgr
tlsmgr unix – – n 1000? 1 tlsmgr
rewrite unix – – n – – trivial-rewrite
bounce unix – – n – 0 bounce
defer unix – – n – 0 bounce
trace unix – – n – 0 bounce
verify unix – – n – 1 verify
flush unix n – n 1000? 0 flush
proxymap unix – – n – – proxymap
proxywrite unix – – n – 1 proxymap
smtp unix – – n – – smtp
relay unix – – n – – smtp
showq unix n – n – – showq
error unix – – n – – error
retry unix – – n – – error
discard unix – – n – – discard
local unix – n n – – local
lmtp unix – – n – – lmtp
anvil unix – – n – 1 anvil
scache unix – – n – 1 scache
dovecot unix – n n – – pipe
flags=DRhu user=vmail:vmail argv=/usr/libexec/dovecot/deliver -f ${sender} -d ${recipient}
——————————————–
DOVECOT CONFIGURATION
————————————————————————————————————————————
# 2.2.10: /etc/dovecot/dovecot.conf
# OS: Linux 3.10.0-229.20.1.el7.x86_64 x86_64 CentOS Linux release 7.1.1503 (Core) xfs
auth_mechanisms = plain login
listen = *
log_path = /var/log/dovecot.log
mail_location = maildir:/home/vmail/%d/%n/Maildir
mail_privileged_group = vmail
mbox_write_locks = fcntl
namespace inbox {
inbox = yes
location =
mailbox Drafts {
special_use = \Drafts
}
mailbox Junk {
special_use = \Junk
}
mailbox Sent {
special_use = \Sent
}
mailbox “Sent Messages” {
special_use = \Sent
}
mailbox Trash {
special_use = \Trash
}
prefix =
}
passdb {
args = /etc/dovecot/dovecot-sql.conf.ext
driver = sql
}
service auth-worker {
user = vmail
}
service auth {
unix_listener /var/spool/postfix/private/auth {
group = postfix
mode = 0666
user = postfix
}
unix_listener auth-userdb {
mode = 0600
user = vmail
}
user = dovecot
}
service imap-login {
inet_listener imap {
port = 143
}
inet_listener imaps {
port = 993
ssl = yes
}
}
service lmtp {
unix_listener /var/spool/postfix/private/dovecot-lmtp {
group = postfix
mode = 0600
user = postfix
}
}
service pop3-login {
inet_listener pop3 {
port = 110
}
inet_listener pop3s {
port = 995
ssl = yes
}
}
ssl = required
ssl_cert = </etc/pki/dovecot/certs/dovecot.pem
ssl_key = </etc/pki/dovecot/private/dovecot.pem
userdb {
args = uid=vmail gid=vmail home=/home/vmail/%d/%n/Maildir
driver = static
}
————————————————————————————————————————————————————————————-
_______________________________________________________________________________________________________________
HI,
Followed exact steps as you have mentioned,
Sending emails are not an issue but receiving email from other servers is..
whenever I send email from gmail , I get this response
—————————————————————————————————————-
Delivery to the following recipient failed permanently:
[email protected]
Technical details of permanent failure:
Google tried to deliver your message, but it was rejected by the server for the recipient domain example.com by mail.example.com. [1**.**.**.**].
The error that the other server returned was:
550 5.1.1 : Recipient address rejected: User unknown in local recipient table
—————————————————————————————————————-
And while sending from Yahoo, I get this
—————————————————————————————————————-
Sorry, we were unable to deliver your message to the following address.
:
Remote host said:
550 5.1.1 Recipient not found.
[RCPT_TO]
—————————————————————————————————————-
While making an effort in resolving this issue….I have modified main.cf
Please help me in resolving this issue…
^^ Didn’t mean to post that as a reply to your post
Do you own the example.com domain?