On 1st July 2014, Zentyal developers announced the release of Zentyal Linux 3.5 Community Small Business Server, a native drop-in replacement for Windows Small Business Server and Microsoft Exchange Server based on Ubuntu 14.04 LTS. This release comes with new features, the most important being a single implementation of LDAP based on Samba4 and Microsoft Outlook 2010 support, while some modules found in previous versions have been completely removed: FTP Server, Zarafa Mail, User Corner, Bandwidth Monitor, Captive Portal and L7 Filer.
Following former topics on Zentyal 3.4 installed and used as a PDC, this tutorial will concentrate on how you can configure Zentyal 3.5 Server to act as a BDC – Backup Domain Controller for Windows Servers or Zentyal 3.4 or 3.5 PDC, by replicating user accounts database, but skipping installation guides since it can be used the same procedure as described for Zentyal 3.4, without setting as a PDC.
Requirements
- Download Zentyal 3.5 Community Edition CD ISO image – http://www.zentyal.org/server/
- Install Zentyal 3.5 using the same procedure as described for Zentyal Linux 3.4.
Step 1: Install Required Modules for Zentyal BDC
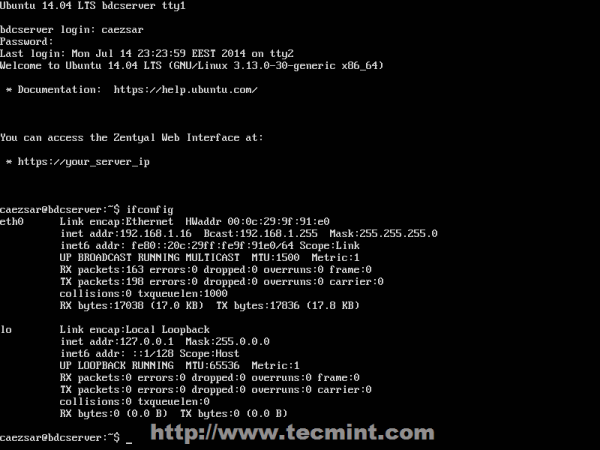
1. After a fresh installation of Zentyal 3.5 Server, login to console prompt and verify your server IP address using ifconfig command, if you use a DHCP server on your network that automatically assigns IP addresses to your network hosts, to be able to login to Zentyal Web Administration.
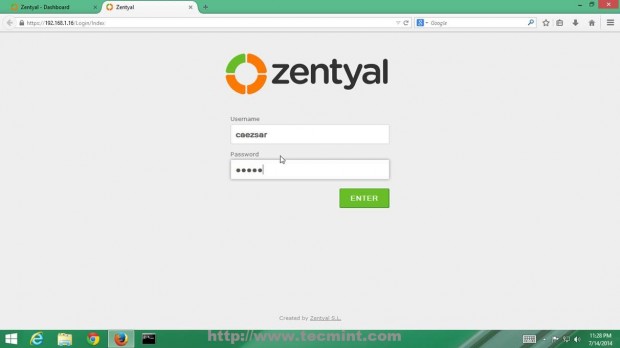
2. After you get your Zentyal system IP address, open a browser from a remote location and login to Web Remote Admin Interface using the address https://zentyal_IP and credentials configured for Zentyal Admin User on installation process.
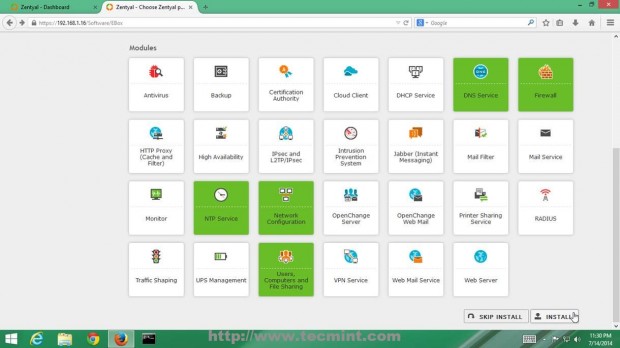
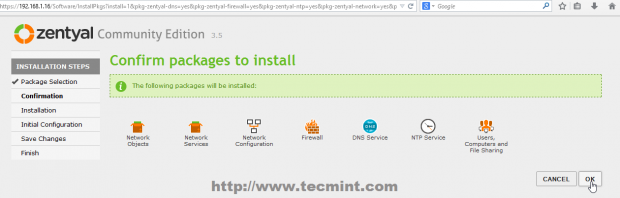
3. On the first window choose the following Zentyal packages to install so you can configure your server to act as a BDC and hit on OK button on next prompt.
- DNS Service
- Firewall
- NTP Service
- Network Configuration
- Users, Computers and File Sharing
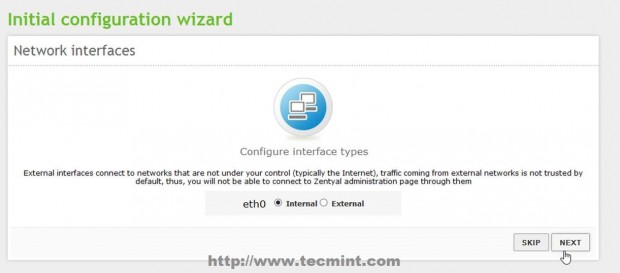
4. Zentyal Ebox will start installing the required packages with their dependencies and when will reach Network Interfaces configuration wizard. Here setup your Network Interface as Internal and hit on Next button to proceed further.
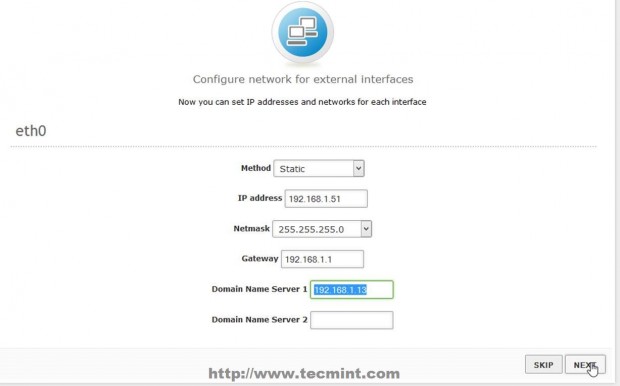
5. Due to the fact that you will be using Zentyal as a BDC in your network interface, must be assigned with a static IP address. Choose Static as IP configuration Method, provide your local network static IP Address, Netmask and Gateway and – very important – choose your Primary Domain Controller IP Address or the servers responsible for DNS PDC resolutions to be used on Domain Name Server field, then click on Next to continue.
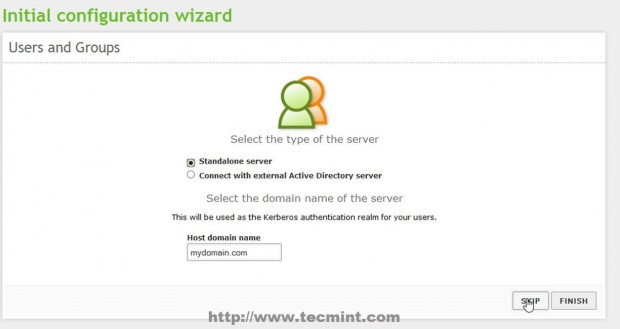
6. On the next stage on Users and Groups leave it as default and hit Skip button and the modules installation should continue.
7. After this step if you configured other static IP Address than the one automatically issued by DHCP server, you will lose connectivity to Zentyal Server from browser. To re-login, go back to browser and type your newly Static IP Address that you manually added above on step 5 and use the same credentials as earlier.
8. After all modules finish installing move to Module Status, make sure you check all modules listed, hit on above Save Changes button and click again on Save button prompt to apply changes and start modules.

Step 2: Setup Zentyal 3.5 as a BDC
9. After all required modules installed and operational, it’s time to configure Zentyal 3.5 to act as a Backup Domain Controller or Additional Domain Controller by synchronizing User Accounts Database.
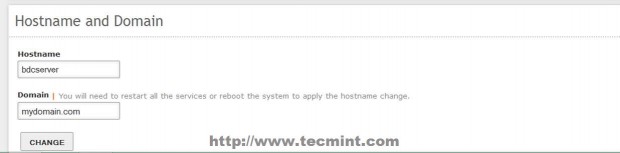
10. Go to System -> General -> Hostname and Domain and check your Hostname and Domain name entries – provide an descriptive name for Hostname, like bdc for example and use your main domain name on Domain field – by default this step should be configured on system installation process by choosing your server BDC hostname.
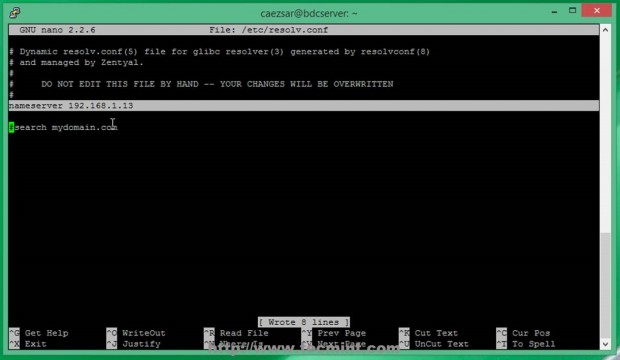
11. But before starting to join the main domain, assure that you have connectivity and DNS resolution to Primary Domain Controller Server. First open Putty, login to your Zentyal BDC server and edit resolv.conf file to point to your Primary Domain Controller IP Address or DNS Server Address responsible with PDC name resolutions.
# nano /etc/resolv.conf
This file is automatically generated by Zentyal DNS Resolver and manual changes will be overwritten after modules restart. Replace nameserver statement line with your Primary Domain Controller IP Address (in this case my Zentyal PDC has 192.168.1.13 IP Address – change it accordingly).
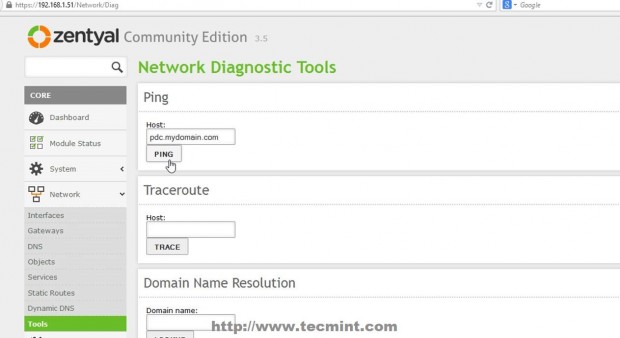
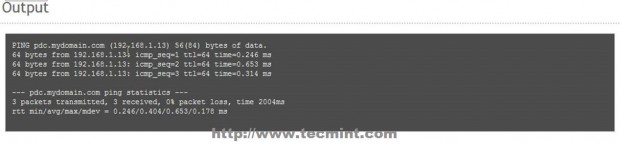
12. After the file was edited, don’t restart any modules at all and issue a ping command with your Primary Domain Controller FQDN domain name and verify if it responds with the correct IP Address (in this case my PDC FQDN is pdc.mydomain.com – a fictive one used only locally).
# ping pdc.mydomain.com

13. If you want to conduct other DNS test go to Zentyal Web Remote Admin Tool and use Ping and Lookup with your specific PDC FQDN domain name buttons from Network -> Tools Menu as presented on the below screenshots.

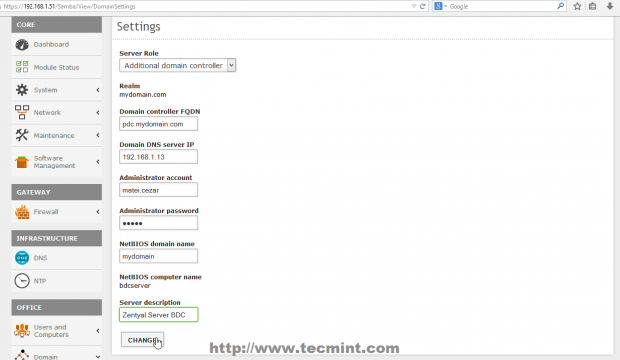
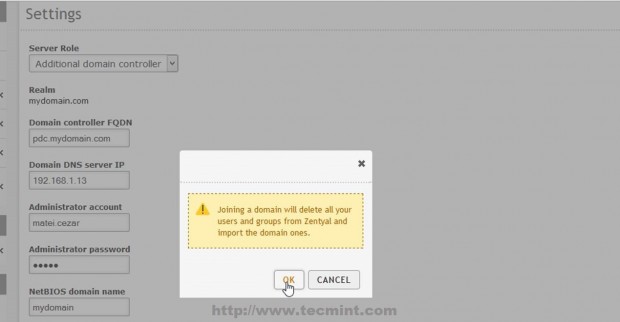
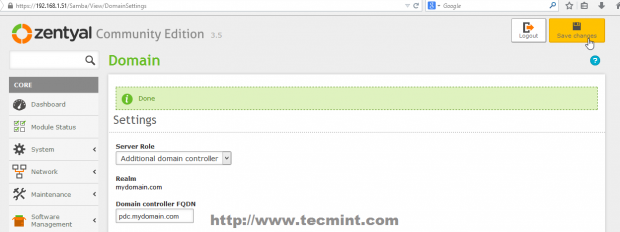
14. After the DNS test revealed that everything is correctly configured and functional move to Domain -> Settings left Menu and use the following Settings and after you finish hit on Change button and OK on Domain Join notification prompt, then upper Save Changes to apply configurations and stat importing User Accounts Database from your man PDC Server.
- Server Role = Additional Domain Controller.
- Domain Controller FQDN = your Primary Domain Controller FQDN.
- Domain DNS Server IP = your Primary Domain Controller IP Address or DNS responsible with PDC resolutions.
- Administrator Account = your Primary Domain Controller Administrator User.
- Administrator Password = your Primary Domain Controller Administrator User password.
- NetBIOS Domain Name = choose a domain name for NetBIOS – it can be your main domain name.
- Server Description = Choose a descriptive name that defines your BDC server.
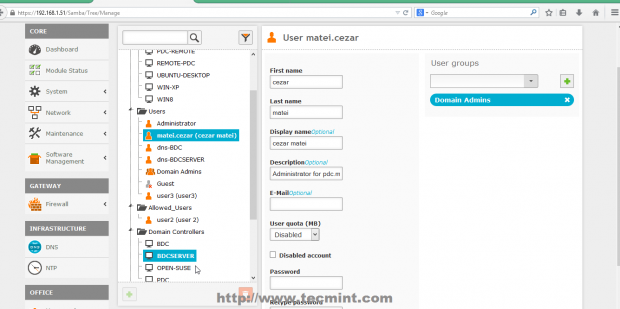
15. That’s it! Depending on your database size the replication process can take a while, and after it finishes you can go to Users and Computers -> Manage and you should see the entire Users and Computers database from PDC completely synchronized with your Zentyal 3.5 BDC Server. Use klist command to see your domain Administrator Users.
$ klist

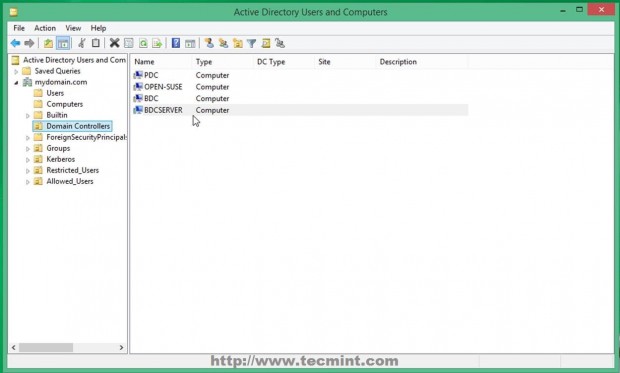
16. You can also check your Zentyal 3.5 BDC from a Windows based system if you have installed RSAT (Remote Server Administration Tools) by opening Active Directory Users and Computers -> Domain Controllers.
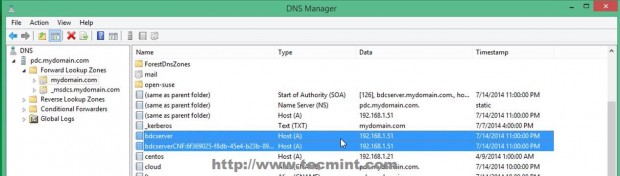
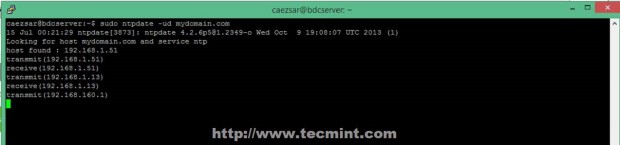
17. As the last checks and setting you can open DNS Manager and see that a new DNS A entry has been added with your BDC Server Hostname using its IP Address. Also make sure that you open a SSH connection to your Zentyal BDC Server with Putty and sync time on both Domain Controllers using ntpdate command.
$ sudo ntpdate -ud domain.tld
Zentyal Linux 3.5 Community Edition Server with Samba4 can fully participate in Active Directory, and once configured as a part of the domain you can use RSAT Active Directory tools from a remote location and switch FSMO roles to the AD servers on your network.

When i authenticate my BDC TO PDC that time showing this error:
Some modules reported error when saving changes . More information on the logs in /var/log/zentyal/
could not to bind ldap server(simple bind failed: nt status logon failure)please check supplied credentials .
am using zentyal 4.2 deployment edition. Could you please help me
I hope your valuable replay.
aneed sbalan
Hey, I am getting this error.
some module reported error when saving changes more information on the logs in /var/log/zentyal
The local Domain pdc.mydomain.lan must match the AD server domain mydomain.lan.
Now I have checked the names of the severs and net but i can’t figure out where im going wrong.
What caused this issue? You can try to re-join the domain again!
Hi Matei, thanks for your great tutorials. There are great help for us. We configure one BDC in our network but after few months syncronization between Dc and BDC is broken. We try a lot of commands to resync them but we don’t success at all. My question is, if we demote BDC we lost authentication for all other services on BDC? Like vpn accounts, sharing atribute (there are some folders shares on BDC)? And if we join again BDC in domain it will be the same configuration of users rights ?
What forest and domain functional levels are supported? I’ve heard stories of having to lower the functional levels to make this work.
Also, how is replication handled? In current versions of Windows the replication is handled by DFS which has the advantage of only replicating the modified parts of the files, not the entire files, making replication much faster and less bandwidth intensive? Does Zentyal support this type of replication?
As far as I know Zentyal (and Samba4 implicit) supports maximum 2008_R2 domain level. With replication i cannot give you a straight answer…i think is DFS-R, but in order to be sure please consult Zentyal or Samba official documentation!
My BDC got corrupted somehow and would like to create a new one with the same name. However how to delete the old BDC from the PDC? Thanks.
Got the following error when trying to join the domain:
“Some modules reported error when saving changes . More information on the logs in /var/log/zentyal/
Could not bind to AD LDAP server (Simple Bind Failed: NT_STATUS_LOGON_FAILURE).Please check the supplied credentials.”
I was using “.local” in my domain name. Could this be a problem?
The problem should be the AD administrative user that you are using to use for binding. Check the your PDC administrative user and password.
You were quite right about this, Mr. Cezar. Everything now syncs and all tests are good.
Thanks for this and all of your well done tutorials.
I have a problem after setting the change in the domain settings, it would show “enable users module” even if i had already enabled it.
I tried this tut, but it kept failing
I checked the perl module (.pm) which failed, and noticed the ‘cat’ command used for introduce the password with the samba-tool command, which was the reference that I obteined in the logs.
Long story short, if I used an alphanumeric password (for example: “Word with space an dots…” ) for the admin user, the samba-tool keeps failing. Solution: Use an initial short password for the first sync
Hope this helps
@Aldo,
Thanks for that password tip..hope it will help…
Hi Matei,
Thanks for the detailed how to…i have done the BDC in my the lab network and it was able to replicate users from my other zentyal PDC but when i created a share folder in the BDC users can access the share folder with proper user rights but unable to browse or access their own home folder. How can i make their home folder available to them in the BDC?
Thanks,
Newel
Philippines
I have one question, I wonder if anyone’s experienced this. How well would Zentyal handle about 500 user objects and 600 computer objects – performance-wise?
You can create a domain level replication and promote a windows server as PDC
Nice post…
Thanks for all..
May I ask ??
How if we will to upgrade this BDC ( Zentyal base ) to PDC ( Windows based ) ??
Any post about that ?
Thx
Yuko
Indonesia
Thank you very much Matei.
I’m glad to find well-prepared How-tos for latest Zentyal-Releases.
This was a very helpful information to me getting sync work for the first time ever.
I’d like to contribute one aspect I was faced with. In my first attempts I used the administrator account of the PDC created during installation to join the BDC to the domain. But I got reproducibly the error message
“Could not bind to AD LDAP server (Simple Bind Failed: NT_LOGON_FAILURE) Please check the supplied credentials …” when I confirmed to join the domain. Credentials were definitely correct (checked multiple times).
A bit strange, because I assumed that this administrator account refers to the “Build-in account for administering the computer/domain” which is a member of the group “Domain Admins”.
SOLUTION for me:
I solved the problem by creating a dedicated new user on the PDC and assigned him to group “Domain Admins” manually. Joining of BDC to the domain using this user was now conducted successfully.
Maybe one can confirm (or contradict) that I faced this issue due to missing background-information or perhaps due to a kind of bug. Anyway I hope this workaround helps others too.
Have a nice sync!
Torsten