This topic might seem a bit peculiar. I mean, why should you convert your home directory into a separate partition?
Whenever you are installing Linux, the installer already selects the ‘guided‘ partitioning by default. When you go with this option, the installer places the home directory plus all the other system directories under the root ( / ) partition.
While this setup works quite well, it presents a huge risk. If your system crashes or something corrupts the root partition, all your personal files residing in the home directory are lost.
For this reason, it is important to create a separate home partition during installation. This guarantees the safety of your personal files during reinstallation of an operating system or in case the root partition crashes.
If you accepted the default option while partitioning your hard drive such that all our directories fall under the root partition, then this guide is for you.
In this guide, we will transfer the home directory to a separate partition on a newly added disk. For demonstration purposes, we will use a removable USB drive to serve the purpose of an additional drive. In the real world, this could be an SSD drive or an additional HDD that you want to be the home partition.
Let’s begin!
Step 1: Identify the Added New Drive
Before plugging in the removable drive, we only have a single hard drive (/dev/sda) with a home folder and all the system partitions mounted on the / or root partition.
Here is a glance of your hard drive configuration using the df command.
$ df -Th
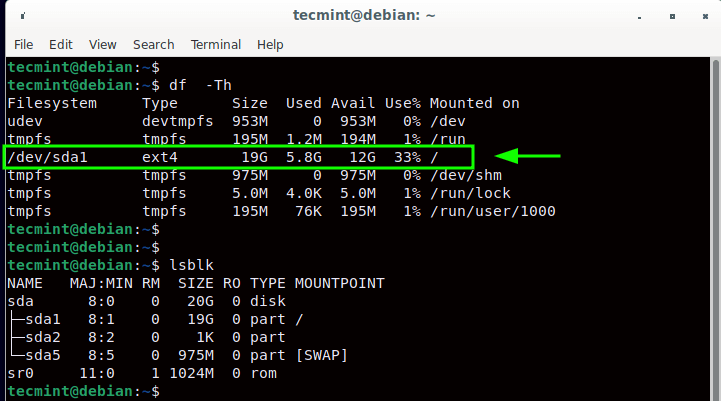
Next, we will plug in the 8GB removable USB drive. This is identified as /dev/sdb and is mounted on the /media/tecmint/USB mountpoint.
To confirm this, we will run the lsblk command.
$ lsblk
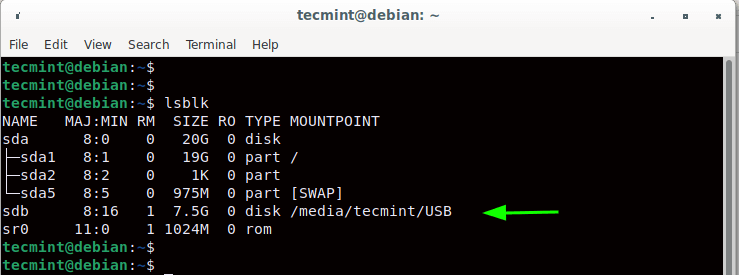
The partition and mountpoint might vary according to your setup. For instance, a third drive will be indicated as /dev/sdc, a fourth one /dev/sdd and so on.
Step 2: Create a New Partition in Linux
We have newly added our second drive to our system, but in order to use it as a separate partition for our home directory, we need to create a partition on it. At the moment it doesn’t have one since it is a new drive.
The fdisk command confirms it as shown.
$ sudo fdisk -l
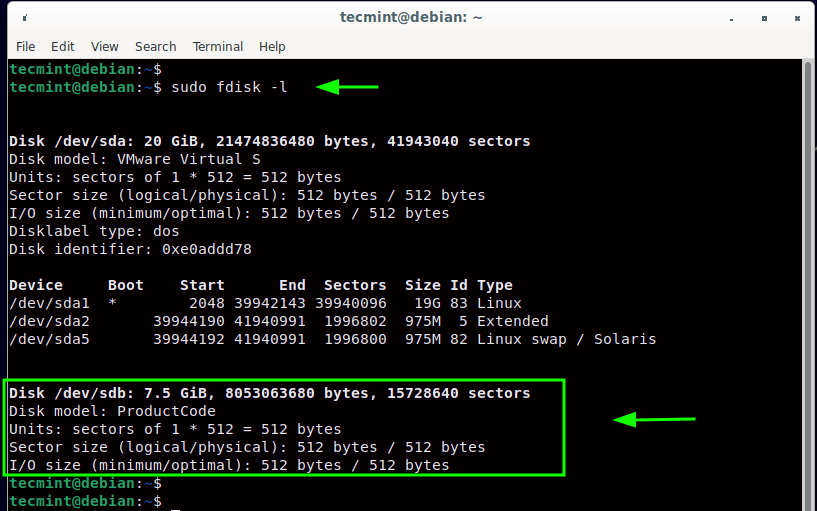
In the highlighted section, you can see that the new drive does not have any partition associated with it unlike the first drive which has /dev/sda1, /dev/sda2, and /dev/sda5.
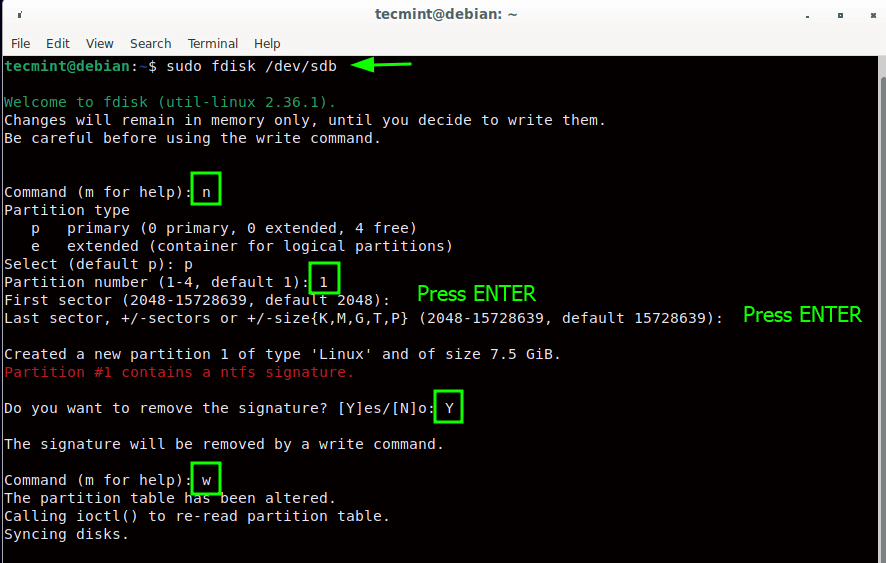
Now, we will create a partition using the command:
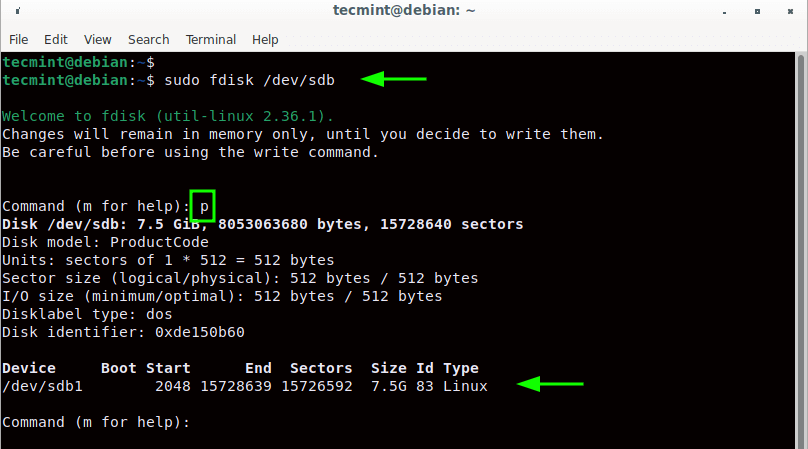
$ sudo fdisk /dev/sdb
When prompted, press 'n' to create a new partition. Then press 'p' to specify the creation of a primary partition, and hit '1' to specify the partition number. For the next two prompts, hit ‘ENTER‘ to accept the defaults in specifying the first and last sectors.
Since my removable drive comes with the NTFS filesystem, I will remove it by pressing 'Y'. To save all the changes made, press 'w', as this writes all the changes made to the partition.
To confirm the changes made, once again, run the command:
$ sudo fdisk /dev/sdb
When prompted, press 'p' for print. This prints out the partition’s information. From the output, you can see that a new partition /dev/sdb1 has been created with Linux as the filesystem type. We need to format it to the ext4 filesystem type which we will do so in the next section.
Step 3: Format a New Partition in Linux
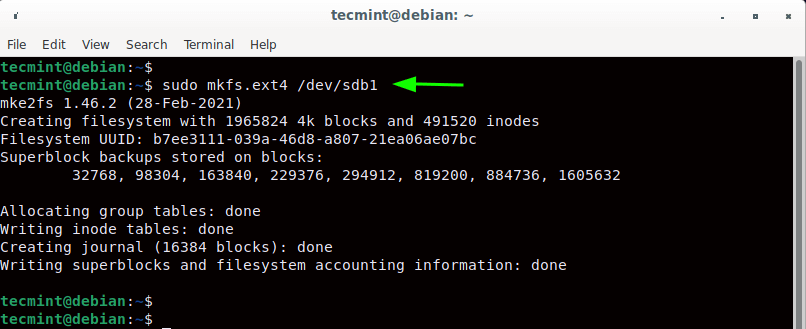
The next step is to format the /dev/sdb1 partition using the ext4 filesystem format. Take note that we are formatting /dev/sdb1 (the partition) and not /dev/sdb which is the removable drive.
$ sudo mkfs.ext4 /dev/sdb1
Step 4: Mount New Partition in Linux
For the drive to be accessible to the system, we need to mount it on the system’s filesystem. But first, we will create a mount point on which we will mount the partition.
$ sudo mkdir -p /srv/home
Next, we will mount the partition on the mountpoint as follows. This, in effect, makes the drive available to the system.
$ sudo mount /dev/sdb1 /srv/home
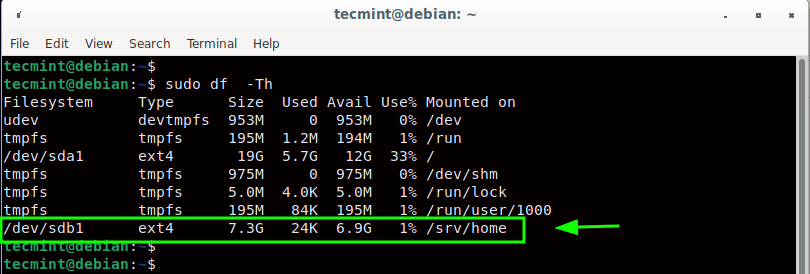
To confirm this, run the df command as shown:
$ sudo df -Th
Step 5: Copy Home Directory Files to New Partition
We now need to copy the contents of the home directory to the mount point which is now located on the drive. So, we will run the command:
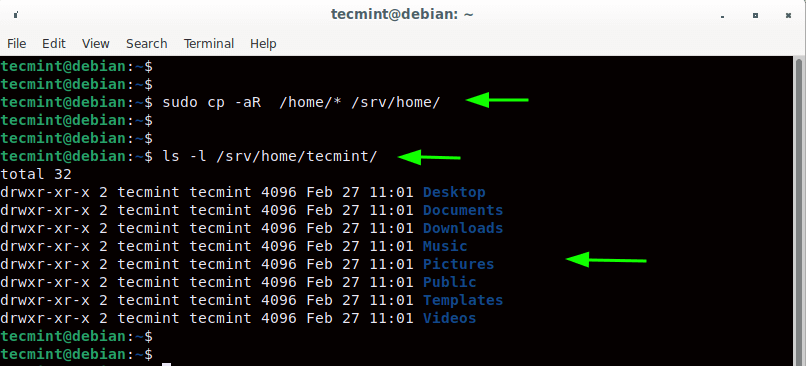
$ sudo cp -aR /home/* /srv/home/
Just to confirm that everything went all we will check the contents of the home directory.
$ ls -l /srv/home/tecmint
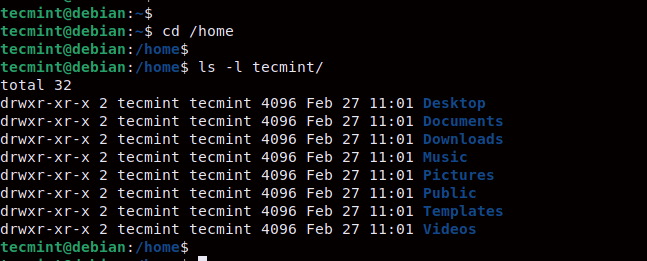
From the output, you can clearly see that all the default directories expected to be in the home directory are present.
Step 6: Create a New Home Directory and Mount Drive
We now need to create another home directory on which we will mount our home partition. To avoid confusion, we will rename our current home directory to /home.bak shown.
$ sudo mv /home /home.bak
Next, we will create a new home directory.
$ sudo mkdir /home
We will then unmount the /dev/sdb1 filesystem and mount it to the newly created home directory
$ sudo umount /dev/sdb1
$ sudo mount /dev/sdb1 /home
To confirm that the /home directory contains the default directories, we will navigate into and list its contents:
$ cd /home
$ ls -l tecmint
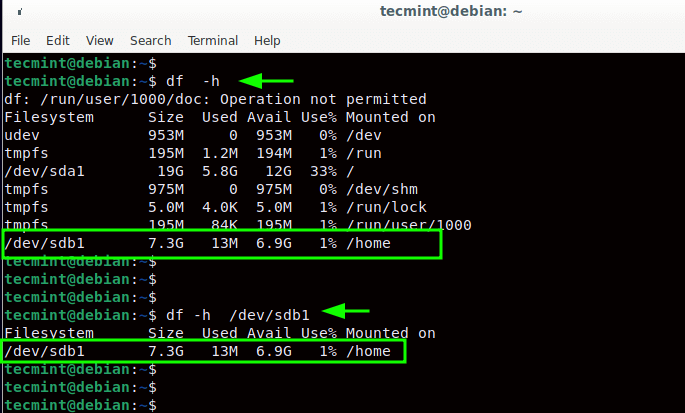
Additionally, you can verify that our filesystem is mounted on the /home mount point using the df command as follows.
$ sudo df -Th /dev/sdb1
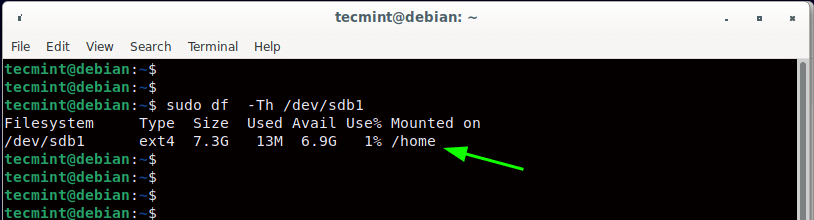
The output confirms that the /dev/sdb1 filesystem on our drive is mounted on the /home partition. However, this will not survive a reboot. To make this persistent, an additional step is required and that is to modify the /etc/fstab file with the filesystem information.
Step 7: Permanent Partition Mount in Linux
To automatically ensure that the filesystem is mounted every time upon system startup, we are going to modify the /etc/fstab file. But first, let us get the UUID of the filesystem as follows.
$ sudo blkid /dev/sdb1
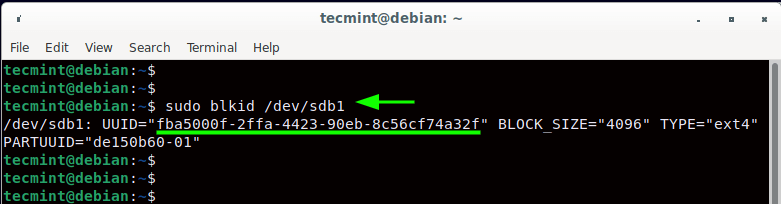
Copy and paste the UUID somewhere on a text editor as this will be used in the next step.
Next, open the /etc/fstab file.
$ sudo vim /etc/fstab
Append this line to the file as shown. Replace the uid in the square brackets with the actual UUID of the /dev/sdb1 filesystem that you copied and pasted earlier on the text editor.
UUID=[ uid ] /home ext4 defaults 0 2
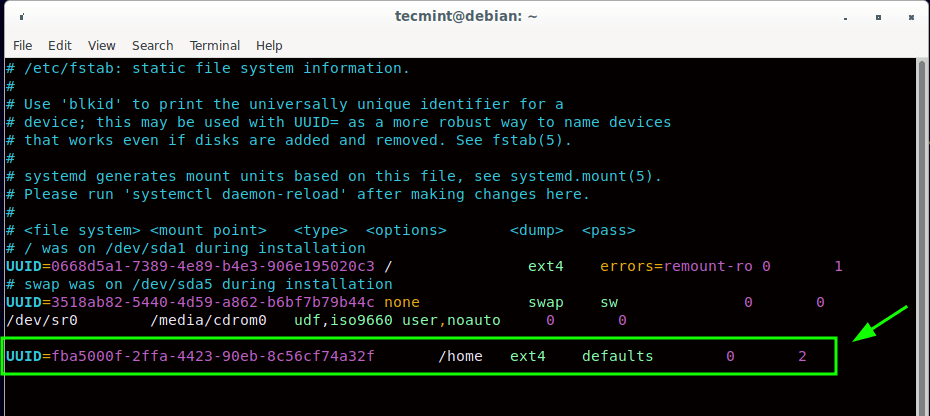
Save the changes and close the file. Then run the following command to mount all the partitions.
$ sudo mount -a
Now, your drive will be mounted every time on system startup on the /home partition.
$ df -h /dev/sdb1
To avoid going through all these steps, it’s always advised to have a separate home partition from the rest of the system partitions during installation in order to separate your personal files from system files. This makes it easy to recover your data should something go wrong.


Whenever I install a Linux distro, it is my standard practice to set up at least three partitions: root (/), /home, and swap, with /home always being on its own drive.
This allows me to quickly reinstall a distro or install a different one. However, I use GParted to set up the partitions rather than ‘fdisk‘ or other error-prone CLI methods.
GParted allows me to see what is happening with my disk(s) in real-time and avoids using esoteric, non-intuitive commands. It also helps prevent any potentially fatal ‘finger checks’.
Absolutely perfect tutorial. I have finally managed to install Arch and made a partition specifically for a separate /home. Now I have that partition in use with modified fstab and all.
I have tried this many times in the past but it never worked so thanks very much for the guide here.
Thank you for the clear instructions, it was very helpful!.
Thank you very much. I am very happy
In many cases, you would have a /sda that is large enough (say larger than 200 G) to have both the root partition and the separate /home on it.
So how do you shrink the existing / to make room for a new /dev/sda6 to hold the /home (like you would have had it if you had created the separate /home from the start)?
It is of course always wise to create a copy on a usb before you manipulate the /home.
How do you shrink the existing
/partition?To shrink the existing
"/"partition, utilize the “Resize/Move” option in GParted. This process may take some time, depending on the size of your"/"partition.Remember to backup or copy your disk before making changes to
"/"to safeguard against any potential issues.Personally, I prefer using a separate HDD exclusively for
"/home".Having a separate
"/home"offers advantages such as the ability to reinstall a distribution or install a different one without impacting your'/home'.Nice. Thank you for this helpful information.
Don’t forget to remove /home.bak – a home backup directory.
Thank you!
This helped me a lot. I have a laptop with a 125GB hard drive and one scsi 1TB. I made the 1TB to /home partition and I installed it with the debian firmware edition.
Totally unnecessary with firmware. Easy changed with the /home intact.
Thank you very much for your tutorial. I’ve converted by /home directory into the Linux partition perfectly!
Thanks for this instruction, it works nice.
Thank you for a great little guide, it worked perfectly and has made reinstalling OSes a doddle!
Can you write a script that will do it automatically and put it on GitHub of course the first version will be buggy? like scripts for installing Arch, Gentoo :( but they are automatic somehow
Good Morning,
I followed the perfect tutorial but when I restart the emergency mode appears and I have to comment on the line that I created in the fstab to re-enter my computer. what should I do?
Did you list the disk’s UUID or the partition’s UUID in your fstab file? I remember I made that mistake when I first tried this.
You want to add the disk’s UUID (NOT the PARTUUID) to your fstab with no spaces or quotation marks.
Also, you can either add a space or a single TAB between the UUID, filesystem type and mounting options when modifying your fstab file. If you use multiple spaces between elements you will get an error.
After you modify your fstab and save it, you should be able to enter
"mount -a"to process the new fstab and see if the entry you just added will successfully mount the new drive/partition.If you get a new empty prompt, congrats, it worked.
If it doesn’t work, you’ll at least get an error as to why, which will hopefully point you in the right direction to get the issue solved for you.
Good luck regardless.