Creating a bootable USB drive is one of the most preferred ways of testing and installing a Linux operating system on a PC. This is so because most modern PCs don’t come with a DVD drive anymore. Further, USB drives are easily portable and less delicate than a CD / DVD.
Many graphical tools abound that can help you create a bootable USB drive. One of the most widely used tools is Rufus, a simple yet very effective tool. Sadly, it’s only available for Windows systems.
Thankfully, Ubuntu ships with its own tool called Startup Disk Creator. The tool is easy to use and allows you to create a bootable Ubuntu USB disk in no time.
With a bootable Ubuntu USB drive you can perform the following operations:
- Install Ubuntu on your PC.
- Try out Ubuntu desktop without installing it on your hard drive.
- Boot into Ubuntu on another PC and run it.
- Perform diagnostic operations such as repairing or fixing a broken configuration.
With that in mind, let’s see how you can create a bootable Ubuntu USB startup disk.
Requirements
For this exercise, ensure that you have the following prerequisites before you get started:
- A USB drive – Minimum 4GB.
- Ubuntu ISO image ( We will use Ubuntu 20.04 ISO ).
- A stable internet connection for downloading the Ubuntu ISO image – If you don’t have one.
In this guide, we will explore three methods that you can use to create a bootable Ubuntu USB startup disk.
On this page:
Let’s shift gears and see how you can create a startup Ubuntu.
Creating Ubuntu USB Startup Disk Using Graphic Tool
The Startup disk creator is Ubuntu’s native tool that comes preinstalled in every modern Ubuntu release. It allows a user to create a Live USB drive from an ISO image is a simple yet fast and effective way.
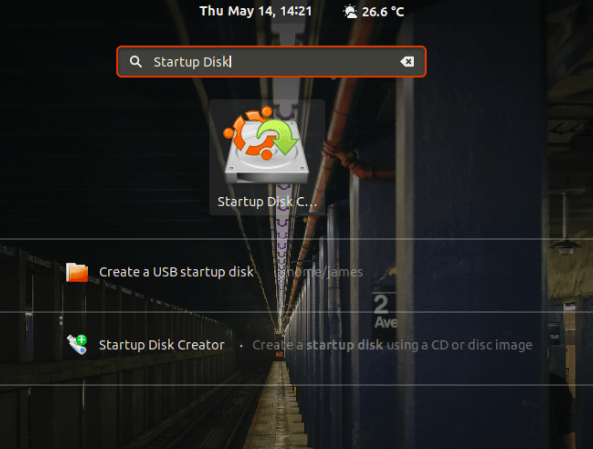
To launch Startup Disk creator, click on ‘Activities’ at the top left corner of your desktop and search for the tool in the application manager as shown. Next, click on the ‘Startup Disk Creator’ option to launch it.
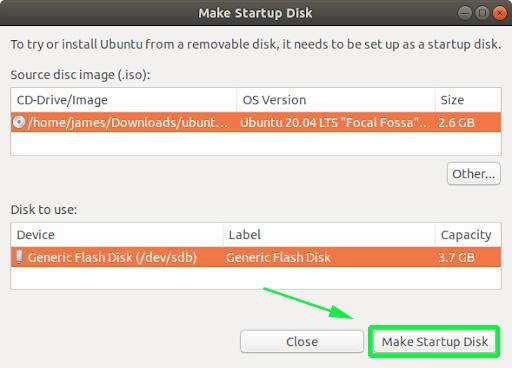
Once launched, you will get a window as shown. The upper section displays the path of the ISO image, the version of the ISO file and its size. If all options are okay, proceed and hit the ‘Make Startup Disk’ option to commence the process of creating the bootable USB drive.
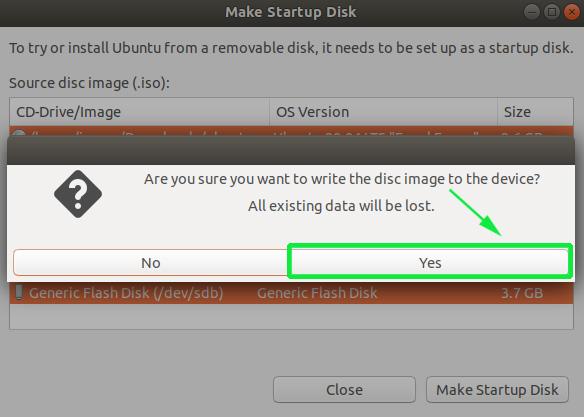
Thereafter, you will get a pop-up notification asking you whether to proceed with the creation or abort. Click on the ‘Yes’ option to initialize the creation of the bootable drive. Provide your password to authenticate and start the process.
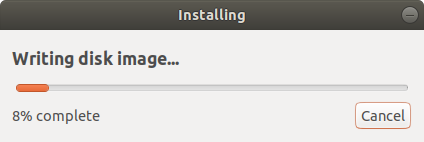
The Startup Disk Creator tool will begin writing the disk image onto the USB drive. This should only a few minutes to be completed.
Once complete, you will get the notification pop-up below indicating that all went well. To try out Ubuntu, click on the ‘Test Disk’ button. If you want to go ahead and start using the bootable drive, simply click ‘Quit’.

Creating Ubuntu USB Startup Disk Using DDrescue Command
The ddrescue tool is a popular data recovery tool that you can use to recover data from failed storage devices such as hard drives, pen drives, etc. Additionally, you can use the ddrescue tool to convert an ISO image to a startup USB drive.
To install ddrescue on Ubuntu / Debian systems execute the command.
$ sudo apt install gddrescue
NOTE: Repositories refer to it as gddrescue. However when invoking it on the terminal use ddrescue.
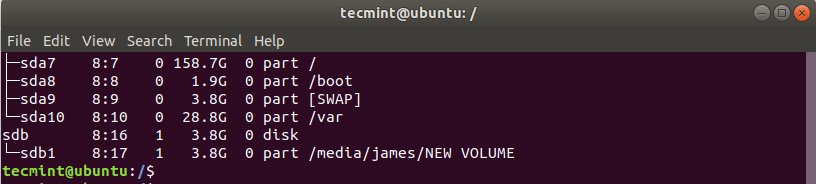
Next, we need to verify the block device volume of the USB drive. To achieve this, use the lsblk command as shown below:
$ lsblk
The output below confirms that our USB drive is denoted by /dev/sdb.
Now use the syntax below to create a bootable USB stick.
$ sudo ddrescue path/to/.iso /dev/sdx --force -D
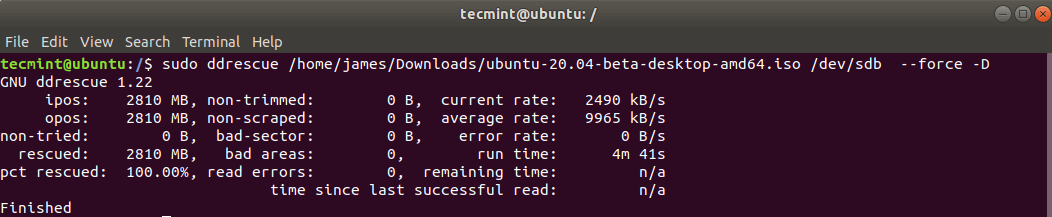
For example to create a Ubuntu 20.04 startup disk we executed the command below.
$ sudo ddrescue ubuntu-20.04-beta-desktop-amd64.iso /dev/sdb --force -D
The process takes a few minutes and your bootable USB drive will be ready in no time.
Creating Ubuntu USB Startup Disk Using dd Command
Another simple and easy to use command-line tool you can use to create a startup disk is the dd command. To use the tool, plug in your USB drive and identify the device volume using the lsblk command.
Next, unmount the USB drive using the command below:
$ sudo umount /dev/sdb
Once the USB drive is unmounted, run the following command:
$ sudo dd if=ubuntu-20.04-beta-desktop-amd64.iso of=/dev/sdb bs=4M
Where Ubuntu-20.04-beta-desktop-amd64.iso is the ISO file and bs=4M is an optional argument to help accelerate the process of creating the bootable drive.

You can now eject your Live USB drive and plug it to any PC and either try out or install Ubuntu.
This brings us to the end of this topic. We hope you found this guide useful and that you can now comfortably create a bootable USB startup disk using all the methods explained herein.


I am brand new to Linux distros. I need to make a verbal USB to install on my laptop. All the instructions on the help pages say to use Rufus Unfortunately I’m telling you to get through an android tablet Via OTG cable to USB. How do I make this work?? I’m great with hardware. Software is not my forte.
You can have a clue what you’re talking about this startup disk Creator is not easy to use I’ve been studying it for 2 days it’s still can’t get it anything nothing works on it.
It worked! Thanks a lot. My personal computer crashed after upgrading to Ubuntu 21 and I had to create the installer through an Ubuntu Server that I have in another…
Can it be installed on only a specific partition of the external? the command has
--forceso I dare not try.“NOTE: Repositories refer to it as gddrescue. However when invoking it on the terminal use gddrescue.”
Isn’t there something wrong with that statement? Should both names be GDDRESCUE?