A few days ago, I came across a CentOS 8 32-bit distro and decided to test it on an old 32-bit machine. After booting up, I realized there was a bug causing the network connection to drop. Every time I rebooted, I had to manually bring the network back up, which led me to wonder: How can I automate this process with a script that runs every time the system boots?
The solution is straightforward, and today, I’ll show you how to do this using systemd service units, but before we jump into that, let’s first take a quick look at what a service unit is and how it works.
In this article, we’ll cover the basics of systemd service units, their relationship with “targets,” and how to set up a service unit to run a script at boot. I’ll keep things simple, focusing on the practical steps, so you’ll have everything you need to know to tackle this on your own.
What is a Systemd Service Unit?
In simple terms, a service unit in systemd is a configuration file that defines how a service should behave on your system. It could be something like a network service, a program, or even a script that needs to run when your computer boots or at a specific point during the boot process.
These service units are grouped into targets, which can be seen as milestones or stages in the boot process. For example, when your system reaches the multi-user target (runlevel 3), certain services will be started. You can think of these targets as “collections” of services that work together at various stages of the boot sequence.
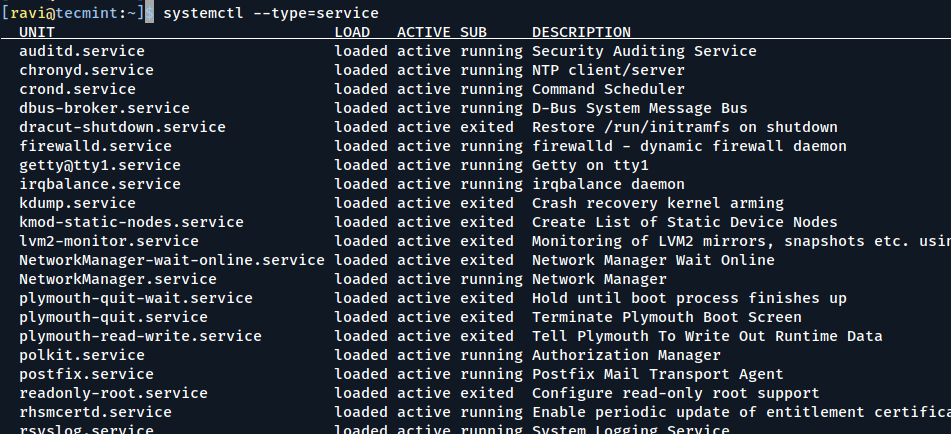
If you’d like to see the services running in a particular target (for example, graphical.target), you can use the systemctl command:
systemctl --type=service
This will show you all active services in your current target. Some services run continuously, while others start up once and then exit.
Checking the Status of a Service
If you’re curious about a particular service, you can use systemctl status to see whether it’s active or inactive:
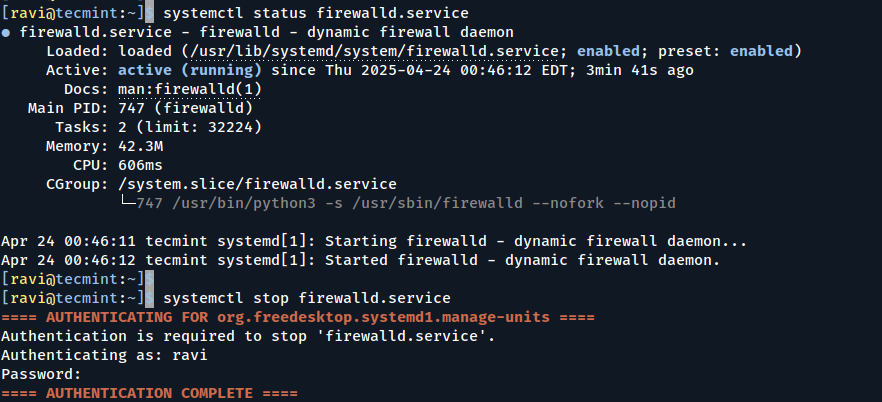
systemctl status firewalld.service
This command checks the status of the firewalld service. You’ll notice that it’s active, meaning it’s running, and enabled, which means it will start automatically on the next boot.
You can also stop a service temporarily (until the next boot) using:
systemctl stop firewalld.service
systemctl status firewalld.service
This will stop the firewalld service for this session, but won’t prevent it from starting up next time.
Enabling and Disabling Services
To ensure a service starts automatically on boot, you need to enable it, which will create a symbolic link in the appropriate target’s wants folder:
systemctl enable firewalld.service
To disable it, you would simply run:
systemctl disable firewalld.service

Creating a Custom Service Unit
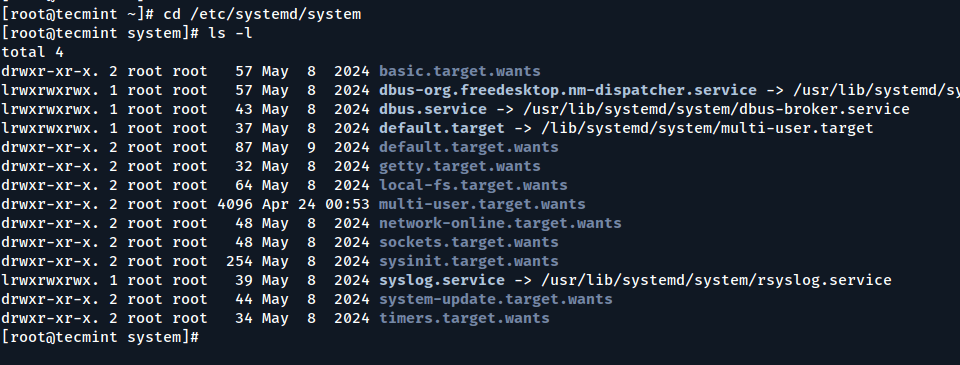
To set up a service that runs a script at boot, we’ll create a new service unit under the /etc/systemd/system directory, here you’ll see existing service unit files and folders for different targets.
cd /etc/systemd/system
ls -l
Let’s create our own service unit called connection.service using Vim or your preferred text editor to create it:
vim connection.service
Or
vi connection.service
Add the following content to the file.
[Unit]
Description=Bring up network connection
After=network.target

[Service]
ExecStart=/root/scripts/conup.sh

[Install]
WantedBy=multi-user.target
Explanation:
[Unit]: The unit’s metadata. We’ve given it a description and told it to run afternetwork.target, meaning it will only execute after the network has been initialized.[Service]: This section defines the command to execute when the service starts. In this case, it runs the scriptconup.sh.[Install]: This section tells systemd that the service should be loaded at the multi-user target, which is the standard runlevel for most systems.
Now, enable the service so it will start automatically on the next boot:
systemctl enable connection.service
You can confirm that it has been enabled by checking the multi-user.target.wants directory:
ls -l multi-user.target.wants/
The symbolic link to connection.service should now be present. However, we still need to create the script that this service will run.

Creating the Script
Let’s now create the conup.sh script that will bring the network connection up.
cd /root
mkdir scripts
cd scripts
vi conup.sh
Add the following line to bring the network up, here the script uses the nmcli command to bring the network connection on the enp0s3 interface up.
#!/bin/bash
nmcli connection up enp0s3
Don’t forget to make the script executable.
chmod +x conup.sh
At this point, the service is ready to go.
SELinux Contexts (For RHEL/CentOS Users)
If you’re using a RHEL-based system (like CentOS or Rocky Linux), don’t forget about SELinux, which can block scripts from running if the correct security context isn’t applied.
To temporarily set the context so the system treats the script as a regular executable, use:
chcon -t bin_t /root/scripts/conup.sh
However, this change won’t survive a reboot or file relabeling.
To make it permanent, use:
semanage fcontext -a -t bin_t "/root/scripts/conup.sh"
restorecon -v /root/scripts/conup.sh
This step ensures the script continues to run properly even after reboots or SELinux policy reloads.
Testing the Service
To test it without rebooting, you can start it manually.
systemctl start connection.service
If everything is set up correctly, the service will execute the script, and your network connection should be restored.
Alternatively, if you wrote a simpler script like touch /tmp/testbootfile, you can check if the file was created in /tmp to confirm the service is running as expected.
Conclusion
By now, you should have a good understanding of systemd service units and how to create and manage them on your system. You’ve also automated a common task – bringing up the network connection on boot using a simple service unit.
Hopefully, this guide helps you get more comfortable with managing services, targets, and scripts in systemd, making your system more automated and efficient.


If you’re using RHEL, don’t forget about SELinux contexts – they can block scripts from running if not set correctly.
For example, to allow your script to run, use:
This sets the correct SELinux type (
bin_t) so the system treats it like a regular executable.@Andras,
Great point! SELinux can definitely cause unexpected issues if the right context isn’t set – especially on RHEL-based systems.
To make it permanent, consider using semanage:
When I run systemctl start I get the following error message:
Changed on disk. Run systemctl daemon-reload to reload units.
Then when I run a systemctl status the output on the active line says:
my.service file entials
what is run level 0 again? rescue? since when?
How to add commands to run when someone calls for “stop” or “restart“.
Your article really makes things clear! Thank you!
It’s helped a lot thank you very much for this great article..
I have to agree, this article was very clear in explaining things about Linux services like wants and targets. I see a few comments about things that aren’t exactly right, but the basics are so well explained. I’d love to see a follow-up article that went into those topics in more detail.
it’s wrong
you MUST use /bin/bash /path/myservice.sh.
I created a systemd service. But it ask for password every time to start? How to make it run without sudo(ing)?
My script doesnt’t start on boot, it starts only after maually typing systemctl start
What happens when you issue the command?:
systemctl stop connection.service
Do you need to supply a stop script definition somewhere or does it just ignore if no stop script is defined?
No, it simply stops the service. systemd is taking care of that for you. Note that the service is only stopped for the current session. Once you reboot, the service will be started again (you stopped the service, you didn’t disable it…)
That was an amazing article, very well written and well explained, CONGRATS!
You should continue writing articles like this one Ioannis, you are really good at it!
I’d love to see a similar article about (1)mounting file systems at boot time, and (2)mounting external drives and media. Specifically, how to alter the default, automatic mount point.
What you outline in this article wont work until you run ‘systemctl daemon-reload’. This needs to be done when you add or change unit files.
or you reboot. systemd daemon-reload is only needed when you instantaneously want to start the service (which is indeed most of the time what you want…)
Could have shared it.. but you spelled systemd wrong in the title. It should not have a capital “D”. You could also have executed a command instead of running a script. It is a good example though.
Over the years, I’ve found that wrapping commands with scripts helps make things more maintainable. AND you can do things before and after your command if that is ever needed or wanted.
Very useful!!!! Thanks so much!!!
Hi,
Very useful and interesting article,
Thanks a lot
Thank you Jalal,
feeling great to be useful to you