This is the 3rd part of the series about creating GUI applications under the Linux desktop using PyGObject. Today we’ll talk about using some advanced Python modules & libraries in our programs like ‘os‘, ‘WebKit‘, ‘requests‘ and others, beside some other useful information for programming.
Requirements
You must go through all these previous parts of the series from here, to continue further instructions on creating more advance applications:
- Create GUI Applications Under Linux Desktop Using PyGObject – Part 1
- Creating Advance PyGobject Applications on Linux – Part 2
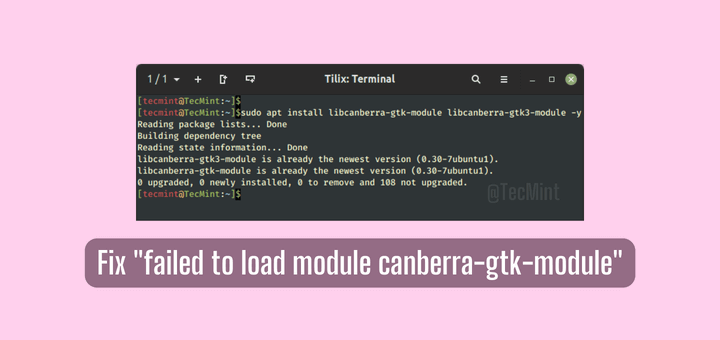
Modules & libraries in Python are very useful, instead of writing many sub-programs to do some complicated jobs which will take a lot of time and work, you can just import them ! Yes, just import the modules & libraries you need to your program and you will be able to save a lot of time and effort to complete your program.
There are many famous modules for Python, which you can find at Python Module Index.
You can import libraries as well for your Python program, from “gi.repository import Gtk” this line imports the GTK library into the Python program, there are many other libraries like Gdk, WebKit.. etc.
Creating Advance GUI Applications
Today, we’ll create 2 programs:
- A simple web browser; which will use the WebKit library.
- A desktop recorder using the ‘avconv‘ command; which will use the ‘os’ module from Python.
I won’t explain how to drag & drop widgets in the Glade designer from now on, I will just tell you the name of the widgets that you need to create, additionally I will give you the .glade file for each program, and the Python file for sure.
Creating a Simple Web Browser
In order to create a web browser, we’ll have to use the “WebKit” engine, which is an open-source rendering engine for the web, it’s the same one which is used in Chrome/Chromium, for more info about it you may refer to the official Webkit.org website.
First, we’ll have to create the GUI, open the Glade designer and add the following widgets. For more information on how to create widgets, follow the Part 1 and Part 2 of this series (links given above).
- Create ‘window1’ widget.
- Create ‘box1’ and ‘box2’ widget.
- Create ‘button1’ and ‘button2’ widget.
- Create ‘entry1’ widget.
- Create ‘scrolledwindow1’ widget.
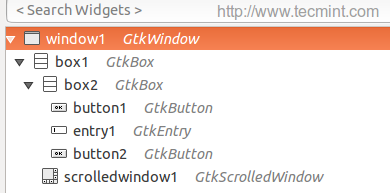
After creating widgets, you will get the following interface.
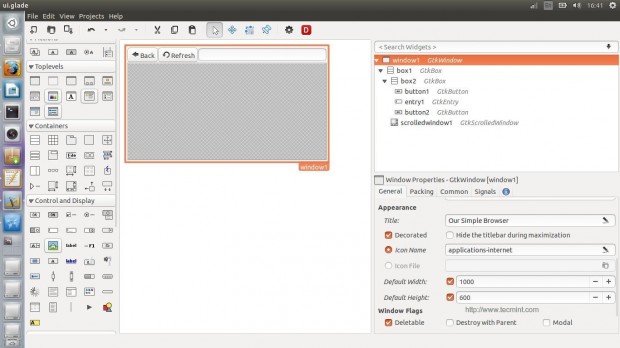
There’s nothing new, except the “Scrolled Window” widget; this widget is important in order to allow the WebKit engine to be implanted inside it, using the “Scrolled Window” widget you will also be able to scroll horizontally and vertically while you browse the websites.
You will have now to add “backbutton_clicked” handler to the Back button “clicked” signal, “refreshbutton_clicked” handler to the Refresh button “clicked signal” and “enterkey_clicked” handler to the “activated” signal for the entry.
The complete .glade file for the interface is here.
<?xml version="1.0" encoding="UTF-8"?>
<!-- Generated with glade 3.16.1 -->
<interface>
  <requires lib="gtk+" version="3.10"/>
  <object class="GtkWindow" id="window1">
    <property name="can_focus">False</property>
    <property name="title" translatable="yes">Our Simple Browser</property>
    <property name="window_position">center</property>
    <property name="default_width">1000</property>
    <property name="default_height">600</property>
    <property name="icon_name">applications-internet</property>
    <child>
      <object class="GtkBox" id="box1">
        <property name="visible">True</property>
        <property name="can_focus">False</property>
        <property name="orientation">vertical</property>
        <child>
          <object class="GtkBox" id="box2">
            <property name="visible">True</property>
            <property name="can_focus">False</property>
            <child>
              <object class="GtkButton" id="button1">
                <property name="label">gtk-go-back</property>
                <property name="visible">True</property>
                <property name="can_focus">True</property>
                <property name="receives_default">True</property>
                <property name="relief">half</property>
                <property name="use_stock">True</property>
                <property name="always_show_image">True</property>
                <signal name="clicked" handler="backbutton_clicked" swapped="no"/>
              </object>
              <packing>
                <property name="expand">False</property>
                <property name="fill">True</property>
                <property name="position">0</property>
              </packing>
            </child>
            <child>
              <object class="GtkButton" id="button2">
                <property name="label">gtk-refresh</property>
                <property name="visible">True</property>
                <property name="can_focus">True</property>
                <property name="receives_default">True</property>
                <property name="relief">half</property>
                <property name="use_stock">True</property>
                <property name="always_show_image">True</property>
                <signal name="clicked" handler="refreshbutton_clicked" swapped="no"/>
              </object>
              <packing>
                <property name="expand">False</property>
                <property name="fill">True</property>
                <property name="position">1</property>
              </packing>
            </child>
            <child>
              <object class="GtkEntry" id="entry1">
                <property name="visible">True</property>
                <property name="can_focus">True</property>
                <signal name="activate" handler="enterkey_clicked" swapped="no"/>
              </object>
              <packing>
                <property name="expand">True</property>
                <property name="fill">True</property>
                <property name="position">2</property>
              </packing>
            </child>
          </object>
          <packing>
            <property name="expand">False</property>
            <property name="fill">True</property>
            <property name="position">0</property>
          </packing>
        </child>
        <child>
          <object class="GtkScrolledWindow" id="scrolledwindow1">
            <property name="visible">True</property>
            <property name="can_focus">True</property>
            <property name="hscrollbar_policy">always</property>
            <property name="shadow_type">in</property>
            <child>
              <placeholder/>
            </child>
          </object>
          <packing>
            <property name="expand">True</property>
            <property name="fill">True</property>
            <property name="position">1</property>
          </packing>
        </child>
      </object>
    </child>
  </object>
</interface>
Now copy the above code and paste it in the “ui.glade” file in your home folder. Now create a new file called “mywebbrowser.py” and enter the following code inside it, all the explanation is in the comments.
#!/usr/bin/python
# -*- coding: utf-8 -*-

## Here we imported both Gtk library and the WebKit engine.
from gi.repository import Gtk, WebKit

class Handler:

  def backbutton_clicked(self, button):
  ## When the user clicks on the Back button, the '.go_back()' method is activated, which will send the user to the previous page automatically, this method is part from the WebKit engine.
    browserholder.go_back()

  def refreshbutton_clicked(self, button):
  ## Same thing here, the '.reload()' method is activated when the 'Refresh' button is clicked.
    browserholder.reload()

  def enterkey_clicked(self, button):
  ## To load the URL automatically when the "Enter" key is hit from the keyboard while focusing on the entry box, we have to use the '.load_uri()' method and grab the URL from the entry box.
    browserholder.load_uri(urlentry.get_text())

## Nothing new here.. We just imported the 'ui.glade' file.
builder = Gtk.Builder()
builder.add_from_file("ui.glade")
builder.connect_signals(Handler())

window = builder.get_object("window1")

## Here's the new part.. We created a global object called 'browserholder' which will contain the WebKit rendering engine, and we set it to 'WebKit.WebView()' which is the default thing to do if you want to add a WebKit engine to your program.
browserholder = WebKit.WebView()

## To disallow editing the webpage.
browserholder.set_editable(False)

## The default URL to be loaded, we used the 'load_uri()' method.
browserholder.load_uri("https://tecmint.com")

urlentry = builder.get_object("entry1")
urlentry.set_text("https://tecmint.com")

## Here we imported the scrolledwindow1 object from the ui.glade file.
scrolled_window = builder.get_object("scrolledwindow1")

## We used the '.add()' method to add the 'browserholder' object to the scrolled window, which contains our WebKit browser.
scrolled_window.add(browserholder)

## And finally, we showed the 'browserholder' object using the '.show()' method.
browserholder.show()

## Give that developer a cookie !
window.connect("delete-event", Gtk.main_quit)
window.show_all()
Gtk.main()
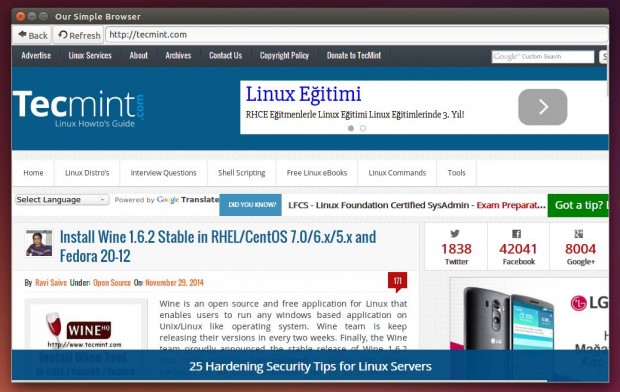
Save the file, and run it.
$ chmod 755 mywebbrowser.py
$ ./mywebbrowser.py
And this is what you will get.
You may refer for the WebKitGtk official documentation in order to discover more options.
Creating a Simple Desktop Recorder
In this section, we’ll learn how to run local system commands or shell scripts from the Python file using the ‘os‘ module, which will help us to create a simple screen recorder for the desktop using the ‘avconv‘ command.
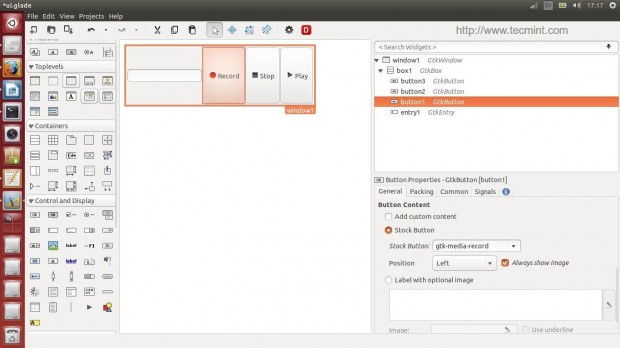
Open the Glade designer, and create the following widgets:
- Create ‘window1’ widget.
- Create ‘box1’ widget.
- Create ‘button1’, ‘button2’ and ‘button3’ widgets.
- Create ‘entry1’ widget.
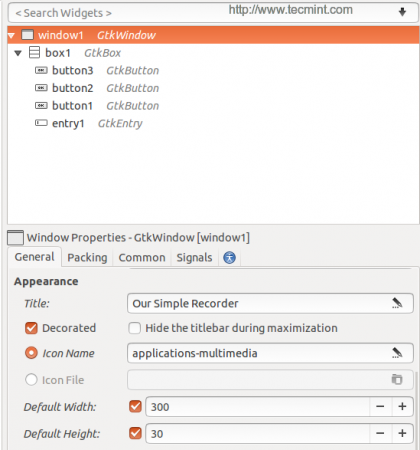
After creating above said widgets, you will get below interface.
Here’s the complete ui.glade file.
<?xml version="1.0" encoding="UTF-8"?>
<!-- Generated with glade 3.16.1 -->
<interface>
  <requires lib="gtk+" version="3.10"/>
  <object class="GtkWindow" id="window1">
    <property name="can_focus">False</property>
    <property name="title" translatable="yes">Our Simple Recorder</property>
    <property name="window_position">center</property>
    <property name="default_width">300</property>
    <property name="default_height">30</property>
    <property name="icon_name">applications-multimedia</property>
    <child>
      <object class="GtkBox" id="box1">
        <property name="visible">True</property>
        <property name="can_focus">False</property>
        <child>
          <object class="GtkEntry" id="entry1">
            <property name="visible">True</property>
            <property name="can_focus">True</property>
          </object>
          <packing>
            <property name="expand">False</property>
            <property name="fill">True</property>
            <property name="position">0</property>
          </packing>
        </child>
        <child>
          <object class="GtkButton" id="button1">
            <property name="label">gtk-media-record</property>
            <property name="visible">True</property>
            <property name="can_focus">True</property>
            <property name="receives_default">True</property>
            <property name="use_stock">True</property>
            <property name="always_show_image">True</property>
            <signal name="clicked" handler="recordbutton" swapped="no"/>
          </object>
          <packing>
            <property name="expand">True</property>
            <property name="fill">True</property>
            <property name="position">1</property>
          </packing>
        </child>
        <child>
          <object class="GtkButton" id="button2">
            <property name="label">gtk-media-stop</property>
            <property name="visible">True</property>
            <property name="can_focus">True</property>
            <property name="receives_default">True</property>
            <property name="use_stock">True</property>
            <property name="always_show_image">True</property>
            <signal name="clicked" handler="stopbutton" swapped="no"/>
          </object>
          <packing>
            <property name="expand">True</property>
            <property name="fill">True</property>
            <property name="position">2</property>
          </packing>
        </child>
        <child>
          <object class="GtkButton" id="button3">
            <property name="label">gtk-media-play</property>
            <property name="visible">True</property>
            <property name="can_focus">True</property>
            <property name="receives_default">True</property>
            <property name="use_stock">True</property>
            <property name="always_show_image">True</property>
            <signal name="clicked" handler="playbutton" swapped="no"/>
          </object>
          <packing>
            <property name="expand">True</property>
            <property name="fill">True</property>
            <property name="position">3</property>
          </packing>
        </child>
      </object>
    </child>
  </object>
</interface>
As usual, copy the above code and paste it in the file “ui.glade” in your home directory, create a new “myrecorder.py” file and enter the following code inside it (Every new line is explained in the comments).
#!/usr/bin/python
# -*- coding: utf-8 -*-

## Here we imported both Gtk library and the os module.
from gi.repository import Gtk
import os

class Handler:
  def recordbutton(self, button):
    ## We defined a variable: 'filepathandname', we assigned the bash local variable '$HOME' to it + "/" + the file name from the text entry box.
    filepathandname = os.environ["HOME"] + "/" + entry.get_text()

    ## Here exported the 'filepathandname' variable from Python to the 'filename' variable in the shell.
    os.environ["filename"] = filepathandname

    ## Using 'os.system(COMMAND)' we can execute any shell command or shell script, here we executed the 'avconv' command to record the desktop video & audio.
    os.system("avconv -f x11grab -r 25 -s `xdpyinfo | grep 'dimensions:'|awk '{print $2}'` -i :0.0 -vcodec libx264 -threads 4 $filename -y & ")


  def stopbutton(self, button):
    ## Run the 'killall avconv' command when the stop button is clicked.
    os.system("killall avconv")

  def playbutton(self, button):
  ## Run the 'avplay' command in the shell to play the recorded file when the play button is clicked.
    os.system("avplay $filename &")


## Nothing new here.. We just imported the 'ui.glade' file.
builder = Gtk.Builder()
builder.add_from_file("ui.glade")
builder.connect_signals(Handler())

window = builder.get_object("window1")
entry = builder.get_object("entry1")
entry.set_text("myrecording-file.avi")

## Give that developer a cookie !
window.connect("delete-event", Gtk.main_quit)
window.show_all()
Gtk.main()
Now run the file by applying the following commands in the terminal.
$ chmod 755 myrecorder.py
$ ./myrecorder.py
And you got your first desktop recorder.

You can find more information about the ‘os‘ module at Python OS Library.
And that’s it, creating applications for the Linux desktop isn’t hard using PyGObject, you just have to create the GUI, import some modules and link the Python file with the GUI, nothing more, nothing less. There are many useful tutorials about doing this in the PyGObject website:
Have you tried creating applications using PyGObject? What do you think about doing so? What applications have you developed before?


Hi friend.. the browser not load websites in BadWindows 7? I dont understand… XD