In Part 3 of the RHCSA exam preparation series, ‘File and Directory Management,’ we will review some essential skills required for the day-to-day tasks of a system administrator.
Linux File Basics: How to Create, Copy, Move & Delete
File and directory management is a critical competence that every system administrator should possess. This includes the ability to create/delete text files from scratch (the core of each program’s configuration) and directories (where you will organize files and other directories), and to find out the type of existing files.
The touch command can be used not only to create empty files but also to update the access and modification times of existing files.

You can use file [filename] to determine a file’s type (this will come in handy before launching your preferred text editor to edit it).
file testfile

and rm [filename] to delete it.
rm testfile

As for directories, you can create directories inside existing paths with mkdir [directory] or create a full path with mkdir -p [/full/path/to/directory].
mkdir dir1
mkdir -p dir1/dir2/dir3
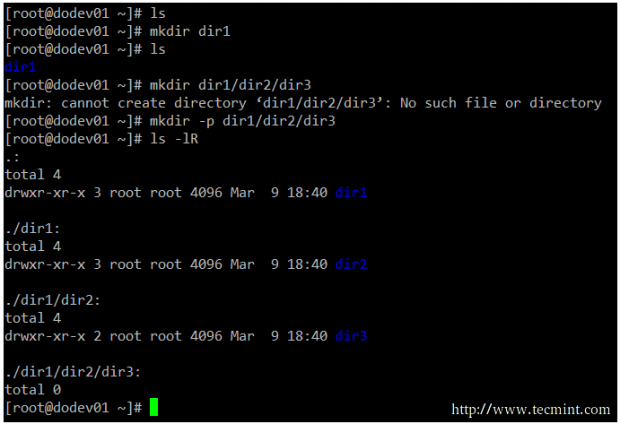
When it comes to removing directories, you need to make sure that they’re empty before issuing the rmdir [directory] command, or use the more powerful (handle with care!) rm -rf [directory].
This last option will force remove recursively the [directory] and all its contents – so use it at your own risk.
rmdir dir1
rm -rf dir1
Input/Output Redirection & Piping in Linux
The command line environment provides two very useful features that allow to redirect the input and output of commands from and to files, and to send the output of a command to another, called redirection and pipelining, respectively.
To understand those two important concepts, we must first understand the three most important types of I/O (Input and Output) streams (or sequences) of characters, which are in fact special files, in the *nix sense of the word.
- Standard input (aka stdin) is by default attached to the keyboard. In other words, the keyboard is the standard input device to enter commands to the command line.
- Standard output (aka stdout) is by default attached to the screen, the device that “receives” the output of commands and displays them on the screen.
- Standard error (aka stderr), is where the status messages of a command is sent to by default, which is also the screen.
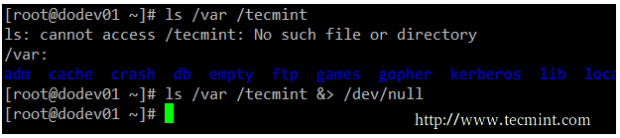
In the following example, the output of ls /var is sent to stdout (the screen), as well as the result of ls /tecmint. But in the latter case, it is stderr that is shown.

To more easily identify these special files, they are each assigned a file descriptor, an abstract representation that is used to access them.
The essential thing to understand is that these files, just like others, can be redirected. What this means is that you can capture the output from a file or script and send it as input to another file, command, or script. This will allow you to store on disk, for example, the output of commands for later processing or analysis.
To redirect stdin (fd 0), stdout (fd 1), or stderr (fd 2), the following operators are available.
| Redirection Operator | Effect |
| > | Redirects standard output to a file containing standard output. If the destination file exists, it will be overwritten. |
| >> | Appends standard output to a file. |
| 2> | Redirects standard error to a file containing standard output. If the destination file exists, it will be overwritten. |
| 2>> | Appends standard error to the existing file. |
| &> | Redirects both standard output and standard error to a file; if the specified file exists, it will be overwritten. |
| < | Uses the specified file as standard input. |
| <> | The specified file is used for both standard input and standard output. |
As opposed to redirection, pipelining is performed by adding a vertical bar (|) after a command and before another one.
Remember:
- Redirection is used to send the output of a command to a file or to send a file as input to a command.
- Pipelining is used to send the output of a command to another command as input.
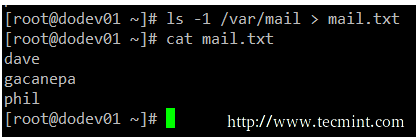
Example 1: Redirecting Linux Command Output to File
There will be times when you will need to iterate over a list of files. To do that, you can first save that list to a file and then read that file line by line.
While it is true that you can iterate over the output of ls directly, this example serves to illustrate redirection.
ls -1 /var/mail > mail.txt
Example 2: Redirecting stdout and stderr to /dev/null
In case we want to prevent both stdout and stderr to be displayed on the screen, we can redirect both file descriptors to /dev/null. Note how the output changes when the redirection is implemented for the same command.
ls /var /tecmint
ls /var/ /tecmint &> /dev/null
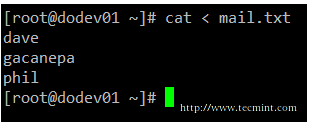
Example 3: Using Files as Input to a Command in Linux
While the classic syntax of the cat command is as follows.
cat [file(s)]
You can also send a file as input, using the correct redirection operator.
cat < mail.txt
Example 4: Sending Command Output as Input to Another
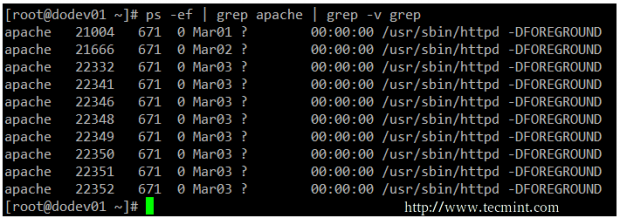
If you have a large directory or process listing and want to be able to locate a certain file or process at a glance, you will want to pipeline the listing to grep.
Note that we use to pipelines in the following example. The first one looks for the required keyword, while the second one will eliminate the actual grep command from the results.
This example lists all the processes associated with the apache user.
ps -ef | grep apache | grep -v grep
Master File Management: Archive, Compress & Extract in Linux
If you need to transport, backup, or send via email a group of files, you will use an archiving (or grouping) tool such as tar command, typically used with a compression utility like gzip, bzip2, or xz.
Your choice of a compression tool will be likely defined by the compression speed and rate of each one. Of these three compression tools, gzip is the oldest and provides the least compression, bzip2 provides improved compression, and xz is the newest and provides the best compression.
Typically, files compressed with these utilities have .gz, .bz2, or .xz extensions, respectively.
| Command | Abbreviation | Description |
| –create | c | Creates a tar archive |
| –concatenate | A | Appends tar files to an archive |
| –append | r | Appends non-tar files to an archive |
| –update | u | Appends files that are newer than those in an archive |
| –diff or –compare | d | Compares an archive to files on disk |
| –list | t | Lists the contents of a tarball |
| –extract or –get | x | Extracts files from an archive |
| Operation modifier | Abbreviation | Description |
| —directory dir | C | Changes to directory dir before performing operations |
| —same-permissions and —same-owner | p | Preserves permissions and ownership information, respectively. |
| –verbose | v | Lists all files as they are read or extracted; if combined with –list, it also displays file sizes, ownership, and timestamps |
| —exclude file | — | Excludes file from the archive. In this case, file can be an actual file or a pattern. |
| —gzip or —gunzip | z | Compresses an archive through gzip |
| –bzip2 | j | Compresses an archive through bzip2 |
| –xz | J | Compresses an archive through xz |
Example 5: Compress Files Effectively: Tar + gzip, bzip2, & xz in Linux
You may want to compare the effectiveness of each tool before deciding to use one or another. Note that while compressing small files, or a few files, the results may not show much difference, but may give you a glimpse of what they have to offer.
tar cf ApacheLogs-$(date +%Y%m%d).tar /var/log/httpd/*        # Create an ordinary tarball
tar czf ApacheLogs-$(date +%Y%m%d).tar.gz /var/log/httpd/*    # Create a tarball and compress with gzip
tar cjf ApacheLogs-$(date +%Y%m%d).tar.bz2 /var/log/httpd/*   # Create a tarball and compress with bzip2
tar cJf ApacheLogs-$(date +%Y%m%d).tar.xz /var/log/httpd/*    # Create a tarball and compress with xz

Example 6: Preserve Permissions & Ownership in Archives
If you are creating backups from users’ home directories, you will want to store the individual files with the original permissions and ownership instead of changing them to that of the user account or daemon performing the backup.
The following example preserves these attributes while taking the backup of the contents in the /var/log/httpd directory:
tar cJf ApacheLogs-$(date +%Y%m%d).tar.xz /var/log/httpd/* --same-permissions --same-owner
Create Hard & Soft Links in Linux
In Linux, there are two types of links to files: hard links and soft (aka symbolic) links. Since a hard link represents another name for an existing file and is identified by the same inode, it then points to the actual data, as opposed to symbolic links, which point to filenames instead.
In addition, hard links do not occupy space on disk, while symbolic links do take a small amount of space to store the text of the link itself.
The downside of hard links is that they can only be used to reference files within the filesystem where they are located because inodes are unique inside a filesystem.
Symbolic links save the day, in that they point to another file or directory by name rather than by inode, and therefore can cross filesystem boundaries.
The basic syntax to create links is similar in both cases:
ln TARGET LINK_NAME               # Hard link named LINK_NAME to file named TARGET
ln -s TARGET LINK_NAME            # Soft link named LINK_NAME to file named TARGET
Example 7: Creating Hard & Soft Links in Linux
There is no better way to visualize the relation between a file and a hard or symbolic link that points to it, than to create those links. In the following screenshot, you will see that the file and the hard link that points to it share the same inode and both are identified by the same disk usage of 466 bytes.
On the other hand, creating a hard link results in an extra disk usage of 5 bytes. Not that you’re going to run out of storage capacity, but this example is enough to illustrate the difference between a hard link and a soft link.

A typical usage of symbolic links is to reference a versioned file in a Linux system. Suppose there are several programs that need access to file fooX.Y, which is subject to frequent version updates (think of a library, for example).
Instead of updating every single reference to fooX.Y every time there’s a version update, it is wiser, safer, and faster, to have programs look to a symbolic link named just foo, which in turn points to the actual fooX.Y.
Thus, when X and Y change, you only need to edit the symbolic link foo with a new destination name instead of tracking every usage of the destination file and updating it.
Summary
In this article, we have reviewed some essential file and directory management skills that must be a part of every system administrator’s tool-set. Make sure to review other parts of this series as well in order to integrate these topics with the content covered in this tutorial.
Feel free to let us know if you have any questions or comments. We are always more than glad to hear from our readers.
For comprehensive RHCSA exam preparation, we have created a comprehensive ebook titled ‘RHCSA Exam Study Guide‘, covering all the objectives with practical examples.


I have not understand why we used second grep in below example.if first grep is capable of providing details of all apache process , what is use of second one ?
# ps -ef | grep apache | grep -v grep.
Compare the output without the second pipeline and the second grep and you’ll find your answer :). Hint: also check the purpose of the -v option of grep.
Hello Gabriel,
Nice article, also correct the typo: Note that we use to(2) pipelines in the following example > Note that we use two(2) pipelines in the following example.
There is no typo. Compare the output without the second pipeline and the second grep and you’ll understand why I used two greps and two pipelines :). Hint: also check the purpose of the -v option of grep.
thank u for the demonstration. I got ask u a question i.e i had a file 200M and created a hardlink for this file the actual disk space will 400M for both files or 200M.since u run ls -li will show both file point to same inode and they had the same size
@Faisal,
The process of creating a hard link does NOT duplicate the file. So if you have a 200 MB file and create a hard link to it, the hard link itself will not occupy another extra 200 MB. One way you can check this is by doing
du -sch /full/path/to/directory/*
where /full/path/to/directory/ is the directory where you have the 200 MB file. Do that and then delete the hard link, then try again. You will not see a difference in the disk usage.
@Gabriel
thanks
In the ‘hard & soft link’, maybe the phrase ‘On the other hand, creating a hard link results in an extra disk usage of 5 bytes.’ should be ‘On the other hand, creating a soft link results in an extra disk usage of 5 bytes.’, isn’t it?
@Eduardo,
Good catch! Yes, that is a typo. Thanks for bringing that up to our attention. I’ll ask Ravi to correct it.
It should be corrected by now, more than a year now. Still, points to hard link. If you wish can also update that why hard links can’t be created for directories.
While ‘&> ‘ works in récent Bash,
‘2>&1 ‘ Will redirect stdout “to where stderr is” on close to every shell around.
@Cyrille,
You are correct. But I wonder if anyone today is using a Bash version that is old enough to not accept ‘&>’. If they do, they better update it :).
Small mistake, in tar compression flags you have commit (should be uppercase J instead lowercase j for xz compression ).
PS.
Thanks for that two articles, for me is some kind of reapet …
@Adam,
Thanks, corrected in the writeup…
Thanks for share this content!
@Henrik,
I am glad that you have found this article useful. Please stay tuned for the rest of the series!
This bit “2>>” should not be “Appends standard error to a file”?
@Tomas,
You are correct my friend! That was a typo. Ravi will correct it when he sees this comment. Thank you for your contribution.
Nice guide , I would like to know how I can get RHEL copy and how much is the price for it, please
@ahmedhsn,
Please refer to this link: https://www.redhat.com/wapps/store/catalog.html. Hopefully that will answer your question.