How to Use ‘fsck’ to Repair Linux File System Errors

Linux Filesystems are responsible for organizing how data is stored and recovered. One way or another, with time, the filesystem may become corrupted and certain parts of it may not be accessible. If your filesystem develops such inconsistency it is recommended to verify its integrity.

This can be completed via a system utility called fsck (file system consistency check), which checks the root file system automatically during boot time or ran manually.

In this article, we are going to review the fsck command and its usage to help you repair Linux disk errors.

When to Use fsck Command in Linux

There are different scenarios when you will want to run fsck. Here are a few examples:

  • The system fails to boot.
  • Files on the system become corrupt (often you may see input/output error).
  • The attached drive (including flash drives/SD cards) is not working as expected.

fsck Command Options

The fsck command needs to be run with superuser privileges or root. You can use it with different arguments. Their usage depends on your specific case. Below you will see some of the more important options:

  • -A – Used for checking all filesystems. The list is taken from /etc/fstab.
  • -C – Show progress bar.
  • -l – Locks the device to guarantee no other program will try to use the partition during the check.
  • -M – Do not check mounted filesystems.
  • -N – Only show what would be done – no actual changes are made.
  • -P – If you want to check filesystems in parallel, including root.
  • -R – Do not check the root filesystem. This is useful only with ‘-A‘.
  • -r – Provide statistics for each device that is being checked.
  • -T – Does not show the title.
  • -t – Exclusively specify the Linux filesystem types to be checked. Types can be comma-separated lists.
  • -V – Provide a description of what is being done.

Run fsck Command to Repair Linux File System Errors

In order to run fsck, you will need to ensure that the partition you are going to check is not mounted. For the purpose of this article, I will use my second drive /dev/sdb mounted in /mnt.

Here is what happens if I try to run fsck when the partition is mounted.

# fsck /dev/sdb
Run fsck on Mounted Partition

To avoid this unmount the partition using.

# umount /dev/sdb

Then fsck can be safely run with.

# fsck /dev/sdb
Run fsck on Linux Partition

Understanding fsck Exit Codes

After running fsck, it will return an exit code. These codes can be seen in fsck’s manual by running:

# man fsck

0      No errors
1      Filesystem errors corrected
2      System should be rebooted
4      Filesystem errors were left uncorrected
8      Operational error
16     Usage or syntax error
32     Checking canceled by user request
128    Shared-library error            

Fsck Repair Linux Filesystem

Sometimes more than one error can be found on a filesystem. In such cases, you may want fsck to automatically attempt to correct the errors. This can be done with:

# fsck -y /dev/sdb

The -y flag, automatically “yes” to any prompts from fsck to correct an error.

Similarly, you can run the same on all filesystems (without root):

$ fsck -AR -y 

How to Run fsck on Linux Root Partition

In some cases, you may need to run fsck on the root partition of your system. Since you cannot run fsck while the partition is mounted, you can try one of these options:

  • Force fsck upon system boot
  • Run fsck in rescue mode

We will review both situations.

Force fsck Upon System Boot

This is relatively easy to complete, the only thing you need to do is create a file called forcefsck in the root partition of your system. Use the following command:

# touch /forcefsck

Then you can simply force or schedule a reboot of your system. During the next bootup, the fsck will be performed. If downtime is critical, it is recommended to plan this carefully, since if there are many used inodes on your system, fsck may take some extra time.

After your system boots, check if the file still exists:

# ls /forcefsck

If it does, you may want to remove it in order to avoid fsck on every system boot.

Run fsck in Rescue Mode

Running fsck in rescue mode requires a few more steps. First, prepare your system for reboot. Stop any critical services like MySQL/MariaDB etc and then type.

# reboot

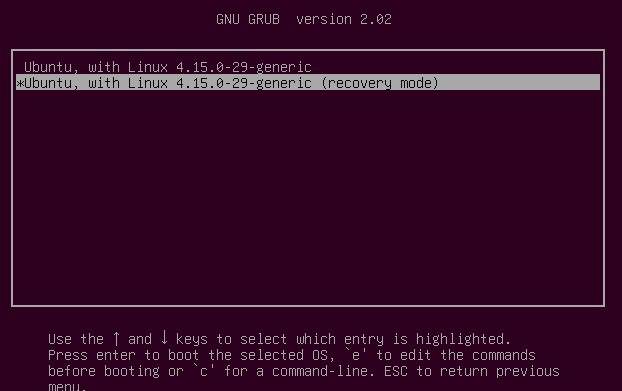
During the boot, hold down the shift key so that the grub menu is shown. Select “Advanced options”.
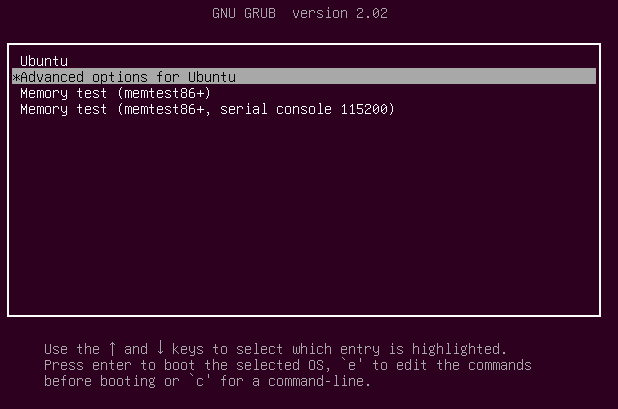
Grub Advance Options
Grub Advanced Options

Then choose “Recovery mode”.

Select Linux Recovery Mode

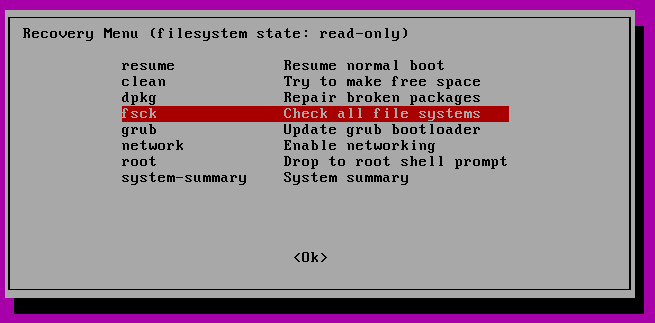
In the next menu select “fsck”.

Select fsck Utility
Select fsck Utility

You will be asked if you wish to have your / filesystem remounted. Select “yes”.

Confirm Root Filesystem

You should see something similar to this.
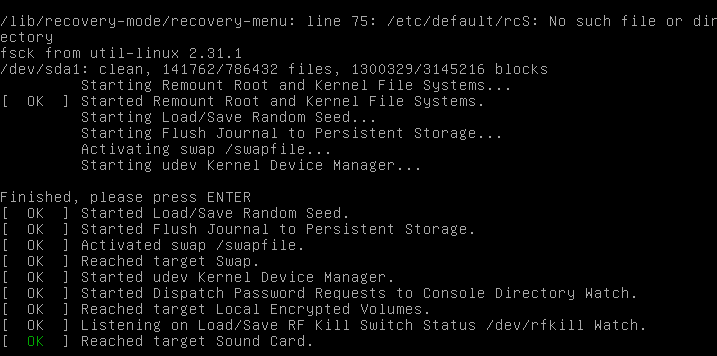
Running fsck Filesystem Check

You can then resume normal boot, by selecting “Resume”.
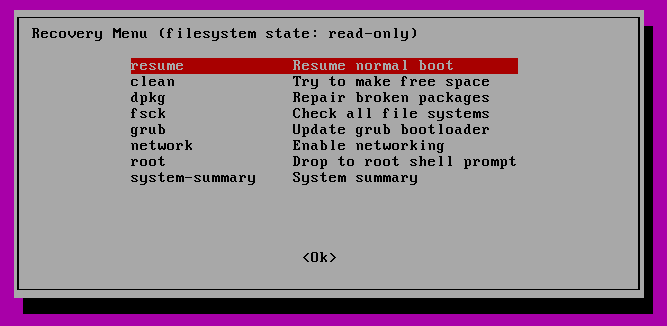
Select Normal Boot
Select Normal Boot
Conclusion

In this tutorial, you learned how to use fsck and run consistency checks on different Linux filesystems. If you have any questions about fsck, please do not hesitate to submit them in the comment section below.

Marin Todorov
I am a bachelor in computer science and a Linux Foundation Certified System Administrator. Currently working as a Senior Technical support in the hosting industry. In my free time I like testing new software and inline skating.

Each tutorial at TecMint is created by a team of experienced Linux system administrators so that it meets our high-quality standards.

Join the TecMint Weekly Newsletter (More Than 156,129 Linux Enthusiasts Have Subscribed)
Was this article helpful? Please add a comment or buy me a coffee to show your appreciation.

38 thoughts on “How to Use ‘fsck’ to Repair Linux File System Errors”

  1. Hi Ravi,

    I have an issue below on my Centos 7.7 64 bit, when i check the log /var/log/dmesg.

    I have running RAID1 with two hard disk another one internal hard disk mount manually, now i have unmount another hard disk and showing below message. But the system is booting properly without any issue. Could you help me, what’s the issue and how to solve it.

    11.231467] FAT-fs (sdb1): Volume was not properly unmounted. Some data may be corrupt. Please run fsck.

    #df -h

    Filesystem Size Used Avail Use% Mounted on
    devtmpfs 3.8G 0 3.8G 0% /dev
    tmpfs 3.8G 4.0K 3.8G 1% /dev/shm
    tmpfs 3.8G 41M 3.8G 2% /run
    tmpfs 3.8G 0 3.8G 0% /sys/fs/cgroup
    /dev/mapper/centos-root 908G 548G 361G 61% /
    /dev/sdb2 3.8G 271M 3.5G 8% /boot
    /dev/sdb1 3.8G 12M 3.8G 1% /boot/efi
    tmpfs 778M 0 778M 0% /run/user/2
    tmpfs 778M 0 778M 0% /run/user/0

    Reply
  2. Want to thank you so much, your advice helped me to fix my Linux-system. I thought I would have to throw away my laptop, now it runs again :-).

    Thank you!

    Reply
    • Just a note, but you probably never have to throw out an entire laptop if the drive fails. Almost all laptops allow quick and easy replacement of the hard drive… Still a good thing you could fix it through just software though. :)

      Reply
    • @Robercleiton,

      No, it won’t work, because swap partition does not contain any data and there is no point in repairing it. If swap partition is corrupted, you can fix it using mkswap command.

      $ sudo mkswap /dev/sda2 #sda2 is swap partition device name
      $ sudo swapon /dev/sda2
      
      Reply
  3. Doesn’t work. I have a 32 bits Ubuntu-based system. When I try to use Gparted, it says that I must have a more recent version of e2fsprogs. When I use fsck, it says the same thing. I tried to update through Synaptic, it doesn’t see a newer version. I tried to add the PPA (ppa:hloeung/e2fsprogs), it shows a mistake, and thus doesn’t show newer packages.

    Reply
    • This is likely related to the fact that 32-bit builds of Ubuntu and Ubuntu packages have been dropped. The PPA you mention also only has a 64-bit build.

      If moving to a 64-bit distro isn’t an option, perhaps you can build a 32-bit version of e2fsprogs from the source.

      Reply
  4. systemd broke the well-known sudo touch /forcefsck method in 2015.

    Since then, it hasn’t worked.

    There is an obtuse grub command that does work or just boot from alternate media, like from a “Try Ubuntu” flash drive, then run the fsck from that environment.

    Reply
  5. Hi,

    I did a umount and:

    torben@torben-Aspire-E5-773G:~$ sudo fsck /dev/sdb6
    fsck from util-linux 2.31.1
    e2fsck 1.44.1 (24-Mar-2018)
    /dev/sdb6: clean, 185609/30433280 files, 4058434/121728256 blocks
    

    No return code, but the file disappeared (not in fstab, but in lsblk). What happened? Can I get it back?

    Best regards
    torben

    Reply
  6. Recovery options in this guide are obsolete.

    You can no longer check all filesystems with the recovery menu since all filesystems mount as read-write. The logic of the recovery boot menu is broken now.

    Also, adding /forcefsck no longer works on recent Ubuntu versions with systemd.

    Reply
  7. Hello,

    I need to run fsck on root, but for some reason creation of forcefsck does not result in a file systems consistency check upon sudo reboot it just takes me directly to the GRUB menu.

    Any advice?

    Reply
  8. This was an awesome little guide! However, why doesn’t it work for me? I think it has to do with the fact that I’ve set up my OS to use LVM, even when I use touch /forcefsck, the log states that I should no longer use forcefsck but rather use the command in grub… any idea?

    Reply

Got something to say? Join the discussion.

Thank you for taking the time to share your thoughts with us. We appreciate your decision to leave a comment and value your contribution to the discussion. It's important to note that we moderate all comments in accordance with our comment policy to ensure a respectful and constructive conversation.

Rest assured that your email address will remain private and will not be published or shared with anyone. We prioritize the privacy and security of our users.