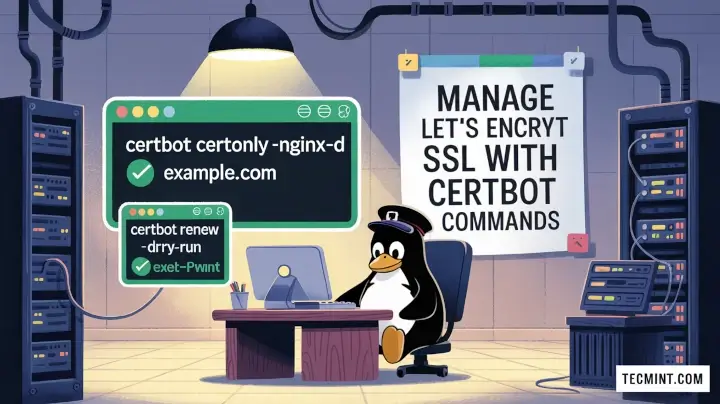
Linux Filesystems are responsible for organizing how data is stored and recovered. One way or another, with time, the filesystem may become corrupted and certain parts of it may not be accessible. If your filesystem develops such inconsistency it is recommended to verify its integrity.
This can be completed via a system utility called fsck (file system consistency check), which checks the root file system automatically during boot time or ran manually.
In this article, we are going to review the fsck command and its usage to help you repair Linux disk errors.
Table of Contents
When to Use fsck Command in Linux
There are different scenarios when you will want to run fsck. Here are a few examples:
- The system fails to boot.
- Files on the system become corrupt (often you may see input/output error).
- The attached drive (including flash drives/SD cards) is not working as expected.
fsck Command Options
The fsck command needs to be run with superuser privileges or root. You can use it with different arguments. Their usage depends on your specific case. Below you will see some of the more important options:
-A– Used for checking all filesystems. The list is taken from/etc/fstab.-C– Show progress bar.-l– Locks the device to guarantee no other program will try to use the partition during the check.-M– Do not check mounted filesystems.-N– Only show what would be done – no actual changes are made.-P– If you want to check filesystems in parallel, including root.-R– Do not check the root filesystem. This is useful only with ‘-A‘.-r– Provide statistics for each device that is being checked.-T– Does not show the title.-t– Exclusively specify the Linux filesystem types to be checked. Types can be comma-separated lists.-V– Provide a description of what is being done.
Run fsck Command to Repair Linux File System Errors
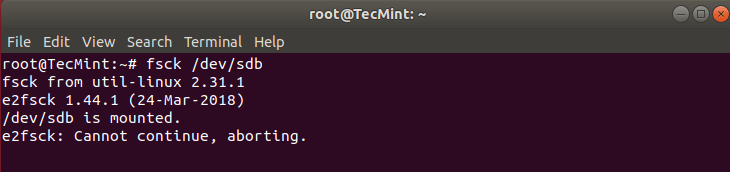
In order to run fsck, you will need to ensure that the partition you are going to check is not mounted. For the purpose of this article, I will use my second drive /dev/sdb mounted in /mnt.
Here is what happens if I try to run fsck when the partition is mounted.
# fsck /dev/sdb
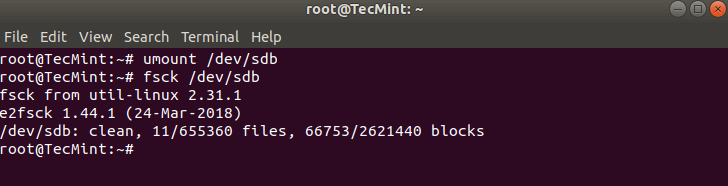
To avoid this unmount the partition using.
# umount /dev/sdb
Then fsck can be safely run with.
# fsck /dev/sdb
Understanding fsck Exit Codes
After running fsck, it will return an exit code. These codes can be seen in fsck’s manual by running:
# man fsck

0      No errors
1      Filesystem errors corrected
2      System should be rebooted
4      Filesystem errors were left uncorrected
8      Operational error
16     Usage or syntax error
32     Checking canceled by user request
128    Shared-library error
Fsck Repair Linux Filesystem
Sometimes more than one error can be found on a filesystem. In such cases, you may want fsck to automatically attempt to correct the errors. This can be done with:
# fsck -y /dev/sdb
The -y flag, automatically “yes” to any prompts from fsck to correct an error.
Similarly, you can run the same on all filesystems (without root):
$ fsck -AR -y
How to Run fsck on Linux Root Partition
In some cases, you may need to run fsck on the root partition of your system. Since you cannot run fsck while the partition is mounted, you can try one of these options:
- Force fsck upon system boot
- Run fsck in rescue mode
We will review both situations.
Force fsck Upon System Boot
This is relatively easy to complete, the only thing you need to do is create a file called forcefsck in the root partition of your system. Use the following command:
# touch /forcefsck
Then you can simply force or schedule a reboot of your system. During the next bootup, the fsck will be performed. If downtime is critical, it is recommended to plan this carefully, since if there are many used inodes on your system, fsck may take some extra time.
After your system boots, check if the file still exists:
# ls /forcefsck
If it does, you may want to remove it in order to avoid fsck on every system boot.
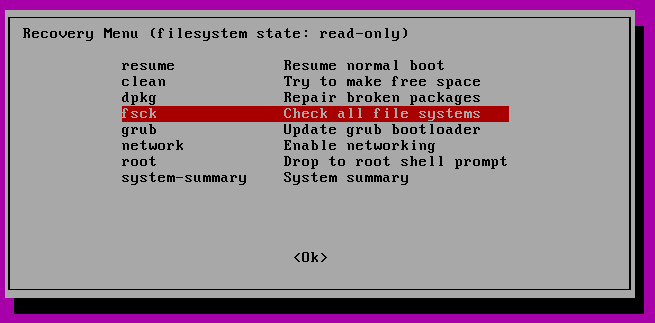
Run fsck in Rescue Mode
Running fsck in rescue mode requires a few more steps. First, prepare your system for reboot. Stop any critical services like MySQL/MariaDB etc and then type.
# reboot
During the boot, hold down the shift key so that the grub menu is shown. Select “Advanced options”.
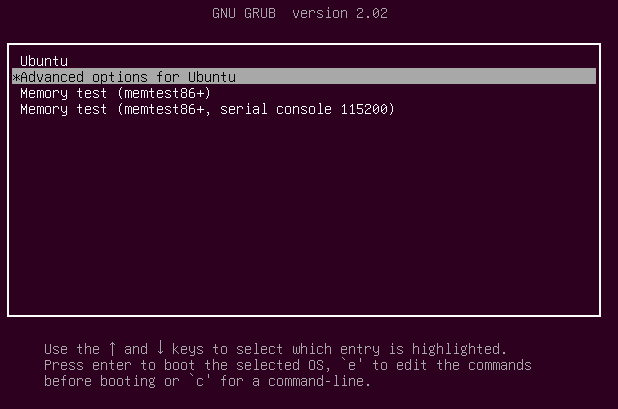
Then choose “Recovery mode”.
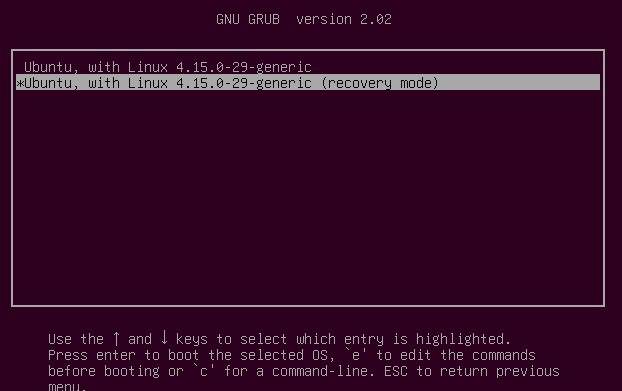
In the next menu select “fsck”.
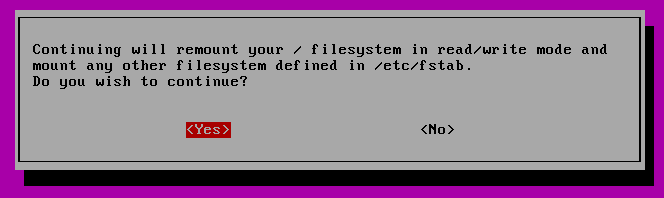
You will be asked if you wish to have your / filesystem remounted. Select “yes”.
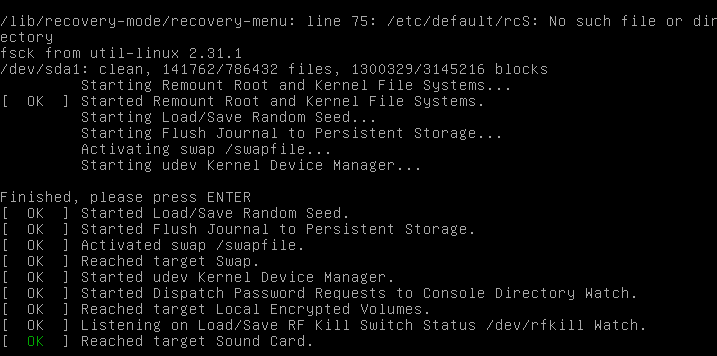
You should see something similar to this.
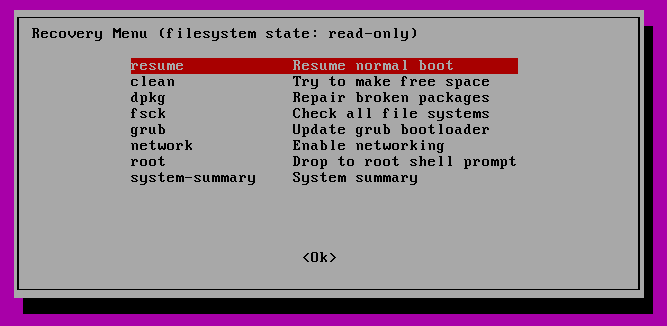
You can then resume normal boot, by selecting “Resume”.
Conclusion
In this tutorial, you learned how to use fsck and run consistency checks on different Linux filesystems. If you have any questions about fsck, please do not hesitate to submit them in the comment section below.

This is the wrong instruction, on a Debian system, the HDD will be broken.
Thank you for this. I used the first option of fsck command and it seems to have worked like a charm.
I appreciate your contributing to the community.
When I typed fsck /dev/SDA -a, it showed me this,
If the device is valid and it really contains an ext2/ext3/ext4 filesystem (and if not swap or ufs or something else), then the superblock is corrupt, and you might try running e2fsck with an alternate superblock:
Found a dos partition table in /dev/SDA.
When I try to run the e2fsck commands it gave, it shows sh: syntax error: unexpected newline.
And then when I try to unmount /dev/SDA it can’t unmount because it’s an invalid argument?
I’m a total beginner at Linux and I really don’t know what to do now
Capitalization and spelling matter on the shell. Device names are never capitalized (so sda, not SDA). unmount should be umount, too.
I updated to the newest version of Ubuntu, now it will not boot. I get the BusyBox black screen and when I used the exit command, here’s the output:
/init: line 866: logsave: not found
Failure: File system check of the root filesystem failed
The root filesystem in /dev/sda6 requires a manual fsck
But when I attempt to do so, I get a text file busy error.
How can I fix this?
Good morning, happy new year to you.
Thank you for the article and your time spent on this website your time spent doing this is very much appreciated by me. I am using a laptop and ran a disk check using the smart control application which stated errors were found.
Although I deleted the partition and reformatted the drive the errors remained which made me curious about error checking and cyclic redundancy checks which lead me to do a little research on physical drive checks and more detailed analysis.
Doing searching online drove me here and to the FSCK command which even though I had wiped the drive still showed a wealth of errors (As I ran it without the
-yflag initially), your article provided some clarity I was missing and made me wonder if some of these errors are reached because there is still junk data left on the drive because I have not low-level formatted it.So now I am running the command as
'sudo fsck -y -c /dev/sdb'Now it will search for errors, fix them as found, and display ongoing progress… Which begs the question… If I low-level formatted this drive by overwriting it with zero, would these errors then be wiped free? And if that is true, then the error that may still be found would be from smart control querying the device bios to see if it’s detected possible hardware failure (As the drive would now be wiped completely clean of any software issues) which means that fsck is really only untangling crosslinked files/sectors/clusters, etc.
Forgive the stupid questions, I am not well educated on computer drives from a hardware perspective, or a read/write/data perspective so I am aware I’m ignorant and most articles I’ve read only give so much in-depth information.
In any case, I am going to let this command run in its entirety and see what the outcome is. Thank you for your time. Thank you for the article.
Does Linux (ubuntu) install run fsck before installing? or format automatically “note” the problematic sectors on the new partitions? I try to install Ubuntu and always ran into disc problems How to force a correction before the install?
Would be better to get this on youtube.
Not at all. You can’t copy text out of a video. Text articles work well for this kind of explanation.
Hi Ravi,
I have an issue below on my Centos 7.7 64 bit, when i check the log /var/log/dmesg.
I have running RAID1 with two hard disk another one internal hard disk mount manually, now i have unmount another hard disk and showing below message. But the system is booting properly without any issue. Could you help me, what’s the issue and how to solve it.
11.231467] FAT-fs (sdb1): Volume was not properly unmounted. Some data may be corrupt. Please run fsck.
#df -h
Filesystem Size Used Avail Use% Mounted on
devtmpfs 3.8G 0 3.8G 0% /dev
tmpfs 3.8G 4.0K 3.8G 1% /dev/shm
tmpfs 3.8G 41M 3.8G 2% /run
tmpfs 3.8G 0 3.8G 0% /sys/fs/cgroup
/dev/mapper/centos-root 908G 548G 361G 61% /
/dev/sdb2 3.8G 271M 3.5G 8% /boot
/dev/sdb1 3.8G 12M 3.8G 1% /boot/efi
tmpfs 778M 0 778M 0% /run/user/2
tmpfs 778M 0 778M 0% /run/user/0
Want to thank you so much, your advice helped me to fix my Linux-system. I thought I would have to throw away my laptop, now it runs again :-).
Thank you!
Just a note, but you probably never have to throw out an entire laptop if the drive fails. Almost all laptops allow quick and easy replacement of the hard drive… Still a good thing you could fix it through just software though. :)
Does it support swap partition?
@Robercleiton,
No, it won’t work, because swap partition does not contain any data and there is no point in repairing it. If swap partition is corrupted, you can fix it using mkswap command.
Doesn’t work. I have a 32 bits Ubuntu-based system. When I try to use Gparted, it says that I must have a more recent version of e2fsprogs. When I use fsck, it says the same thing. I tried to update through Synaptic, it doesn’t see a newer version. I tried to add the PPA (ppa:hloeung/e2fsprogs), it shows a mistake, and thus doesn’t show newer packages.
This is likely related to the fact that 32-bit builds of Ubuntu and Ubuntu packages have been dropped. The PPA you mention also only has a 64-bit build.
If moving to a 64-bit distro isn’t an option, perhaps you can build a 32-bit version of e2fsprogs from the source.
systemd broke the well-known
sudo touch /forcefsckmethod in 2015.Since then, it hasn’t worked.
There is an obtuse grub command that does work or just boot from alternate media, like from a “Try Ubuntu” flash drive, then run the fsck from that environment.
Hi,
I ran
fsck -y.The volume could not be repaired after 3 attempts
Any suggestions?
Hi,
I did a umount and:
No return code, but the file disappeared (not in fstab, but in lsblk). What happened? Can I get it back?
Best regards
torben
Recovery options in this guide are obsolete.
You can no longer check all filesystems with the recovery menu since all filesystems mount as read-write. The logic of the recovery boot menu is broken now.
Also, adding
/forcefsckno longer works on recent Ubuntu versions with systemd.Hello,
I need to run fsck on root, but for some reason creation of forcefsck does not result in a file systems consistency check upon sudo reboot it just takes me directly to the GRUB menu.
Any advice?
This was an awesome little guide! However, why doesn’t it work for me? I think it has to do with the fact that I’ve set up my OS to use LVM, even when I use
touch /forcefsck, the log states that I should no longer use forcefsck but rather use the command in grub… any idea?@Ricardo,
Could you share the screenshot or output of the forcefsck command?
Lifesaver, short and accurate article..
Thank a lot Sir, was very useful
I tried it from the recovery mode and I get to the screen to switch to read/write and click yes, then it says
dev/sda1is mounted and takes me back to recovery menu.If I click fsck again, it says this operation requires me to be in read-only mode and the last operation requested switched me to read/write. To go back to read-only, reboot the system. I’ve done this over and over. I’m in Ubuntu 18.10. Any ideas? Thanks
I have exact same problem with Mint 19.1 virtual machine on VirtualBox.
I have the exact same issue – it says `dev/sda1` is mounted and aborts and when I try again it says now it has to be `readonly` – did you manage to get it fixed?
I have a VPS CentOS 7, If following this tutorial, will i lose my data on vps ?
@Hung,
Not at all, fsck only scans for filesystem errors and fix it
What version of Ubuntu does this article relate to? People like me are still using 16.04 because of all of 18.04’s problems and I don’t see the graphic just below the line, “You can then resume to normal boot, by selecting “Resume”. Is that GUI ONLY in 18.04?
My PC is not showing 64 bit while I try to install it. What to do please help me..
Classic Ubuntu user arrogance, to equate Ubuntu with all of Linux in the headline, then list *Ubuntu-specific recovery-mode options as if they were universal. Just about every “recovery mode” I’ve ever seen, even under GRUB 2, is a command line prompt with very limited options. Well the first half of the article is universal, at least.
Still doesn’t work. I can’t access root, my command starts with (initramfs)
@Tsele,
Your question is not clear, could you elaborate more..
@Eric, if you have an issue with a windows partition, it would be better to use chkdsk windows utility. In Linux, there is fsck.ntfs which is a symlink to ntfsfix.
ntfsfix is a utility that fixes some common NTFS problems. ntfsfix is NOT a Linux version of chkdsk. It only repairs some fundamental NTFS inconsistencies, resets the NTFS journal file and schedules an NTFS consistency check for the first boot into Windows.
Interesting, but what about an external drive that giving problems running Windows 10? will fsck “fix” that drive as well? And is the syntax the same? (Just point your Linux machine to it and run fsck??)
@Eric,
I don’t think fsck recognize windows filesystem, never tried it. I think you should give a try and see..:)
If you have the ntfs4g binaries installed, fsck can evaluate and even fix said partitions; that said, Windows specific tools, such as CHKDSK are (for once) less destructive and get better results if you’re trying to preserve as much data as possible.