In the previous article of this series, we reviewed 7 tips and tricks to add to your vi/m skill set, besides the reasons given previously, learning how to use effectively a text editor in Linux is an essential ability for a system administrator or engineer and is a required competency to pass any major Linux certification program (such as LFCS, LFCE, RHCSA, and RHCE).
That said, let’s get started.
8. Create Horizontal or Vertical Vim Windows
This tip was shared by Yoander, one of our readers, in Part 1. You can launch vi/m with multiple horizontal or vertical divisions to edit separate files inside the same main window:
Launch vi/m with two horizontal windows, with test1 at the top and test2 at the bottom
vim -o test1 test2
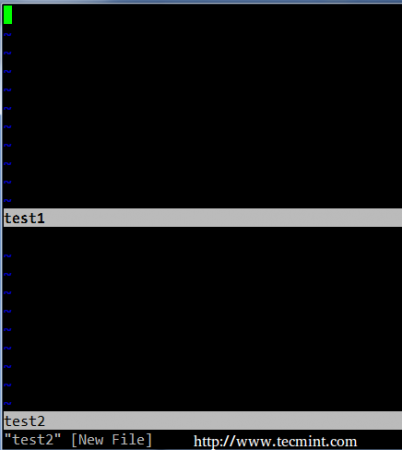
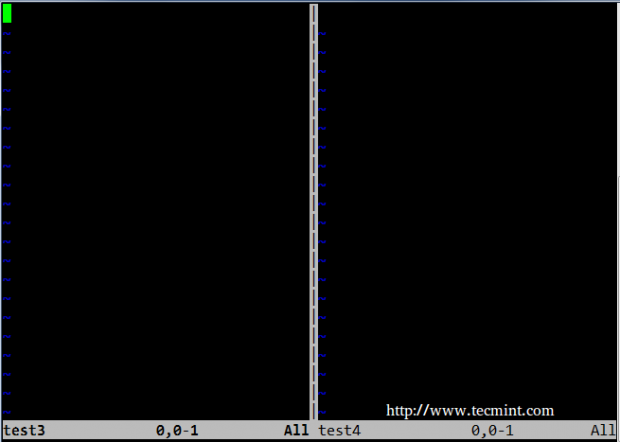
Launch vi/m with two vertical windows, with test3 on the left and test4 on the right:
vim -O test3 test4
You can switch the cursor from one window to another with the usual vi/m movement routine (h: right, l: left, j: bottom, k: top):
- Ctrl+w k – top
- Ctrl+w j – bottom
- Ctrl+w l – left
- Ctrl+w h – right
9. Change UPPERCASE or Lowercase in Vim
Please note that this tip only works in vim. In the next examples, X is an integer number.
- To change a series of letters to uppercase, position the cursor on the first letter, then type gUX in ex mode, and finally press the right arrow on the keyboard.
- To change X number of words, place the cursor at the beginning of the word, and type gUXw in ex mode.
- To change an entire line to uppercase, place the cursor anywhere on the line and type gUU in ex mode.
For example, to convert an entire lowercase line to uppercase, you should place the cursor anywhere on the line and type gUU:

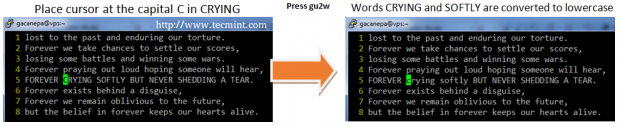
For example, to convert 2 uppercase words to lowercase, you should place the cursor at the beginning of the first word and type gu2w:
10. Delete Text in Vim Insert Mode
While you can delete characters or several words at once in ex mode (i.e. dw to delete a word), you can also do so in Insert mode as follows:
- Ctrl + h: delete the previous character to the place where the cursor is currently located.
- Ctrl + w: delete the previous word to the place where the cursor is currently located. For this to work correctly, the cursor must be placed in an empty space after the word that you need to delete.
- Ctrl + u: delete the current line beginning at the character immediately to the left of the place where the cursor is.
11. Move or Copy Existing Lines Within Vim
While it is true that you can use the well-known dd, yy, and p commands in ex mode to delete, yank (copy), and paste lines, respectively, that only work when the cursor is placed where you want to perform those operations.
The good news is that with the copy and move commands, you can do the same regardless of where the cursor is currently placed.
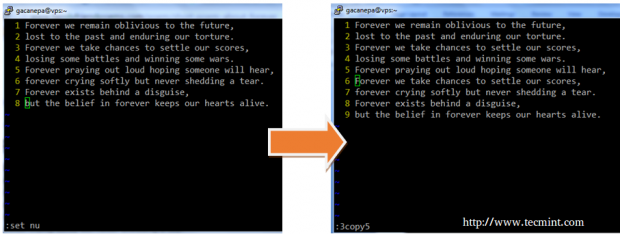
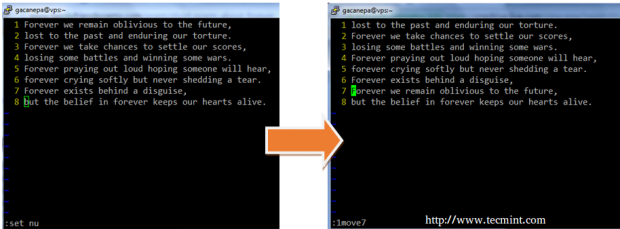
For the next example, we will use a short poem titled “Forever” by Terri Nicole Tharrington. To begin, we will have Vim display the line numbers (:set nu in Command mode – consider this an extra tip). We will use :3copy5 (also in Command mode) to copy line 3 below line 5:
Now, undo the last change (Esc + u – another bonus tip!) and type :1move7 to replace line 7 with line 1. Please note how lines 2 through 7 are shifted up and former line 1 now occupies line 7:
12. Navigating and Counting Pattern Matches in Vim
This tip is based on the substitute command (tip #7 in Part 1 of this series), with the exception that it will not remove anything since the substitute behavior is overridden by the n option, resulting in the count of occurrences of the specified pattern:
Make sure that you don’t omit any of the forward slashes!
:%s/pattern//gn
For example,
:%s/libero//gn
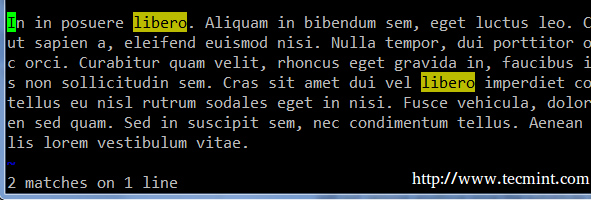
To move from one occurrence of the pattern to the next in ex mode, press n (lowercase N). To move to the previous instance, press N.
13. Open a File in Vim at a Specified Line
By default, when you launch vi/m, the cursor is initially placed in the last line that was edited. If you want to open the program and have the cursor be directly placed on a specified line, you can use the following trick:
# vim filename +line_number
For example, open forever.txt and place the cursor in line 6:
# vim forever.txt +6
Let’s tweak this example a little bit. Suppose we want to open the file on the line where the 3rd occurrence of the pattern appears:
# vim filename +$(grep -in pattern filename | sed -n 3p | cut -d: -f1)
Let’s take a closer look at what the above command does:
- grep -in pattern filename – displays all lines from the filename where the pattern occurs, with the line number at the beginning of each output line.
- sed -n 3p – displays the 3rd line from the preceding pipeline’s output.
Finally,
- cut -d: -f1 returns the first field of the previous pipeline with the colon
(:)is the field separator.
grep -in forever forever.txt
grep -in forever forever.txt | sed -n 3p
grep -in forever forever.txt | sed -n 3p | cut -d: -f1

The result of the previous command is then passed to vi/m to open the program at the specified line.
14. Customizing Vim Environment
If you use vi/m to edit configuration files or to write code, you will want to be able to display the line
- Vim for Linux Admins: 8 Powerful Tips and Tricks (Part 2)
numbers when you first open the program and to set automatic indentation so that when you press the Enter key, the cursor will be automatically placed at the proper position. In addition, you may want to customize the number of white spaces a tab occupies.
While you can do that each time you launch vi/m, it’s easier to set these options in ~/.vimrc so that they will be automatically applied:
set number
set autoindent
set shiftwidth=4
set softtabstop=4
set expandtab
For further options to customize your vi/m environment, you can refer to the online vim documentation.
15. Get General Vim Help/ with Vimtutor
If at any time you need to brush up your general vi/m skills, you can launch vimtutor from the command line which will display a full vi/m help that you can refer to as often as you wish without the need to fire up a web browser to search how to accomplish a certain task in vi/m.
vimtutor
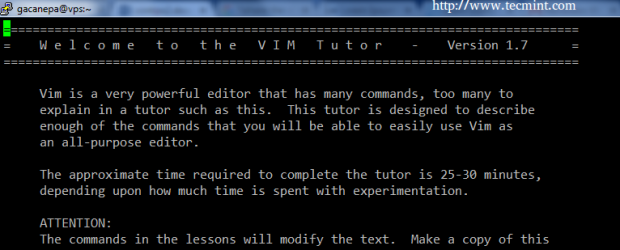
Note that you can navigate or search the contents of Vimtutor as if you were navigating a regular file in vi/m.
Summary
In this 2-article series, I’ve shared several vi/m tips and tricks that should help you to be more effective when it comes to editing text using command line tools.
I’m sure you must have other ones – so feel free to share them with the rest of the community in the comment form below. As always, questions and comments are also welcome.


this guy uses vim on windows’ cmd, what a shame. Looks like they are the on who needs to learn about Linux
Very useful Tips
thanks Gabriel.
Not as advanced as some of these, esc + : set number has saved my life multiple times, especially when I am following a tutorial. It counts and displays the line numbers. Maybe it is one that everyone knows, but I remember googling for it a while back during a project. Could be very helpful for people just starting out. :)
Very nice tips, extremely interesting and useful. Thank you!
Open vim in the first matching for specific word, in this case NameVirtualHost
$ vim +/NameVirtualHost /etc/httpd/conf/httpd.conf