Network Time Protocol (NTP) presents an unique ability for companies to synchronize the clocks of all the systems within the company. Time synchronization is important for many reasons ranging from application time stamps to security to proper log entries.
When an organization’s systems all maintain different clock times, it becomes very difficult from a troubleshooting standpoint to determine when and under what conditions a particular event might be occurring.
NTP provides an easy way to ensure that all systems will maintain the correct time which in turn can greatly simplify the burden on administrators/tech support.
NTP works on the premise of synchronization with reference clocks, also known as ‘stratum 0‘ servers. All other NTP servers then become a lower level strata server based upon how far they are from a reference server.
The start of the NTP chain is a stratum 1 server which is always directly connected to a stratum 0 reference clock. From here, lower level strata servers are connected via a network connection to a higher strata level server.
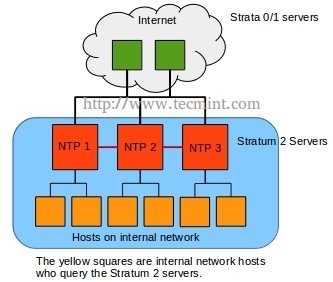
Refer to the diagram below for a clearer concept.

While setting up a stratum 0 or stratum 1 server can be done, it is expensive to do so and as such this guide will focus on lower strata server setup.
Tecmint has a basic host configuration of NTP at the following link:
Where this guide will differ is rather than having all of the hosts on the network querying out to public NTP servers, one (or better practice, several) server(s) will contact the public NTP system and then provide time for all hosts within the local network.
An internal NTP server is often ideal to conserve network bandwidth as well as provide some increased security through NTP restrictions and cryptography. To see how this differs from the first diagram, please see the second diagram below.
Step 1: Installation of NTP Server
1. The first step to setting up an internal NTP structure is to install the NTP server software. The software package in Debian called ‘NTP‘ currently contains all of the server utilities necessary to setup a NTP hierarchy. As with all tutorials about system configuration, Root or sudo access is assumed.
# apt-get install ntp
# dpkg --get-selections ntp          [Can be used to confirm NTP is installed]
# dpkg -s ntp                        [Can also be used to confirm NTP is installed]
Step 1: Configuration of NTP Server
2. Once NTP is installed, it is time to configure what higher stratum servers to query for time. The configuration file for NTP is stored at ‘/etc/ntp.conf‘ and can be modified with any text editor. This file will contain the fully qualified domain names of the the higher level servers, restrictions set for this NTP server, and any other special parameters for hosts querying this NTP server.
To start the configuration process, the higher level servers need to be configured. Debian by default will put the Debian NTP pool in the configuration file. These are fine for most purposes but an administrator can visit NIST to specify certain servers or to use all of NIST’s servers in a round robin fashion (suggested method by NIST).
For this tutorial specific servers will be configured. The configuration file is broken into some major sections and is configured by default for IPv4 and IPv6 (If you wish to disable IPv6, there is mention to this later). To start the configuration process, the configuration file must be opened with a text editor.
# nano /etc/ntp.conf
The first few sections (driftfile, statsdir, and statistics) are fine set to the defaults. The next section contains the higher level servers through which this server should request time. The syntax for each server entry is very simple:
server <fully qualified domain name> <options>
server time.nist.gov iburst â     [sample entry]
Typically it is a good idea to have several higher strata servers to choose from in this list. This server will query all of the servers in the list to determine which one is the most reliable. The servers for this example were obtained from: http://tf.nist.gov/tf-cgi/servers.cgi.

Step 3: Configuration of NTP Restrictions
3. The next step is to configure NTP restrictions. These are used to allow or dis-allow hosts to interact with the NTP server. The default for NTP is serve time to anyone but do not allow configuration on both IPv4 and IPv6 connections.
This server is currently only used on an IPv4 network so IPv6 was disabled by two means. The first thing done to disable IPv6 on the NTP server was to change the defaults that the daemon starts. This was accomplished by changing the line in ‘/etc/default/ntp‘.
# nano /etc/default/ntp
NTPD_OPTS='-4 -g' [Add the ' -4 ' to this line to tell NTPD to only listen to IPv4]
Back in the main configuration file (/etc/ntp.conf), the NTP daemon will be automatically configure to share time with all IPv4/6 hosts but not allow configuration. This can be seen by the following two lines:

NTPD works on an allowed unless denied basis. Since IPv6 was disabled, the ‘restrict -6‘ line can be removed or commented out with a ‘ #

This changes the default behavior for NTP to ignore all messages. This may seem odd but keep reading as restrict clauses will be used to fine tune access to this NTP server for the hosts that need access.
Now the server needs to know who is allowed to query the server for time and what else they are allowed to do with the NTP server. For this server, a private network of 172.27.0.0/16 will be used to build the restrict stanza.

This line informs the server to allow any host from the 172.27.0.0/16 network to access the server for time. The parameters after the mask help to control what any of the hosts on this network can do when querying the server. Let’s take a moment to understand each of these restrict options:
- Limited: Indicates that if a client should abuse the number of packets rate control, the packets will be discarded by the sever. If the Kiss of Death packet is enabled, it will be sent back to the abusive host. The rates are configurable by an admin but the defaults are assumed here.
- KOD: Kiss of Death. If a host violates the limit of packets to the server, the server will respond with s KoD packet to the violating host.
- Notrap: Decline mode 6 control messages. These control messages are used for remote logging programs.
- Nomodify: Prevents ntpq and ntpdc queries that would modify the server’s configuration but informational queries are still permitted.
- Noquery: This option prevents hosts from querying the server for information. For example without this option hosts can use ntpdc or ntpq to determine where a particular time server is getting it’s time from or other peer time servers that it may be communicating with.


I didn’t understand this concept properly. could you please explain easily so that the common person also able to understands.
Thanks in advance.
@Jaipalreddy,
What you didn’t understand? could you explain more where you didn’t understand and what you looking us to explain more in depth?
Great article. Thanks
This is most useful and helpful article about ntp restrictions, thank You author!! It really works