Apache Tomcat is a free, mature, robust, and popular web application server software that is used to serve Java-based applications. It is an open-source implementation of the Java Servlet, JavaServer Pages (JSP), Java Expression Language and Java WebSocket technologies, developed by the Apache Software Foundation (ASF).
Read Also: How to Install Apache Tomcat in Ubuntu
This tutorial will walk you through the process of installing and configuring the latest release of Tomcat 9 on your Debian 10 Linux server.
Before you start with this tutorial, make sure you have a non-root user account with sudo privileges on your server. If not, you can set up one using our guide on How to Create a New Sudo User on Ubuntu/Debian.
Step 1: Install Java on Debian 10
To install the latest release of Tomcat 9 on your Debian 10 server, you must have Java installed on the server so that you can execute Java web application code.
First, update the system software package index using the apt command as shown.
$ sudo apt update

Then install the Java Development Kit package using the apt command.
$ sudo apt install default-jdk
Once the Java installation is complete, check the version of Java installed on the system using the following command.
$ java -version

Step 2: Install Tomcat in Debian 10
For security purposes, Tomcat should be installed and executed by unprivileged user (i.e. not root). We will create a new tomcat group and user to run the Tomcat service under /opt/tomcat directory (Tomcat installation).
$ sudo mkdir /opt/tomcat
$ sudo groupadd tomcat
$ sudo useradd -s /bin/false -g tomcat -d /opt/tomcat tomcat

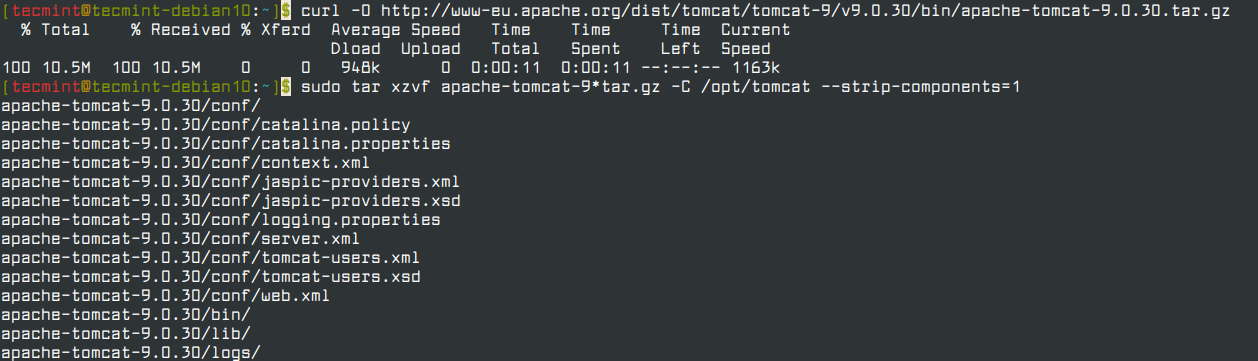
Once we set up tomcat user, now download the latest version of Tomcat 9 (i.e 9.0.30) from the Tomcat 9 Downloads page or use the following curl command-line tool to download the tarball and extract the archive to /opt/tomcat directory.
$ curl -O http://www-eu.apache.org/dist/tomcat/tomcat-9/v9.0.30/bin/apache-tomcat-9.0.30.tar.gz
$ sudo tar xzvf apache-tomcat-9*tar.gz -C /opt/tomcat --strip-components=1
Next, assign the permissions to tomcat user to have access to the Tomcat installation /opt/tomcat directory.
$ cd /opt/tomcat
$ sudo chgrp -R tomcat /opt/tomcat
$ sudo chmod -R g+r conf
$ sudo chmod g+x conf
$ sudo chown -R tomcat webapps/ work/ temp/ logs/

Step 3: Create a Tomcat systemd Service File
We will create a new systemd service file to manage and run Tomcat as a service under systemd. To create a service file, you should know where Java is installed, as this referred to as JAVA_HOME using the following command.
$ sudo update-java-alternatives -l

From the above output, our JAVA_HOME is:
/usr/lib/jvm/java-1.11.0-openjdk-amd64
Once we know our JAVA_HOME, we can create the systemd service file called tomcat.service in the /etc/systemd/system directory by running.
$ sudo nano /etc/systemd/system/tomcat.service
Paste the following contents into your tomcat.service file.
[Unit]
Description=Apache Tomcat Web Application Container
After=network.target

[Service]
Type=forking

Environment=JAVA_HOME=/usr/lib/jvm/java-1.11.0-openjdk-amd64
Environment=CATALINA_PID=/opt/tomcat/temp/tomcat.pid
Environment=CATALINA_HOME=/opt/tomcat
Environment=CATALINA_BASE=/opt/tomcat
Environment='CATALINA_OPTS=-Xms512M -Xmx1024M -server -XX:+UseParallelGC'
Environment='JAVA_OPTS=-Djava.awt.headless=true -Djava.security.egd=file:/dev/./urandom'

ExecStart=/opt/tomcat/bin/startup.sh
ExecStop=/opt/tomcat/bin/shutdown.sh

User=tomcat
Group=tomcat
UMask=0007
RestartSec=10
Restart=always

[Install]
WantedBy=multi-user.target
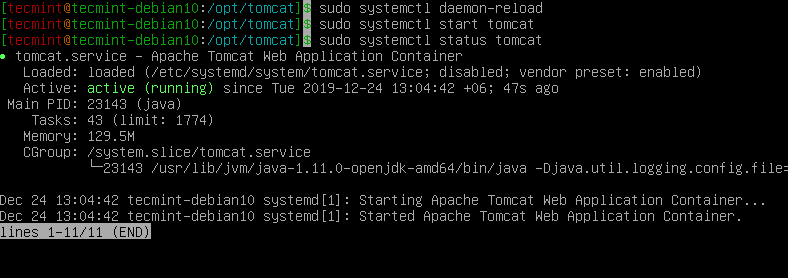
Next, reload the systemd to apply the new changes, so that it knows about our tomcat.service file.
$ sudo systemctl daemon-reload
Finally, you can start and verify the status of the Tomcat service by running the following commands.
$ sudo systemctl start tomcat
$ systemctl status tomcat
$ systemctl enable tomcat
Step 4: Enable Login for Tomcat Manager and Host Manager
In order to access the manager-gui and admin-gui web apps that comes with Tomcat, we must enable login to our Tomcat server by editing the tomcat-users.xml file as shown.
$ sudo nano /opt/tomcat/conf/tomcat-users.xml
Add the following configuration within the <tomcat-users> tags, with the correct username and password as shown.
<role rolename="admin-gui,manager-gui"/>
<user username="admin" password="password" roles="admin-gui,manager-gui"/>
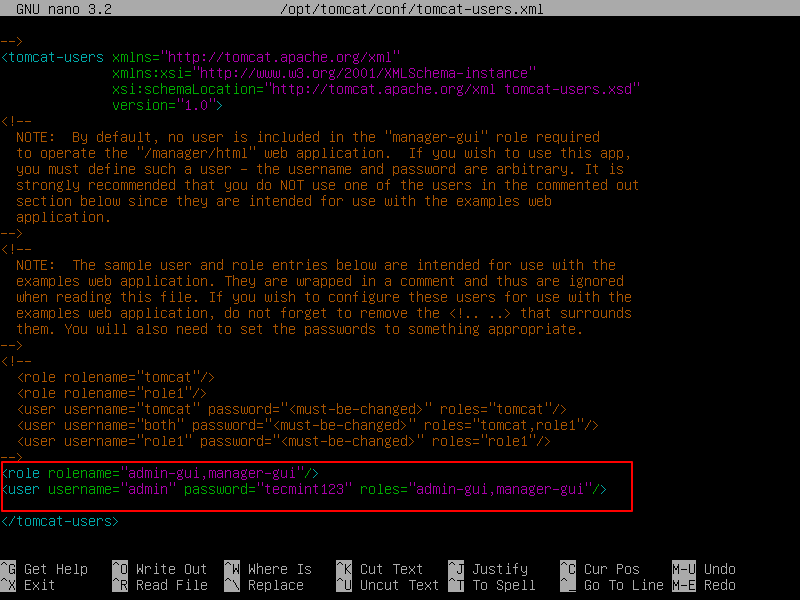
The above configuration implies that add the admin-gui and manager-gui roles to a user named “admin” with a password of “tecmint123”.
Step 5: Enable Remote Login to Tomcat Manager and Host Manager
For security reasons, access to the Tomcat Manager and Host Manager apps is locked down to the localhost (the server where it is deployed), by default.
However, you can enable remote access from a specific IP address or any host or network to Tomcat Manager and Host Manager apps as explained below.
For the Tomcat Manager app, type:
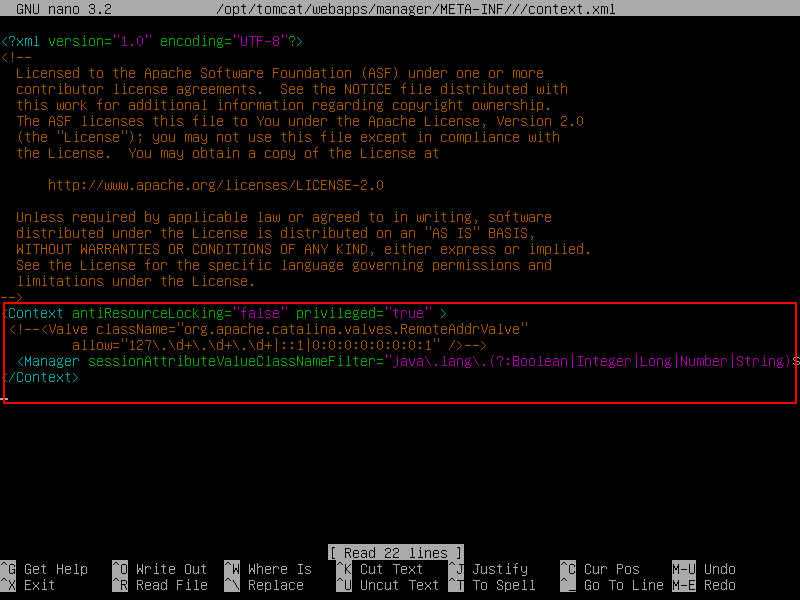
$ sudo nano /opt/tomcat/webapps/manager/META-INF/context.xml
For the Host Manager app, type:
$ sudo nano /opt/tomcat/webapps/host-manager/META-INF/context.xml
Inside, comment out the IP address restriction to allow access from any network.
<Context antiResourceLocking="false" privileged="true" >
  <!--<Valve className="org.apache.catalina.valves.RemoteAddrValve"
         allow="127\.\d+\.\d+\.\d+|::1|0:0:0:0:0:0:0:1" />-->
</Context>
Alternatively, enable remote access from your own IP address 192.168.0.103 or from a network (192.168.0.0) by adding the IP address to the list.
allow="127\.\d+\.\d+\.\d+|::1|0:0:0:0:0:0:0:1|192.168.0.103" />-->
allow="127\.\d+\.\d+\.\d+|::1|0:0:0:0:0:0:0:1|192.168.0.*" />-->
Save the files, and restart the Tomcat service to keep our changes into effect.
$ sudo systemctl restart tomcat
Step 6: Access the Tomcat Web Interface
To access a Tomcat web interface from any browser, you need to open 8080 port to allow traffic to the Tomcat service on the firewall by typing.
$ sudo ufw allow 8080
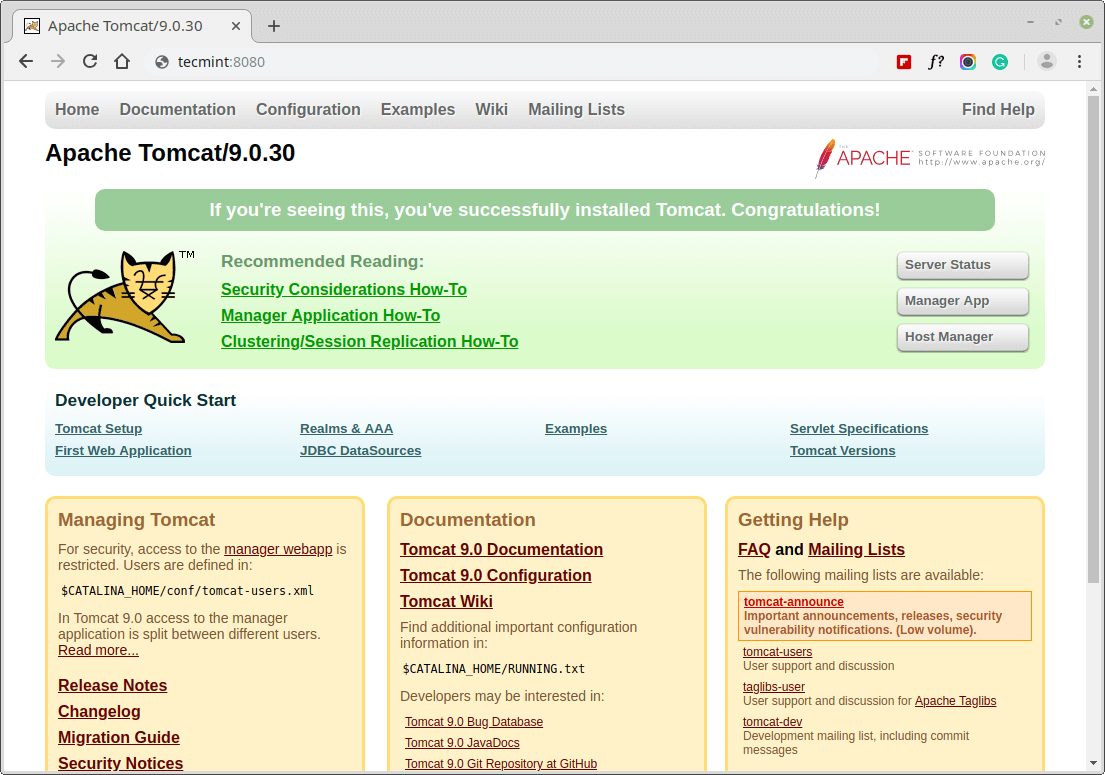
Now access the Tomcat web management interface by going to your server’s domain name or IP address followed by port 8080 in your browser.
http://server_domain_or_IP:8080
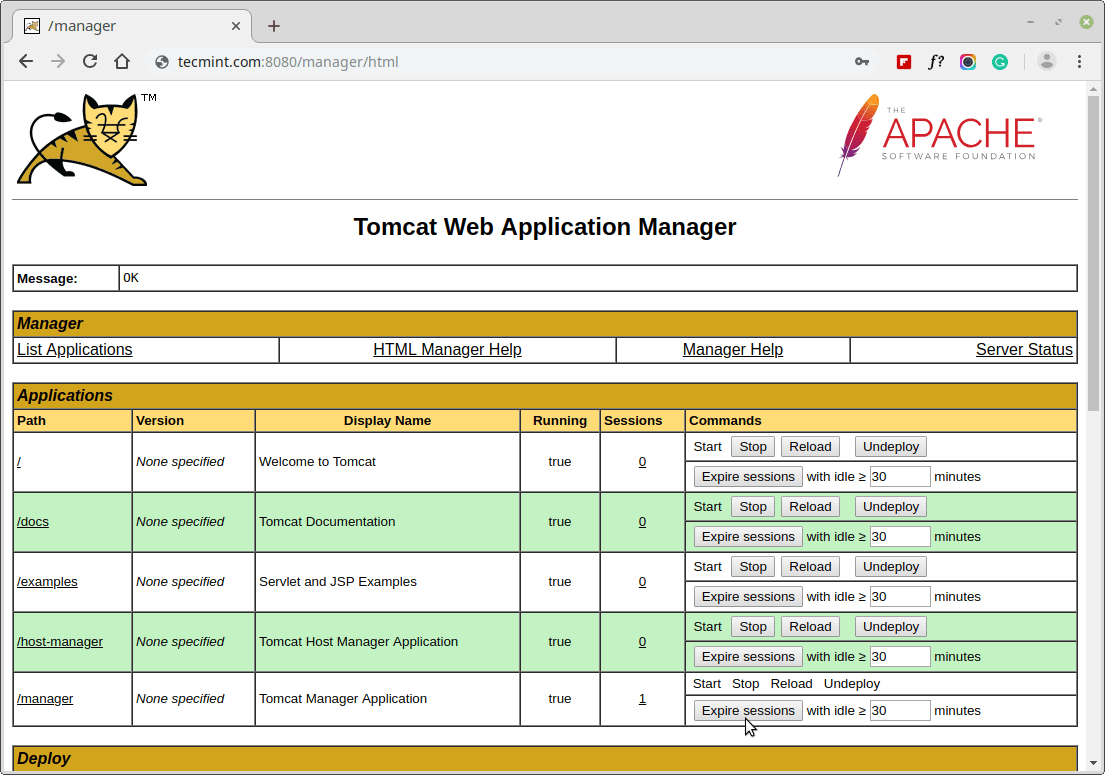
Let’s access the Manager App at the below URL, you will need to enter the account credentials.
http://server_domain_or_IP:8080/manager/html
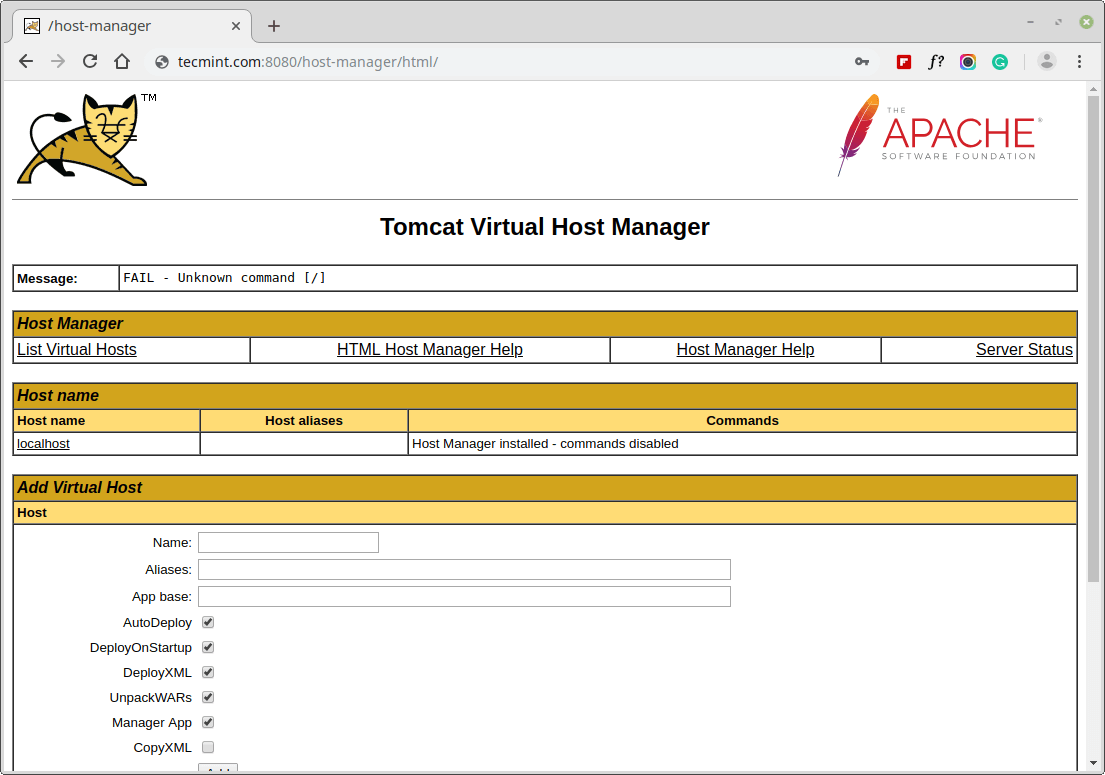
Let’s access the Host Manager at the below URL, you will need to enter the account credentials.
http://server_domain_or_IP:8080/host-manager/html/
That’s all! Your Tomcat installation is complete, now you can deploy and run Java web applications. If you have any questions or thoughts to share, reach us via the comment form below.


It works perfectly (2022) on my manjaro too, thanks soo much! an easy and perfect explanation!
A very good article. A note: in the tomcat-users.xml section, the passwords for text and screenshot are different. this could lead to confusion.
Perfect article. Just needed to update the Java information in the service configuration, the rest of the steps worked charm.